Lightspeed Zulu H-Mod User manual

Zulu H-Mod User Guide

Welcome
Congratulations on purchasing a Lightspeed Aviation Zulu H-Mod Active Noise Reduction (ANR) kit
for your helmet. Your installation provides a premium product engineered to provide the highest levels
of performance, comfort, and durability and is backed by the only warranty in the industry.
For more information about our company and products, visit LightspeedAviation.com.
Thank you for choosing Lightspeed.

Contents
Introduction ....................................................................................2
Getting Started
Fit.........................................................................................................4
Battery Installation....................................................................4
Battery Types................................................................................5
Battery Life ....................................................................................5
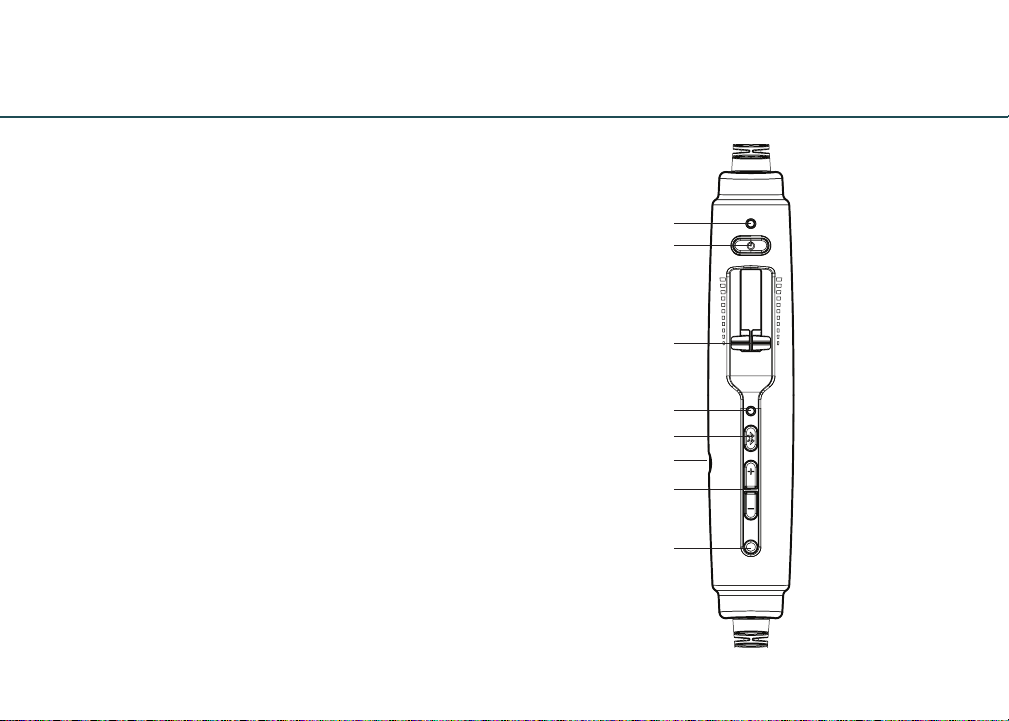
Controller........................................................................................6
Using Your Zulu H-Mod
Turning ON and OFF ...............................................................8
Matching Stereo/Mono Setting to an
Audio Panel ..................................................................................8
Front Row Center .....................................................................8
ComPriority ..................................................................................9
Wired Auxiliary Devices ........................................................9
Connecting to iPhone or iPad with the
Auxiliary Input Cord.................................................................9
Setting DIP Switches ............................................................10
Using Bluetooth®Wireless Technology
Connecting Mobile Devices for the First Time........12
Using Bluetooth Wireless Technology Features .....13
Bluetooth Mode—ON and OFF........................................13
FlightLink........................................................................................14
Quick Disconnect .....................................................................15
Peak Performance Tips.........................................................16
FAQs ....................................................................................................17
Specications..............................................................................19
Warranty Information...........................................................20

Introduction
Your Zulu H-Mod kit includes
(on the following page):
• ZuluH-ModANRkit
• TwoAAbatteries
(not included with panel-powered kits)
• Cordclip
• Audiodevice/iPhonecablewithstandard
3.5mm connector
2

Introduction
3

Fit
The Zulu H-Mod ANR kit is optimized to deliver
clarity and quieting with comfort. Contrary to most
in-helmet passive systems, this ANR kit does not
need signicant pressure to ensure quieting.
For adjustments in tting, you should refer to the
helmet dealer who provided the certied installation
of your Zulu H-Mod ANR kit. The tting instructions
for each helmet will vary considerably.
Getting Started
4
Battery Installation
The standard Zulu H-Mod requires two
AA batteries (included). Use alkaline batteries
for best performance.
A. Open the controller battery/DIP switch door
by either pressing down on the circle icon or
by pulling open the door along the notched
edges. Insert two AA batteries with the correct
polarity positioning.
B. The LED ashes GREEN when charged batteries
are in use and the power is on.
C. When batteries begin to run low the power LED
ashes RED. If the LED ashes RED during ight
the headset will continue to operate for 5–10
more hours. Install new batteries as soon as
possible at any indication of low batteries.

Battery Types
Use two AA alkaline or lithium batteries. Lithium
batteries may provide improved battery life in
colder temperatures. We do not recommend using
rechargeable batteries or mixing battery types
and brands.
Battery Life
A set of batteries can provide up to 40 hours
of power. However, heavy Bluetooth® wireless
technology usage can signicantly reduce battery
life. Under quiet conditions Zulu H-Mod will auto
shut o approximately ve minutes after the helmet
is removed from your head.
Getting Started
5

Controller
A. Power indicator LED: Flashes GREEN when power
is supplied to Zulu H-Mod and batteries are
strong. Flashes RED when batteries are low.
B. Power button: Powers on the kit, turning on
Active Noise Reduction (ANR). Press button once
to turn Zulu H-Mod on; press and hold to turn
Zulu H-Mod o.
To toggle the LED brightness from bright to dim
quickly press the power button twice.
C. Volume control: Controls audio panel volume
with individual sliders for each ear. Does not
aect the volume of auxiliary devices.
A
B
C
D
E
F
G
H
The Zulu H-Mod
controller
Getting Started
6

D. Bluetooth mode indicator LED: Flashes BLUE
when Bluetooth mode is on and RED when
Bluetooth mode is being turned o. In pairing
mode, ashes alternating RED and BLUE.
E. Bluetooth power button: Turns on and o the
Bluetooth signal and controls deviced connected
devices via Bluetooth technology.
F. Auxiliary input jack: Provides a wired input for
audio and cell phone devices.
G. Bluetooth volume buttons: Controls the volume
of devices connected via Bluetooth technology.
H. ComPriority button: When enabled, automatically
quiets music and audio from auxiliary devices
during radio communications.
Getting Started
7

Using Your Zulu H-Mod
Turning ON and OFF
ON: Press the power button once to turn on the
system. The GREEN power LED ashes when power
is supplied. Active Noise Reduction (ANR) is engaged
when you turn on the system.
OFF: Press and hold the power button until the
GREEN power LED turns o.
Zulu H-Mod will auto shut o approximately ve
minutes after removing the helmet and under quiet
conditions.
The power LED ashes RED when batteries are low;
see Battery Installation on page 4.
Matching Stereo/Mono Setting to an Audio Panel
The Stereo/Mono DIP switch setting should match
the signal from your audio panel. Zulu H-Mod is
shipped in Mono (the “on” position) so you only
need to change the setting if you use a stereo panel.
STEREO should be used for a stereo panel and
MONO for a mono panel. Incorrect settings result
in communications being heard in only one ear or
weakly in both. This switch does not aect auxiliary
devices, so you can enjoy auxiliary audio in stereo
regardless of how the Stereo/Mono DIP switch is set.
Front Row Center™
Front Row Center is a built-in feature that gives you
a theater-like experience, enhancing stereo sound
reproduction so that audio seems to come from all
around you, not just from your right and left.
8

ComPriority™
ComPriority is turned on or o by the bottom-most
controller button. With ComPriority enabled when
radio communications are detected, the volume
of auxiliary devices will be signicantly reduced.
ComPriority is enabled by default when you power
on your Zulu H-Mod. Plug into your intercom and
talk into the microphone while playing music
using a wired device. If ComPriority is enabled, your
auxiliary music volume will decrease when you start
to talk. During cell phone calls, the other party will
be muted, so you should disable ComPriority before
making calls.
Using Your Zulu H-Mod
9
Wired Auxiliary Devices
Zulu H-Mod’s wired auxiliary input allows you to
connect to cell phones and to most audio devices.
To connect a music player to the auxiliary input jack,
use the cord provided. To adjust the volume on a
device connected to the auxiliary input jack, use the
controls on the device itself.
Connecting to iPhone or iPad with the
Auxiliary Input Cord
If you connect to an iPhone or iPad using the wired
auxiliary input cord, you can use the silver button
on the cord to perform the following functions:
• Play/Pause: Press the button once to Pause
music; press the button again to Play music.

• Track Forward: Press the button twice rapidly to
track forward.
• Answering calls: Music automatically mutes and
pauses for an incoming call. Press the button to
answer the call.
• Disconnecting a call: Press the button to
disconnect the call; music automatically resumes.
Using Your Zulu H-Mod
10
Setting DIP Switches
DIP switches are factory set to match most
aircraft audio panels. To change a DIP switch
setting open the controller battery/DIP switch
door. Use a small pointed object such as a wood
toothpick to slide the DIP switch to ON or OFF
depending on your preference.

Zulu H-Mod DIP Switch and Their Recommended Use
Using Your Zulu H-Mod
11
DIP switch OFF position ON position Recommendations
Stereo/Mono Stereo Mono—Factory
setting
Aects audio from the panel only. Set to Stereo only if you
are using a stereo panel. If your audio panel produces a mono
signal but the switch is set to Stereo, you will hear audio
communications in only one ear or weakly in both.
Leave o Leave set to OFF Test mode; for factory use only.
Cell mic bias—two
switches that must
both be in the
same position
Cell mic bias o—
Factory setting
for helicopter and
panel-powered
headsets
Cell mic bias on—
Factory setting for
battery-powered
airplane headset
Lets you make phone calls with the system when it is not
plugged into a cockpit audio panel. Available for battery-
powered systems only.
Note to helicopter pilots: The ON setting for these switches is
incompatible with some helicopter audio panels. If you plan
to use this feature and keep the switches set to ON, test the
system in the cockpit before takeo.
Noise gating Factory setting Usually left OFF; only used in quiet environments. Test before
using to avoid missed communications from softer radio signals.
FlightLink Factory setting Enables FlightLink For FlightLink to work properly, it must be in the ON position.
This will also aect cell phone usage — when in the ON
position, the recipient of a cell phone call will hear all sounds
on the intercom. To avoid this, unplug from the panel during
phone calls.

Using Devices Enabled by Bluetooth Technology
12
Connecting to Mobile Devices for the First Time
The Bluetooth interface allows cell phone and stereo
music streaming capability (A2DP). Before using a
mobile phone for the rst time with Zulu H-Mod,
it must be “paired”or electronically connected via
Bluetooth wireless technology.
To pair a mobile phone or device:
1. Turn on the system and verify the GREEN LED
is ashing. Make sure the Bluetooth mode is
turned OFF. (See “Bluetooth Mode—ON and
OFF”, page 13).
2. Press and hold the Bluetooth button for about
ve to ten seconds or until the Bluetooth LED
continually ashes RED and BLUE. This indicates
the pairing mode setting and lasts about
two minutes. If this step takes longer and the
Bluetooth LED is no longer alternating RED and
BLUE, start over from step one.
3. In pairing mode, follow the menu prompts on
your Bluetooth wireless technology enabled
device directing it to look for other Bluetooth
wireless technology enabled devices.
4. Select Lightspeed-V### (numbers may vary) on your
mobile device from the list of found devices.
5. If asked to enter a password or PIN, enter 0000.
Your mobile device should now be paired and ready
for continued use.
When you turn on Bluetooth mode again, it will
connect to the most recently paired device. Most
mobile devices connect automatically. If that doesn’t
happen it may be necessary to use the settings

Bluetooth Devices
13
menu of your device to choose and re-pair
Lightspeed-V### (numbers may vary). Turning o
Bluetooth before turning o your system may help
retain the pairing.
Using Bluetooth Wireless Technology Features
Depending on the Bluetooth prole of the phone,
you can use the Bluetooth buttons to perform
several functions. Some typical functions are:
• PresstheBluetoothbuttononceforvoicedialing
(if supported by your phone).
• PresstheBluetoothbuttononcetoansweracall.
• PresstheBluetoothbuttononcetodisconnect
from a call.
• PressandholdtheBluetoothbuttonfortwo
seconds to redial the last number called.
• UsetheBluetoothvolumebuttons(+and–
buttons) to adjust the volume. You may also
adjust the volume on your connected device.
Bluetooth Mode—ON and OFF
ON: With Zulu H-Mod turned ON, press and hold the
Bluetooth
button (see page 7), until you hear a high
tone and the Bluetooth indicator LED ashes three
BLUE pulses. For rst-time pairing see instructions
on page 12.
OFF: Press and hold the Bluetooth button for about
three seconds until a high tone is emitted and the
Bluetooth indicator LED ashes three RED pulses.
Note: The Bluetooth feature must be turned ON for
devices connected via Bluetooth to correctly function.

14
FlightLink
FlightLink is the rst in-ight cockpit
recording application for the iPad®and
iPhone.®The free app works seamlessly
with Zulu H-Mod to capture and retrieve all
incoming and outgoing communications.
Features
• Record all activity over the intercom, as well as
in-cabin conversation.
• Playback the prior two seconds or two minutes.
• Store your recording library.
• Draw notes, codes, or diagrams on the
convenient iPad scratchpad for reference.
How to Activate
• Download the FlightLink app from the App Store.
• Move the far right DIP switch (#6) to the ON
position. When in the FlightLink DIP switch is in
the ON position, the recipient of a
cell phone call will hear all sounds on
the intercom. To avoid this, unplug
your system from the panel during
phone calls.
• Connect your Apple®device to
the controller using the supplied
auxilliary device/iPhone cable.
• Tap the icon to begin using the app.
Toggling Between Apps
Press your device’s Home button or swipe up to
access and select another app. Your recording will
continue uninterrupted as you switch between
dierent applications.
NOTE: If you simultaneously use an app that provides
audio, you will need to run it on a second device to
prevent interruption of FlightLink recording.

Quick Disconnect
Quick Disconnect cable
Experience fast, safe egress with Lightspeed’s exclusive
quick-disconnect cable that has a 9-pound pull force
(4 kg) and makes emergency egress even safer.
To know if this feature is connected properly, there
are two ways you can verify its proper alignment:
visually and mechanically. Visually you can align
two indicators (red dots) on each connecting end
of the Quick Disconnect feature. When the red dots
are aligned, the connection is correct. The second
is a tactile way, or non-visual. Spin the two ends
once aligned until you hear or feel a click. The Quick
Disconnect must be aligned or won’t snap in.
15
In non-emergency situations, the power should be
turned o instead of using the Quick Disconnect
feature to power o.

Peak Performance Tips
• Startwithanexcellentt—see“Fit,”onpage4.
• SettheStereo/MonoDIPswitchtomatchthe
signal from your audio panel (see “Matching Stereo/
Mono Setting to an Audio Panel” on page 8).
• Keepcellphonesatleast12inchesfromthe
Zulu H-Mod controller when making calls to
reduce static noise during phone calls.
• Toconservebatterylife,turnoBluetoothmode
when not in use.
• Youcanuseauxiliarydevicessuchasamusic
player by connecting to the Zulu H-Mod auxiliary
input jack and a cell phone by connecting via
Bluetooth wireless technology, or through the
3.5mm audio device/iPhone cable provided.
Peak Performance Tips
16

FAQs
Why do I hear radio communications in only
one ear, or weakly in both?
The Zulu H-Mod Stereo/Mono DIP switch is likely
set to Stereo while your audio panel is transmitting
a mono signal. To x this, change the Stereo/Mono
DIP switch to Mono (the “on”position). This setting
does not aect music or audio from auxiliary devices;
you can hear stereo sound on auxiliary devices even
when the Stereo/Mono DIP switch is set to Mono.
When pairing Zulu H-Mod with my phone via
Bluetooth wireless technology, why does my
phone indicate it cannot connect?
The system may not be in pairing mode. To enter
pairing mode, you must start with Bluetooth mode
turned fully OFF; (see “Connecting to Mobile Devices
for the First Time,” on page 12).
Why doesn’t my phone accept the 0000
passcode when I try to connect via Bluetooth
wireless technology?
Your system may not be in pairing mode. Some
phones prompt for a pass code without checking
for pairing mode. When the phone cannot pair, it
rejects the passcode. To enter pairing mode, you must
start with Bluetooth mode turned fully OFF (see
“Connecting to Mobile Devices for the First Time,”
on page 12).
How can I reduce static noise during cell phone calls?
To reduce RF interference during phone calls, keep
cell phones at least 12 inches from the controller
when making calls.
17

FAQs
When ying, what causes a warbling noise in
the ear cup?
If your ear is not entirely inside the cup, with a
tight seal, air can seep in and cause the ANR to
compensate for uneven internal cup pressure.
See “Fit,” on page 4.
18
Table of contents
Other Lightspeed Headset manuals