Lightspeed Zulu User manual

User Guide
ZuluUG_online.book Page 1 Thursday, December 27, 2007 9:50 PM

2Zulu User Guide
Contents
About this guide ....................................................................................... 3
Where to find key information...........................................................................................3
How to contact Lightspeed ...............................................................................................3
Setting up Zulu ......................................................................................... 4
What’s in the box ..............................................................................................................4
Fitting your headset..........................................................................................................4
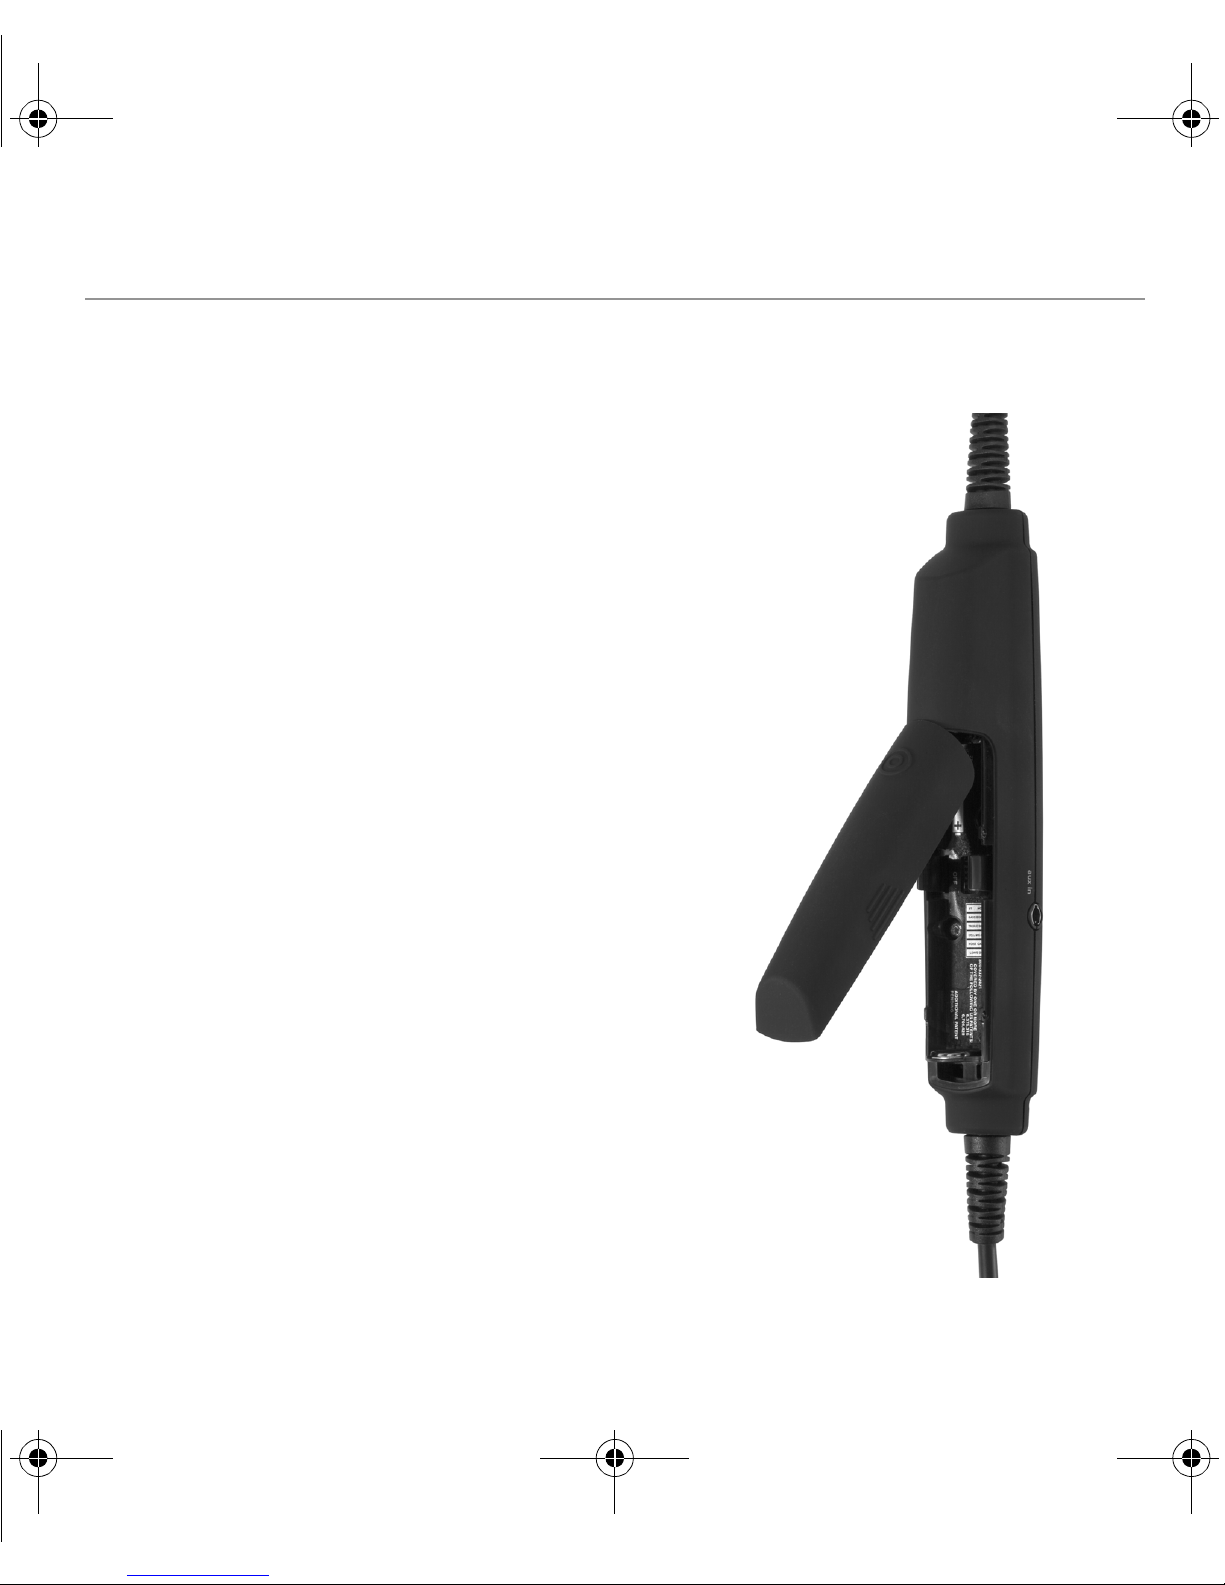
Changing batteries and monitoring battery life.................................................................5
Using your Zulu headset .......................................................................... 6
The Zulu Controller...........................................................................................................6
Turning on and off Zulu.....................................................................................................7
Using Front Row Center to enhance stereo .....................................................................7
Using Auto MusicMute to quiet auxiliary devices .............................................................7
Matching Zulu’s Stereo/Mono setting to your audio panel signal .....................................8
Getting the best possible performance from Zulu.............................................................8
Using auxiliary devices............................................................................. 9
Connecting a wired device to the auxiliary input jack.......................................................9
Using wireless devices with Zulu......................................................................................9
Using a Bluetooth device ....................................................................... 10
Turning on and off Bluetooth mode ................................................................................10
Connecting a Bluetooth device for the first time.............................................................10
Connecting a previously paired Bluetooth device...........................................................11
Using Zulu’s Bluetooth features......................................................................................11
Setting DIP switches .............................................................................. 12
Frequently Asked Questions .................................................................. 14
Specifications ......................................................................................... 15
ZuluUG_online.book Page 2 Thursday, December 27, 2007 9:50 PM

January 2008 3
About this guide
This guide describes how to set up and use your Zulu®ANR aviation headset for the best
sound quality, Active Noise Reduction (ANR), safety, and comfort.
Where to find key information
How to contact Lightspeed
Visit our website: www.lightspeedaviation.com
Call us: 800-332-2421
Fax: 503-968-7664
Email: sales@lightspeedaviation.com or service@lightspeedaviation.com
For information on… See…
How to fit your headset for the best sound,
comfort, and noise reduction
“Fitting your headset” on page 4
How to use Zulu’s controls and features “Using your Zulu headset” on page 6
“Using auxiliary devices” on page 9
How to set up and use Bluetooth®devices “Using a Bluetooth device” on page 10
When to choose stereo or mono settings “Matching Zulu’s Stereo/Mono setting to
your audio panel signal” on page 8
How to turn down music automatically during
radio communications
“Using Auto MusicMute to quiet auxiliary
devices” on page 7
How to get the best sound from your Zulu
headset
“Getting the best possible performance from
Zulu” on page 8
Answers to commonly asked questions “Frequently Asked Questions” on page 14
ZuluUG_online.book Page 3 Thursday, December 27, 2007 9:50 PM

4Zulu User Guide
Setting up Zulu
What’s in the box
Your Zulu headset package includes:
Fitting your headset
A good headset fit is a key part of both comfort and ANR performance. Zulu’s Active
Noise Reduction feature requires a good seal around your ears and a symmetrical
fit over your head. When properly fitted, the ear cups should completely cover your ears
and the headband should rest lightly on top of your head.
To fit the headset to your head:
1. Fully extend both ear cup sliders.
2. Put the headset on with the microphone and cable to your left.
3. Pressing the top of the headband down onto your head, slide up each ear cup until it
covers your entire ear without pinching any part of your ear under the seal. Make sure
the two ear cup sliders are extended an equal amount.
4. Position the microphone 1/8 inch from your mouth.
The Zulu headset adjusts to fit most adults. If you have a small head or are using the
headset for a child, contact Lightspeed for different headpads
.
■Zulu ANR headset
■Microphone windscreen
■Two AA batteries
■This user guide
■Carrying case and detachable shoulder strap
■Cell phone cable with standard 2.5 mm connector
■Audio device cable
ZuluUG_online.book Page 4 Thursday, December 27, 2007 9:50 PM

January 2008 5
Changing batteries and monitoring battery life
Zulu requires two AA batteries (included). Use
alkaline batteries for best performance.
When Zulu is turned on and battery power is strong,
the power indicator LED flashes green. Under
normal conditions, a set of batteries provides up
to 50 hours use; however, heavy Bluetooth use can
significantly reduce battery life.
When batteries run low, the power LED flashes
red. If the power LED flashes red when you first
turn on the headset, Lightspeed recommends
that you install fresh batteries before take-off.
If batteries run low during flight, it’s best to keep
Zulu powered on continuously until you can
change the batteries safely.
To install batteries, open the battery door
on the back of the Zulu controller, either by
pressing down on the circle icon to pop open
the door or by prying open the door along its
grooved edges. Alternatively, you can grasp
the finger grips on the sides of the battery
door and pull up with a slight diagonal twist.
Zulu’s power shuts off automatically 2 minutes
after you remove the headset from your head.
ZuluUG_online.book Page 5 Thursday, December 27, 2007 9:50 PM

6Zulu User Guide
Using your Zulu headset
A
B
C
D
E
F
H
I
G
The Zulu Controller
A Power indicator LED: Flashes green when power is
supplied to Zulu and batteries are strong. Flashes red when
batteries are low.
B Power button: Powers on headset, turning on Active Noise
Reduction (ANR). Press button once to turn Zulu on; press and
hold to turn Zulu off.
C Volume control: Lets you control audio panel volume with
individual sliders for each ear. Does not affect the volume
of auxiliary devices.
DFRC
®(Front Row Center) button: Turns on and off
Front Row Center (FRC). Front Row Center enhances stereo so
that sound seems to come from all around you, not just from
right and left.
E Bluetooth indicator LED: Flashes blue when Bluetooth
mode is on and red when Bluetooth is being turned off. In
pairing mode, flashes alternating red and blue.
F Bluetooth button: Turns on and off the Bluetooth signal
and controls Bluetooth-connected devices.
G Auxiliary input jack: Provides a wired input for audio
devices such as music players and cell phones.
H Bluetooth volume buttons: Controls the volume of
Bluetooth devices.
I Auto MusicMute button: Quiets music and audio from
auxiliary devices during radio communications. Does not
affect cell phone calls.
ZuluUG_online.book Page 6 Thursday, December 27, 2007 9:50 PM

January 2008 7
Turning on and off Zulu
When you turn on Zulu, you turn on Active Noise Reduction (ANR) as well. To turn on
Zulu, press the power button once. To turn off Zulu, press and hold the power button.
Zulu’s power shuts off automatically 2 minutes after you remove the headset from
your head.
When power is supplied to Zulu and the batteries are strong, the power indicator
LED flashes green. When the batteries are running low, the power LED flashes red.
See “Changing batteries and monitoring battery life” on page 5 for information
on battery use.
Using Front Row Center to enhance stereo
The FRC button toggles on and off Front Row Center (FRC®). Front Row Center gives
you a theater-like listening experience, enhancing stereo sound reproduction so that
audio seems to come from all around you, not just from your right and left.
Using Auto MusicMute to quiet auxiliary devices
The bottom-most button on the Zulu Controller toggles on and off Auto MusicMute.
When radio communications come in from the panel, Auto MusicMute decreases
the volume of auxiliary devices by 80%. To test whether Auto MusicMute is enabled,
simply talk into your headset microphone while playing music over a wired or Bluetooth
auxiliary device (see “Using auxiliary devices” on page 9). If Auto MusicMute is on, it will
turn down your auxiliary music when you start to talk.
Note: Auto MusicMute does not affect cell phone calls.
ZuluUG_online.book Page 7 Thursday, December 27, 2007 9:50 PM

8Zulu User Guide
Matching Zulu’s Stereo/Mono setting to your audio
panel signal
For best results, Zulu’s Stereo/Mono DIP switch setting should match the signal from
your audio panel. If you are using a stereo audio panel, Zulu should be set to Stereo for
best sound quality. If you are using a mono audio panel, Zulu should be set to Mono;
otherwise, you will hear radio communications in only one ear. The Stereo/Mono DIP
switch does not affect auxiliary devices, so you can enjoy auxiliary audio in both stereo
and FRC regardless of how the DIP switch is set. For information on setting DIP switches,
see “Setting DIP switches” on page 12.
Getting the best possible performance from Zulu
Follow these tips to get the best possible performance from your Zulu headset:
■Make sure you have an excellent fit—see “Fitting your headset” on page 4.
■For a theater-like listening experience, press FRC to turn on Front Row Center.
■For the best sound quality when listening to music or other audio entertainment, use
an audio device that is plugged into the auxiliary input jack.
■Make sure Zulu’s Stereo/Mono DIP switch setting matches the signal from your audio
panel; see “Matching Zulu’s Stereo/Mono setting to your audio panel signal,” above.
■If you need a little help hearing speech clearly during radio communications or phone
calls, try using Treble boost (see “Setting DIP switches” on page 12). If you do not need
the extra boost, keep this feature turned off for a more realistic sound.
■To prevent static noise during phone calls, keep cell phones at least 12 inches from
the Zulu Controller and headset when making calls.
ZuluUG_online.book Page 8 Thursday, December 27, 2007 9:50 PM

January 2008 9
Using auxiliary devices
You can use auxiliary devices such as music players and cell phones by connecting to
Zulu’s auxiliary input jack or by connecting wirelessly using Bluetooth. You get the best
sound quality when you connect devices to Zulu’s auxiliary input jack.
To enhance stereo sound when listening to auxiliary audio devices, turn on Front Row
Center. You can also use Zulu’s Treble boost and Bass boost DIP switches to adjust the
sound. Zulu’s Stereo/Mono DIP switch setting does not affect auxiliary devices, so you
can listen to auxiliary audio in both stereo and FRC even when Zulu is set to mono.
When Auto MusicMute is on, Zulu automatically turns down auxiliary devices during
radio communications; see “Using Auto MusicMute to quiet auxiliary devices” on
page 7.
Connecting a wired device to the auxiliary input jack
To connect a music player or cell phone to Zulu’s auxiliary input jack, use the
appropriate supplied cable. Some cell phones use proprietary connectors and
require an adapter or special cable—call Lightspeed if you need help with your setup.
To adjust the volume on a device connected to Zulu’s auxiliary input jack, use the
controls on the device itself.
Using wireless devices with Zulu
Before you can connect a wireless Bluetooth device for the first time, you must pair it
with Zulu. This procedure is described in “Connecting a Bluetooth device for the first
time” on page 10. Once you pair your Bluetooth device with Zulu, you can connect to it
easily when Zulu’s Bluetooth mode is turned on. For details on using Bluetooth devices
with Zulu, see “Using a Bluetooth device” on page 10.
ZuluUG_online.book Page 9 Thursday, December 27, 2007 9:50 PM

10 Zulu User Guide
Using a Bluetooth device
Note: Different manufacturers use different interfaces and names for the functions
described here. See your Bluetooth device documentation for details as needed.
Turning on and off Bluetooth mode
To turn on Bluetooth mode:
With Zulu turned on, press and hold Zulu’s Bluetooth button until you hear a long,
high-pitched tone and the Bluetooth indicator LED flashes three quick blue pulses.
To turn off Bluetooth mode:
Press and hold Zulu’s Bluetooth button for about 5 seconds—until you hear a long,
high-pitched tone and the Bluetooth indicator LED flashes two long red pulses.
Connecting a Bluetooth device for the first time
Before you can connect a Bluetooth device to Zulu for the first time, you must pair it
with Zulu. Use the steps below.
To pair a Bluetooth device with Zulu:
1. Make sure Zulu’s Bluetooth mode is turned fully off. You should not see blue or
red flashes from the Bluetooth LED, only green flashes from Zulu’s power LED.
See “Turning on and off Bluetooth mode,” above.
2. Once Bluetooth mode is off, press and hold the Bluetooth button for about
5 seconds, until the Bluetooth LED flashes alternating red and blue. This puts
Zulu in pairing mode.
ZuluUG_online.book Page 10 Thursday, December 27, 2007 9:50 PM

January 2008 11
3. Follow menu prompts on your Bluetooth phone or device to direct it to look for other
Bluetooth devices.
4. Select ZULU_BT from the list of found devices.
5. When asked to enter a passcode or PIN, enter 0000.
Connecting a previously paired Bluetooth device
When you turn on Bluetooth mode, Zulu tries to reconnect to the most recently paired
phone or device. Most Bluetooth devices connect to Zulu automatically, but in some
cases, you may need to use the device’s menu to select ZULU_BT.
Using Zulu’s Bluetooth features
You can use Zulu’s Bluetooth buttons to perform several functions on your phone or
audio device. These functions vary depending on the Bluetooth profile supported by your
phone or device.
Some typical functions for a cell phone are:
■Press the Bluetooth button once for voice dialing (if supported by your phone).
■Press the Bluetooth button once to answer the phone when it rings.
■Press the Bluetooth button once to disconnect from a call.
■Press and hold the Bluetooth button for 2 seconds to redial the last number called.
■Use the Bluetooth volume buttons (Zulu’s + and - buttons) to adjust volume.
To conserve Zulu’s battery power, turn off Bluetooth mode when not in use.
ZuluUG_online.book Page 11 Thursday, December 27, 2007 9:50 PM

12 Zulu User Guide
Setting DIP switches
Zulu DIP switches are factory-set to match most audio panels. You may need to
adjust the Stereo/Mono DIP switch to match your setup, but in most cases, you
can leave switches set to their factory defaults. See the table on the next page for
recommendations on DIP switch settings.
To change a DIP switch setting, open the battery door and remove one or both batteries.
Slide the switch to the desired position, OFF or ON, using a pen, toothpick, or paper clip.
ZuluUG_online.book Page 12 Thursday, December 27, 2007 9:50 PM

January 2008 13
Below is a list of features controlled by DIP switches, along with use recommendations.
Zulu DIP switches and their recommended use
DIP switch OFF position ON position Recommendations
Stereo/Mono Stereo Mono
(factory setting)
Affects audio from the panel only
and should be set to Mono in most
cases. Set this to Stereo only if
you are using a stereo audio panel.
If your audio panel produces a
mono signal but the switch is
set to Stereo, you will hear radio
communications in only one ear.
Bass boost Bass boost off
(factory setting)
Bass boost on Increases bass amplification.
Treble boost Treble boost off
(factory setting)
Treble boost on Increases treble. This feature can
be useful if you need extra help
hearing speech clearly.
Cell mic bias Cell mic bias off Cell mic bias on
(factory setting)
Powers Zulu’s microphone so you
can make phone calls with the
headset when it is not plugged
into an airplane’s audio panel.
Noise gating Leave set to OFF. If interested in using this feature,
call Lightspeed for information.
Leave off Leave set to OFF. Test mode; for factory use only.
ZuluUG_online.book Page 13 Thursday, December 27, 2007 9:50 PM

14 Zulu User Guide
Frequently Asked Questions
Why do I hear radio communications in only one ear?
You probably have Zulu’s Stereo/Mono DIP switch set to Stereo but are using an audio
panel that transmits a mono signal. A stereo configuration requires two channels, one
for each ear. Audio panels that transmit mono signals send audio through only one
channel, so you hear audio in only one ear. To fix this, reset Zulu's Stereo/Mono DIP
switch to Mono (see “Setting DIP switches” on page 12). This setting does not affect
music or audio from auxiliary devices; you can hear stereo sound and use Front Row
Center on auxiliary devices even when the Stereo/Mono DIP switch is set to Mono.
When pairing Zulu to my Bluetooth phone, why does my phone tell
me it cannot connect?
Your Zulu headset may not be in pairing mode. To enter pairing mode, you must start
with Bluetooth mode turned fully off; see “Connecting a Bluetooth device for the first
time” on page 10.
Why won’t my Bluetooth phone accept Zulu’s 0000 passcode?
Your Zulu headset may not be in pairing mode. Some phones prompt for a passcode
without checking first to see whether the headset is in pairing mode. When the phone
cannot pair with the headset, it rejects the passcode. To enter pairing mode, you must
start with Bluetooth mode turned fully off; see “Connecting a Bluetooth device for the
first time” on page 10.
How can I reduce static noise during cell phone calls?
To prevent RF interference during phone calls, keep cell phones at least 12 inches from
the Zulu Controller and headset when making calls.
ZuluUG_online.book Page 14 Thursday, December 27, 2007 9:50 PM

January 2008 15
Specifications
General
Connectors: .250-inch commercial stereo headphone plug ; .206-inch MIL-SPEC microphone plug
Battery power supply: 3V, two AA batteries
Panel power supply: Aircraft 8V–40V DC
Weight: 13.9 oz.
Headphone
Transducer: 40 mm moving coil
Frequency response: 20 Hz–20 kHz
Nominal impedance: 170 ohms stereo; 85 ohms mono
Microphone
Transducer principle: Noise-canceling electret
Frequency response: 200 Hz–6000 Hz
Maximum SPL: 114 dB
Terminating impedance: 470 ohms
Operating voltage: 8V–16V DC, approx. 5 mA–12 mA
ANR
Maximum SPL: Greater than 125 dB at 100 Hz
Headset configurations available
■Battery-powered with standard straight cord and dual plugs
■Panel-powered with straight cord and single LEMO plug
■Battery-powered with coiled cord and single U-174 plug
■Panel-powered with coiled cord and single LEMO plug
ZuluUG_online.book Page 15 Thursday, December 27, 2007 9:50 PM

Copyright Lightspeed Aviation, Inc., 2008. All rights reserved. Lightspeed Aviation™ is a trademark and Zulu®
and FRC®are registered trademarks of Lightspeed Aviation, Inc. Bluetooth®is a registered trademark of the
Bluetooth SIG.
www.lightspeedaviation.com
ZuluUG_online.book Page 16 Thursday, December 27, 2007 9:50 PM
Table of contents
Other Lightspeed Headset manuals