Lignomat Ligno-DuoTec BW User manual

User Instructions
for
pin-less
Ligno-DuoTec BW
and
Ligno-Tec RH
(F4-F7)
Lignomat USA Ltd
14345 NE Morris Ct
Portland OR 97230 USA
Tel: 1-800-227-2105
FAX: 1-503-255-1430
E-mail: [email protected]
www.lignomat.com
The Ligno-DuoTec BW is a capacitance-
type meter for wood, bamboo and
building materials. The sensor plates
on the back emit and pick-up very low-
powered electromagnetic signals.
The measurements generated by the
Ligno-DuoTec BW are average values
of the entire measuring field between
the surface and the maximum depth
of penetration. Moisture closer to the
surface has a greater effect on the
average than the moisture closer to
the maximum depth of penetration.
All Lignomat meters internally check
and adjust the calibration. Therefore
manual recalibration is neither needed
nor possible.
Wood
Range: 5*-60%. Readings above 25%
fiber saturation point are less accu-
rate. *To check the lowest possible
reading, hold the meter in the air and
push the READ key. The range for hard-
woods with high specific gravity is
lower than 5%. The range for soft-
woods with low specific gravity is
higher than 5%.
Settings: 30-100.
Gravity Range 0.3 to1.0. For un-
listed species the specific gravity can
be used as species setting. For ex-
ample, if the specific gravity is 0.42
the setting is #42. Values for the
specific gravity can be found on the
Internet by entering <specific grav-
ity…> followed by the name of the
wood. For calculations see section F1.
For unlisted species or new prod-
ucts Lignomat offers testing to de-
termine the correct setting.
Sheetrock:
# 15, range 0-2%.
Moisture values are in percent.
Bamboo:
Check green card for
code#. Range same as for wood.
Concrete:
Code# 25, reference
scale only 0-99. See section F4.
Reference scales:
Code# 0: Sensitivity level for lami-
nates and products out of wood.
Code#10: Sensitivity level for build-
ing materials lighter than concrete.
Selectable Measuring Depth:
1/4” (7mm) and 3/4” (20mm)
B1 B2
Ligno-DuoTec BW - Scan Mode
Check and Change Settings
Settings for wood species and build-
ing materials are listed on the lami-
nated pocket guide included with
each meter. To recall active settings
push the SET/HOLD key repeatedly.
Use
S
or
Tkeys to change settings.
1 st:
Active Material Setting for
wood and non-wood materials
2 nd:
Active
Measuring Depth
for 1/4” or 3/4” (7mm or 20mm)
Use
S
or
T
key to change.
Change mm to inches:
Disconnect
battery and press SET key twice.
Connect battery again. The display
pictured below will appear, push
T
key to change from inches to mm
and push
S
key to change from
mm to inches.
3.24 is the soft-
ware version.
B4
Take Measurements
After settings have been checked /
changed, push the READ key to ob-
tain moisture readings. The active
setting appears
briefly, followed
by the default
(lowest) reading, if the sensor plates
are not in contact with any material.
For actual measurements, place the
meter on the
test sample (for
wood in the di-
rection of the grain). Press down
slightly, holding the outer sides of
the meter without touching sample
with your hand.
The HOLD key is
used to freeze
the indicated .
value for one minute. Helpful when
taking notes or when measuring in
places, where the display cannot be
read while measuring. At any time
you can switch back to measuring
by pushing the READ key again.
B3
When the moisture is too low to
measure, the default reading ap-
pears with “Min” in the lower left
side of the
display. When
the moisture
is too high, the highest moisture
value is displayed with “Max” on
the lower left side of the display.
For accurate readings:
- Sample should be big enough to
cover both sensor plates
- Measuring depth has to be set
according to sample thickness.
- Surface should be smooth and
flat. For uneven surfaces take
the highest value of several
measurements.
To eliminate any possible influence
from material underneath the
sample board, it is recommended
(if possible) to arrange the
sample so that an open space is
directly underneath the measuring
area. If this is not possible, make
sure the Ligno-DuoTec BW is set
for the correct measuring depth.
B5
Ligno-DuoTecBW and RH new.internet.p65 10/18/2011, 4:11 PM1

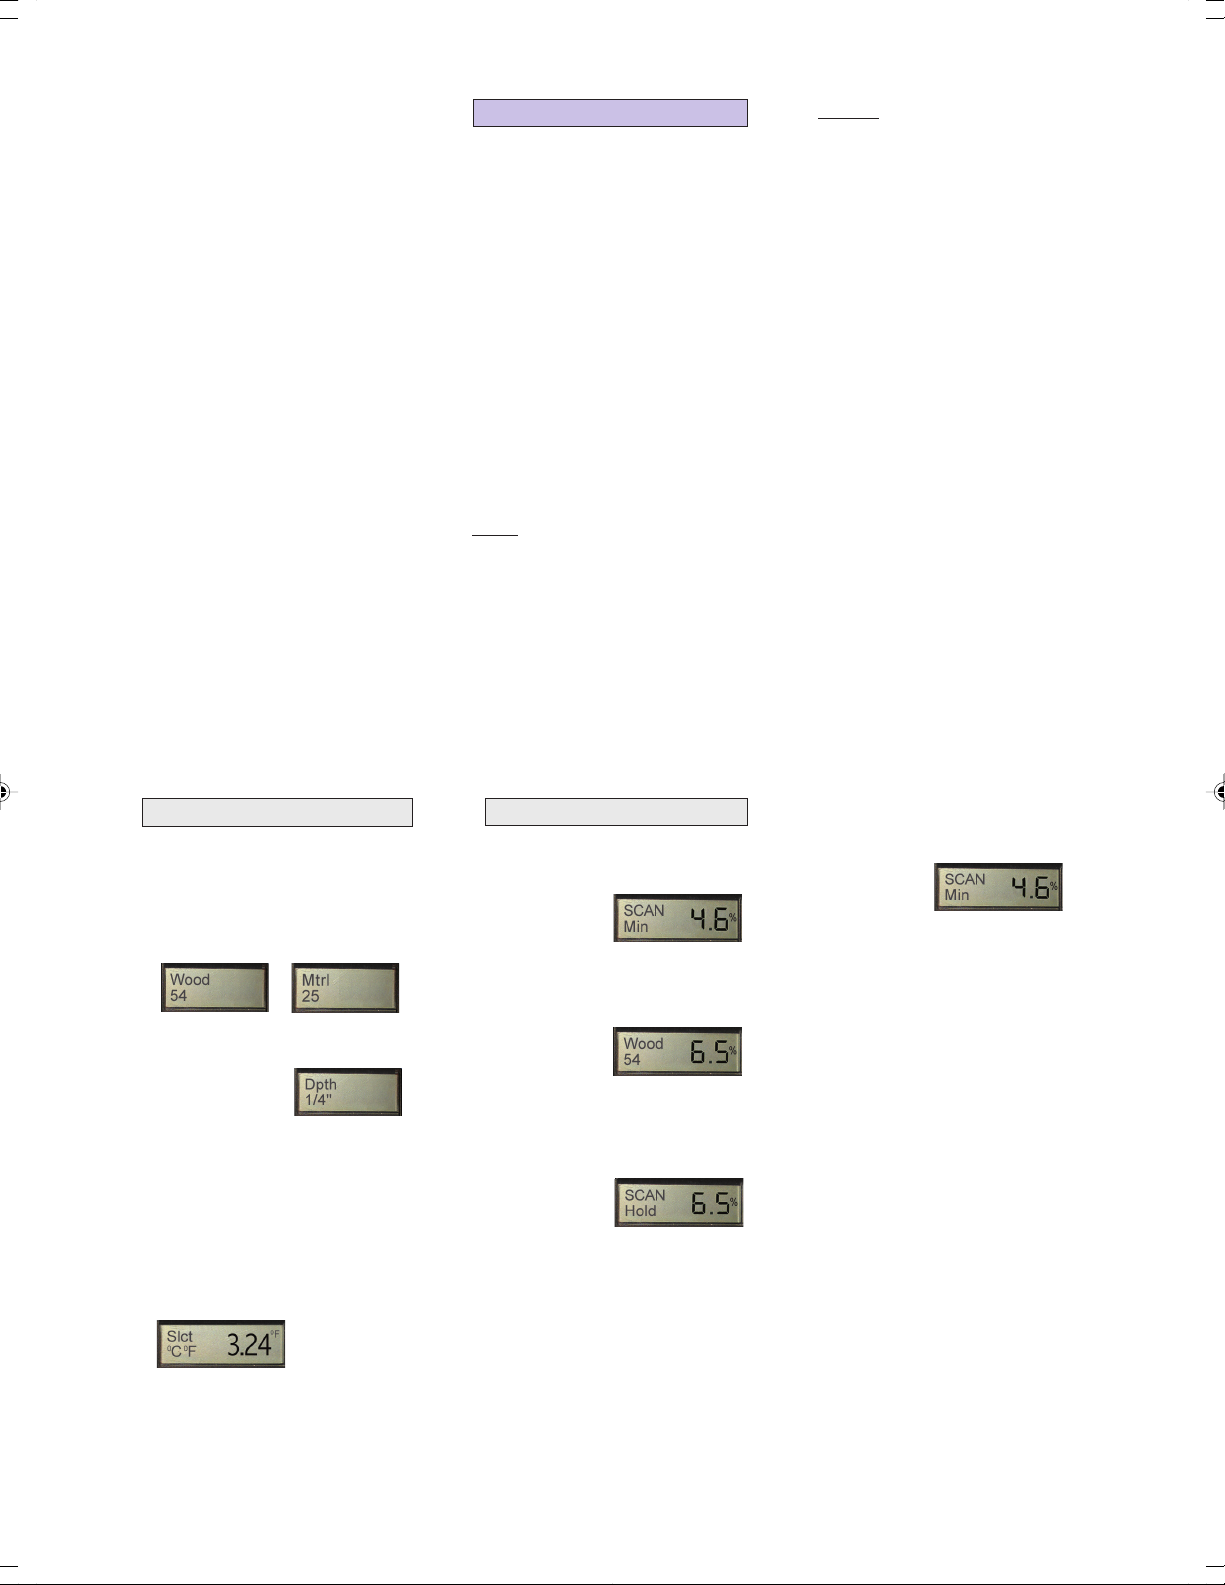
Selectable Measuring Depths
Unique to Lignomat’s meters.
Dual-depth feature allows measuring:
- All thicknesses from veneer to 1.5”.
See section B8.
- Hardwood top layer of laminates
or engineered boards and floors.
- Wood floors thinner than 3/4” with-
out including concrete or subfloor
underneath.
- Moisture close to surface and
deeper down to compare core and
surface moisture.
3/4” or 20mm
1/4” or 7mm
B6
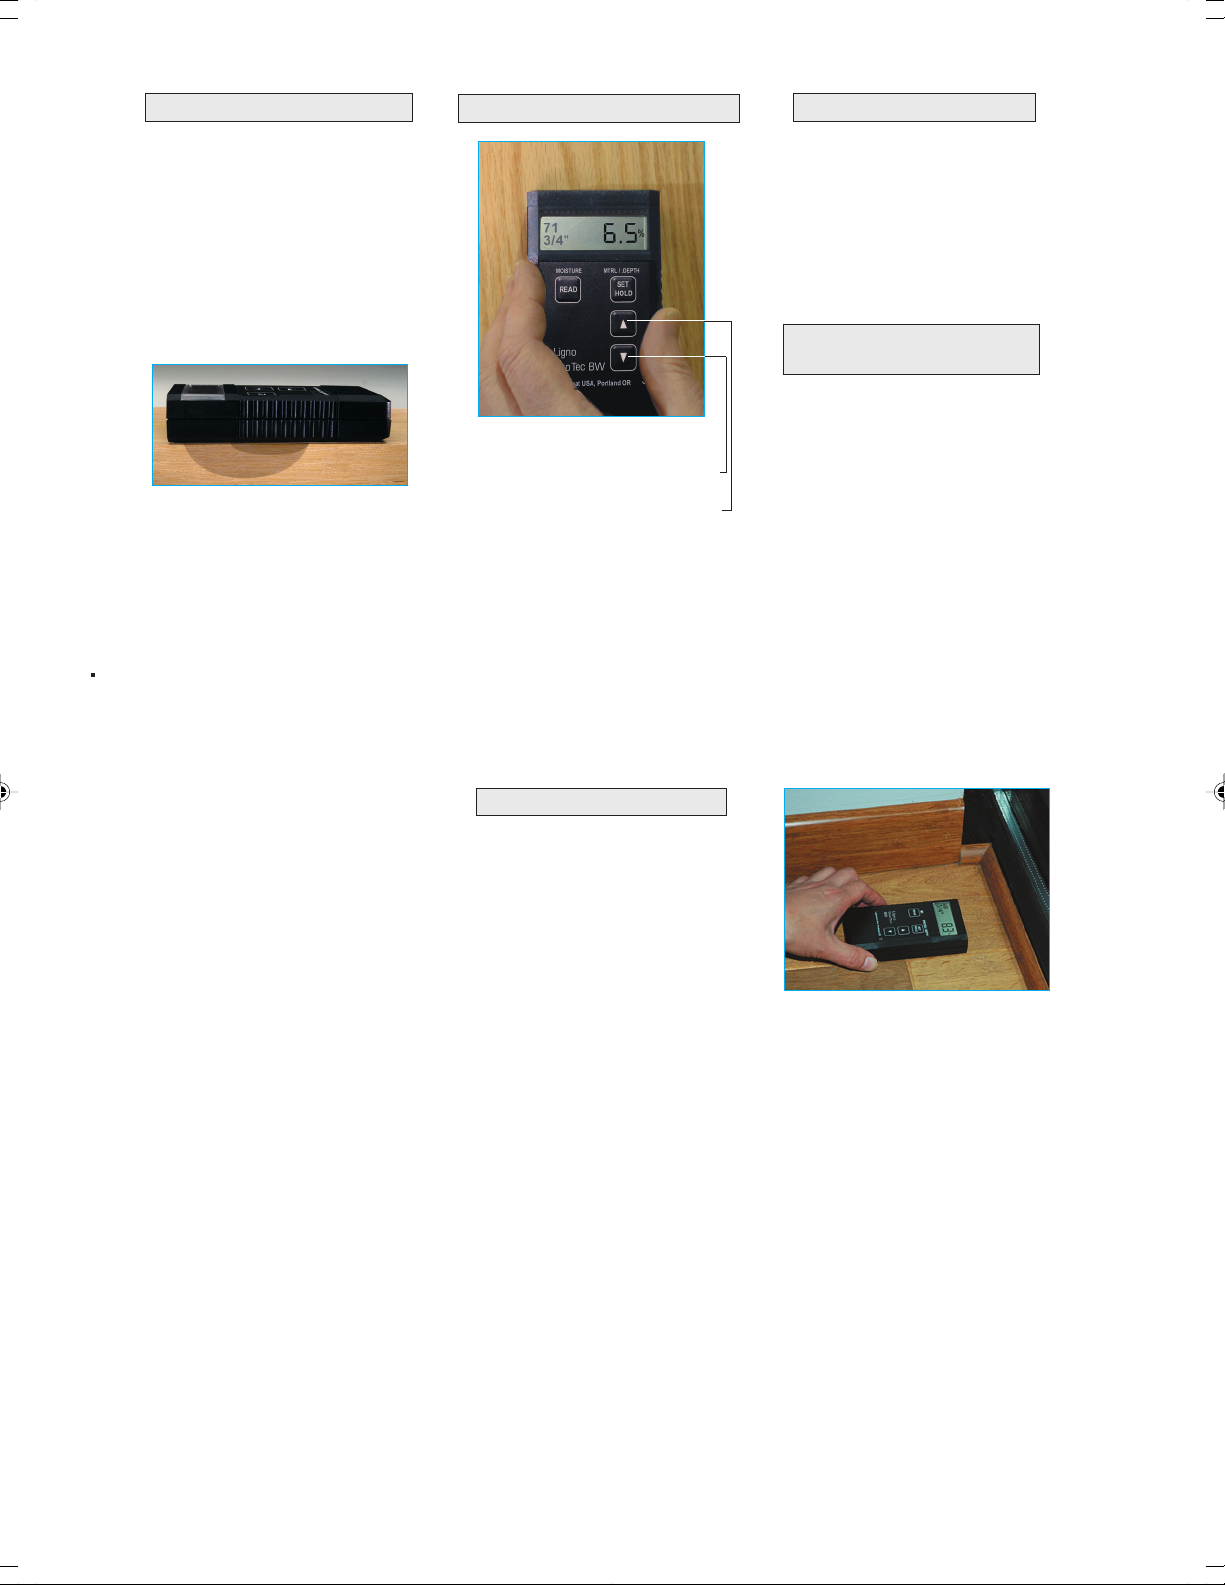
While measuring, you can toggle be-
tween the two measuring depths.
Push the
T
key to switch to 1/4”
(20mm). Push the
S
key to switch
to 3/4” (7mm). One hand can hold
the meter, the other hand can acti-
vate the up or down key. You do not
have to move the meter at all.
A great way to compare surface with
core moisture.
The measuring depth is crucial. For
samples thinner than the measuring
depth, readings may not be accurate:
-If not enough test material is under-
neath the sensor plates, values may
be too low.
- If material underneath the test
sample is included in the measure
ments, values may be too high.
Toggle between 1/4” and 3/4”
B7
We recommend placing a light-
weight material such as Styrofoam
under the veneer. It not only pre-
vents inaccurate readings, but also
helps to create a flat measuring plat-
form for the veneer. To obtain ac-
curate readings for very thin ve-
neer it may be necessary to make
a stack of several sheets.
Veneer
If the sample to be measured is
composed of different wood spe-
cies or different materials (linoleum
glued on to wood, plywood, bam-
boo flooring with a wood core,
etc...) or if no wood species set-
ting exists a setting can be found
by using a dry sample board.
The dry sample could come from
your office or from an area that
has already dried out or from a
place where excess moisture never
reached. Estimate the moisture...
(continued section F1)
Find Settings for Composite
and Engineered Boards.
B8
content. An acclimated sample
from a home, office or show room
should be at around 7.5%.
Start by selecting setting #50.
Then take a measurement.
- If the reading is below 7.5%,
choose a setting lower than #50.
- If the reading is above 7.5%,
choose a setting higher than #50.
Then take another measurement.
Change settings, until you find a
setting, which gives a value of
7.5%. This setting can be used in
the future for the same product.
Calculating Specific Gravity
The specific gravity can be calcu-
lated, if the Weight (W) in Ounces
and the Length, Width and Heights
in inches is available:
(Weight x 1.73)
—————————
(W x L x H)
Once the specific gravity has been
found (value between 0.3 and 1.00)
the corresponding setting is be-
tween 30 and 100.
See section B2.
F1
For the Floor Installer
Moisture meters should be used
throughout the installation process.
First, when the floor is delivered, to
make sure the floor is dry.
Next, before and after acclimation,
to make sure the floor is acclimated
to the ambient conditions at the place
of installation. Best mark selected
sample boards and take readings re-
peatedly.
The moisture condition of the floor
should be documented at the time
the customer signs off on the instal-
lation. Select several moisture sensi-
tive areas. Take readings on both
depth levels and document the read-
ings with species setting, measuring
depth and location. Maybe even tak-
ing a photo to pinpoint the location.
If you ever have to go back to check
out a complaint, you can measure
the same areas again and compare
with the origina
l readings. Keeping
track of moisture conditions may in
the end protect you from unwarranted
claims.
Comparing readings taken at 1/4”
and 3/4” can also help to diagnose
problems and indicate if moisture
was absorbed from the down-side
or the up-side of the floor.
Measuring Concrete and other
Building Materials
Comparative readings can be taken
in most building materials, where
higher readings indicate more mois-
ture. These qualitative test results
can indicate problem areas. Test re-
sults from pin or pinless meters should
not be used to decide whether or not to
lay a wood floor over a concrete slab.
An RH in-depth probe test is recom-
mended. NWFA ruling. See section F5.
F2 F3
Ligno-DuoTecBW and RH new.internet.p65 10/18/2011, 4:11 PM2

In-depth RH Test in Concrete
Accessories are available to mea-
sure moisture in concrete slabs: RH
BluePeg sensors, RH Cable and
Sleeves. Lignomat’s RH BluePeg sys-
tem complies to ASTM F2170-09
standard.
Test methods
such as the
Calcium Chlo-
ride test or
measurements
with hand held
non-invasive
or resistance-
type moisture
meters have
proven to be unreliable. The in-depth
RH test can detect excess moisture
inside the slab, which will rise to-
wards the surface, once the floor
covering is installed.
See separate RH BluePeg instruc-
tions on how to obtain measure-
ments, which comply with the ASTM
regulations.
F5
Moisture Problems
Nobody would worry about mois-
ture if it would not be for shrinking
and warping or mold and dry rot.
Assuming wood was dry initially, no
problems will occur
- if the ambient conditions are kept
between 35-50% relative humidity
at a temperature of 60-80
0
F.
- if the building is healthy and moi-
sture from the outside cannot mi-
grate through the concrete floor,
the walls and roofs to the inside.
To help investigate moisture prob-
lems, Lignomat developed the new
BL2 moisture tracker. With the BL2
you can simultaneously record
moisture in wood, drywall and con-
crete and RH / temperature.
Ligno-DuoTec BW - RH Mode
The RH BluePeg sensor and the RH
Adapter or RH cable are required.
The connector for the RH BluePeg
sensor is located on the top of the
Ligno-DuoTec BW.
As soon as one of Lignomat’s RH
BluePeg sensors is connected, the
Ligno-DuoTec BW automatically
switches into RH mode. Push the
READ key and the RH reading ap-
pears. Values for Temperature, Dew
Point Temperature and GPP can be
obtained by pressing the
S
or
T
keys repeatedly.
F4
Specifications and Warranty
Ligno-DuoTecBW:
For Measuring
Range and Settings for wood spe-
cies and materials see section B1, 2.
Size: 2”x 5.5” x 1” (12 x 6 X 2.5cm)
Sensor Plates:
2 1/2”L x 1 1/2”W (65 x 40mm)
Battery: One 9V battery (included).
To exchange the battery, slide bat-
tery cover off on back of instrument.
A low battery symbol will appear on
the display, when the battery has been
drained to 25% of its capacity.
RH BluePeg Sensor:
Relative Humidity: 0 to 99.9%
+/-1.8% for 10-90% ~
+/-3% below 10%, above 90%
Temperature: -30
0
F to 170
0
F,
+/-0.50F for 32-1200F
+/-10F < 320F% and >1200F
Size: 1.75 long and 0.5" diameter
Connector: 3.5 mm stereo jack for
RH Cable and RH Adaptor.
Warranty: All Lignomat meters have a
two year warranty. Accessories have
a one year warranty. Battery ex-
cluded.
F6
F7
Ligno-DuoTecBW and RH new.internet.p65 10/18/2011, 4:11 PM3
This manual suits for next models
1
Other Lignomat Measuring Instrument manuals

Lignomat
Lignomat Ligno-VersaTec User manual

Lignomat
Lignomat S-10 User manual

Lignomat
Lignomat Ligno-Scanner SD User manual

Lignomat
Lignomat Ligno-Scanner S User manual

Lignomat
Lignomat PK Setup guide

Lignomat
Lignomat Lignometer K User manual

Lignomat
Lignomat Ligno-VersaTec V-0 User manual

Lignomat
Lignomat mini-Ligno DX/C User manual