manuals.online logo
Brands
  1. Home
  2. •
  3. Brands
  4. •
  5. Lindy
  6. •
  7. Extender
  8. •
  9. Lindy 39399 User manual

Lindy 39399 User manual

Radio Frequency Energy, Certifications, Recycling Information
© LINDY ELECTRONICS LIMITED & LINDY-ELEKTRONIK GMBH – 2nd EDITION (JULY 2012)
CE Certification
This equipment complies with the requirements relating to electromagnetic compatibility, EN
55024 and EN55022 for ITE (Information Technolology Eqipment), EN61000-3-2/-3.
It has been manufactured under the scope of RoHS compliance.
FCC Warning
This equipment has been tested and found to comply with the limits for a Class B digital device,
pursuant to part 15 of the FCC Rules.
Operation is subject to the following two conditions:
1. This device may not cause harmful interference, and
2. This device must accept any interference received, including interference that may cause
undesired
WEEE (Waste of Electrical and Electronic Equipment),
Recycling of Electronic Products
All EU countries
In 2006 the European Union introduced regulations (WEEE) for the collection and recycling of
all waste electrical and electronic equipment. It is no longer allowable to simply throw away
electrical and electronic equipment. Instead, these products must enter the recycling process.
Each individual EU member state has implemented the WEEE regulations into national law in
slightly different ways. Please follow your national law when you want to dispose of any
electrical or electronic products. More details can be obtained from your national WEEE
recycling agency.
LINDY No. 39399, 39395, 39379
2
nd
Edition, July 2012
www.lindy.com
© LINDY ELECTRONICS LIMITED & LINDY-ELEKTRONIK GMBH – 2nd EDITION (JULY 2012)
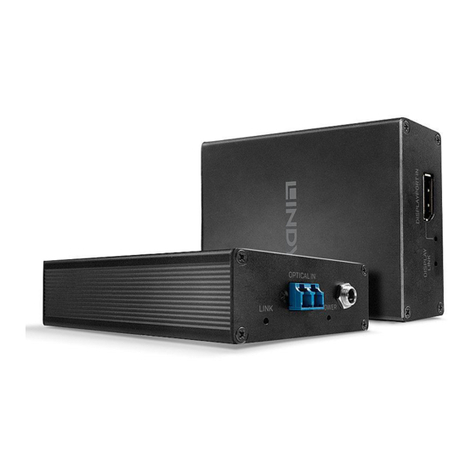
Fiber Optic DVI-D KVM Extender
User Manual English
WARNING!
This product contains invisible and/or visible laser beams. Under normal operation this
radiation is not harmful to eyes and skin. Avoid eye and skin exposure.
Under normal operation the laser transmitters should switch of when no fibre cable is connected
or when the cable is broken. If you experience any problems with this product please contact
LINDY. Under no circumstances must the product housing be opened.
No. 39399 1000m Version Multi Mode SC
No. 39395 1000m Version Multi Mode SC Dual Head
No. 39379 5000m Version Single Mode LC
www.lindy.com
CLASS 1 LASER
P
RODUCT
MAX OUTPUT: 1mW
MULTI WAVE LENGTH: 1310/1550nm
User Manual English
2
Introduction
Thank you for purchasing the LINDY Fibre Optic DVI-D KVM Extender. This fibre optic extender
allows you to transmit up to DVI-D Single Link @ 1920x1200 or 1080p (without HDCP) and
USB mouse and keyboard signals up to a distance of 1000m/3000feet using standard
multimode 50/125µm SC Duplex fibre cable. In addition to extending DVI-D, keyboard and
mouse signals, the extender can also repeat IR remote commands/signals, with the use of the
optional IR Repeater Kit (LINDY No. 38006). The DVI Dual Head version 39395 supports
connection of two DVI monitors. The Single Mode LC Duplex version 39379 supports larger
distances of up to 5 kilometres.
Features & Specifications
Extends DVI-D and USB mouse & keyboard signals up to 1/5km (3000/15000)feet
Compatible with USB and multi-protocol mice and keyboards at the receiver/user console.
Does not support USB HID functions for touch screens or similar.
Compatible with USB or PS/2 mouse and keyboard ports at the transmitter / PC
Uses standard inexpensive Duplex Fibre Cable
Auto power save mode when source device is powered off
Auto Laser disable if fibre cable is broken or removed
Optional IR repeater function (order IR Repeater Kit separately, LINDY No. 38006)
Compatible with DVI 2.0 specification, supports DVI-D Single Link
Supports resolutions up to 1920x1200@60Hz or 1080p without HDCP
Supports connection of HDMI equipment using DVI-HDMI cables – however, HDCP is not
supported.
Uses EDID emulation for DVI-D video resolution setting
Maximum DVI-D and USB cable length up to 5m in and out
Multi country wall mount power supply 100 - 240VAC / 5V DC ~2A
Package Contents
LINDY Fibre Optic DVI-D KVM Extender x 2 (1x Transmitter, 1x Receiver)
Multi-Country wall mount power supply 100 - 240VAC / 5V DC
1x(2x) DVI-D cable, 2x PS/2 cable, 1x USB A/Mini-B cable – all 2m
This User Manual
User Manual English
3
Installation
1. Connect your DVI-D source to the Fibre Optic Transmitter (maximum cable length 5m).
2. For mouse and keyboard signals connect either the two PS/2 cables or the USB A/Mini-B
cable from the Fibre Optic Transmitter to your computer. The transmitter supports PS/2 as
well as USB connection for mouse and keyboard PC connection.
3. Remove the dust covers from the Fibre Optic Transmitter and Receiver ports and from your
Fibre Cable. Connect one end of the duplex fibre cable to the Transmitter and the other end
to the Receiver. This must be set up as A to A and B to B connection (see port labelling
on the units) and NOT as a cross over connection as provided by some SC Duplex
Cables with pre-installed clamp on the connector. If you have a cross over cable that
does not work on the extender please swap the connectors over with each other on one end
only. Please ensure that the connectors are fully engaged before proceeding.
4. Use another DVI-D cable (maximum length 5m) to connect your DVI-D display device to the
DVI-D port on the Receiver.
5. Connect your USB (or multi protocol USB-PS/2) mouse and keyboard to the USB ports on
the receiver labelled with mouse and keyboard symbols.
6. If you are using the optional IR extender kit (LINDY No. 38006) please connect the IR
receiver to the receiver unit and the IR transmitter to the transmitter unit and place the IR
receiver and transmitter in appropriate position.
7. Plug the power supplies into the transmitter and receiver and power on.
8. Then power on your display and source to complete the installation
Please Note: The extender uses EDID emulation for the video signal resolution setting. The
highest supported resolution is 1920x1200@60Hz. If your monitor is only able to support
lower resolutions it may be necessary to set the video resolution on your signal source
(computer) before installing the extender.
Troubleshooting
If you have no image on your display
Check that the DC plugs and jacks used by external power supplies (both the extender units
and others) are firmly connected and that the Power LED is on.
Check that the fibre connectors are plugged in correctly and that the Link Status LED is lit. If
the Link LED is not lit then check your cable has a A:A and B:B configuration. If it still is not
lit, please try another cable to make sure it isn't broken.
Check that the DVI-D source and display are both powered on and active. Please note that
HDCP is not supported.
If Power and Link LEDs are on, reduce the length of DVI-D, USB and PS/2 cables.
If you cannot solve the problem please contact the LINDY Support team – you can find our
worldwide contact information always up to date on our website.

This manual suits for next models

2

Other Lindy Extender manuals

Lindy 38106 User manual

Lindy

Lindy 38106 User manual

Lindy 70466 User manual

Lindy

Lindy 70466 User manual

Lindy 32667 User manual

Lindy

Lindy 32667 User manual

Lindy 32917 User manual

Lindy

Lindy 32917 User manual

Lindy 42700 User manual

Lindy

Lindy 42700 User manual

Lindy 38403 User manual

Lindy

Lindy 38403 User manual

Lindy 38403 User manual

Lindy

Lindy 38403 User manual

Lindy 38344 User manual

Lindy

Lindy 38344 User manual

Lindy 39390 User manual

Lindy

Lindy 39390 User manual

Lindy 43308 User manual

Lindy

Lindy 43308 User manual

Lindy 38301 User manual

Lindy

Lindy 38301 User manual

Lindy 38338 User manual

Lindy

Lindy 38338 User manual

Lindy HDMI over Ethernet Extender User manual

Lindy

Lindy HDMI over Ethernet Extender User manual

Lindy 38300 User manual

Lindy

Lindy 38300 User manual

Lindy Fiber Optic DVI-D User manual

Lindy

Lindy Fiber Optic DVI-D User manual

Lindy 42688 User manual

Lindy

Lindy 42688 User manual

Lindy 38066 User manual

Lindy

Lindy 38066 User manual

Lindy 38139 V2 User manual

Lindy

Lindy 38139 V2 User manual

Lindy 39200 User manual

Lindy

Lindy 39200 User manual

Lindy 38340 User manual

Lindy

Lindy 38340 User manual

Lindy 43247 User manual

Lindy

Lindy 43247 User manual

Lindy 38209 User manual

Lindy

Lindy 38209 User manual

Lindy 38387 User manual

Lindy

Lindy 38387 User manual

Lindy 42780 User manual

Lindy

Lindy 42780 User manual

Popular Extender manuals by other brands

SY SY-UHD-FM installation guide

SY

SY SY-UHD-FM installation guide

Gefen EXT-DIGAUD-141 user manual

Gefen

Gefen EXT-DIGAUD-141 user manual

Wavlink WL-WN579A3 quick start guide

Wavlink

Wavlink WL-WN579A3 quick start guide

LEGRAND QMotion QMOLEEDZRX installation instructions

LEGRAND

LEGRAND QMotion QMOLEEDZRX installation instructions

KVM-TEC USBflex Quick installation

KVM-TEC

KVM-TEC USBflex Quick installation

Hall Research Technologies FXT-460 user manual

Hall Research Technologies

Hall Research Technologies FXT-460 user manual

TP-Link RE210 user guide

TP-Link

TP-Link RE210 user guide

D-Link DAP-1330 Quick install guide

D-Link

D-Link DAP-1330 Quick install guide

Valcom IP Solutions VIP-802 manual

Valcom

Valcom IP Solutions VIP-802 manual

Altronics A3602 quick start guide

Altronics

Altronics A3602 quick start guide

TP-Link RE200 user guide

TP-Link

TP-Link RE200 user guide

ATZ HDMI-E120IR manual

ATZ

ATZ HDMI-E120IR manual

Elvaco CMeX10S Quick manual

Elvaco

Elvaco CMeX10S Quick manual

D-Link EXO DRA-1360 user manual

D-Link

D-Link EXO DRA-1360 user manual

NETGEAR EX7000 Getting started guide

NETGEAR

NETGEAR EX7000 Getting started guide

LevelOne HVE-6000 user manual

LevelOne

LevelOne HVE-6000 user manual

Digitus DS-55510 manual

Digitus

Digitus DS-55510 manual

Urmet Dialog Ourten OT-PLC602 manual

Urmet Dialog

Urmet Dialog Ourten OT-PLC602 manual

manuals.online logo
manuals.online logoBrands
  • About & Mission
  • Contact us
  • Privacy Policy
  • Terms and Conditions

Copyright 2025 Manuals.Online. All Rights Reserved.