Lindy 38009 User manual

© LINDY Group –FOURTH EDITION (JULY 2018)
HDMI & IR CAT6 Extender Premium
User Manual English
Benutzerhandbuch Deutsch
Manuel Utilisateur Français
Manuale Italiano
No. 38009
lindy.com
Tested to Comply with
FCC Standards
For Home and Office Use!


User Manual English
1
Introduction
Thank you for purchasing the LINDY HDMI & IR CAT6 Extender Premium. This Extender allows
you to extend signals up to 100m using CAT5e/6 RJ45 cable. For the best performance and
especially for longer distances, we recommend using high quality solid core/structured cabling;
the table below shows the maximum distance possible based on the resolution and cable type
which are used:
The extender uses two modules, one transmitter and one receiver, along with a single power
supply which can be connected to either unit with power being sent over the CAT6 cable to the
other unit, perfect for descreet or retro fit installations. Bi-directional IR support allows HDMI
source equipment to be controlled from the display end of the installation (Rx to Tx) or display
equipment to be controlled from the HDMI source equipment end of the installation, giving you
complete control over your AV equipment.
Package Contents
▪HDMI & IR CAT6 Extender Premium (1 x Transmitter, 1 x Receiver)
▪Multi-Country Power Adapter 12V DC/1A)
▪IR Extender Cable x 4 (2 x Emmiter, 2 x Receiver)
▪This User Manual
Specification
▪Extends HDMI 1.3 & IR signals via Cat5e/Cat6/Cat7
▪CAT5e: 1080p60 50m, 1080i/720p 80m
▪CAT6: 1080p60 80m, 1080i/720p 100m
▪CAT7 : 1080p 3D 80m, 1080p60 Desktop 100m, 1080i/720p 100m
▪Supports resolutions: 1080p24/30/50/60, 1080i, 720p, 576p, 480p
▪Support for 3D Signals, including 1080p 3D
▪Deep Colour capable: supports 30/36/48 bit colour depth
▪Audio Formats: LPCM, DTS Digital, DTS HD, Dolby Digital & Dolby True HD
▪Supports 20 –60kHz IR Frequencies
▪IR can be used from Rx to Tx or Tx to Rx to control AV equipment
▪Maximum recommended HDMI Cable length, 5m in/out
▪Automatic EDID pass through
▪Transmitter ports: HDMI Type A In, 1x CAT5e/6 Out, 3.5mm IR In, 3.5mm IR Out & DC Socket
▪Receiver ports: HDMI Type A Out, 1x CAT5e/6 In, 3.5mm IR In, 3.5mm IR Out & DC Socket
▪Dimensions (LxWxH): 100x65x26mm (each unit)
▪Weight: 0.200kg (each unit)
1080i / 720p
1080p
CAT6 UTP/STP Solid Core
100m
80m
CAT5e UTP/STP Solid Core
80m
50m
CAT7 S/FTP Solid Core
100m
80m 3D / 100m 1080p60 Desktop

User Manual English
2
Installation
Important! If you want to lay cables inside a cable duct or through a wall, please test your RJ45
cables in a test installation at the highest desired resolution with the extender BEFORE you
install them in your wall or cable duct!
The following steps are for an installation using HDMI equipment, if you are using DVI equipment,
please substitute the HDMI cables for DVI to HDMI cables where required.
1. Connect your HDMI source to the HDMI Extender Transmitter unit using a HDMI cable
(maximum length 5m).
2. Connect one end of the CAT5e/6 cable (max. length 100m) to the CAT5e/6 port on the
Transmitter and the other end to the CAT5e/6 port of the Receiver. Use solid core installation
cable of at least Cat.5e UTP.
3. Use another HDMI cable (maximum length 5m) to connect your HDMI display device to the
HDMI output port on the Receiver unit.
4. For additional Infrared remote signal functionality, connect the included IR Extension Cables
to the Transmitter and Receiver units as required, matching the labels on the Cables to the
Ports they are connected to.
5. Place the IR Out Eye in front of the IR Port of the equipment you want to control, and ensure
to place the IR In Eye in a location where it may easily receive the signal of your IR remote.
6. Power on your HDMI Source and Display to complete the installation.
7. Plug the DC power supply into the Transmitter or Receiver unit, the Power/Video LED will
illuminate Red on both units.
8. After 2-3 seconds the EDID handshake will complete and then the Power/Video LED will
illuminate Blue on both the Transmitter and Receiver and the installation is complete.
Troubleshooting
There is no display on the screen.
▪Check that the DC plug and jack used by external power supply are firmly connected.
▪Check that the CAT5e/6 cable is plugged in correctly and that the Power/Video LED is Blue.
▪Check that the HDMI source and display are both powered on and active.
▪Power off all the devices, then power on in this order: first, the transmitter unit, then the display
and finally the source.
▪For some HDMI devices it may be helpful to unplug and replug their HDMI connection to re-
initiate the HDMI handshake and recognition.
▪Reduce the length of CAT5e/6 or HDMI cable used, or use a higher quality cable. Please refer
to the Introduction section for the maximum distance/resolution/cable combinations.
▪Connect the power supply to the other side of the installation to which you currently have it
connected.

Benutzerhandbuch Deutsch
1
Einführung
Mit dem LINDY HDMI & IR CAT6 Extender Premium haben Sie ein erstklassiges Produkt
erworben. Es unterstützt die Übertragung von Full HD 1080p Signalen über Distanzen bis bis zu
100m bei Verwendung hochwertiger Cat.5e/6 RJ45 Kabel. Für beste Resultate besonders bei
großen Distanzen empfehlen wir als Verbindungskabel Installationskabel mit starren Adern.
Typischerweise sind folgende Distanzen realisierbar:
Der Extender besteht aus Transmitter/Sender (TX) und Receiver/Empfänger (RX) und einem
Netzteil, welches wahlweise an TX oder RX angeschlossen werden kann und das jeweils andere
Gerät über das Verbindungskabel mit Strom versorgt. Der Extender arbeitet sowohl als HDMI wie
auch als Infrarot IR-Fernbedienungs-Extender. Bidirektionale IR-Unterstützung erlaubt sowohl
die Fernsteuerung der Signalquelle wir auch die Fernsteuerung der Anzeigegeräte.
Lieferumfang
▪HDMI &IR Cat.6 Extender Premium (1x Transmitter, 1x Receiver)
▪1x Multi-Country Netzteil 12V DC ~1A
▪4x IR Extender-Kabel (2x Emitter, 2x Receiver)
▪Dies Handbuch
Spezifikationen
▪Extender für HDMI und IR Signale
▪Unterstützt HDMI Auflösungen bis max. 1080p60
▪Unterstützung für 3D Signale, einschließlich 1080p 3D
▪Deep Colour fähig: Unterstützung für 30/36/48 Bit Farbtiefe
▪Audio Formate: LPCM, DTS Digital, DTS HD, Dolby Digital & Dolby True HD
▪Unterstützt IR Frequenzen im Bereich 20 –60kHz, bidirektional
▪Automatische EDID Übertragung
▪Maximale HDMI Kabellänge: 5m am Ein- und Ausgang
▪Anschlüsse TX: HDMI Typ A In, 1x CAT5e/6 Out, 3.5mm IR In, 3.5mm IR Out, Netzteil
▪Anschlüsse RX: HDMI Typ A Out, 1x CAT5e/6 In, 3.5mm IR In, 3.5mm IR Out, Netzteil
▪Abmessungen (BxTxH): ca. 100x65x26mm (sowohl TX wie RX)
▪Gewicht: ca. 0,2kg (sowohl TX wie RX)
1080i / 720p
1080p
CAT6 UTP/STP Solid Core
100m
80m
CAT5e UTP/STP Solid Core
80m
50m
CAT7 S/FTP Solid Core
100m
80m 3D / 100m 1080p60 Desktop

Benutzerhandbuch Deutsch
2
Installation und Inbetriebnahme
ACHTUING! Bevor Sie die Cat.5/6 Verbindungskabel in einen Kabelkanal verlegen führen Sie
bitte unbedingt einen Verbindungstest durch um die Kompatibilität des Kabels mit dem Extender
und den angeschlossenen HDMI-Geräten 100%ig sicher zu stellen!
Die folgenden Schritte beschreiben die Installation mit HDMI Geräten. Bei Verwendung von DVI
Geräten ersetzen Sie bitte die HDMI-Kabel durch HDMI-DVI-Kabel.
1. Verbinden Sie Ihre HDMI Signalquelle mit dem HDMI Extender Transmitter mit einem HDMI
Kabel (max. Länge 5m).
2. Schließen Sie das eine Ende des Cat.5e/6 Kabels (max. Länge 100m) am Transmitter und
das andere Ende am Receiver an. Verwenden Sie Installationskabel mit starren Adern (solid
core) mindestens der Qualität 22/24AWG Cat.5e/6 UTP. Bis zu mittleren Distanzen kann auch
hochwertiges Patchkabel funktionieren.
3. Verwenden Sie ein weiteres HDMI Kabel (max. 5m Länge) zum Anschluss Ihres HDMI
Displays an den Receiver.
4. Zur Unterstützung der IR-Fernbedienungsfunktionalität schließen Sie die IR-Extenderkabel je
nach Bedarf an. Beachten Sie die Bezeichnungen an den Kabeln und an den Buchsen an TX
und RX.
5. Platzieren Sie die IR Out Transmitter so, dass die HDMI Geräte die IR-Signale empfangen
können, und die IR In Receiverkabel so, dass sie die IR Signale der Fernbedienungen
aufnehmen können.
6. Schließen Sie das Netzteil je nach Wunsch entweder am Transmitter oder am Receiver an,
die Power/Video LEDs an beiden Geräten sollten dann rot leuchten.
7. Schalten Sie das HDMI Display ein, und dann die HDMI Signalquelle.
8. Nach 2-3 Sekunden sollte der EDID Handschake abgeschlossen sein und die HDMI Quelle
sollte sich auf die Features des HDMI Displays eingestellt haben. Die Power/Video LEDs
sollten nun Blau leuchten, der Extender ist betriebsbereit.
Fehlersuche und -behebung
Der Monitor zeigt kein Bild.
▪Prüfen Sie ob das Netzteil und das Cat.5e/6/7 Kabel korrekt angeschlossen sind. Sowohl am
Transmitter als auch am Receiver müssen die Power/Video LEDs leuchten. Sollte nur eine
leuchten so wechseln Sie das Netzteil zum jeweils anderen Gerät, wenn die LED auch dann
nicht leuchtet liegt ein Gerätefehler vor.
▪Stellen Sie sicher, dass sowohl HDMI Quelle wie auch Anzeigegerät korrekt arbeiten.
▪Schalten Sie alle Geräte nochmals aus und in der folgenden Reihenfolge wieder ein: zuerst
TX/RX, dann den HDMI Monitor und dann die HDMI Quelle.
▪Bei verschiedenen HDMI Geräten kann es erforderlich sein nochmals das HDMI Kabel
abzuziehen um den HDMI Handshake Link erneut zu initialisieren.
▪Verringern Sie die Kabellänge des Cat.5e/6 Kabels oder verwenden Sie ein höherwertiges
Verbindungskabel falls Sie weiterhin keine Funktion erhalten. Beachten Sie die maximal
zulässigen Kabellängen.
▪Verwenden Sie eventuell kürzere HDMI Kabel bei Problemen mit den HDMI Geräten.

Manuel Utilisateur Français
1
Introduction
Merci d’avoir choisi l’Extender HDMI & IR CAT6 Premium LINDY. Cet Extender vous permet
d’étendre les signaux jusqu’à 100m en utilisant du câble RJ45 CAT5e/6. Pour obtenir de meilleurs
performances et plus spécialement sur de longues distances, nous recommandons l’utilisation
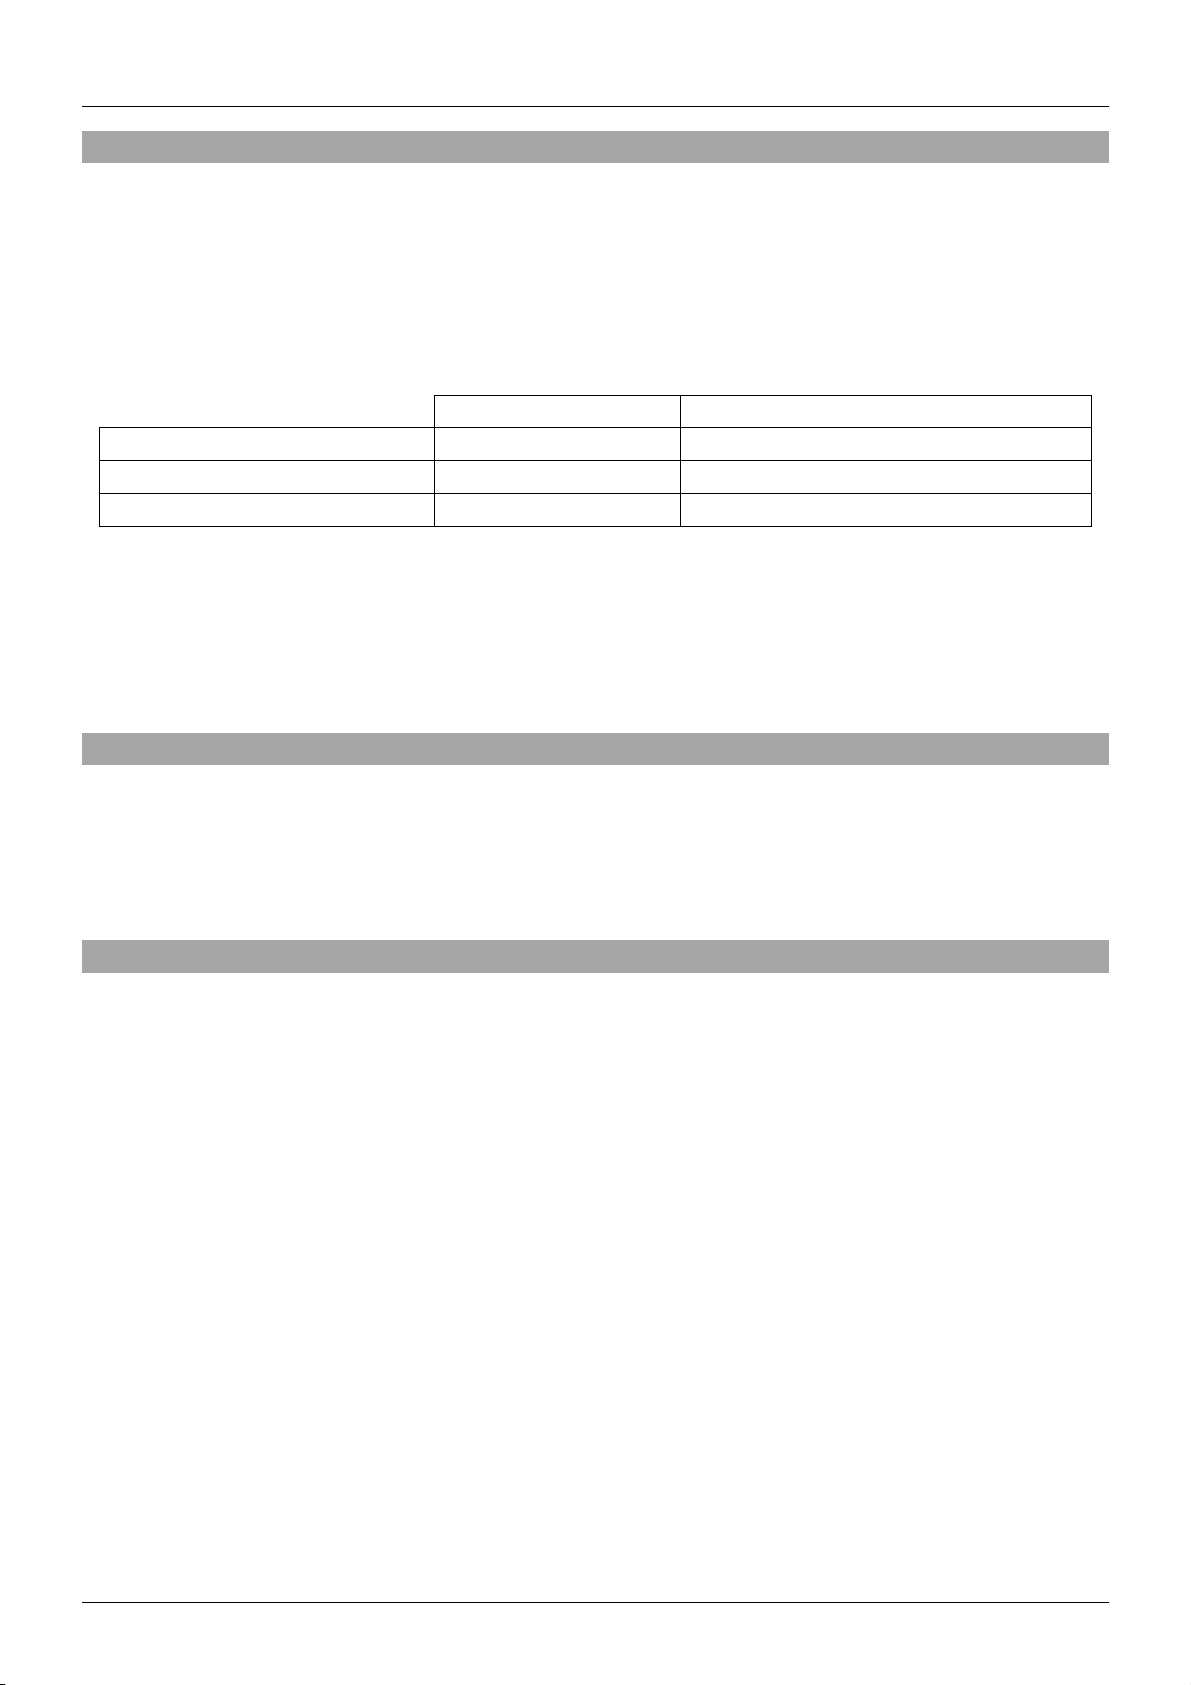
de câble monobrin de haute qualité; le tableau ci-dessous indique la distance maximale basée
sur la résolution et le type de câble utilisé:
L’extender utilise deux modules, un émetteur (transmitter-Tx) et un récepteur (receiver-Rx), avec
une alimentation unique qui peut être connectée à l’une ou l’autre unité avec l’alimentation
transitant sur le câble CAT6 vers l’autre unité, parfait pour une installation discrète ou lors de
rénovation. La prise en charge bidirectionnelle des signaux IR permet à l’équipement source
HDMI d’être contrôlé à partir de l’affichage distant de l’installation (Rx vers Tx) ou à l’équipement
d’affichage d’être contrôlé du côté de la source HDMI de l’installation, vous donnant une maîtrise
complète de votre équipement audio/vidéo.
Contenu
▪Extender HDMI & IR CAT6 Premium (1 x émetteur, 1 x récepteur)
▪Alimentation multi-pays 12V DC/1A
▪Câble d’extension IR x 4 (2 x émetteurs, 2 x récepteurs)
▪Ce manuel utilisateur
Spécifications
▪Etends les signaux HDMI 1.3 & IR via câble Cat5e/Cat6/Cat7
▪CAT5e: 1080p60 50m, 1080i/720p 80m
▪CAT6: 1080p60 80m, 1080i/720p 100m
▪CAT7 : 1080p 3D 80m, 1080p60 Desktop 100m, 1080i/720p 100m
▪Prend en charge les résolutions: 1080p24/30/50/60, 1080i, 720p, 576p, 480p
▪Prise en charge pour les signaux 3D, incluant le 1080p 3D
▪Compatible Deep Colour: prise en charge des profondeurs de couleur 30/36/48 bit
▪Formats audio: LPCM, DTS Digital, DTS HD, Dolby Digital & Dolby True HD
▪Prise en charge des fréquences IR 20 –60kHz
▪L’IR peut être utilisé du Rx vers Tx ou Tx vers Rx pour contrôlés les équipements AV
▪Longueur maximale de câble HDMI en entrée comme en sortie, 5m
▪By-pass automatique EDID
▪Ports Transmitter: entrée HDMI type A, 1x sortie CAT5e/6, entrée 3.5mm IR, sortie 3.5mm IR
& connecteur d’alimentation DC
▪Ports Receiver: sortie HDMI type A, 1x entrée CAT5e/6, entrée 3.5mm IR, sortie 3.5mm IR &
connecteur d’alimentation DC
▪Dimensions (LxlxH): 100x65x26mm (pour chaque unité)
▪Poids: 0.200kg (chaque unité)
1080i / 720p
1080p
CAT6 UTP/STP Solid Core
100m
80m
CAT5e UTP/STP Solid Core
80m
50m
CAT7 S/FTP Solid Core
100m
80m 3D / 100m 1080p60 Desktop

Manuel Utilisateur Français
2
Installation
Important! Si vous voulez poser les câbles dans une gaine ou au travers un mur, merci de
tester vos câbles RJ45 dans une installation de test à la plus haute résolution voulue avec
l’extender AVANT de les installer définitivement dans la gaine ou dans le mur !
Les étapes suivantes font références à une installation avec des équipements en HDMI, si vous
utilisez des appareils DVI, merci de substituer les câbles HDMI pour des câbles DVI vers HDMI.
1. Connectez la source HDMI à l’émetteur de l’extender HDMI en utilisant un câble HDMI
(longueur maximale 5m).
2. Connectez une extrémité du câble CAT5e/6 (longueur maximale 100m) au port CAT5e/6 sur
l’émetteur et l’autre extrémité au port CAT5e/6 du récepteur. Utilisez un câble monobrin d’au
moins Cat.5e UTP.
3. Utilisez un autre câble HDMI (longeur maximale 5m) pour connecter votre affichage HDMI au
port HDMI de sortie sur le récepteur.
4. Pour les fonctionnalités infrarouge additionnelle, connectez les câbles d’extensions IR à
l’émetteur et récepteur comme requis, en faisant correspondre les indications portés sur les
câbles avec les ports de connexions.
5. Placez l’émetteur IR en face du capteur IR de l’équipement que vous cherchez à contrôler, et
assurez-vous de placer le capteur IR à un emplacement où il recevra facilement les signaux
de votre télécommande IR.
6. Mettez en route votre source et votre affichage HDMI pour compléter l’installation.
7. Branchez l’alimentation DC dans l’émetteur ou le récepteur, la LED Power/Video s’allumera
en rouge sur les deux unités.
8. Après 2-3 secondes la négociation EDID sera complétée et la LED Power/Video s’éclairera
en bleu sur l’émtteur et le récepteur et l’installation sera complète.
Dépannage
Il n’y a pas d’affichage sur l’écran.
▪Vérifiez que les connecteurs d’alimentations sont bien branchés.
▪Vérifiez que le câble CAT5e/6 est bien connecté et que la LED Power/Video est bleue.
▪Vérifiez que la source et l’affichage HDMI sont tous deux démarrer et actifs.
▪Coupez tous les appareils, puis démarrez-les dans cet ordre: en premier, l’émetteur, puis
l’affichage et finalement la source.
▪Pour certains appareils en HDMI il peut être utile de débrancher puis rebrancher leurs
connexions HDMI pour réinitialiser la négociation et identification HDMI EDID.
▪Reduisez la longueur des câbles CAT5e/6 ou HDMI utilisés, ou utilisez une qualité de câbles
supérieure. Merci de vous référer à la section d’introduction de ce présent document pour la
combinaison distance/resolution/type de câble maximale.
▪Connectez l’alimentation de l’autre côté de l’installation à laquelle vous l’avez actuellement
connectée.

Manuale Italiano
1
Introduzione
Grazie per aver acquistato l’Extender CAT6 Premium HDMI & IR LINDY. Questo prodotto vi
permetterà di estendere un segnale video digitale fino ad un massimo di 100m utilizzando cavi
CAT5e/6 RJ45. Per ottenere migliori risultati e soprattutto per le distanze più elevate vi
raccomandiamo di utilizzare cavi di alta qualità e di tipo solid core (conduttore monofilare). La
tabella seguente vi mostra la distanza massima raggiungibile in base alla risoluzione e al tipo di
cavo utilizzato:
L’extender utilizza due moduli, un trasmettitore e un ricevitore, in abbinamento ad un singolo
alimentatore collegabile indifferentemente ad uno dei due moduli (l’alimentazione verrà poi
trasferita tramite il cavo CAT6 all’altro modulo) facilitando l’installazione e rendendo più semplice
nascondere le unità dietro agli schermi. Il supporto bidirezionale per i segnali IR permette di
controllare le sorgenti HDMI dal punto in cui è installato lo schermo e viceversa.
Contenuto della confezione
▪Extender HDMI & IR CAT6 Premium (1 trasmettitore, 1 ricevitore)
▪1 Alimentatore Multi-Country 12V DC/1A
▪4 x cavi extender IR (2 x trasmettitore, 2 x ricevitore)
▪Questo manuale
Specifiche
▪Estende segnali HDMI 1.3 & IR su cavo Cat5e/Cat6/Cat7
▪CAT5e: 1080p60 50m, 1080i/720p 80m
▪CAT6: 1080p60 80m, 1080i/720p 100m
▪CAT7 : 1080p 3D 80m, 1080p60 Desktop 100m, 1080i/720p 100m
▪Supporta le seguenti risoluzioni: 1080p24/30/50/60, 1080i, 720p, 576p, 480p
▪Supporto per segnali 3D, incluso 1080p 3D
▪Supporto Deep Colour con profondità colore a 30/36/48 bit
▪Formati Audio: LPCM, DTS Digital, DTS HD, Dolby Digital & Dolby True HD
▪Supporta Frequenze IR fra 20 –60kHz
▪Il ripetitore IR può essere utilizzato da Rx a Tx o da Tx a Rx per controllare tutti i dispositivi
AV
▪Lunghezza massima raccomandata dei cavi HDMI: 5m in ingresso e in uscita
▪Trasferimento Automatico del segnale EDID fra schermo e sorgente
▪Porte dell’unità trasmittente: Ingresso HDMI Tipo A , Uscita RJ45 CAT5e/6, Ingresso da
3.5mm IR, Uscita da 3.5mm IR e presa DC alimentazione
▪Porte dell’unità Ricevente: Uscita HDMI Tipo A , Ingresso RJ45 CAT5e/6, Ingresso da 3.5mm
IR, Uscita da 3.5mm IR e presa DC alimentazione
▪Dimensioni (LxPxA): 100x65x26mm (ogni unità)
▪Peso: 0.200kg (ogni unità)
1080i / 720p
1080p
CAT6 UTP/STP Solid Core
100m
80m
CAT5e UTP/STP Solid Core
80m
50m
CAT7 S/FTP Solid Core
100m
80m 3D / 100m 1080p60 Desktop

Manuale Italiano
2
Installazione
Importante! Se desiderate posare il cavo cat.5e/6 in una conduttura o canalina vi preghiamo di
effettuare un test del cavo stesso alla massima risoluzione PRIMA di inserire il cavo nella sede
definitiva.
I seguenti passi si riferiscono all’installazione con dispositivi HDMI. Per installazioni con prodotti
DVI vi preghiamo di sostituire i cavi HDMI con le rispettive versioni HDMI/DVI quando necessario.
1. Collegate la vostra sorgente HDMI al Trasmettitore dell’Extender HDMI utilizzando un cavo
HDMI (lunghezza massima 5m).
2. Collegate un capo del cavo CAT5e/6 (lunghezza massima 100m) alla porta CAT5e/6 del
Trasmettitore e l’altro capo alla porta CAT5e/6 del Ricevitore. Utilizzate cavi solid core almeno
Cat.5e UTP.
3. Utilizzate un altro cavo HDMI (lunghezza massima 5m) per connettere la porta HDMI dell’unità
ricevente allo schermo.
4. Per la ripetizione di segnali IR collegate i cavi IR inclusi al Trasmettitore e al Ricevitore facendo
corrispondere le indicazioni riportate sulle etichette fissate ai cavi alla corrispondenti porte
sulle unità dell’extender.
5. Posizionate l’occhio IR trasmittente di fronte alla porta IR del dispositivo che volete controllare
e assicuratevi di posizionare l’occhio IR ricevente in un punto dove possa facilmente captare
il segnale del vostro telecomando.
6. Accendete la vostra sorgente HDMI e il Display per completare l’installazione.
7. Collegate l’alimentatore DC al Trasmettitore o al Ricevitore (il LED Power/Video si illuminerà
in rosso su entrambe le unità).
8. Dopo 2-3 secondi verrà completata la negoziazione EDID e il LED Power/Video si illuminerà
in Blu su entrambe le unità. A questo punto l’installazione sarà completa.
Soluzione Problemi
Non compare nessun segnale video.
▪Controllate che il connettore dell’alimentatore sia inserito correttamente.
▪Controllate che il cavo Cat.5e/6 sia inserito correttamente e che il LED Power/Video sia
acceso in Blu
▪Controllate che la sorgente HDMI ed il monitor siano entrambi accesi ed attivi.
▪Spegnete tutti i dispositivi e riaccendeteli nel seguente ordine: prima il trasmettitore, quindi il
monitor e infine la sorgente.
▪Per molti dispositivi HDMI può essere necessario scollegare e ricollegare i cavi HDMI per
riavviare il riconoscimento HDMI.
▪Ridurre la lunghezza del cavo Cat.5e/6 o HDMI oppure utilizzarne uno di qualità superiore
Fate riferimento all’ Introduzione per controllare le combinazioni distanza/risoluzione/tipo di
cavo idonea alla vostra installazione.
▪Provate a connettere l’alimentatore sul modulo opposto.

Radio Frequency Energy, Certifications, Recycling Information
CE Certification
This equipment complies with the requirements relating to Electromagnetic Compatibility
Standards.
It has been manufactured under the scope of RoHS compliance.
CE Konformitätserklärung
Dieses Produkt entspricht den einschlägigen EMV Richtlinien der EU für IT-Equipment und darf
nur zusammen mit abgeschirmten Kabeln verwendet werden.
Diese Geräte wurden unter Berücksichtigung der RoHS Vorgaben hergestellt.
Die formelle Konformitätserklärung können wir Ihnen auf Anforderung zur Verfügung stellen
FCC Certification
This equipment has been tested and found to comply with the limits pursuant to part 15 of the
FCC Rules. These limits are designed to provide reasonable protection against harmful
interference in a residential installation.
You are cautioned that changes or modification not expressly approved by the party responsible
for compliance could void your authority to operate the equipment.
Operation is subject to the following two conditions:
1.This device may not cause harmful interference, and
2. This device must accept any interference received, including interference that may cause
undesired operation.
LINDY Herstellergarantie –Hinweis für Kunden in Deutschland
LINDY gewährt für dieses Produkt über die gesetzliche Regelung in Deutschland hinaus eine
zweijährige Herstellergarantie ab Kaufdatum. Die detaillierten Bedingungen dieser Garantie
finden Sie auf der LINDY Website aufgelistet bei den AGBs.
Hersteller / Manufacturer (EU):.
LINDY-Elektronik GmbH LINDY Electronics Ltd
Markircher Str. 20 Sadler Forster Way
68229 Mannheim Stockton-on-Tees, TS17 9JY
GERMANY United Kingdom
Email: info@lindy.com , T: +49 (0)621 470050 postmaster@lindy.co.uk , T: +44 (0)1642 754000

Radio Frequency Energy, Certifications, Recycling Information
WEEE (Waste of Electrical and Electronic Equipment),
Recycling of Electronic Products
Europe, United Kingdom
In 2006 the European Union introduced regulations (WEEE) for the collection and recycling of all
waste electrical and electronic equipment. It is no longer allowable to simply throw away electrical
and electronic equipment. Instead, these products must enter the recycling process.
Each individual EU member state has implemented the WEEE regulations into national law in
slightly different ways. Please follow your national law when you want to dispose of any electrical
or electronic products. More details can be obtained from your national WEEE recycling agency.
Germany / Deutschland Rücknahme Elektroschrott und Batterie-Entsorgung
Die Europäische Union hat mit der WEEE Direktive Regelungen für die Verschrottung und das
Recycling von Elektro- und Elektronikprodukten geschaffen. Diese wurden im Elektro- und
Elektronikgerätegesetz –ElektroG in deutsches Recht umgesetzt. Das Entsorgen von Elektro-
und Elektronikgeräten über die Hausmülltonne ist verboten! Diese Geräte müssen den Sammel-
und Rückgabesystemen zugeführt werden! Dort werden sie kostenlos entgegen genommen. Die
Kosten für den weiteren Recyclingprozess übernehmen die Gerätehersteller.
LINDY bietet deutschen Endverbrauchern ein kostenloses Rücknahmesystem an, beachten Sie
bitte, dass Batterien und Akkus den Produkten vor der Rückgabe an das Rücknahmesystem
entnommen werden müssen und über die Sammel- und Rückgabesysteme für Batterien separat
entsorgt werden müssen. Ausführliche Informationen zu diesen Themen finden Sie stets aktuell
auf der LINDY Webseite im Fußbereich.
France
En 2006, l'union Européenne a introduit la nouvelle réglementation (DEEE) pour le recyclage
de tout équipement électrique et électronique.
Chaque Etat membre de l’ Union Européenne a mis en application la nouvelle réglementation
DEEE de manières légèrement différentes. Veuillez suivre le décret d’application
correspondant à l’élimination des déchets électriques ou électroniques de votre pays.
Italy
Nel 2006 l’unione europea ha introdotto regolamentazioni (WEEE) per la raccolta e il riciclo di
apparecchi elettrici ed elettronici. Non è più consentito semplicemente gettare queste
apparecchiature, devono essere riciclate. Ogni stato membro dell’ EU ha tramutato le direttive
WEEE in leggi statali in varie misure. Fare riferimento alle leggi del proprio Stato quando si
dispone di un apparecchio elettrico o elettronico.
Per ulteriori dettagli fare riferimento alla direttiva WEEE sul riciclaggio del proprio Stato.
No. 38009
4th Edition, July 2018
lindy.com
Tested to Comply with
FCC Standards
For Home and Office Use!
Table of contents
Languages:
Other Lindy Extender manuals