Lindy RS232 User manual

© LINDY ELECTRONICS LIMITED & LINDY-ELEKTRONIK GMBH - SECOND EDITION (February 2016)
USB RS232 Extender Cat.5, 2000m
User Manual English
Benutzerhandbuch Deutsch
Manuel Utilisateur Français
Manuale d’uso Italiano
No. 32155
www.lindy.com
Tested to Comply with
FCC Standards
For Home and Office Use!


User Manual English
Introduction
Thank you for purchasing the LINDY USB to RS232 Cat.5 Extender, 2000m. This device will extend your
RS232 devices up to a distance of 2000m using a single Cat.5 (or higher) cable. It features 2.5kV isolation
to ensure that sensitive controls and devices won´t be damaged. It provides full-duplexremote access and
control of any RS232 protocol device. The Extender consists of a local Transmitter and remote Receiver
unit that are connected by network cable (not included) providing you with a tremendous amount of
flexibility in your installation.
Package Contents
•LINDY RS232 Extender; Transmitter & Receiver Units
•USB Type A to Type B Cable
•Multi-Country Power Supply 5V DC ~1A with DC connector 5.5mm/2.1mm
•Driver CD
•8 assembly screws
•This manual
Features
•Extends RS232 signals up to 2000m via Cat.5 (or higher)
•Supports full duplex transmission
•Supports data transfer rates up to 921.6kbps (up to 700m), 230kbps (up to 1700m) and 115kbps
(up to 2000m)
•Supports +/- 15kV (air) and +/- 8kV (contact) ESD protection
•Supports 40A (5/50ns) & Peak Pulse Power 250W (8/20µs) surge and transient spikes protection
•2.5kV isolation
•LEDs for Power/Transmit/Receive
•Supported OS: Windows XP/Vista/7/8/8.1/10, Windows Server OS 2003/2008/2008R2, Mac OS
8.6 or higher, Linux 1.5.0 or higher
•Aluminium housing, wall mountable
Specification
Art. No. 32155 DB-9M Pin Assignment
Chip FTDI
Unit Category Transmitter Receiver Pin No. Definition
Connector
Host USB Type B Female x 1
Output RJ-45 Female x 2 RXD
Input x RJ-45 Female 3 TXD
Device x DB-9 Male 4 DTR
Interconnection Cable Standard Cat.5 / 5e / 6 5 GND
LED 3 ( TX / RX / PWR ) 3 ( TX / RX / PWR ) 6 DSR
Power Mode Bus powered DC5V 7 RTS
Operating/Storage Temp. -40 to 85°C (-40 to 185°F) 8 CTS
Housing Aluminum 9
Dimension ( L x W x H ) 90 x 73 x 31mm 90 x 73 x 31mm

User Manual English
Installation
If you have internet connectivity then drivers will be installed automatically when you connect the USB
RS232 Extender.
Connect the Transmitter unit to the host computer via USB and the Transmitter to the Receiver with Cat.5
(or higher) cable up to a maximum length of 2000m. The power LEDs will light up on both the Transmitter
and Receiver
Windows 7 / 8 / 8.1 / 10 or later
1. “Installing device driver software“ will pop up from the
taskbar. Click to show the status.
2. The program will search via Windows Update:
3. When the applicable driver is detected,
the device driver software will be
installed automatically.
4. When the USB Serial Port is installed, please close the window.

User Manual English
Drivers can also be installed through the
FTDI driver package of the enclosed CD.
Double-click “CDM v2.12xxx WHQL Certified Windows OS_x86.x64.exe”
Then extract the drivers and click “next” to continue. Accept the license agreement, then the device driver
installation wizard will detect the operating system of your computer and install the corresponding driver
automatically.
When the device driver installation is completed, please click “finish” to exit.
If you have any
difficulties with the drivers provided on CD, you may download the updated or
appropriate versions from FTDI Web site www.ftdichip.com/Drivers/VCP.htm, supported device
“FT232BL(M)”.
USB to Serial Application Operation
The application program “USB_RS232_AP.exe” supports Windows XP SP3 / Vista / 7 / 8 / 8.1 / 10 or
higher only.
Installation:
Make sure the device drivers are installed, then double-click the “USB_RS232_AP.exe” for installation.
The USB to Serial application program will detect all serial devices connected to the PC. Click “detect”,
then it will show the device´s COM ports automatically.

User Manual English
Note: Some host computers with built-in USB 3.0 hub may not detect USB Serial devices. Please connect
to a USB 2.0 port then.
Windows XP
1. Installing via the New Hardware Wizard
If a device of the same type has been installed on your machine before and the drivers that are about to
be installed are different from those installed already, the original drivers need to be uninstalled. Please
refer to the Uninstalling instruction below.
Either copy the Windows XP drivers form the enclosed CD or download the latest available drivers from
the FTDI web site from FTDI website www.ftdichip.com/Drivers/VCP.htm, supported device
“FT232BL(M)”. Unzip them to a location on your PC.
If you are running Windows XP or Windows XP SP 1, temporarily disconnect your PC from the Internet.
This can be done by either removing the network cable from your PC or by disabling your network card
by going to the "Control Panel\Network and Dial Up Connections", right clicking on the appropriate
connection and selecting "Disable" from the menu. The connection can be re-enabled after the
installation is complete. This is not necessary under Windows XP SP 2 if configured to ask before
connecting to Windows Update. Windows XP SP 2 can have the settings for Windows Update changed
through "Control Panel\System" then select the "Hardware" tab and click "Windows Update".
Connect the device to a spare USB port on your PC. The Microsoft composite device driver is
automatically loaded in the background. Once the composite driver has been installed, Windows Found
New Hardware Wizard will launch. If there is no available Internet connection or Windows XP SP 2 is
configured to ask before connecting to Windows Update, this screen is displayed:

User Manual English
Select "No, not this time" from the options
available and then click "Next" to proceed with the
installation. If there is an available Internet
connection, Windows XP will connect to the
Windows Update website and install any suitable
driver it finds for the device in preference to the
driver manually selected.
Select "Install from a list or specific location
(Advanced)" and then click "Next".
Select "Search for the best driver in these
locations" and Browse the folder where the CDM
driver has been stored and continue with “Next”.
Once the file path has been entered in the box,
click next to proceed.

User Manual English
If Windows XP is configured to warn when
unsigned (non-WHQL certified) drivers are about
to be installed, this message dialogue will be
displayed unless installing a Microsoft WHQL
certified driver. Click on "Continue Anyway" to
continue with the installation. If Windows XP is
configured to ignore file signature warnings, no
message will appear.
This screen will be displayed as Windows XP
copies the required driver files:
Windows should then display a message indicating that the installation was successful. Click "Finish" to
complete the installation.
Open the Device Manager (located in "Control
Panel\System" then select the "Hardware" tab and
click "Device Manger" and select "View > Devices
by Connection", the device appears as a "USB
Serial Converter" with an additional COM port with
the label "USB Serial Port":

User Manual English
2. Installing Using DPInst
In the case of a Microsoft WHQL certified driver package, it is possible to preinstall the driver package using
the Microsoft Driver Install Frameworks (DIFx) tools. The simplest tool provided is the Driver Package
Installer (DPInst). When placed in the same directory as the INF files for the driver package, simply run
DPInst.exe and the certified driver package will be installed on the machine.
The current driver package supports 32bit and 64bit systems through common INF files. DPInst has
separate executables for 32bit and 64bit installation. This means that if a single solution is desired for 32bit
and 64bit systems, the developer must be able to detect which version of DPInst is required for the system
the driver is being installed on.
3. Installing From Windows Update
If a certified driver is available for the target operating system, it is possible to install the driver from the
Windows Update website.
Directions to install the driver from Windows Update are very similar to those outlined above (in “Installing
via the New Hardware Wizard”) except that the “Yes, this time only” or “Yes, now and every time I connect
a device” option should be selected on the first screen of the wizard when asked if Windows Update
should be checked for a driver. If the wizard finds a matching driver on Windows Update, the driver will
be automatically downloaded and installed for the device.
Uninstalling Instruction
Devices can be removed using the Device Manager by simply right clicking on the device and selecting
"Uninstall". This will delete the associated registry entries for that device only.
Under Windows XP, driver files and OEM INF and PNF files must be removed manually or by using a
custom application.OEMINF and PNFfiles arelocated intheWindows\Inf directory andcan be identified
by searching for a VID and PID string matching the device installed e.g. VID_0403&PID_6001. Once the
matching OEM INF files are found (e.g. oem10.inf for FTDIBUS.INF and oem11.inf for FTDIPORT.INF),
the corresponding PNF files must also be removed (e.g. oem10.pnf and oem11.pnf). Driver files are
located in the Windows\System32 and Windows\System32\Drivers directories.
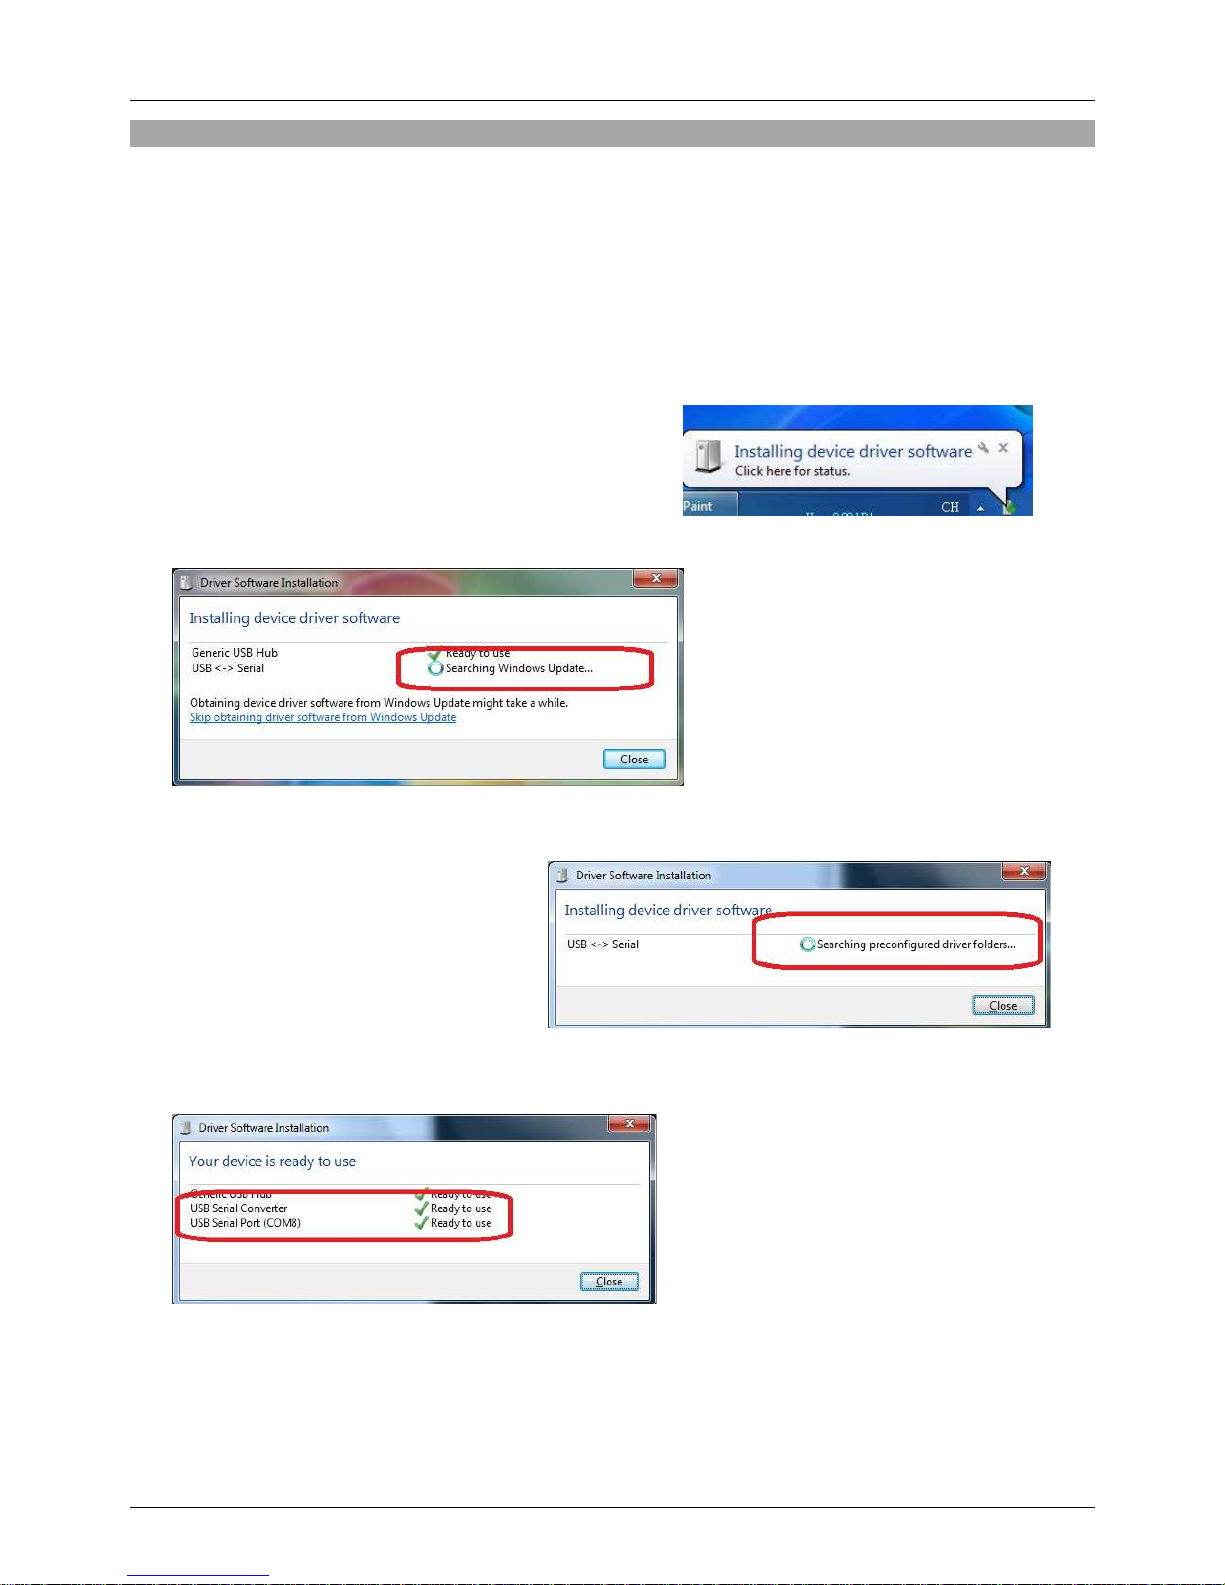
Windows Vista
Connect the device to a spare USB port on your PC. If there is an available Internet connection, Windows
VISTA will automatically connect to the Windows Update website and install any suitable driver it finds for
the device in preference to the driver manually selected. If no suitable driver is automatically found then
this procedure should be followed:

User Manual English
A screen will appear which informs you, that new hardware was found. Select “Locate and install driver
software (recommended)” When you are asked to insert the disk, either insert the Driver CD or (if you
have downloaded the CDM drivers before) select “I don´t have the disc”. Show me other options”. Then
“Check for a solution” and “Browse for driver software on your computer”. Browse the folder where the
CDM driver has been stored and continue with “Next”. The driver will then be installed. It is important then
to determine which COM port has been assigned to the device for configuring the application that will use
the device.
Open the Device Manager (located in "Control Panel\System" then select the "Hardware" tab and click
"Device Manager") and select "View > Devices by Connection", the device appears as a" USB Serial
Converter" with an additional COM port with the label "USB Serial Port".
This screen shows the
device connected to
COM3.
If you have any
difficulties with the drivers, you may download the updated or appropriate versions from
FTDI Web site www.ftdichip.com/Drivers/VCP.htm, supported device “FT232BL(M)”.
Uninstalling Instruction
With the release of Microsoft Windows Vista, the FTDI uninstaller has been rendered unusable due to
Windows Resource Protection preventing the executable from deleting driver files and associated
registry values. Vista will only allow the system itself to modify files and registry values in these locations.
Consequently, a new method for uninstalling is required. Devices can be removed using the Device
Manager by simply right clicking on the mouse and selecting "Uninstall". This will delete the associated
registry entries for that device only. Vista provides an automatic method to delete driver files via a check
box to "Delete the driver software for this device" on the uninstall dialog box.

User Manual English
Windows XP and Server 2003 do not have this check box, so driver files and OEM INF and PNF
files must be removed manually or by using a custom application.
MAC OS X Installation Guide
Download the driver from the
enclosed CD or from the
VCP Drivers section of the
FTDI web site and save it to the
hard disk. The driver is now
available in disk image (.dmg)
format. Run the installer by double
clicking on the
FTDIUSBSerialDriver.dmg icon.
Click Continue to proceed with the installation and follow the instructions on screen. When the
installation is complete, reboot the computer.
When the computer has rebooted, plug in the device. If the device is installed properly, you will see
entries in the /dev directory:
/dev/cu.usbserial-xxxxxxxx
/dev/tty.usbserial-xxxxxxxx
“xxxxxxxx” is either the device's serial number or, for unserialized devices, a location string that depends
on which USB port your device is connected to. The Terminal application can be launched by selecting
Go > Applications > Utilities > Terminal. Type the following lines in the Terminal window to produce the
file list:

User Manual English
cd /dev
ls-l
If you run the application System
Preferences and select Network (Go >
Applications > System Preferences >
Network), you should see the text "New
Port Detected".
Click OK and select Network Port
Configurations from the list. The new port can
be enabled from this screen by checking the on
box and clicking Apply Now.
At this point, it is possible to exit the
network and use the device as a COM port.
If you wish to set the device up as a
modem for an Internet connection, select
the new port from the shown list to display
the window.

User Manual English
Entries for this screen are specific to the Internet account for each user. If you do not know the required
details, contact your Internet service provider.
Uninstalling instruction
To remove the drivers from Mac OS X, the user must be
logged on as root. Root is a reserved username that has
the privileges required to access all files.
Start a Terminal session (Go > Applications > Utilities >
Terminal) and enter the following commands at the
command prompt:
cd /System/Library/Extensions
rm -r FTDIUSBSerialDriver.kext
cd /Library/Receipts
rm -r FTDIUSBSerialDriver.kext
The driver will then be removed from the system.
To remove the port from the system, run the application
System Preferences and select Network. Select Network
Port Configurations. Select the uninstalled port and click
Delete. Confirm the deletion to remove the port.

Handbuch Deutsch
Einführung
Vielen Dank dass Sie sich für den Kauf dieses LINDY USB RS232 Cat.5 Extenders entschieden haben.
Mit diesem Extender können Sie für Ihre RS232-Geräte mithilfe eines Cat.5-Kabels (oder höher) Distanzen
bis zu 2000m überbrücken. Die Isolationsspannung von 2,5kV sorgt dafür, dass sensible Steuerungen
und Geräte bei großen Entfernungen nicht beschädigt werden. Er unterstützt Voll-Duplexübertragung und
steuert beliebige RS232-Geräte. Der Extender besteht aus einer Sende- und Empfangseinheit, die durch
ein Netzwerkkabel (nicht im Lieferumfang enthalten) verbunden sind und Ihnen somit große Flexibilität bei
der Installation bieten.
Lieferumfang
•LINDY RS232 Extender; Sende- und Empfangseinheit (Transmitter & Receiver)
•USB Typ A / B - Kabel
•Treiber-CD
•8 Montageschrauben
•Dieses Handbuch
Eigenschaften
•Überbrückt Distanzen von RS232-Geräten bis 2000m
•Unterstützt Voll-Duplexübertragung
•Unterstützt Datenraten bis 921,6kbit/s (bis 700m), 230kbit/s (bis 1700m) und 115kbit/s (bis 2000m)
•+/-15kV (Luft) & +/- 8kV (Kontakt) ESD-Schutz
•40A (5/50ns) & Impulsspitzenleistung 250W (8/20µs) Schutz vor Spannungsspitzen
•Isolationsspannung: 2,5kV
•LEDs für Stromversorgung/Transmitter/Receiver
•Unterstützte Betriebssysteme: Windows XP/Vista/7/8/8.1 /10, Server OS 2003/2008/2008R2, ab
Mac OS 8.6
•Betriebs-/Lagertemperatur: -40°C - 85°C
•Aluminiumgehäuse, zur Wandmontage geeignet
Spezifikationen
No. 32155 DB-9M Pinbelegung
Chip FTDI
Transmitter Receiver Pin No. Definition
Anschluss
Host USB Type B Buchse x 1
Ausgang RJ-45 Buchse x 2 RXD
Eingang x RJ-45 Buchse 3 TXD
Device x DB-9 Stecker 4 DTR
Verbindungskabel Standard Cat.5 / 5e / 6 5 GND
LED 3 ( TX / RX / PWR ) 3 ( TX / RX / PWR ) 6 DSR
Power Mode Bus powered DC5V 7 RTS
Betriebs-/Lagertemperatur -40 bis 85°C (-40 bis 185°F) 8 CTS
Abmessung ( L x W x H ) 90 x 73 x 31mm 90 x 73 x 31mm 9

Handbuch Deutsch
Installation
Die Installation der Treiber erfolgt bei Anschluss des USB RS232 Extenders automatisch, sofern Sie über
eine Internetanbindung verfügen.
Schließen Sie den Transmitter/Sender mit beiliegendem USB-Kabel am Host Computer an. Transmitter
und Receiver/Empfänger verbinden Sie dann mit einem maximal 2000m langem Cat.5 (oder höher) Kabel.
Die LEDs für die Stromversorgung (PWR) leuchten dann auf Sender und Empfänger auf.
Windows 7 / 8 / 8.1 / 10 oder höher
1. In der Taskleiste erscheint die Meldung, dass die
Gerätetreibersoftware installiert wird. Klicken Sie
darauf, um den Status anzuzeigen.
2. Das Programm sucht dann über Windows Update:
3. Wenn der entsprechende Treiber
gefunden ist wird er automatisch
installiert.
4. Nach erfolgter Installation des USB
Serial Ports schließen Sie bitte das
Fenster.

Handbuch Deutsch
Die Treiber können auch mittels des FTDI
Treiberpakets auf beiliegender CD
installiert werden. Öffnen Sie dazu mit
einem Doppelklick die “CDM v2.12xxx
WHQL Certified Windows
OS_x86.x64.exe”
Extrahieren Sie die Treiber, klicken Sie auf “Weiter” und akzeptieren Sie die Lizenzvereinbarung. Der für
Ihr Betriebssystem geeignete Treiber wird dann automatisch installiert.
Sollten Sie Probleme mit den Treibern auf beiliegender CD haben, gehen Sie bitte auf die
FTDI Website
und laden die aktuellsten Teriber herunter: www.ftdichip.com/Drivers/VCP.htm (supported device
“FT232BL(M)”).
Anwendungsprogramm USB-Seriell
Das Anwendungsprogramm “USB_RS232_AP.exe” unterstützt nur Windows XP SP3 / Vista / 7 / 8 / 8.1 /
10 (oder höher).
Installation: Vergewissern Sie sich, dass die Gerätetreiber installiert sind. Dann führen Sie mit einem
Doppelklick auf “USB_RS232_AP.exe” die Installation aus.
Das Anwendungsprogramm wird angeschlossene, serielle Geräte erkennen. Sie können sich die
entsprechenden COM-Ports dann anzeigen lassen.
Beachten Sie bitte, dass einige Host Computer mit integriertem USB 3.0 Hub USB-Serielle Geräte
möglicherweise nicht erkennen. Schließen Sie den Extender dann bitte an einen USB 2.0 Port an.
Windows XP
1. Installation mit dem Hardware-Assistenten
War bereits einmal ein ähnliches Gerät an Ihrem Computer angeschlossen, deinstallieren Sie bitte
zunächst dessen Treiber (siehe auch unten Hinweise zur Deinstallation), bevor Sie die Treiber dieses
LINDY Extenders installieren.

Handbuch Deutsch
Laden Sie entweder die Windows XP-Treiber von beiliegender CD herunter oder suchen Sie die
aktuellsten Treiber auf der FTDI Website www.ftdichip.com/Drivers/VCP.htm (supported device
“FT232BL(M)”).
Wenn Sie Windows XP oder Windows XP SP 1 auf Ihrem Computer installiert haben, unterbrechen Sie
bitte kurzzeitig Ihre Internetverbindung. EntfernenSie dazu entweder dasNetzwerkkabel oder deaktivieren
Sie die Netzwerkkarte indem Sie in der Systemsteuerung auf "Netzwerk- und Internetverbindungen"
gehen, einen Rechtsklick auf die entsprechende Verbindung durchführen und "Deaktivieren" auswählen.
Nach erfolgter Installation kann die Internetverbindung wieder eingerichtet werden. UnterWindows XP SP
2 ist dieses Prozedere nicht erforderlich, wenn es so konfiguriert ist, dass gefragt wird, bevor eine
Verbindung zu Windows Update hergestellt wird. In Windows XP SP 2 kann die Einstellung für Windows
Update in der Systemsteuerung unter "Hardware" und einen Klick auf "Windows Update" erfolgen.
Verbinden Sie das Gerät mit einem freien USB-Port Ihres Computers. Im Hintergrund wird automatisch
der Microsoft Gerätetreiber geladen. Anschließend erscheint die Meldung, dass neue Hardware gefunden
wurde. Wenn keine Verbindung mit dem Internet besteht oder Windows XP SP 2 so konfiguriert ist, dass
es fragt, bevor eine Verbindung zu Windows Update hergestellt wird, erscheint dieser Bildschirm:
Sie werden gefragt, ob ein Windows Update
durchgeführt werden soll. Beantworten Sie
das bitte mit „Nein“ und klicken Sie auf
„Weiter“ um mit der Installation fortzufahren.
Bei vorhandener Internetverbindung
wird Windows XP eine Verbindung zur
Windows Update Website herstellen und
einen geeigneten Treiber installieren
(vorrangig zum manuell ausgewählten Treiber).
Wählen Sie einen Treiber aus einer Liste aus.

Handbuch Deutsch
Suchen Sie nach dem CDM-Treiber, den Sie von
der CD heruntergeladen haben (geben Sie den
Pfad ein).
Je nach Konfiguration von Windows XP ist es möglich dass ein Warnhinweis erscheint, wenn Treiber
installiert werden sollen, die nicht WHQL-zertifiziert sind. Bitte fahren Sie dann dennoch mit der Installation
fort.
Nach erfolgter Installation finden Sie im
Gerätemanager einen "USB Serial Converter"
mit einem COM-Port ("USB Serial Port").
2. Installation mit “DPInstaller”
Bei Microsoft WHQL-zertifizierten Treibern ist es möglich, das Treiberpaket mit Microsoft Driver Install
Frameworks (DIFx) Tools vorzuinstallieren. Das einfachste Tool ist der Driver Package Installer (DPInst).
Wenn er sich im selben Verzeichnis befindet wie die INF-Dateien für das Treiberpaket, starten Sie einfach
die DPInst.exe und die zertifizierten Treiber werden installiert.
Das aktuelle Treiberpaket unterstützt 32bit- und 64bit-Systeme mit den INF-Dateien. DPInst hat
verschiedene ausführbare Dateien für 32bit- und 64bit-Installation. Wenn also eine einheitliche Lösung für
32bit- und 64bit-Systeme gewünscht wird, muss herausgefunden werden, welche Version des DPInst für
das System, auf dem der Treiber installiert wird, erforderlich ist.
3. Installation über Windows Update
Zertifizierte Treiber können über das Windows Update installiert werden. Die Vorgehensweise ist dabei
ähnlich wie unter Punkt 1 ( “Installation mit dem Hardware-Assistenten” ), allerdings beantworten Sie nun
die Frage, ob ein Windows Update durchgeführt werden soll, mit “Ja”. Wenn der Assistant einen
passenden Treiber auf der Windows Update Website findet, wird dieser automatisch installiert.

Handbuch Deutsch
Deinstallation
Geräte können einfach entfernt werden, indem sie mit der rechten Maustaste auf das Gerät und dann
auf “Deinstallieren” klicken. Dadurch wird der Registry-Eintrag des entprechenden Geräts entfernt.
Unter Windows XP müssen Treiber und OEM INF/PNF-Dateien manuell oder mit einer
benutzerdefinierten Anwendung entfernt werden. OEM INF- und PNF-Dateien befinden sich im
Windows\Inf-Verzeichnis. Sie finden diese durch eine Suche nach VID- und PID- Hersteller-IDs für das
installierte Gerät (z.B. VID_0403&PID_6001). Wenn man die entsprechenden OEM INF-Dateien
gefunden hat (z.B. oem10.inf für FTDIBUS.INF und oem11.inf für FTDIPORT.INF), müssen die
zugehörigen PNF Dateien entfernt werden (z.B. oem10.pnf und oem11.pnf). Treiberdateien befinden
sich im Verzeichnis Windows\System32 und Windows\System32\Drivers.
Windows Vista
Schließen Sie den Extender an einem freien USB Port Ihres Computers an. Bei vorhandener
Internetverbindung wird Windows Vista automatisch über Windows Update passende Treiber installieren.
Wenn auf diese Weise kein Treiber gefunden wird, gehen Sie bitte wie folgt vor:
Wenn die Meldung auf dem Bildschirm erscheint, dass neue Hardware gefunden wurde, wählen Sie
“Treibersoftware suchen und installieren (empfohlen)”. Legen Sie dann die Treiber-CD ein oder (wenn Sie
die Treiber bereits vorab heruntergeladen haben) wählen Sie “Der Datenträger ist nicht verfügbar”.
Suchen Sie dann nach Treibersoftware auf dem Computer in dem Ordner, wo sich der CDM-Treiber
befindet. Installieren Sie den Treiber und legen Sie fest, welcher COM-Port dem Device zugordnet ist um
die Anwendung zu konfigurieren.
Öffnen Sie den Gerätemanager in der Systemsteuerung, dort sehen Sie einen "USB Serial Converter" mit
einem COM-Port ("USB Serial Port").
Hier ist das Device z.B. mit
COM3 verbunden.

Handbuch Deutsch
Sollten Sie Probleme mit den Treibern auf beiliegender CD haben, gehen Sie bitte auf die
FTDI Website
und laden die aktuellsten Teriber herunter: www.ftdichip.com/Drivers/VCP.htm (supported device
“FT232BL(M)”).
Deinstallation
Seit der Freigabe von Windows Vista kann das FTDI-Deinstallationsprogramm nicht mehr verwendet
werden. Geräte können nun im Gerätemanger entfernt werden indem Sie mit der rechten Maustaste
darauf klicken und „Deinstallieren“ wählen. Dadurch werden die dazugehörigen Registrierungseinträge
dieses Geräts entfernt. Vista bietet die Möglichkeit mit einer Checkbox Treiberdateien im
entsprechenden Dialogfeld zu löschen.
Bei Windows XP und Server 2003 müssen die
Treiberdateien und OEM INF-/PNF-Dateien
dagegen manuell oder mit einer
benutzerdefineirten Anwendung entfernt werden.
MAC OS X Installation
Laden Sie die VCP_Treiber von der beiliegenden
CD oder von der FTDI Website
(www.ftdichip.com/Drivers/VCP.htm - supported
device “FT232BL(M)”) auf Ihre Festplatte
herunter. Der Treiber hat das Dateiformat “disk
image” (.dmg). Durch einen Doppelklick auf das
Icon “FTDIUSBSerialDriver.dmg“ starten Sie
das Installationsprogramm. Folgen Sie den
Bildschirmanweisungen. Wenn die Installation
beendet ist, führen Sie bitte einen Neustart
durch, danach schließen Sie den Extender an.
Bei korrekter Installation sehen Sie dann
folgende Einträge im Verzeichnis /dev:
/dev/cu.usbserial-xxxxxxxx
/dev/tty.usbserial-xxxxxxxx
Other manuals for RS232
1
Table of contents
Languages:
Other Lindy Extender manuals

Lindy
Lindy 43312 User manual

Lindy
Lindy CAT5E/6 User manual

Lindy
Lindy 38105 User manual

Lindy
Lindy 38015 User manual

Lindy
Lindy 32385 User manual

Lindy
Lindy 32681 User manual

Lindy
Lindy HDMI over Ethernet Extender User manual

Lindy
Lindy 39245 User manual

Lindy
Lindy 42801 User manual

Lindy
Lindy 38208 User manual