Lindy IPower Pro 8 User manual

© LINDY Group - FIRST EDITION (June 2018)
IPower Switch Pro 8
User Manual English
Benutzerhandbuch Deutsch
Manuel Utilisateur Français
Manuale Italiano
No. 32659
lindy.com


User Manual English
Introduction
Thank you for purchasing the IPower Switch Pro 8. This product has been designed to provide trouble free, reliable
operation. It benefits from both a LINDY 2 year warranty and free lifetime technical support. To ensure correct use,
please read this manual carefully and retain it for future reference.
This IPower Switch Pro 8 is an advanced power management solution which connects to your existing network
infrastructure to provide convenient remote control power management and monitoring of equipment. System
administrators can control the power to multiple servers, workstations, hubs, switches, routers etc allowing reboot
and power-on and off functions, via a simple to use browser interface.
Package Contents
IPower Switch Pro 8
Brackets and Screws for mounting
Lindy Quick Installation Guide, OpenSource Statement
Features
1. Remote management switch for up to 8 computers or other devices
2. Daily, Weekly, Monthly & Yearly Power Consumption Data
3. IPv4 and IPv6 Support
4. SSL Web Browser (Https) for set up and operation
5. Quick and easy to install
Installation
Login
Power on your PDU and connect the Ethernet cable. Press and hold the “Function” button and release the button
after 2 beeps, the “Meter” will display 4 numbers in sequence; this is the PDU’s IP address. If the PDU can’t get an
IP from the DHCP server, the IP will stay as the default - 192.168.0.216. Make sure that servers IP address is in
the same subnet as the PDU’s IP. Input IP address to your web browser and then check the PDU information.
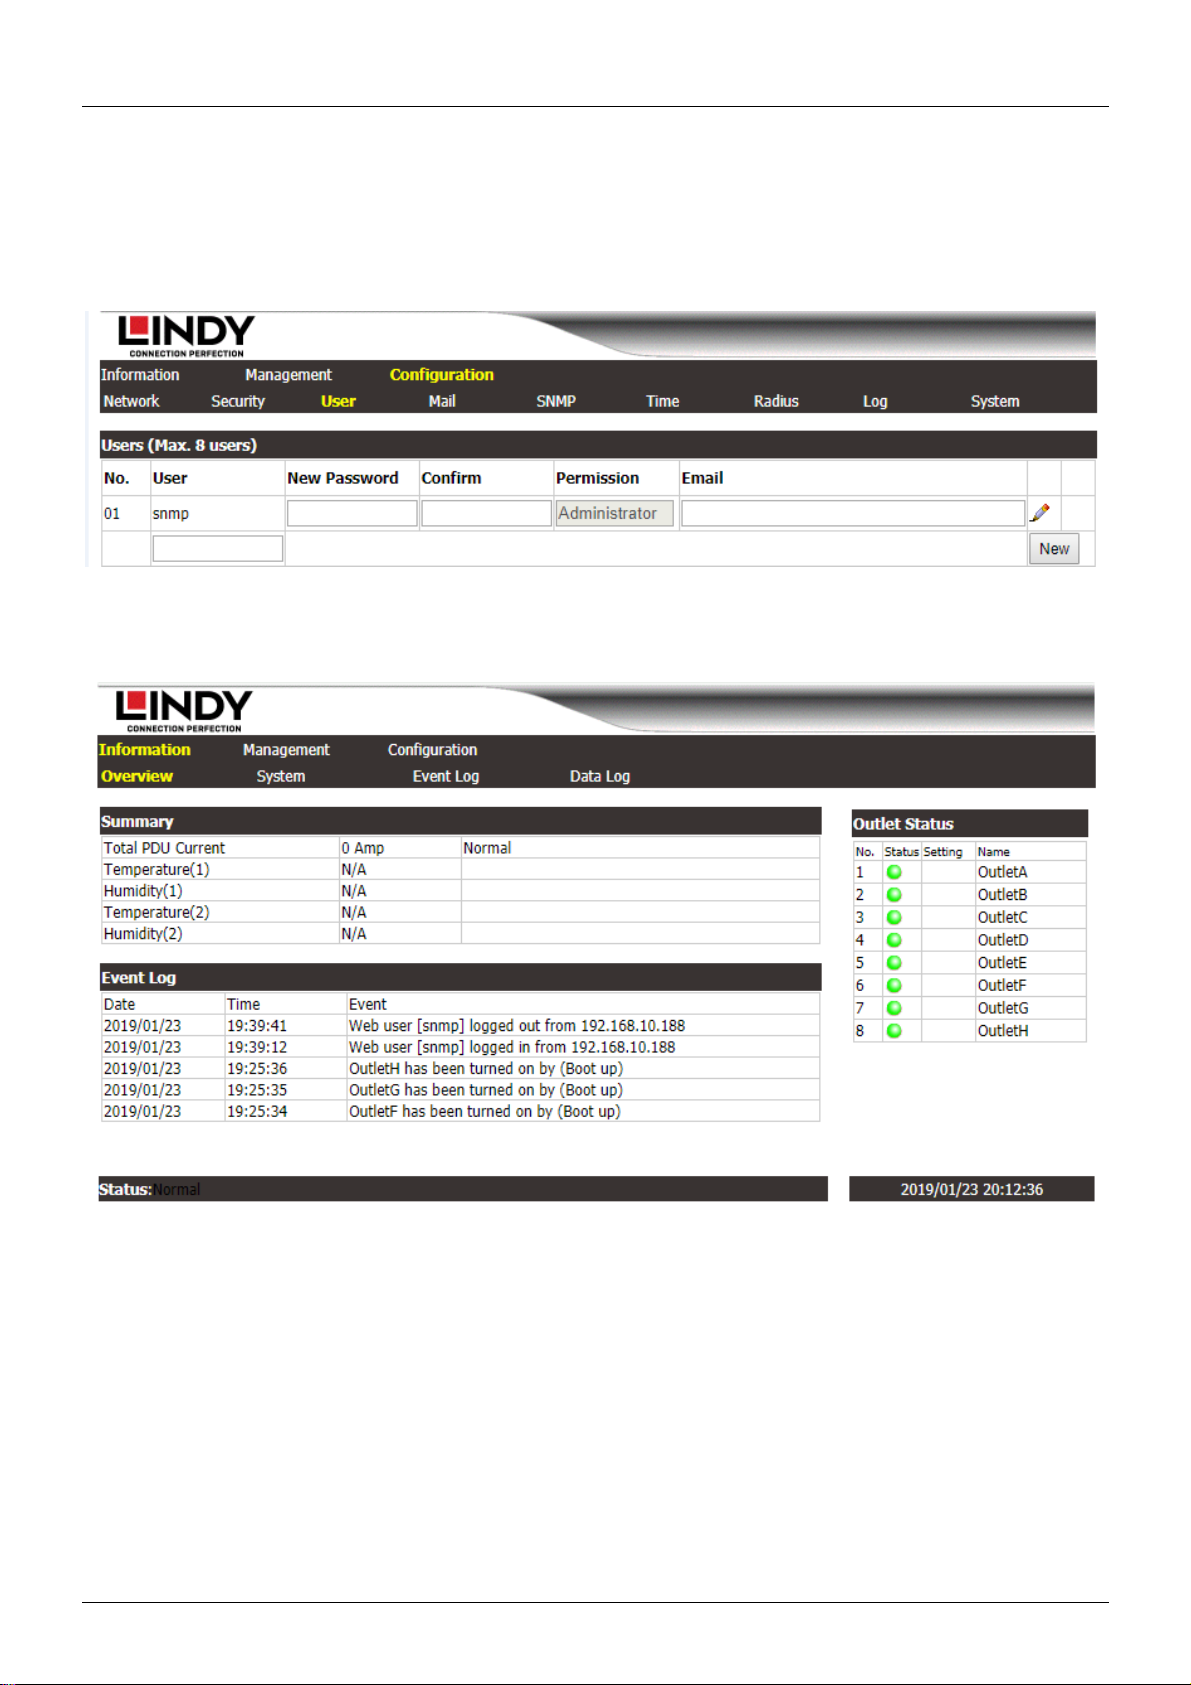
1. Default Login Name is “snmp” and default Login Password is “1234”.

User Manual English
2. You can add up to 8 user accounts.
a. Admin (Full authority, control and configuration permission). Default Login Name“snmp”, default
Login Password “1234”.
b. Power User (Monitoring PDU, control the specific outlets. No permission for configurations).
Default Login Password “password”.
c. View Only (Monitoring PDU. No permission to control or configurate the PDU)
Information - Overview
On this tab you will find a summary of all values, event logs and the outlet status.

User Manual English
Information –System
On this tab you will find all necessary information regarding system, network and SNMP.
Information –Event Log
On this tab you will find all event logs. It’s possible to log up to 5000 entries.

User Manual English
Information –Data Log
On this tab you will find all data logs. It’s possible to log up to 5000 entries.
Management –Control
This tab is for controlling a single or group outlets.
ATS Primary Input Selection: Select one of the input sources as primary (Support ATS mode only)

User Manual English
Management –Schedule
On this tab it’s possible to add and modify the schedule settings by date and time for all outlets or outlet groups.
Management –Ping Action
This tab can be used to reboot the locked device by pinging its IP.

User Manual English
Management –Event Action
This tab allows you to configure the outlet actions for current, temperature and humidity over threshold.
Receive Trap OID equal to: Users can input the private OID to trigger the specified outlet action.
Management –Device
Maximum length of characters for outlet names: 36
Maximum time for delay (on/off): 9999 seconds
After Restart:
Define the outlet action after power restart.
Last Status: After power restart, outlets remain the same power status.
ON: Turn on outlets after power restart.
OFF: Turn off outlets after power restart.
Please Note:
After the PDU is plugged into mains power, the system will start to sequentially turn on the output sockets
according to the pre-set delay time in the PDU web interface. The factory default setting for delay time is one
second for each outlet; therefore the 8 ports will take 8 seconds to complete start-up procedure.
Before the sequence procedure is completed, if a PDU is unplugged from the power source, the outlets which are
not turned on will be regarded as remaining at the power-off status. Next time the PDU is plugged into mains
power, these outlets will not be automatically turned on. These outlets can only be turned on by the web interface.
Reset Accumulated Energy: Subtotal for energy (kWh). Users can reset it to 0 and have the PDU restart
calculating.
Carbon Emission Rate: Users can check this parameter through power plant.

User Manual English
Management –Threshold
This tab is to configurate thresholds for current, temperature and humidity.

User Manual English
Configuration –Network
This tab is for IP Address configurations. The default setting for the way to get an IP address is DHCP. If the PDU
can´t get the IP from DHCP server, the IP address will stay at 192.168.0.216
The maximum length of the host name is 36 characters.
Configuration –Security
This tab is to configurate the setup for Web, SSL, SSH and Telnet. For SSH and Telnet the default user name is
“snmp” and the password is “1234”.

User Manual English
Configuration –Mail
This tab is to configure messages to pre-defined accounts when different events are occurring.
Configuration –SNMP
This tab is to configurate network management protocols. Supports SNMPv1, v2 and v3.

User Manual English

User Manual English
Configuration –Time
This tab is to configure time manually or by NTP for schedules and log records.
Configuration –Radius
The system supports the Remote Authentication Dial-in User Service protocol. (RADIUS). It provides a centralized
network protocol to enable remote authentication and authorization.

User Manual English
Configuration –Log
Export: Export events and data log in text format. Set the date to mail kWh usage information.
Syslog: Send event log to specified syslog server.
Heartbeat Trap: Send trap to the specified IP to indicate PDU is alive.
Event Log: Check the box to enable to log the specified event

User Manual English
Configuration –System
System: Export to backup system configuration. Import system configuration from backup file.
Firmware Upgrade: Update: Keep all configurations after complete firmware upgrade. Update and reset: Reset all
configuration back to default after complete firmware upgrade.
Reset System: Restart network system through web.
Temperature Scale: Switch temperature unit between Celsius and Fahrenheit.
Hardware Reset: Define reset action. The reset procedure is to press and hold the Button Definition key on the
front panel of the PDU, release it after hearing 6 beeps.

CE/FCC Statement
CE Certification
This equipment complies with the requirements relating to Electromagnetic Compatibility Standards.
It has been manufactured under the scope of RoHS compliance.
CE Konformitätserklärung
Dieses Produkt entspricht den einschlägigen EMV Richtlinien der EU für IT-Equipment und darf nur
zusammen mit abgeschirmten Kabeln verwendet werden.
Diese Geräte wurden unter Berücksichtigung der RoHS Vorgaben hergestellt.
Die formelle Konformitätserklärung können wir Ihnen auf Anforderung zur Verfügung stellen
FCC Certification
This equipment has been tested and found to comply with the limits for a Class B digital device, pursuant
to part 15 of the FCC Rules. These limits are designed to provide reasonable protection against harmful
interference in a residential installation.
You are cautioned that changes or modification not expressly approved by the party responsible for
compliance could void your authority to operate the equipment.
This device complies with part 15 of the FCC Rules.
Operation is subject to the following two conditions:
1. This device may not cause harmful interference, and
2. This device must accept any interference received, including interference that may cause undesired
operation.
LINDY Herstellergarantie –Hinweis für Kunden in Deutschland
LINDY gewährt für dieses Produkt über die gesetzliche Regelung in Deutschland hinaus eine zweijährige Hersteller-
garantie ab Kaufdatum. Die detaillierten Bedingungen dieser Garantie finden Sie auf der LINDY Website aufgelistet
bei den AGBs.
Hersteller / Manufacturer (EU):.
LINDY-Elektronik GmbH LINDY Electronics Ltd
Markircher Str. 20 Sadler Forster Way
68229 Mannheim Stockton-on-Tees, TS17 9JY
GERMANY United Kingdom
Email: info@lindy.com , T: +49 (0)621 470050 postmaster@lindy.co.uk , T: +44 (0)1642 754000

Recycling Information
WEEE (Waste of Electrical and Electronic Equipment),
Recycling of Electronic Products
Europe, United Kingdom
In 2006 the European Union introduced regulations (WEEE) for the collection and recycling of all waste electrical
and electronic equipment. It is no longer allowable to simply throw away electrical and electronic equipment. Instead,
these products must enter the recycling process.
Each individual EU member state has implemented the WEEE regulations into national law in slightly different ways.
Please follow your national law when you want to dispose of any electrical or electronic products. More details can
be obtained from your national WEEE recycling agency.
Germany / Deutschland Rücknahme Elektroschrott und Batterie-Entsorgung
Die Europäische Union hat mit derWEEE Direktive Regelungen für die Verschrottung und das Recycling von Elektro-
und Elektronikprodukten geschaffen. Diese wurden im Elektro- und Elektronikgerätegesetz –ElektroG in deutsches
Recht umgesetzt. Das Entsorgen von Elektro- und Elektronikgeräten über die Hausmülltonne ist verboten! Diese
Geräte müssen den Sammel- und Rückgabesystemen zugeführt werden! Dort werden sie kostenlos entgegen
genommen. Die Kosten für den weiteren Recyclingprozess übernehmen die Gerätehersteller.
LINDY bietet deutschen Endverbrauchern ein kostenloses Rücknahmesystem an, beachten Sie bitte, dass Batterien
und Akkus den Produkten vor der Rückgabe an das Rücknahmesystem entnommen werden müssen und über die
Sammel- und Rückgabesysteme für Batterien separat entsorgt werden müssen. Ausführliche Informationen zu
diesen Themen finden Sie stets aktuell auf der LINDY Webseite im Fußbereich.
France
En 2006, l'union Européenne a introduit la nouvelle réglementation (DEEE) pour le recyclage de tout équipement
électrique et électronique.
Chaque Etat membre de l’ Union Européenne a mis en application la nouvelle réglementation DEEE de manières
légèrement différentes. Veuillez suivre le décret d’application correspondant à l’élimination des déchets électriques
ou électroniques de votre pays.
Italy
Nel 2006 l’unione europea ha introdotto regolamentazioni (WEEE) per la raccolta e il riciclo di apparecchi elettrici ed
elettronici. Non è più consentito semplicemente gettare queste apparecchiature, devono essere riciclate. Ogni stato
membro dell’ EU ha tramutato le direttive WEEE in leggi statali in varie misure. Fare riferimento alle leggi del proprio
Stato quando si dispone di un apparecchio elettrico o elettronico.
Per ulteriori dettagli fare riferimento alla direttiva WEEE sul riciclaggio del proprio Stato.
LINDY No 32659
1st Edition, June 2018
www.lindy.com
Table of contents
Other Lindy Switch manuals

Lindy
Lindy 43091 User manual

Lindy
Lindy 38034 User manual

Lindy
Lindy 32165 User manual

Lindy
Lindy 38272 User manual

Lindy
Lindy 39322 Installation and operating instructions

Lindy
Lindy 38269 User manual

Lindy
Lindy aJ-Orion User manual

Lindy
Lindy 43199 User manual

Lindy
Lindy 38084 V2 User manual

Lindy
Lindy 25010 User manual