LineEye OP-SB7XC User manual

Instruction Manual
OP-SB7XC
Option for LE-3500XR/LE-2500XR
CAN FD/CAN/LIN Communications
Expansion Kit
《The 6th Edition 2024.01》


Instruction
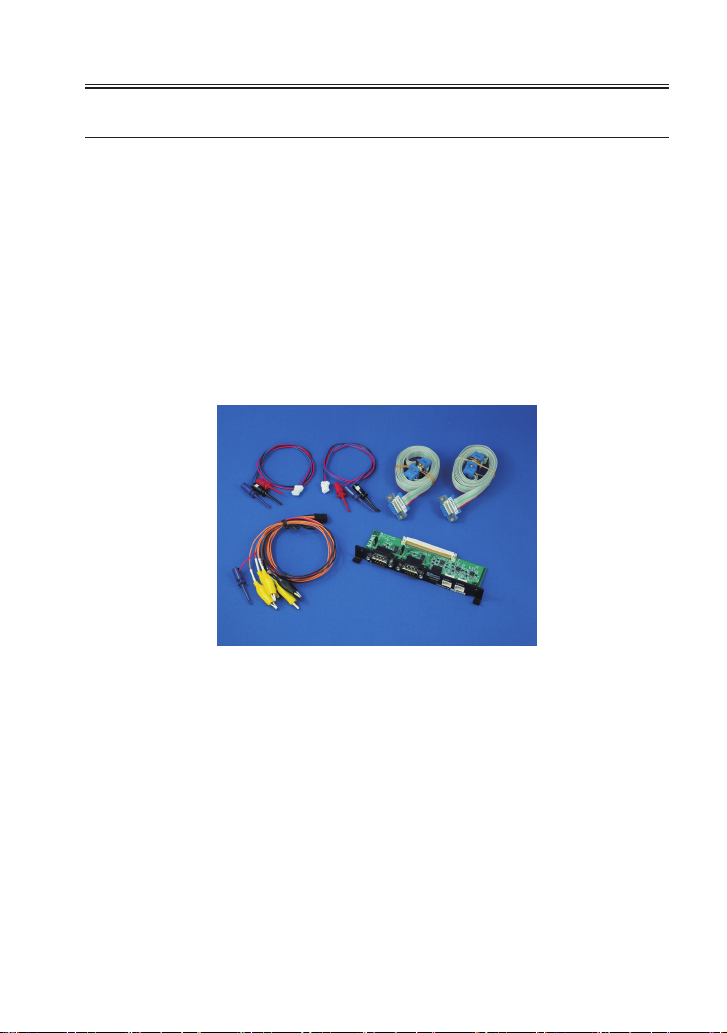
Thank you for your purchase of
OP-SB7XC
. To use it correctly, you are
advised to read and understand this instruction manual thoroughly. Keep
this together with the warranty. If you encounter any problems, you will nd
helpful information in this manual.
NOTICE
It is prohibited to reprint or duplicate any part of the whole of this instruction
manual without prior permission from LINEEYE. The content of this
instruction manual and specications of the products are subject to change
without any notice. This instruction manual has been designed and edited
with great care to give you all necessary information. If you have any
questions, feel free to direct your inquiries to LINEEYE. LINEEYE makes
no warranty or guarantee, either expressed or implied with respect to its
quality, performance, merchantability, or fitness for a particular purpose.
LINEEYE shall not be liable for direct, in-direct, special, incidental,
or consequential damages resulting from any defect in the product. The
warranty and remedies set forth above are exclusive and in lieu of all others.
USER LIMITATION
This product has been developed for the purpose of using as an
analyzer only. When you use this product with the following devices
that are required to function with a high degree of reliability, safety
and accuracy, use it under considering the safe design of the system
in order to maintain reliability and safety for that system;
*Devices that are directly related to transportation such as airplanes,
trains, cars etc.
*Devices for crime prevention and disaster privension.
*Each kind of safety devices and so on.
This product has not been developed for the use that needs exclusivey
high reliability and safety: aerospace apparatus, trunk communication
apparatus, nuclear control apparatus, medical apparatus related with
life maintenance etc. Therefore, do no use for those purposes.
2020 by LINEEYE CO.,LTD. All rights reserved.

● Do not disassemble, modify or repair the line monitor
This may result in an injury, electric shock, and ignition.
● Do not put the analyzer in re or heat them.
This may result in a injury and re due to overheating or explosion.
● Do not use the line monitor if there is inammable gas.
This may result in ignition and explosion.
● Turn o the power of analyzer and unplug the cables immediately
when emanating smoke, odor or sound.
Continuous use may result in an electric shock, injure or ignition.
● Turn o the power and unplug the line monitor immediately when
liquid or foreign substance gets into the line monitor.
Continuous use may result in ignition, electric shock and malfunction.
-1-
Read this rst !!
This Safety Information includes the following important information in
order to not only have you learn the right way to use the analyzer, but also
prevent you from causing damage to people and property. Before using,
please read the main contents after you understand the following symbols &
marks.
Warning Should the device be used without following these symbols,
there is a possibility of accidents, such as a death or a serious
injury, occurring.
Caution Should the device be used without following these symbols,
there is a possibility of accidents, such as a injury (*1), and
material damage (*2) occurring.
*1 “Injury” indicates injury, burn and electric shock, or
the like which does not require hospitalization or the
extended hospital visit.
*2 “Material damage” indicates damage related to a house, a
building, furniture, apparatus, livestock or a pet.
Prohibition The necessary
Safety Information
警告
Warning

● Do not touch the line monitor with wet hand.
This may result in an electric shock and malfunction.
● Do not give a strong impact on the product, such as dropping and
crashing.
● Do not leave the analyzer in the following conditions.
Strong magnetic eld, static electricity or dusty place.
・Temperature and humidity above the specication or where dew
condensation appears.
・Not at, or shaking place.
・Place with leaking water or electricity.
・Place aected by direct sun or near the re.
Please do not leave the analyzer in the car during the summer.
● Do not use at the following situations. The radio wave by the
analyzer may cause trouble.
・Near a medical device such as cardiac pacemaker or hearing aid.
・Near an automatic controller such as re-alarm box or automatic
door.
・Near a microwave, high-level electronics, TV, or radio.
・Near a wireless station for mobile communications or a specied low
power radio station.
-2-
警告
Caution

-3-
CONTENTS
Safety Information ......................................................................1
Chapter 1 Before Using the Product ..........................................5
1.1 Description on This Manual .......................................................5
1.2 Unpacking ...................................................................................6
1.3 Functions and Feature.................................................................7
1.4 Panel Description ........................................................................ 7
Chapter 2 Basic Operation..........................................................8
2.1 Preparation ..................................................................................8
2.2 Connect to the Target Device .....................................................9
2.3 Operation .................................................................................. 11
2.4 Line State LED ......................................................................... 12
Chapter 3 Basic Conguration .................................................13
3.1 Top Menu................................................................................... 13
3.2 Interface and Operation Mode.................................................. 14
3.3 Communication Conditions...................................................... 15
3.4 Record control and J1939.......................................................... 16
Chapter 4 Monitor Function .....................................................18
4.1 Monitor Function ...................................................................... 18
4.2 Start Monitoring ....................................................................... 18
4.3 Data Display.............................................................................. 19
4.4 Retrieval Function ....................................................................23
4.5
Text conversion and printing function of measurement data ..................... 24
Chapter 5 Simulation Function ................................................25
5.1 Simulation Function..................................................................25
5.2 Registration of the send frames ...............................................25

-4-
5.3 Sweep ........................................................................................30
5.4 Start Simulation ........................................................................ 31
Chapter 6 Trigger Function.......................................................34
6.1 Trigger Function........................................................................34
6.2 External Trigger Input/output...................................................34
6.3 Trigger Settings ........................................................................ 34
6.4 Timer/Counter Function ........................................................... 39
Chapter 7 Waveform Monitor ...................................................41
Chapter 8 Save and Load the Data...........................................43
8.1 File Management Function ....................................................... 43
8.2 Save ........................................................................................... 43
8.3 Filter Function...........................................................................44
8.4 Load le .................................................................................... 45
8.5 Delete ...................................................................................... 45
Chapter 9 Documents .............................................................46
9.1 Specications of Function and Hardware................................46
9.2 Measurement port signal denition.......................................... 47
9.3 About J1939...............................................................................48
Chapter 10 After Support and Maintenance ...........................51
10.1 How to make it back to default state ...................................... 51
10.2 Warranty and After service................................................................ 51

-5-
Chapter 1 Before Using the Product
1.1 Description on This Manual
Printed representation
■Printed representation of screen displays in the manual may not be the
same as that actually displayed concerning the font and special symbols.
■Descriptions of items of the screen are enclosed in double quotation marks
“ ”.
■Blinking of cursor is not described on the manual.
Description of the Operating Procedure
■Represent keys and items of the screen are enclosed in [ ].
e.g. Press “ ” key. -> Press [MENU].
■Successive key operations are represented by putting their symbols one
after another.
e.g. : Press [MENU], then touch [System setting].
-> [MENE],[System setting].
■Pressing two keys at the same time is represented by “+”. e.g. [A]+[B]
■Touching the screen is described as “Touch” or “Tap”.
■Touching and sliding the nger to scroll data is described as “Swipe”.
■Unnecessary explanation may be omitted.
e.g. :. Touch current selection and select other item to change.
-> Touch current selection and change it to other item.

-6-
1.2 Unpacking
When you unpack the product, make sure of the following
■The product has not been damaged during the transit. There is not
any defect on the appearance.
■You have received all the standard accessories listed below.
・Interface board 1
・DB9 Monitor cable (LE-009M2)2
・3-line Probe cable (LE-3LP)2
・8-line Probe cable (LE-8EX)1
・Instruction manual ( This book ) 1
・Customer card / Warrant 1
Please contact your LINEEYE distributors if you find any damage to the
product caused by transportation, or if there are accessories lacking.

-7-
1.4 Panel Description
Name Function
1) DSUB 9pin connector Measurement port for CAN/CAN FD
2) Header 8pin connector External input/output port
3) Header 3pin connector Measurement port for CXPI
→ 9.2 Measurement port signal denition
3)2)1)
1.3 Functions and Feature
OP-SB7XC is an interface expansion kit for LE-2500XR/LE-3500XR and
measures CAN (ISO 11898-1), CAN FD (ISO 11898-1:2015) and CXPI
(JASO D015). It helps developing communication system, inspection and
communication trouble shooting.
Function
◆ On-line Monitor Function
Monitor transmission/reception data at real time, and analyzes protocol
and communication errors etc.
◆ Simulation Function
The analyzer becomes a counterpart of the target device and tests
transmission/reception data.
Features
・Support CAN FD (ISO 11898-1:2015) at 20kbps ~5Mbps.
・Support CAN (ISO 11898 ) at 20kbps ~1Mbps.
・Support CXPI (JASO D015) at 5kbps ~20kbps.
・Record digital/analog value of 4 external inputs along with measured data.
・ Monitor only eective data by ID ltering.
・ Find specic data by powerful trigger function.

-8-
Chapter 2 Basic Operation
2.1 Preparation
<Insert the interface board >
Exchange the standard interface board to OP-SB7XC.
1) Turn o the analyzer.
2) Screw o M3 screws on the interface board of analyzer.
3) Take the board o pulling the handles of the interface
board.
4)Insert the interface expansion board (OP-SB7XC) into
the slot completely.
5)Screw it on using M3 screws.
When the analyzer is turned on the power, pre-installed rmware “OP-SB7XC” is started.
Please check the latest firmware from LINEEYE web page. To update the
firmware, download the latest firmware “opsb7xc_fw2_vxxx” and software
for transferring rmware “LE8FIRM V1.10 or later”.
→ https://www.lineeye.co.jp/index.html
→ Please refer to the manual of “software for transferring rmware” for more
details.

-9-
<For CAN/CAN FD >
Use DB9 Monitor cable for CAN/CAN FD communications.
2.2 Connect to the Target Device
It is possible to select 2 measuring channels of separately from CAN FD/
CAN or CXPI.
Connect Ch1 to the port of CAN1 or CXPI1, and Ch2 to the port of CAN2
or CXPI2, using the cables for CAN or CXPI attached to the product.
■
Online Monitor
It is able to measure 2 channels simultaneously. Select CAN1 (CAN
FD/CAN) or CXPI1, and CAN2 (CAN FD/CAN) or CXPI2.
■
Simulation
Select 1 port from CAN1, CAN2, CXPI1 and CXPI2.
DSUB 9pin branch cable
<Setting of Terminator >
The jumper pin makes it possible to connect the terminator in the CAN
communications.
(Factory setting: terminator OFF)
JP1 (1-2 short): Connect the terminator (120 Ohm) to CAN1 port.
JP2 (1-2 short): Connect the terminator (120 Ohm) to CAN2 port.
JP1JP2
When the signal arrangement of the DSUB
9-pin is dierent, please use a conversion
terminal block, etc.
Terminal block for DSUB 9-pin (screwless)
Sold separately (optional).
Model number: LE-9TB

-10-
Color of the lead
wire
Signal Meaning
red Vbat Battery power supply
(9~18V)
blue CXPI Bus CXPI bus signal
black GND Signal ground
<For CXPI >
Pick the target signals using the IC clips of 3-line probe cable.
The correspondence of the lead wires and I/O signals is described below.
3-line Probe cable
Supply :Vbat from external device.
(analyzer does not supply)
<External and trigger I/O >
The analyzer has the external I/O terminals besides the interfaces of CAN/
CAN FD and CXPI.
They are for analog/digital input and the trigger I/O. Use the attached
8-line probe cable.
⑦ ⑤ ③ ①
⑧ ⑥ ④ ②
Pin number Signal Description
1IN4 Digital/Analog input4
2GND Signal ground
3IN2 Digital/Analog input2
4IN3 Digital/Analog input3
5TRG OUT Trigger output
6IN1 Digital/Analog input6
7TRG IN Trigger Input
8GND Signal ground

-11-
Operations Function
[ ]Turn ON/OFF the power.
Press it longer to turn o the power.
[RUN] Start monitoring, measuring or testing operation.
[STOP] Stop monitoring, measuring or testing operation.
[MENU] Return to the top menu.
[ESC] Return to the previous display
Stop renewing data display while measuring.
[ ▲ ] , [ ▼ ] Scroll one data line.
Move the cursor on the condition setting.
[
▲
] , [
▲
] Scroll one character of data.
Change the setting on the condition setting.
[ENTER] Apply selected settings.
[0] ~[F] Enter numerical values. Select send data.
[TOP/DEL] Jump to the top of data.
Delete the entry indicated by the cursor.
[END/X] Jump to the end of the screen.
Enter the data of “Don't Care”.
[SHIFT] Press to use the expanded alternate function of
each key.
[SHIFT]+[ESC] Save the screen image to the storage device.
[SHIFT]+[RUN] Brighter the LCD back light.
[SHIFT]+[STOP] Darker the LCD back light.
[ENTER]+[TOP/DEL]+[ ] Initialize settings. Clear all.
[SHIFT]+[STOP]+[ ] Start the rmware loader.
* [X]+[Y] indicates the operation of pressing [X] and [Y] together at the same time.
2.3 Operation
Touch panels enable to select settings by soft touch or to scroll the display by
swipe.
ڦOperation keys

-12-
2.4 Line State LED
Relationship between line state LEDs and signals.
LED Signal Level Light
SD Ch1data Dominant Red lighting
Receptive OFF
RD Ch2data Dominant Red lighting
Receptive OFF
RS Ch1 VBAT About 8.0V or more Red lighting
About 4.3Vor less OFF
CS Ch2 VBAT About 8.0V or more Red lighting
About 4.3V or less OFF
DR IN1 About 2.0V or more Red lighting
About 1.0V or less OFF
CD IN2 About 2.0Vor more Red lighting
About 1.0V or less OFF
CI IN3 About 2.0Vor more Red lighting
About 1.0V or less OFF
ST2 IN4 About 2.0Vor more Red lighting
About 1.0V or less OFF
ڦShortcut keys
By pressing [0] to [E] after [MENU], you can move to the frequently used setting
screen.
Shortcut key Setting display
[MENU] and [0] Ch1Conguration
[MENU] and [1] Ch2Conguration
[MENU] and [2] Trigger
[MENU] and [3] Record Control
[MENU] and [4] Waveform monitor setting
[MENU] and [5] Interface/Function
[MENU] and [8] Request ID table selection
[MENU] and [9] Send data table selection
[MENU] and [A] CXPI simulation setting
[MENU] and [C] File control/Action mode
[MENU] and [D] System setting
[MENU] and [E] Clock setting
If the transition destination setting screen is not valid for the current function
or operation mode, the operation will be ignored.

-13-
Chapter 3 Basic Conguration
3.1 Top Menu
Press [Menu] to set basic conguration.
Interface/Function :Select the interface and operation mode.
CH1 conguration :Set the communication conditions of CH1.
CH2 conguration :Set the communication conditions of CH2.
Trigger :Set the trigger factor and action. Set the timer/counter for
trigger.
Record control :Set the capture buer, recording type of external input, and
auto save.
Wave monitor :Set the sampling clock for wave monitor.
Touch each item on the screen or select by [ ▲ ] , [ ▼ ]and press [ENTER].
Touch [System settings] to set power saving mode, battery charging type, and
version information.
Touch current time on the right bottom of screen to correct the time.

-14-
3.2 Interface and Operation Mode
From top menu, touch [Interface/Function].
Select the interface and operation mode of analyzer.
■CH1 Interface
Select “CAN” when analyzer uses
CAN1 port for CH1, or “CXPI”
when it uses CXPI1 for CH1.
■CH2 Interface
Select “CAN” when analyzer uses
CAN2 port for CH2, or “CXPI”
when it uses CXPI2 for CH2.
■Operation mode
Select an operation mode from
Monitor or Simulation.
■Simulation CH
Select a port for simulation from CH1 or CH2.
Touch “Simulation settings” on the right bottom of screen for advanced
settings.
It is able to respond ACK as a CAN node for any port including unselected
ports for Simulation. Press [SHIFT]+[A] on above screen.
→ Chapter 5 Simulation Function

-15-
3.3 Communication Conditions
From top menu, touch [CH1 conguration], [CH2 conguration].
<For CAN/CAN FD >
■Speed
Touch […] to select the preset
speed. For CAN FD, set “Baud
rate (data)” as well.
To input the baud rate manually,
touch the current baud rate. On
the right side of inputted baud
rate, the actual baud rate and
tolerance are displayed.
The actual baud rate is the closest baud rate which the circuit is able to
measure. If the tolerance is high, the analyzer may not able to monitor
accu rately.
■Sample point
Set the bit sample point between 60% ~90%. On the right side of
inputted sample point, the actual sample point is displayed.
For CAN FD, set “Sample point (data)” as well.
■CRC type
For CAN FD, select “ISO CRC”
or “non-ISO CRC”.
■ID lter
Mark on the box of “ID filter”
and touch [ID setting]. Set the
ID in binary or with “don’t
care” in [X].

-16-
<For CXPI >
■Speed
Touch […] to select the preset
speed or input baud rate
manually.
■ID lter
Mark on the box of “ID filter”
and touch [ID setting]. Set the
ID in binary or with “don’t care” in [X].
3.4 Record control and J1939
Press [MENU] and touch “Record control” to set additional information,
capture buer, auto save and auto run.
It consumes 32 ~384byte of memory to save one frame.
Setting items of capture buffer, auto save and auto run are same as standard
rmware. Please refer to the instruction manual for analyzer.
Press a tab of additional information and set time stamp and sampling
interval for external input and J1939.
[Time stamp]
Select a unit of time stamp from
H:M:S, M:S:1ms, 100µs, 10µs and
1us.
The unit of 100µs, 10µs and 1µs
are the elapsed time from start of
the measurement.
[Ext.In supplement]
Select the sampling interval (1ms
~10s) of external inputs (TRG
IN, IN1 ~IN4).
It records the analog/digital value
of external input at selected
interval.

-17-
Only time stamp of H:M:S and M:S:1ms are available while it uses the
sampling interval.
[J1939]
It is able to translate a part of parameter which is dened in SAE J1939-71
(Rev.2003-12).
Touch [J1939 setting] and set max. of 5 data.
→ 9.3 About J1939
■Target channel
Select a target channel to
translate into J1939.
■PGN/SPN/Src
PGN
PGN (Parameter Group
number)
Input PGN in decimal.
SPN
SPN (Suspect Parameter Number)
Input SPN in decimal.
Src
Input source address in decimal.
Touch [Change display] for
some times to change to J1939
display. Only latest data will be
translated into J1939.
Table of contents