LINKVIL W611W User manual

Portable Wi-Fi Phone
Quick Start Guide
V1.01
W611W
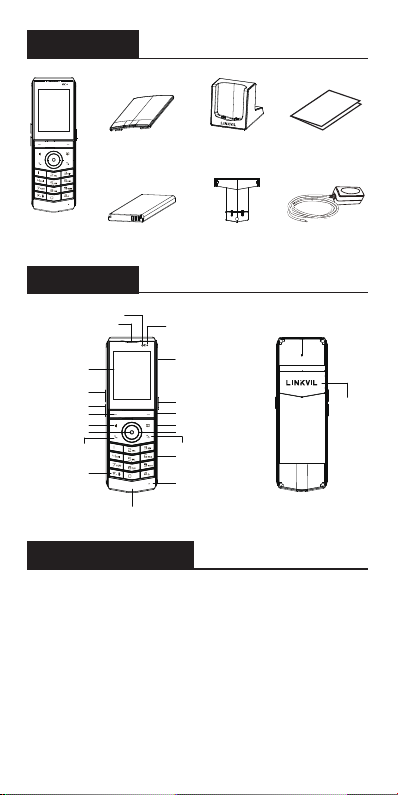
Packing list
Handset
Belt Clip
Quick Start Guide
Battery Cover
Portable
Wi-Fi Phone Rechargeable Battery Power Adapter
Charging Base
Distance sensor
Earpiece Status Indicator
Speaker
Headphone jack
PTT key
Soft key
Phone book
Keypad
Microphone
Charging interface
On-hook key/Power
Off-hook key
Mute key
Hands-free
Soft key
Screen
Volume Key +
Volume Key -
Navigation key
OK key
Install the battery
1. Remove the rear case: Remove the rear case of
the whole machine with a little force from the handle
position A of the rear case of the main unit.
2. Install the battery: Take out the battery from the
packaging box, with the battery with the notch facing up,
put the battery C at the battery compartment C, and pull
the battery button until it completely fits the underside
of the battery.
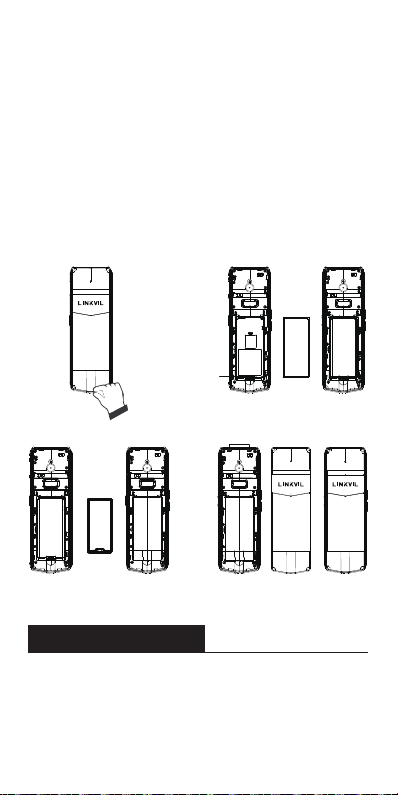
3. Install the battery cover: Take out the battery cover
from the packaging box, and press the battery cover
firmly along the edge of the battery compartment to
ensure that the outer surface of the battery cover is
completely inserted into the battery compartment and
flush with the edge of the battery compartment,
reaching IP67 protection level.
4. Install the back cover: Align the back cover with
the buckle on the back of the main unit, press your
hands along the edge of the main unit from top to
bottom (there will be a "click" sound during the process),
and ensure that there is no gap, it means that the back
cover is fastened.
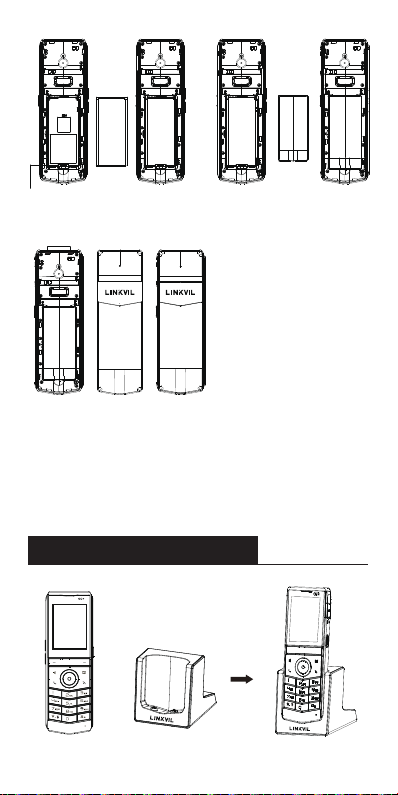
Replacement battery
1. Remove the rear case: Remove the rear case of
the whole machine with a little force from the handle
position A of the rear case of the main unit.
Remove
the rear case Install the battery
Install the battery cover Install the back cover
Battery
button
C C
Buckle
A

Fanvil Technology Co., Ltd.
Website: www.fanvil.com
Tel: +86-755-2640-2199 Fax: +86-755-2640-2618
Add: 10/F Block A, Dualshine Global Science Innovation Center,
Honglang North 2nd Road, Bao'an District, Shenzhen, China

Remove the
rear case
Remove the
battery cover
Battery
button
Remove
the battery
A
B
2. Remove the battery cover: From the back of the
main unit, buckle the hand position B, and pull it
upwards in the direction indicated by the arrow at the
same time (depending on the strength of different users,
it may be removed after two or three times of pulling; in
order to ensure the protection level of the machine ,
it is not easy to disassemble here).
3. Remove the battery: Pull the battery button down to
remove the old battery.
4. Install the battery: Take out the battery from the
packaging box, with the battery with the notch facing
up, put the battery C at the battery compartment C, and
pull the battery button until it completely fits the
underside of the battery.
5. Install the battery cover: Take out the battery cover
from the packaging box, and press the battery cover
firmly along the edge of the battery compartment to
ensure that the outer surface of the battery cover is
completely inserted into the battery compartment and
flush with the edge of the battery compartment,
reaching IP67 protection level.
6. Install the back cover: Align the back cover with
the buckle on the back of the main unit, press your
hands along the edge of the main unit from top to
bottom (there will be a "click" sound during the process),
and ensure that there is no gap, it means that the back
cover is fastened.
Special statement: This product belongs to the
three-proof equipment of IP67. Under normal use,
please do not disassemble the battery cover
arbitrarily. After long-term disassembly, the
protection level of IP67 will be affected. We are not
responsible.
Connect the charging base
CC
Install the battery
Battery
button Install the battery cover
Install the back cover
Buckle

Install the belt clip
Connect Wi-Fi
Configuration
Configuration via Web
Note:
1.Use Fanvil-supplied power adapter (5V/2A).
A third-party power adapter may damage the handset.
2.Check the charging status on the top-right corner of
the LCD screen.
1.Press Menu >Basic>9 WLAN.
2.Select Wi-Fi.
Configuration via Phone
1.Press Menu > Advanced Settings
(Default password 123).
2.Select Accounts: To configure enable the account,
fill the SIP server address, port, user name,
password etc.
1.Get the IP address from the phone: Press Menu
> Status >1Network >Wi-Fi IP.
2.Login: Input the IP address in the web browser.
The PC and phone should be in the same IP address
segment (The default username and password are
both ‘admin’.)
3.Configure: Select Accounts, and fill the relevant
content.

Warning
- Please dispose of lifeless battery under guidance.
- Recycle your device.
- Replacement of a battery with an incorrect type that can defeat a
safeguard (for example,in the case of some lithium battery types);
- Disposal of a battery into fire or a hot oven, or mechanically crushing or
cutting of a battery, that can result in an explosion;
- Leaving a battery in an extremely high temperature surrounding
environment that can result in an explosion or the leakage of flammable
liquid or gas;
- A battery subjected to extremely low air pressure that may result in an
explosion or the leakage of flammable liquid or gas.
Used below 35℃in the state of charge
Regulatory Compliance
Federal Communication Commission (FCC) — USA
This device complies with Part 15 of FCC Rules. Operation is subject to the
following two conditions:(1) this device may not cause harmful interference,
and (2) this device
must accept any interference received; including interference that may cause
undesired operation.
This equipment has been tested and found to comply with the limits for a
Class B digital device, pursuant to Part 15 of the FCC Rules. These limits are
designed to provide reasonable protection against harmful interference in
residential installation.
This equipment generates, uses, and can radiate radio frequency energy,
and if it is not installed and used in accordance with the instruction manual,
it may cause harmful
interference to radio communications. However, there is
interference will not occur in a particular installation.
If this equipment does cause harmful interference
which can be determined by turning the equipment off and on, the user is
encouraged to try to correct the interference by one or more of the
following measures:
• Reorient or relocate the receiving antenna.
• Increase the separation between the equipment and receiver.
• Connect the equipment into an outlet on a circuit different from that to which
the receiver is connected.
• Consult the dealer or an experienced radio/TV technician for help.
Warning: Any changes or modifications to this unit not expressly approved
by the party responsible for compliance could void the user’s authority to
operate the equipment.
FCC Radiation Exposure Statement:
The device has been tested and comply with FCC SAR limits. And keep the
device minimum 5mm from the body when normal use.
This equipment complies with Part 68 of the FCC rules and the requirements
adopted by the ACTA. On the bottom of this equipment is a label that contains,
among other information, a product identifier in the format
US: 3I1IPNANW611W.
If requested, this number must be provided to the telephone co mpany.
and used in accordance with the instruction manual, it may cause harmful
no guarantee that
to radio or television reception,

Fanvil Technology Co., LTD.
Website: www.fanvil.com
Tel: 86-0755-26402199
Email: [email protected]
add:10/F Block A, Dualshine Global Science Innovation,
Honglang North 2nd Road, Bao'an District,Shenzhen, 518101, China
Other manuals for W611W
1
Table of contents
Other LINKVIL IP Phone manuals


