Linnenberg SATIE User manual

Owner’s Manual
SATIE

2

3
SATIE realizes a high performance audio source
without drawbacks. The playback of audio files
at CD uality (1411 kbps) is absolutely
comparable, if not better than the reproduction
of a pure high class CD-player. The result you
get from the SATIE depends strongly on the
resolution of the audio file you play and on the
correct settings of your computer or streamer
running the audio software.
Thank y
ou for
purchasing
the
SATIE !

4
In contrast to a red book CD-player, a computer
in conjunction with SATIE’s USB input can play
files with extremely high resolution and with
different formats like WAV, FLAC or DFF (DSD
bitstream). Such music files can be downloaded
on specialist internet shops like 2L.no,
HDtracks.com or highresaudio.com to name but
a few. The choice of music and the number of
albums available is clearly limited today, but
new releases show up every day. The big
advantage here is that you are not bound to a
certain format like SACD or DVD-Audio.
Computer audio is future proof.
The second essential digital audio format is
S/PDIF (Coax 1, 2, AES/EBU and optical). The SATIE
supports sample rates up to 192kHz and bit
depths up to 24bit.
Furthermore, you can connect a line source to
the SATIE

5
Basic operation
Room temperatures over 30 degrees Celsius
and / or extreme humidity should be
avoided. Keep away from heat sources like
radiators, heating, ovens or similar
appliances dissipating heat. It is important to
maintain an ade uate supply of airflow to
prevent overheating.
!
Place the unit on a solid, flat level surface such
as a shelf where it is convenient to operate.
Before connecting the SATIE to your mains
the first time, check if the indicated mains
voltage is in accordance with your home
supply. Never plug an 115V version in a
230V mains socket or serious damage will
occur.
!
There is no need to operate the mains ON / OFF
switch on the back side of the SATIE since the
standby power consumption is less than 0,5W.
As it is common practice, disconnect SATIE from
the mains during a thunderstorm or when going
on vacation.

6
Once the power cord is connected, the red
indicator LED should light up and blink when the
power switch and subse uently the front panel
push button are operated. The red dot matrix
display greets you with a WELCOME ! . Turn off
the unit by pushing the front button again and
do the signal connections. If everything is
connected, turn on again and have fun!
Remote control operation
To enhance the versatility of the SATIE as an
analog / digital preamp, all functions are
remote controllable. The unit responds to the
remote provided with the unit. Should you
experience the fail of an action subse uent to a
button pressing, please press the button again.
Flat batteries, too long distance / angle or an
obstructed light path may be the reason.
Besides controlling the volume, the remote
enables the user to mute the output, select the
input source and choose the digital filter mode
for PCM input sources.

7
Mute
Pressing the <Mute> button on the remote
mutes the output. Releasing the mute action is
either by pressing <Mute> again or by pressing
the volume buttons. Please note: the mute
function is not available for the line source.
Select
Pressing the <Select> button subse uently
changes the input source of the SATIE. Inputs
USB, AES (symmetric digital input), Coax1, Coax2,
optical (Toslink) and the line input are
selectable.
Mute + Select
Pressing <Mute> first to enter the mute mode
and thereafter <Select> lets you change the filter
setting of digital filter. 6 options are available
through FIR (default) to HYBRID
Volume - , Volume +
The volume control works simultaneously for
both analog and digital inputs. The control
range spans from -85 … +10dB in increments of
0.75dB.

8
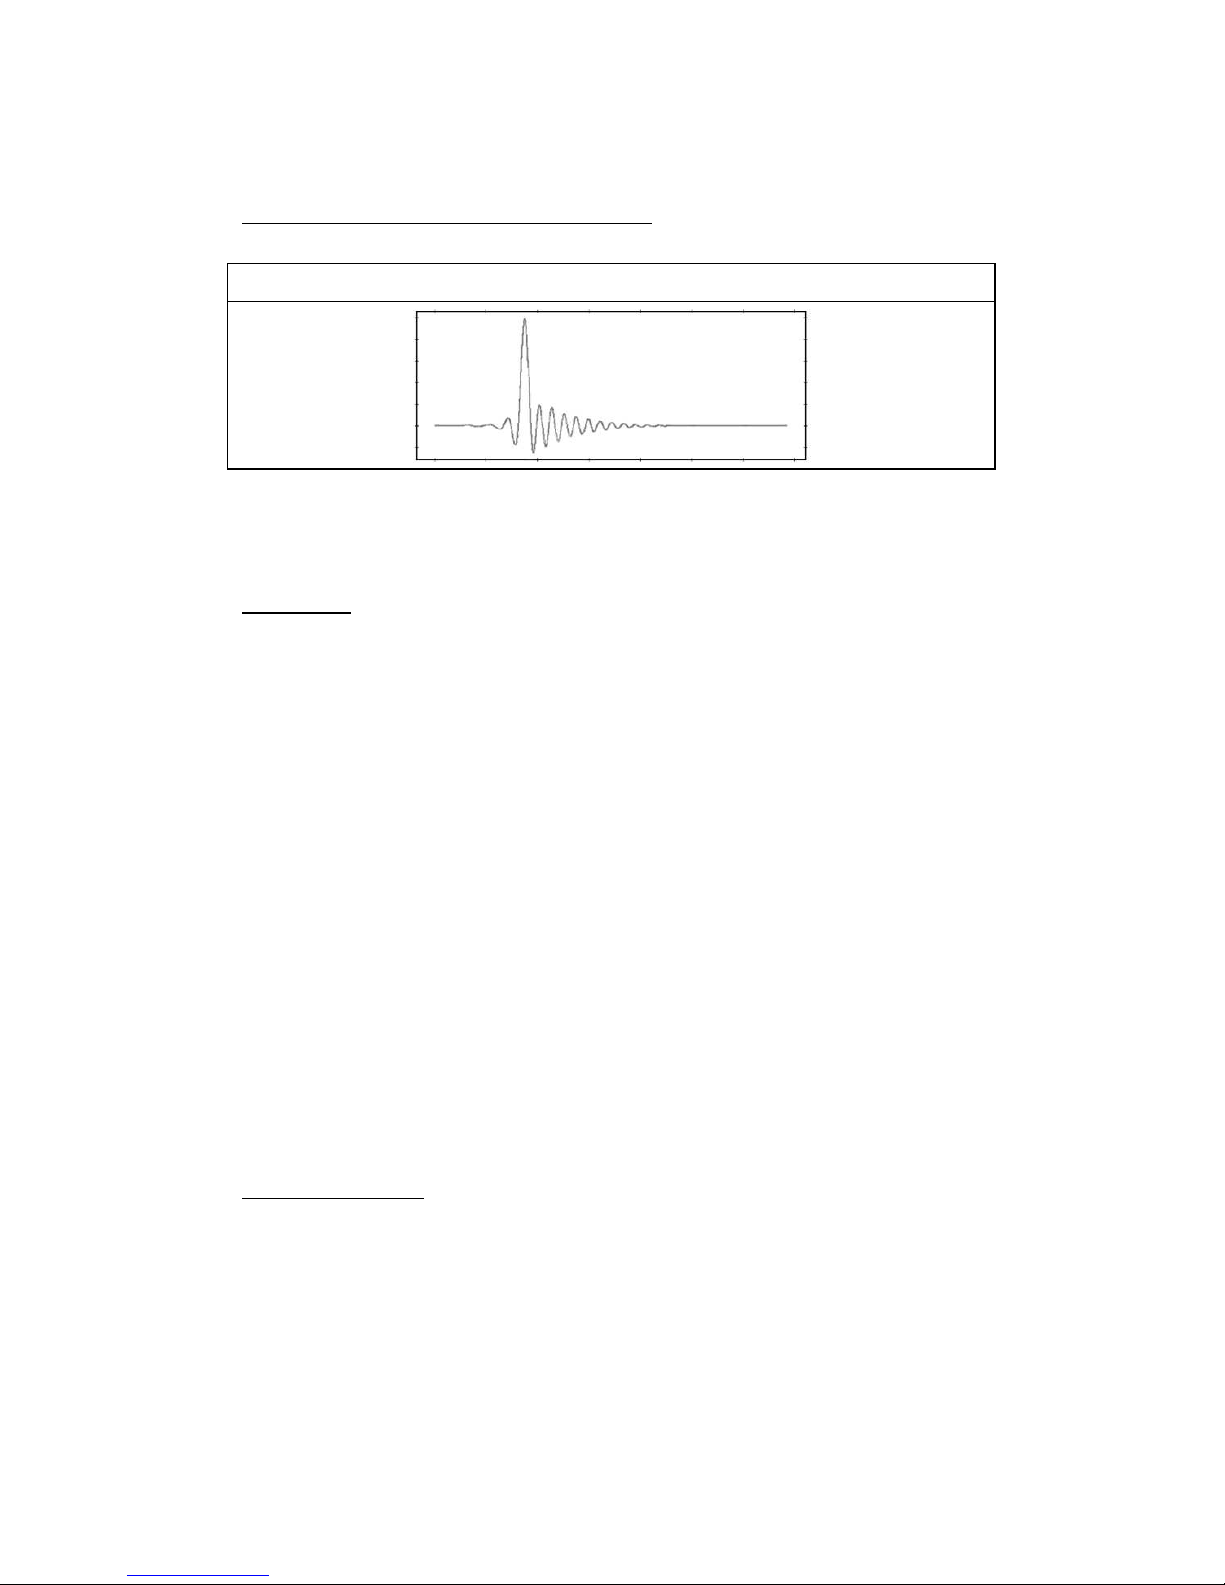
Digital Filter selection
FIR, fast roll off, linear phase.
(Default) PCM
filter with highest
stop band
rejection and
minimal ripple
FIR, slow roll off, linear phase.
IIR, fast roll off, minimum phase.
IIR, slow roll off, minimum phase.
Apodizing, fast roll off, linear phase.
9
Digital Filter selection (cont.)
Hybrid, fast roll off minimum phase.
Display
Some users prefer to have a dimmed listening
ambience where the light from the display
could perturb the tran uillity. When first
powering up the SATIE, the display will be on for
20s before going in to sleep mode. Pressing any
of the remote control buttons lights up the
display for at least 10s, before going dark again.
Whenever (digital inputs only) the input data
stream changes, the display indicates
automatically the type of data stream (DSD or
PCM) and the sample rate.
Fixed mode
Every time, the SATIE is turned on, all major
settings are restored as they were before
placing SATIE in stand by mode. However, the
restored volume setting will be no higher than
40, to prevent excessive high play back levels

10
after turning on, that might damage speaker or
other components. As this might be undesirable
for users operating the SATIE with a preamp, a
fixed mode has been added. The fixed mode is
engaged by selecting a volume level of 85 ( =
2Vrms), then turning off the SATIE and on again.
Instead of 85, FIX is displayed. As long as the
volume remains unaltered, SATIE comes up in
fixed mode, eliminating the need to adjust the
volume every single time for preamp users.
Pushbutton operation
As stated earlier in this document, there is no
need to operate the hard wired mains switch
on the rear of the SATIE. If you want to switch on
or off the unit, use the front panel pushbutton.
Doing so, SATIE stores the current settings
(volume, input, filter) even when the mains
voltage is lost thereafter.

11
Driver installation
Installing process (Mac)
No drivers are re uired for the Mac computer
with OSX 10.6.4 and later. A native support for
audio devices compliant with USB 2.0 Audio
class is already included in the operating
system. Your SATIE will be immediately
recognized by the OS and ready to use. Be sure
to select the SATIE (Combo384 Amanero) as
output device in the “System Preferences /
(Hardware) Sound / Output” menu. In the
“Applications / Utilities / Audio Midi setup.app”
menu you can select the standard sample rate
which is (44100 Hz) for CD sourced music. Using
high end audio player software instead of
iTunes is recommended.
Installation process (PC)
Do not connect the SATIE to your computer
yet, first download and install the driver. !
The newest version of the installation package
for SATIE performance pack edition offers a
single executable for all Windows operating
systems and native ASIO driver for 32 and 64bit
systems. Double click on the file in order to install
the complete package. Restart your PC or

12
Notebook and connect the SATIE to the host for
the first time. The SATIE will now be recognized
as usable device.
When the driver installation is done, you are
ready to play music via USB. As long as the SATIE
is connected, it is automatically selected as
output device. As it is the case with Mac
computer, we highly recommend using special
software instead of the Windows Media Player.
JPLAY (PC)
There are numerous high performance audio
players for Mac and Windows OS available.
Describing all of them would definitely go
beyond the scope of this manual. If you should
encounter problems with specific software,
please feel free to send an en uiry regarding
the matter. We will be happy in assisting you
rectifying the subject.
Representative for a high uality audio player
the JPLAY software is presented. The reason why
JPLAY was chosen is simple: it sounds awesome
and is easy to use – even for computer
newbie’s. The actual version is ready for DSD
playback. Please feel free to order your software
licence at www.jplay.eu . The only drawback is
the very basic to non existent user interface.
Those of you not willing to except the limited
functionality can use JPLAY as ASIO output
device in foobar2000 or just work with
foobar2000 alone. Foobar2000 is free of charge,

13
but needs to be adapted for DSD playback
capability. Here is what to do:
Foobar2000 (PC for PCM and DSD playback):
Install the latest version of foobar2000 from the
official website www.foobar2000.org . Download
the kernel streaming support from the
components section of the website. This allows
you to have a bit-perfect transfer via USB.
Decompress the file and copy the file
“foo_out_ks.dll” in the directory “components” of
the foobar2000 directory.
After having successfully installed all foobar2000
components, connect the SATIE to your PC. Now
start the foobar2000 player. Click on “file”; a drop
down menu will appear; here go to
“preferences”. Select “playback / output”. Now
you have to make several adjustments:
Device : KS: Amanero Technologies
Streaming
Buffer length : 1000ms
Output format : 32bit
That’s the default setting for PCM files like WAV,
FLAC or even MP3. In order to use the DSD
capability of the SATIE, you have to do the

14
following: First, you need to download and install
the Super Audio CD Decoder plug‐in at:
www.sourceforge.net/projects/sacddecoder/files
/foo_input_sacd/
Download “foo_input_sacd‐0.7.4.zip” (or later),
open and extract all files. Then click and install
“ASIOProxyInstall‐0.7.1.2.exe”. After the
installation is finished, copy the
“foo_input_sacd.dll” file into the foobar2000
components folder. Next download and install
the ASIO support 2.1.2 (or later version) plug‐in:
www.foobar2000.org/components/view/foo_out
_asio/
Run the downloaded file
foo_out_asio.fb2k‐component to install the
ASIO plug‐in. Start foobar2000, click menu and
select “file”, and then enter the “preference”
section. Jump to “playback / output” tab. Select
“ASIO: foo_dsd_asio” as output device in the
“Device” section.
Now it is time to install the appropriate ASIO (32
or 64bit) driver from the SATIE driver zip-file.
Sometimes the installation is already carried out
during the installation of the main driver
executable. You won’t have to do it again then.
In foobar2000 “preferences / playback / output /
ASIO” you will see “foo_dsd_asio” as an ASIO
15
driver option. Now configure “foo_dsd_asio” by
double clicking on that entry. The following
options will show up:
ASIO driver : ASIO Combo 384
driver
DSD Playback
Method :
DoP Marker
0x05/0xFA
or
ASIO Native
DSD to DSD Method : none FS: DSD64
PCM to DSD Method : none FS: DSD64
DSD/PCM Transition : 50 ms
Playing DSD256 or DSD512 files re uires the
selection of the native ASIO driver. !
Close the “foo_dsd_asio” pop-up window; go
back to the “Tools / SACD” tab. Here, please
select:
ASIO Driver Mode : DSD
PCM-Volume : +0dB
PCM Samplerate : 176000
DSD to PCM Mode : Multistage
Preferable Area : Stereo

16
Click “OK” button on Preferences windows and
restart the program. You are now ready to play
back PCM and DSD files with foobar2000.
JRIVER (PC)
A combination of fine sound uality and ease of
use is JRIVER. In contrast to foobar2000 there are
just a few adjustments to do.
Output mode : Kernel streaming
Bitstreaming / custom … Yes (DSD over PCM
(DoP))
Format : DoP 1.0
(0xFA / 0x05)
The features of JRIVER are countless and thus
can’t be described here. However the above
settings are essential for the sound uality we
strive for. Our own experience showed that
JRIVER delivers a flawless approach to a high
class software player without the hassle of
foobar2000 and without the limitations of JPLAY.
As is the case with foobar2000, no audible
switching noise between different formats occurs
what so ever.
AUDIRVANA PLUS (MAC)

17
A very user friendly and exceptional sounding
software is Audirvana Plus. Just download the
AudirvanaPlus_1.5.12.dmg file and run it on your
computer. Most of the settings are by default –
there is very little to configure. Please select in
Audirvana preferences menu:
Preferred Audio Device :
Combo384 Amanero
Native DSD capability : DSD over PCM
standard 1.0
You can even arrange Audirvana to upsample
your PCM files in a case selective manner. Even
if the iZotope plug in is one of the best software
upsampler, we recommend playing your files in
the native form as this guarantees the best over
all performance. Upsampling is not making your
source files any better; it just makes the
transmission to the DAC more susceptible to
jitter.

18
SATIE mains voltage selection / fuse
replacement
The following work should only be carried
out by a ualified technician in accordance
to highest electrical safety standards. Risk of
electric shock. !
Replacing the fuse
The fuse must be replaced by a 0.63AT type
(5x20mm). Never attempt to short the fuse
holder. Normally the fuse should never blow – if
it has, it is a sign of a serious fault condition.
Further investigation is needed.
Mains voltage
Altering the mains input voltage range from
115V to 230V or vice versa is done by changing
the fuses. You will need 1x 0,63AT for 230 V
operation and 2x 0,63AT for 115V operation.
Never attempt to apply any other fuse
configuration or a short circuit condition will
occur.

19
Battery change
The remote control supplied with the SATIE is
e uipped with a Lithium battery CR2032. Battery
life is usually more than a year, probably much
longer. For replacing the battery one needs to
dismantle the assembly. 4x bolts on the outside
have to be unscrewed before the remote PCB is
accessible. The actual battery is fixed in a holder.

20
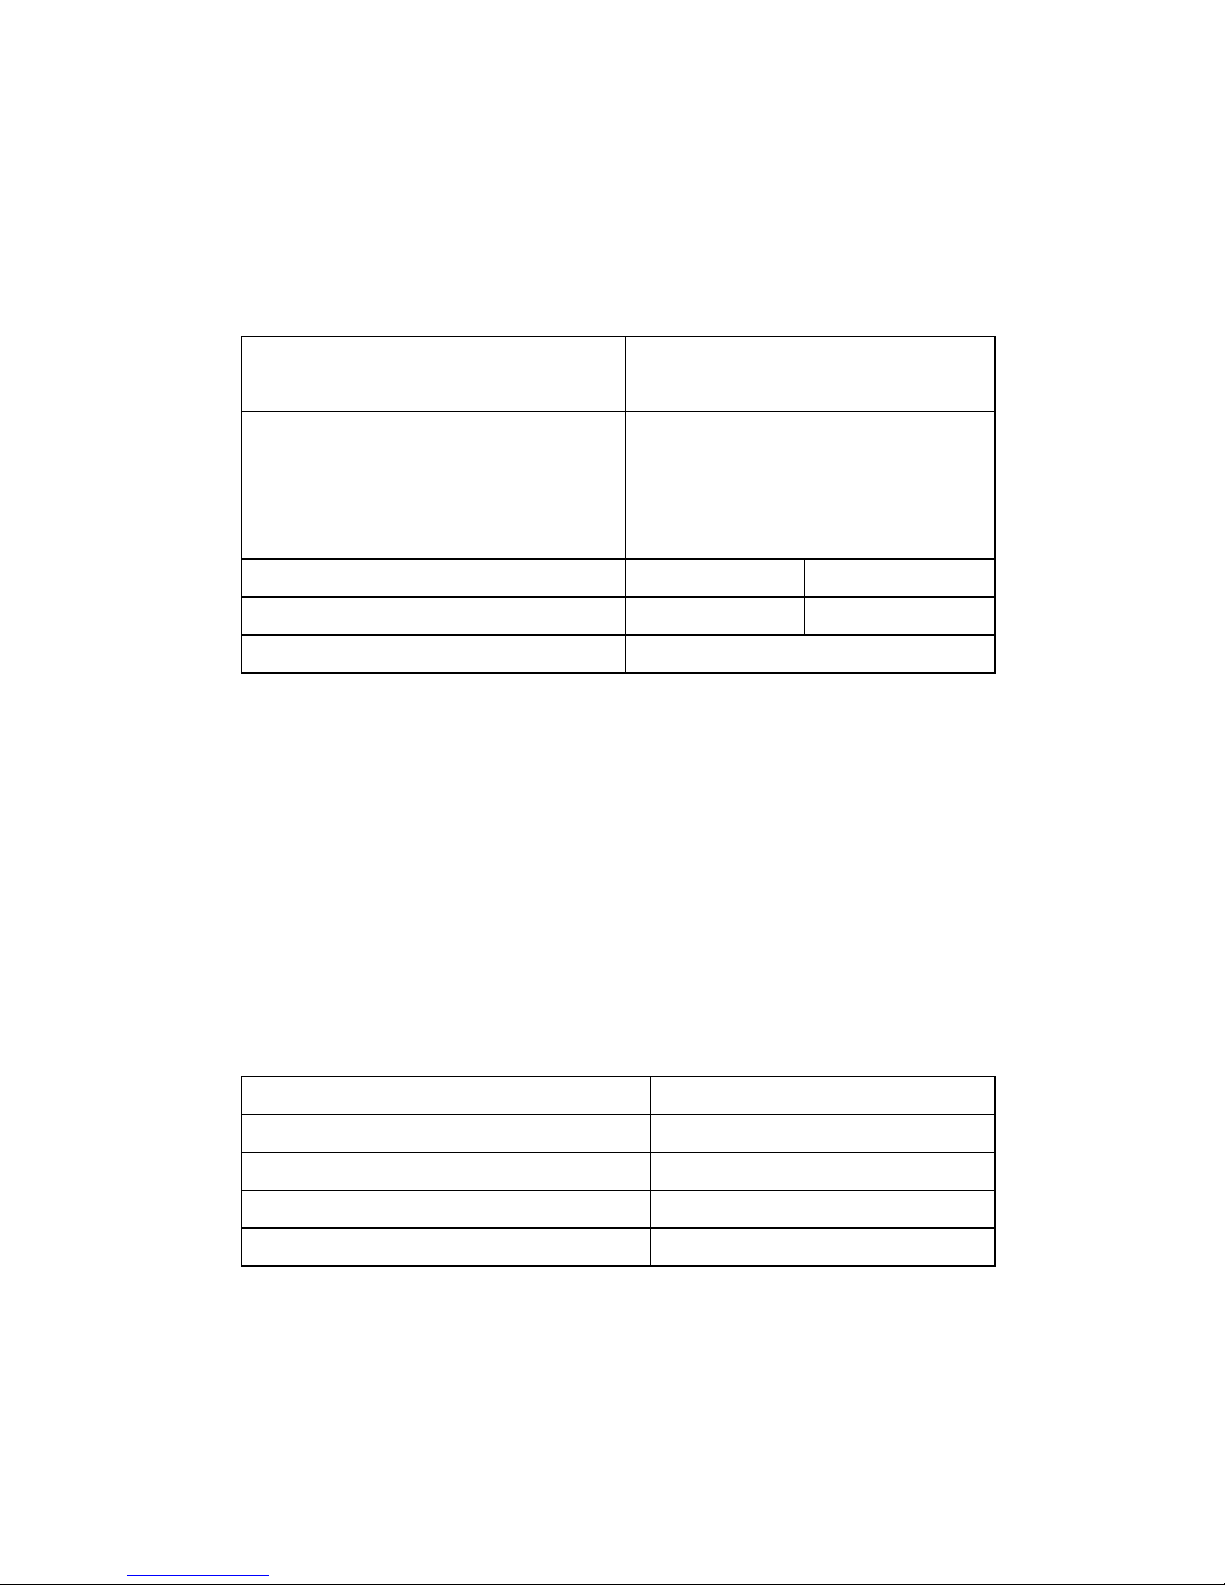
Specifications
Sampling fre uencies
PCM :
44.1, 48, 88.2, 96, 176.4,
192, 352.8 kHz ; S/PDIF
– input limited to 192
kHz max.
Resolution PCM : 32bit
Resolution DSD : DSD64 (2.8224MHz)
and DSD128
(5.6448MHz) over DoP
protocol, DSD256 and
DSD512 over ASIO
native
Master clock jitter : 82 fs (femto seconds)
Fre uency response : DC - 24kHz +0.1dB -
0.5dB
DC – 70kHz -3dB
@192kHz
Distortion and noise : <0.0003% 10Hz - 20kHz
@ 0dB
Dynamic range : 138dB
Crosstalk : 120dB @ 20kHz
Output level :
6V rms single ended
12V rms balanced
@ 0dB and “100”
Output impedance : 300 Ohm per phase
Line input impedance : 600 Ohm per phase !
Power consumption : 14W, < 0.5W turned off
Dimensions (H x W x D) : 75 x 432 x 290 mm
Table of contents


