manuals.online logo
Brands
  1. Home
  2. •
  3. Brands
  4. •
  5. Liquid Instruments
  6. •
  7. Test Equipment
  8. •
  9. Liquid Instruments Moku:Lab User manual

Liquid Instruments Moku:Lab User manual

Moku:Lab
Moku:Lab
Quick start guide
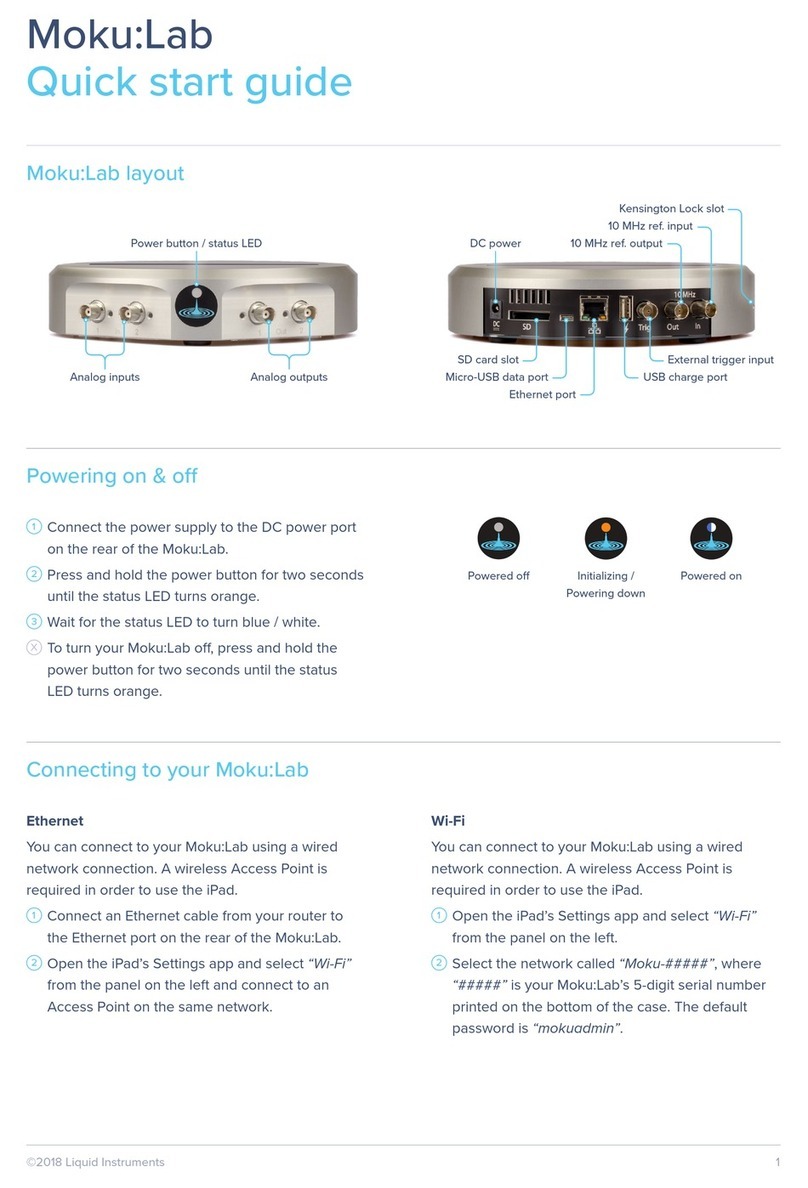
Powering on & o
1Connect the power supply to the DC power port on
the rear of Moku:Lab.
2Press and hold the power button for two seconds
until the status LED turns orange.
3Wait for the status LED to turn blue / white.
Powered o Powered on
Power button / status LED
Analog inputs
SD card slot
Micro-USB data port
Ethernet port
External trigger input
USB charge port
10 MHz ref. input
Kensington Lock slot
10 MHz ref. outputDC power
Analog outputs
XTo turn o your Moku:Lab, press and hold the power button for two seconds until the status LED turns
orange. Wait until the orange light turns o before unplugging.
Initializing /
Powering down
Moku:Lab Quick Start Guide (v23-0510) liquidinstruments.com
Installing the Moku: app
iPad app
1Open the App Store on your iPad.
2Search for the Moku: app and verify that the
publisher is Liquid Instruments.
3Download and install Moku: app on your iPad.
4Open the Moku: app and when prompted for
permission to find and connect to devices on the
local network, grant access to discover and connect
to your Moku:Lab.
Desktop app
1Download the software from Liquid Instruments
Website > Products > Software > Desktop Apps.
2Windows: Run the installer and follow the prompts
to install the Moku: app.
Mac: Drag the icon to your Applications folder to
install the application.
Configure your Moku:Lab to join an existing wireless network
Once you have connected to your Moku:Lab, you can have it join an existing wireless network.
1Launch the Moku: app.
2iPad app: Tap the icon of your Moku:Lab on the “Select your device” screen, then tap the Settings gear at the
bottom left corner of the screen to configure the Moku:Lab settings.
Desktop app: Right-click on the icon of your Moku:Lab on the “Select your device” screen. Then select “Configure
device.”
3Switch to the Wi-Fi tab, select “Join a Wi-Fi network” and type in the name of the Wi-Fi network you would like to
connect to. You will be prompted to enter a password for that network if required.
4Connect your iPad to the same Wi-Fi network. The iPad will only discover Moku devices on the same network.
Accessing instrument tutorials
Factory resetting Moku:Lab
Basic tutorials for each instrument are available in the
iPad and desktop app. To access these tutorials, deploy
the desired instrument and press the main menu button
at the top left of the screen, then hover the “Help” icon.
Alternatively, you can press the F1 key.
Moku:Lab must be plugged in and powered on to perform a Factory Reset. You can return your Moku:Lab to its
default network and configuration settings by pressing the Factory Reset button with a paper clip or small object on
the underside of the device for two seconds. The status LEDs on the power button will cycle through dierent colors
as your Moku:Lab reinitializes. Moku:Lab will restart in Wireless Access Point mode with Ethernet enabled.
?
Connecting to your Moku:Lab for the first time
Option 1: Wireless Access Point
On your iPad or computer, join the Wi-Fi
network called “Moku-######,” where
“######” is the middle 6 digits of the serial
number printed on the bottom of the device.
The default password is mokuadmin.
When your Moku:Lab powers on, it will be in its factory default state. This means it will broadcast a Wireless
Access Point and Ethernet will be enabled.
Option 2: Ethernet
Connect your Moku:Lab to a local
wired network (e.g., a router) via an
Ethernet cable. Make sure your iPad
or computer is connected to the
same network.
Once you have connected your Moku:Lab to your iPad or computer, you can start using your device.
1Launch the Moku: app on your iPad or on your computer.
2Moku:Lab devices that are connected to the same network as your iPad or computer will show up on the “Select
your device” screen.
3Select your Moku:Lab to start using your device. The default name of your Moku:Lab is “Moku ######,” where
“######” is the 6-digit serial number printed on the bottom of the device.
4On the “Select your instrument” menu, select an instrument to deploy to your Moku:Lab.
5To discover how to use each instrument, refer to the “Accessing instrument tutorials”section below.
Getting started with the app
© 2023 Liquid Instruments. All trademarks are property of their respective owners. liquidinstruments.com
Option 3: USB (desktop only)
Connect your Moku:Lab to
your computer via a micro-USB
cable.

Other Liquid Instruments Test Equipment manuals

Liquid Instruments Moku:Pro User manual

Liquid Instruments

Liquid Instruments Moku:Pro User manual

Liquid Instruments Moku:Lab User manual

Liquid Instruments

Liquid Instruments Moku:Lab User manual

Popular Test Equipment manuals by other brands

Fluke AIRCHECK Getting started guide

Fluke

Fluke AIRCHECK Getting started guide

Agilent Technologies 16034G Operation manual

Agilent Technologies

Agilent Technologies 16034G Operation manual

Rigol DS1000 Series Programming guide

Rigol

Rigol DS1000 Series Programming guide

Viavi T-BERD MTS 5800-100G Quick Card

Viavi

Viavi T-BERD MTS 5800-100G Quick Card

GE PACE5000 user manual

GE

GE PACE5000 user manual

Desco 19240 Operation, Installation and Calibration Instructions

Desco

Desco 19240 Operation, Installation and Calibration Instructions

NI NI PCI-5124 Getting started guide

NI

NI NI PCI-5124 Getting started guide

Greenlee 6701 instruction manual

Greenlee

Greenlee 6701 instruction manual

Triplett MG600 user manual

Triplett

Triplett MG600 user manual

Abra AK-105 Operation guide

Abra

Abra AK-105 Operation guide

LEM HEME ISO 1000 operating instructions

LEM

LEM HEME ISO 1000 operating instructions

ASV 3270 user manual

ASV

ASV 3270 user manual

HT EV-TEST100 user manual

HT

HT EV-TEST100 user manual

yellow jacket RecoverX-CAR Operation and maintenance manual

yellow jacket

yellow jacket RecoverX-CAR Operation and maintenance manual

Everfine LT- 101A user manual

Everfine

Everfine LT- 101A user manual

Apera Instruments LabSen 831 user manual

Apera Instruments

Apera Instruments LabSen 831 user manual

Viavi Seeker X with MCA III installation guide

Viavi

Viavi Seeker X with MCA III installation guide

Vigor Equipment V7548 operating instructions

Vigor Equipment

Vigor Equipment V7548 operating instructions

manuals.online logo
manuals.online logoBrands
  • About & Mission
  • Contact us
  • Privacy Policy
  • Terms and Conditions

Copyright 2025 Manuals.Online. All Rights Reserved.