ListenClear PREMIER Series User manual

PREMIER
HEARING AID
USER MANUAL


CONGRATULATIONS!
You’ve just taken your rst step back toward
the center of the conversation.
With a little adjustment, proper care, light
maintenance and dedicated wear, you’ll be back
at the heart of the moments that matter most
for many years to come.
We’re here to help you make this transition as
comfortable and effective as possible, so please
take the time to read this guide carefully.
Contact ListenClear with any concerns and
you’ll be on your way in no time.

PAGE 4 1-888-320-0424
CONTENTS
MEET YOUR NEW HEARING SYSTEM
Getting to Know Your Device ____________________________________ 5
Getting Comfortable with Your New Device______________________ 5-6
GETTING STARTED
Setting Up Your Device _______________________________________ 6-7
BATTERIES 101
Type of Battery ________________________________________________ 7
Low Power Indicator ___________________________________________ 8
Storing Your Batteries __________________________________________ 8
DAY-TO-DAY OPERATIONS
Turning Your Device On/Off ____________________________________ 8
Adjusting Your Device __________________________________________ 9
Using the Telephone____________________________________________ 9
Using the Remote Control and Pairing ________________________ 10-12
How to Use the Mobile App and Pairing _______________________ 13-16
DEVICE MAINTENANCE & TLC
The Ear Tips and Device Rest ___________________________________ 17
TROUBLESHOOTING
Problem-Solving Tips and Tricks _____________________________ 18-19
THE FINE PRINT
Hearing-Related Safety Applications _____________________________ 20
Important Notice from the FDA _________________________________ 20
Dispenser Information ______________________________________ 21-22
Children with Hearing Loss_____________________________________ 22
Service and Warranty_______________________________________ 22-23
Technical Specifications _____________________________________ 23-24
FCC Compliance and Technical Information ___________________ 25-26
YOUR HEARING DIARY
_________________________________________ 27

WWW.LISTENCLEAR.COM PAGE 5
MEET YOUR NEW HEARING SYSTEM
GETTING TO KNOW YOUR DEVICE
SOUND PROCESSOR
EAR TIP
BATTERY DOOR
SPEAKER WIRE
PUSH BUTTON
SPEAKER
GETTING COMFORTABLE WITH YOUR NEW DEVICE
Just like any other big change in your life, you can expect a short period
of getting comfortable with your new hearing aid. You’ll suddenly
hear things that maybe you haven’t in years: a dripping faucet, that old
grandfather clock, footsteps, traffic noises and even the sound of your
own voice! This can all be a lot to take in, so we’ve put together a few
helpful tips and tricks to ease your transition.
1. Be Patient
— By far the most important; understand how much you can
handle and remember that the biggest journeys start with a single step.
2. Try to Wear Your Aids as Much as Possible
— Don’t be overly cautious
wearing your hearing aids at first. The more hours you can wear them, the
sooner your brain will adjust to them. To receive maximum benefit from
your hearing instruments, it is recommended that you wear them every
day for at least eight hours. This will help you acclimate to them quickly.
Use your volume control to soften the sound in certain environments. If
you feel stimulus overload, by all means take a break for an hour or two
but be sure to put them back in when you have rested. If for any reason
you feel the hearing aids are uncomfortable or too loud, be sure to call a
ListenClear Customer Service Representative who will work with you to
solve the issue.

PAGE 6 1-888-320-0424
3. It’s Important to Wear Your Hearing Aids Even When Home Alone
—
Just because you are not talking with someone doesn’t mean you are
not hearing things in your environment. Dogs barking, water running,
air-conditioning blowing, or birds singing. Your new hearing aids are
helping your brain process sounds it may have not heard in a long time.
At first, all these sounds will be more noticeable to you, but once your
brain recognizes these sounds consistently again, they will fade into the
background. So, unless you feel you need a break from the hearing aids,
keep them in. Wearing them consistently is the key to a successful hearing
experience.
4. Mix It Up
—Try new places. As we mentioned, use the aids as much as
possible, in quiet locations and in crowds, noisy traffic locations and so
on. Remember, you can always adjust the volume level.
5. Ask For Help
—Let a ListenClear Customer Service Representative
help you through these new challenges. Talk about what you’re hearing,
what you’re feeling and have them help guide your speaking voice to an
acceptable level. Our Customer Service number is: 888-320-0424.
GETTING STARTED
SETTING UP YOUR DEVICE
Now that you know how to ease into your new hearing aid, let’s get it set
up! It’s easy and will only takes a few minutes before you’re ready to go.
Your ListenClear hearing aid comes pre-assembled and ready to wear.
You’re ready to install the battery and begin!
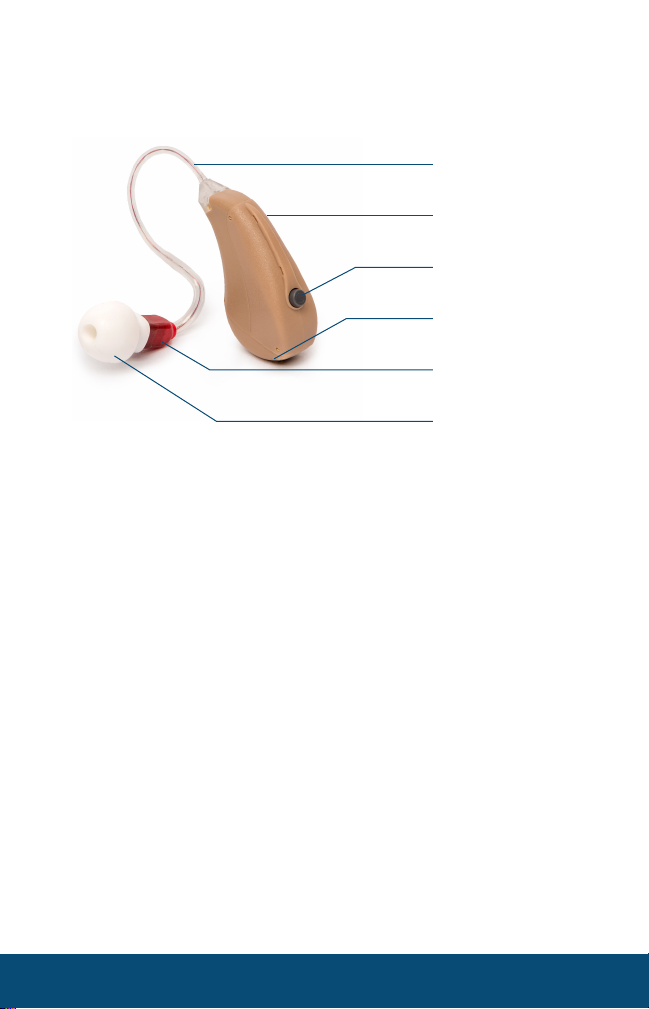
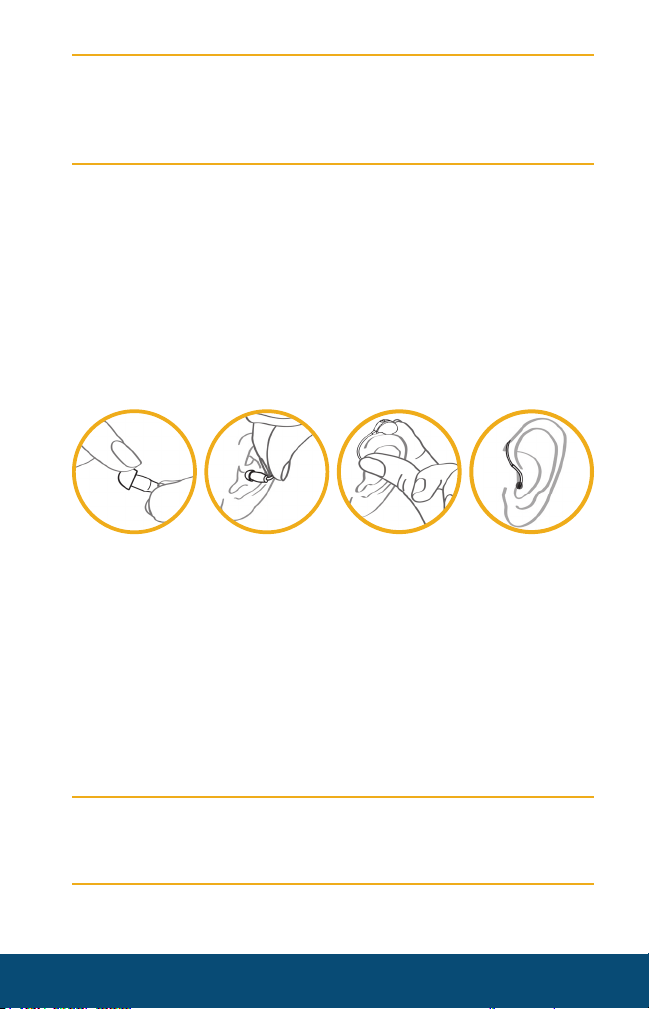
1. Install The Battery
Simply open the battery door using the nail grip on your device
and let the door gently swing open . Grab a brand-new #312 size
battery, remove the tab and insert the battery positive (+) or flat side up
(as shown below in ) and close the compartment door . Voila!
You’re halfway there!
g.1
Nail Grip
g.2
Slide to Open
g.3
Slide to Close

WWW.LISTENCLEAR.COM PAGE 7
2. Try It On
Be sure the Tip is secure on the end of the Speaker (see Figure 1). Hold the
Speaker with your thumb and forefinger and gently insert the Tip into
your ear canal (see Figure 2). Place the sound processor behind your ear
(see Figure 3) and you’re ready to go.
Note:
Blue
BATTERIES 101
TYPE OF BATTERY
Your hearing aid operates by using one (1) #312 size battery. These are
common and easy to find wherever hearing aid batteries are sold.
Call ListenClear Customer Service today to get set up on the Batteries for
Life Program. 888-320-0424.
FIGURE 1 FIGURE 2 FIGURE 3 FIGURE 4

PAGE 8 1-888-320-0424
LOW BATTERY INDICATOR
When your hearing aid’s battery reaches a low power level, you will hear
a series of tones repeated every few minutes until the battery is replaced.
Only replace the battery when you hear the low battery tones every few
minutes. On average, you should have about seven to ten (7-10) days or
more of battery life per battery. We recommend that you be prepared
with backup batteries to avoid situations that leave your hearing at a loss.
NOTE:
STORING YOUR BATTERIES
When storing spare batteries, make sure you keep them in a dry,
moisture-free location. DO NOT place batteries in a refrigerator or
dehumidifying device, as the batteries could leak and harm your device.
Also, avoid having batteries touch each other, even with the tab attached.
Two batteries touching can cause them to discharge.
CAUTION: BATTERIES CAN BE HARMFUL IF SWALLOWED.
DAY-TO-DAY OPERATIONS
TURNING YOUR DEVICE ON/OFF
Your hearing aid is automatically powered on whenever the battery door
is closed. To turn the device off, simply open the door and leave it open
until you are ready to use it again. As we mentioned before, leaving the
battery door open when not in use will dramatically lengthen the life of
your battery.
NOTE:

WWW.LISTENCLEAR.COM PAGE 9
USING THE TELEPHONE
Most often, when answering a telephone with your hearing aid, it’s best
to hold the phone close to your ear without fully covering it. If you start
hearing a whistle or buzz of feedback noise, tilt the receiver slightly at an
angle until the feedback ends. As with a number of other changes, you will
soon find the best way to handle tasks with your new device in your life
and it will all become second nature.
• Automatic
General everyday use. The hearing aid automatically manages the audio output.
• Quiet
Excellent audio quality for quiet environments such as a quiet office or at home.
• Noisy
Directional and noise management features for use in a restaurant, car, crowds
or other noisy location.
• Auditorium
Broad audio that is best used while at a movie, church, or large event and while
listening to music.
• Outdoor
Reduces wind noise for better hearing outdoors.
• TV Streaming
Activate to hear the audio broadcast from the TV Streamer accessory.
ADJUSTING YOUR DEVICE
Pressing the push button on the hearing aid cycles through the available
programs. Each program is signaled by the corresponding audio indicator.
Premier 70
1. Automatic
2. Quiet
3. Noisy
4. Auditorium
5. Outdoor
6. TV Streaming
Premier 50
1. Automatic
2. Quiet
3. Noisy
4. TV Streaming
PUSH BUTTON
NOTE:

PAGE 10 1-888-320-0424
USING THE REMOTE CONTROL
The Remote Control offers the ability to change program, adjust volume,
or mute your hearing aids. Review the diagram below for explanation of
the individual control buttons. NOTE:
HOW TO INSERT AND REPLACE THE BATTERY
The Remote Control uses one Alkaline AAA
battery. To replace, gently slide open the battery
cover, and remove the old battery. Place a new
AAA size battery in the compartment making
sure that it is properly positioned at both ends.
Replace cover.
Push the “Home” button
to return to program
#1 and the power-on
volume setting.
Push the “Mute” button
to mute sound from your
hearing aids. Press the
“Mute” button again to
un-mute.
Push the “-” button to
decrease the volume. Push the “+” button to
increase the volume.
Push the “Program”
button to cycle through
programs.
Push the “L, R, or B”
buttons to specify volume
control of Left, Right, or
Both hearing aids.
Push the “Lock” button
to prevent accidental
control changes. The
Lock button turns the
remote on and off by
unlocking and locking
the remote.
Push the “TV” button to
hear audio sent from the
TV Streamer (Optional
Equipment).
NOTE:
NOTE:

WWW.LISTENCLEAR.COM PAGE 11
REMOTE INDICATOR LIGHT MEANINGS
• When the remote unlocks, three (3) green lights appear in a
clockwise motion. When the remote locks, three (3) green lights
appear in a counter-clockwise motion.
• The Volume Down (-) and Volume Up (+) buttons will blink the
left and right lights with a blue light when the volume adjustment
command is sent to the hearing aids. They will also blink the blue
lights with three (3) quick blinks when the hearing aid reaches the
maximum or minimum volume.
• The Program (P) button will blink the left and right lights with a
blue light equal to the number of the program (eg.: one blink for
program #1, two blinks for program #2, etc.).
• The Home button will blink the left and right lights two (2) times
with a blue light.
• The Mute button will light all three lights with a blue light.
• The TV button will light all three lights two times with a blue light.
• The L / B / R buttons will light the left, both, or right lights with a
green light to indicate which hearing aid(s) will be sent Volume -/+
and Mute commands.
• If you only have one hearing aid, then only one blue light will appear
for the Home, Program and Volume +/- buttons.
• If the Remote is unable to send a command to one hearing aid, the
light on that side will blink red instead of blue.
• When the Remote is almost in need of a replacement AAA battery
the top light will blink red at the same time the left and right lights
are lit with a blue light.
• If all three (3) lights blink red three (3) times when a button is
pressed the AAA battery must be replaced.
NOTE:

PAGE 12 1-888-320-0424
HOW TO PAIR YOUR HEARING AIDS TO THE REMOTE
NOTE:
Your remote arrives already paired with your hearing aids.
However, in the unlikely case, it may be necessary to Re-Enter “Pairing
Mode” on your remote so that it can pair again with your hearing aids.
To Re-Enter “Pairing Mode,” simply hold down the Home button on
the remote for five (5) seconds. When you release the button, the lights
on the remote will rapidly flash blue indicating the remote is in “Pairing
Mode.”
Additionally, it may be necessary to Re-Enter “Pairing Mode” on your
hearing aids so that they can pair with a new or existing remote again.
To Re-Enter “Pairing Mode” on your hearing aids, simply hold the button
on the hearing aid down for three (3) seconds. When you release the
button, you will hear a voice incator saying, “Pairing,” and the hearing aid
will again be in “Pairing Mode.”
PUSH BUTTON
Push the “Home” button for five (5) seconds.
When you release the button, the remote
will rapidly flash blue indicating the remote
is in “Pairing Mode.”
Push the button for three
(3) seconds to re-enter
“Pairing Mode.”

WWW.LISTENCLEAR.COM PAGE 13
CONTROL YOUR HEARING AIDS WITH THE ListenClear
®
APP
The ListenClear App for iPhone® offers an intuitive and
discreet way to control your hearing aids. Once downloaded
on your iPhone you’ll easily be able to control hearing aid
volume and program choices to optimize your listening
experience.
The ListenClear App is available in the App Store®
as a free download. Simply search for ListenClear.
HOW TO PAIR YOUR HEARING AIDS TO THE iPHONE APP
1. Simply open and close the battery door on
your hearing aids. Then hold the button
on the hearing aid down for three (3)
seconds. When you release the button,
you will hear a voice indicator saying,
“Pairing,” and the hearing aid will be in
“Pairing Mode.” NOTE: You must do this
for each hearing aid.
2. On the Scan screen the app will begin
Searching for your hearing aids. Hearing
aids in range will appear in the list on this
screen. Then tap the hearing aids in the
PUSH BUTTON
Push the button for three
(3) seconds to enter
“Pairing Mode.”
Scan Screen Connect Screen with
Pairing Dialog
Connected Screen

PAGE 14 1-888-320-0424
list you would like to pair to. If you have a LEFT and RIGHT hearing
aid, you must select both in order to pair to both hearing aids. Next,
tap “Continue.”
3. On the Connect screen, you will be presented with alerts requesting
to Pair each of your hearing aids with your iPhone. Please select
“OK” to proceed. The app will now automatically Connect to your
hearing aids.
4. Once this process is completed, your hearing aids will automatically
connect when they are powered ON and the app is opened on your
iPhone.
HOW TO RE-ENTER PAIRING
It may be necessary to Re-Enter “Pairing Mode” on your hearing aids so
that they can pair with a new or existing smartphone again.
To Re-Enter “Pairing Mode,” simply hold the button on the hearing aid
down for three (3) seconds. When you release the button, you will hear
a voice indicator saying, “Pairing,” and the hearing aid will again be in
“Pairing Mode.”
ListenClear
®
APP OVERVIEW
Main Navigation
The app uses a tab navigation located at the bottom of the app. Pressing
the Programs, Volume, or Settings button respectively will switch to that
particular screen. The Programs screen allows for quick switching and
optimization of the current program on the hearing aids. The Volume
screen makes it super easy to adjust the volume of your hearing aids. The
Settings screen offers battery/connection status information, as well as
FAQs and app information.
Volume SettingsPrograms

WWW.LISTENCLEAR.COM PAGE 15
Easily Change the Volume
On the Volume screen, move the blue volume
slider up or down. To control the Left or
Right hearing aid volume independently, tap
the switch above the blue slider. To mute the
volume, simply tap the Mute button below the
volume slider.
Tap the Home button in the top left to quickly
go back to 50% volume and program #1. Tap
the TV button in the top right to activate the
TV Streaming program.
Activate TV Streaming
In order to enable TV Streaming, you must have the ListenClear TV
Streaming accessory turned on and connected with your TV. Then, in
the ListenClear app, you can activate the TV Streaming program on your
hearing aids either on the Volume screen or the Program screen.
On the Volume screen, simply
tap the TV Streaming button on
the top right. On the Programs
screen, tap the TV Streaming
program button.
On the Volume screen, when
the TV Streaming program is
activated, a yellow volume slider
becomes available.
Move the yellow slider up
or down to control the TV
Streaming volume.
To mute the TV Streaming
volume, simply tap the Mute
button below the TV Streaming
volume slider or switch to a
different program.
TV Streaming
Volume Screen with
TV Streaming Active
Home
L/R Split Switch
Volume Sliders
Mute Buttons
Volume Screen

PAGE 16 1-888-320-0424
Quickly Change the Program
On the Programs screen, tap the
program button of your choice in the
list to go to that program on your
hearing aids.
Tap the Home button in the top left
corner to quickly go back to 50%
volume and program #1.
Noise Reduction &
Feedback Control
On the Programs screen, tap the Noise
Reduction button. The top control can be
used to increase or decrease the hearing
aid’s noise reduction features. The bottom
control can be used to increase or decrease
the hearing aid’s feedback control features.
You can save your changes for that
program with the Save button.
Tuning
On the Programs screen, tap the Tuning
button. The Tuning control works like a
stereo equalizer. It features four different
preset options for common EQ settings,
and it also allows individual control of
the Bass, Mid, and Treble acoustics of the
hearing aid.
You can set the tuning separately for
your left and right hearing aids if you
choose. You can save your changes for that
program with the Save button.
Programs Screen
Home
Programs
Noise Reduction
Tuning
Noise Reduction
Screen
Save
Reset
Tuning Screen
Save
Reset

WWW.LISTENCLEAR.COM PAGE 17
DEVICE MAINTENANCE & TLC
Maintenance of your hearing aid is very important to make sure you
get the most benefits from its use for many years to come. We highly
recommend you follow these tips to keep your system clean and working
properly.
THE EAR TIPS
Your ear tips have a filter that collects wax in order to prevent damage
to the speaker. However, this wax and other debris can build-up over
time. For this reason, we highly recommended that you replace the ear
tips monthly so that you can continue to enjoy the best possible audio
experience. Any cleaning should be limited to simply wiping surfaces
with a clean cloth. Do not use sharp instruments to remove dirt or wax as
delicate components are easily damaged.
WARNING:
Be sure to inspect your device’s ear tips often and make sure they are not
swollen or discolored and free of tears, cuts or other damage. If you see
any damage to the tips, remove and replace it immediately, as a damaged
tip could possibly come off in your ear. If a tip is lost in your ear, do not be
alarmed, simply contact a healthcare professional for immediate removal.
Replacement ear tips are available through ListenClear and we
recommend that you always keep spares just as you do with your spare
batteries. Please call Customer Service today to order additional tips at:
888-320-0424.
EVEN YOUR HEARING DEVICE NEEDS REST
At Night:
Open the battery door, remove the battery and place your device
in its protective case. By leaving the battery door and case open, you allow
any moisture in the device to evaporate and help keep it in optimal shape.
For Long-Term Storage:
Clean your hearing aid, remove the battery
and store it in its protective case in a cool, dry area to reduce potential
corrosion.

PAGE 18 1-888-320-0424
WARNING:
TROUBLESHOOTING
Device not working properly? Take a look at the guide on the next page
for possible solutions. If you’ve tried troubleshooting with our Do-It-
Yourself Problem-Solving Guide and the problem hasn’t been fixed, do
not attempt to take your hearing aid apart or do anything more, as you
may terminate your warranty. Simply contact ListenClear Customer
Service for assistance and we’ll get you back up and running as fast as we
can: 888-320-0424.
PROBLEM SOLVING TIPS AND TRICKS
Most of the time, sound clarity issues can be solved by replacing your
battery and/or replacing your device’s ear tip. If the problem still isn’t
fixed, see our Do-It-Yourself Problem-Solving Guide on the next page.

WWW.LISTENCLEAR.COM PAGE 19
NO SOUND OR NOT LOUD ENOUGH
CAUSE POSSIBLE REMEDY
Not turned on Turn the hearing aid on by closing
the battery door
Low/dead battery Replace battery
Programming adjustment Call Customer Service
888-320-0424
Ear Wax Replace the ear tip
Moisture Open battery door and
allow to dry
Low volume Increase the volume by using the
Remote or the Mobile App
“BATTERY” VOICE INDICATOR
CAUSE POSSIBLE REMEDY
Low battery Replace battery
WHISTLING OR FEEDBACK
CAUSE POSSIBLE REMEDY
Device is not
inserted properly Remove and re-insert
Hair or clothing near ear Remove hair or clothing near ear
Ear wax Replace the ear tip
Low Whistle/Feedback Reduction
If you have Premier 70 devices,
increase the Whistle/Feedback
Reduction by using the Mobile App
POOR FIT
CAUSE POSSIBLE REMEDY
Device is falling out
of your ears
Call Customer Service
888-320-0424
DIY PROBLEM SOLVING GUIDE

PAGE 20 1-888-320-0424
THE FINE PRINT
INTENDED USE
Clearity manufactured hearing systems are air-conduction hearing aids
intended as amplification devices to compensate for impaired hearing of
adults.
HEARING-RELATED SAFETY APPLICATIONS
Although your hearing instrument is warranted, reflecting its design
quality and reliability, fail-safe reliability is not implied. The hearing
instrument should not be relied upon as a primary safety system in
any application where injury or loss of life may result from failure of
the hearing device to properly operate. No redundancy or back-up is
available in either the power source or the individual and collective circuit
functions of the instrument.
WARNING: Although your hearing system has been designed to comply
with the most stringent international electromagnetic compatibility
standards, the possibility cannot be excluded that it may cause
interference with other equipment, such as medical devices. It is also
possible that unforeseen interference may occur in the hearing aid due
to electromagnetic radiation from other products such as alarm systems,
room surveillance equipment, and mobile phones.
IMPORTANT NOTICE FROM THE FDA FOR PROSPECTIVE
HEARING AID USERS
Good health practice requires that a person with a hearing loss have a
medical evaluation by a licensed physician (preferably a physician who
specializes in diseases of the ear) before purchasing a hearing aid. Licensed
physicians who specialize in diseases of the ear are often referred to as
otolaryngologists, otologists or otorhinolaryngologists. The purpose of
medical evaluation is to assure that all medically treatable conditions that
may affect hearing are identified and treated before the hearing aid is
purchased. Following the medical evaluation, the physician will give you
a written statement that states that your hearing loss has been medically
evaluated and that you may be considered a candidate for a hearing aid.
The physician will refer you to an audiologist or a hearing aid dispenser,
as appropriate, for a hearing aid evaluation. The audiologist or hearing
This manual suits for next models
2
Table of contents
Other ListenClear Hearing Aid manuals