hi Health Innavations BTE Series User manual

1
ESSENTIAL GUIDE
How-to videos available on hihealthinnovations.com
Get the best results with your
hi BTE®hearing aids

2
TABLE OF CONTENTS
What’s in the Package................................................................................3
Getting the Best Results........................................................................4-5
Hearing Aid at a Glance........................................................................6-7
Ear Tubes & Tips, Power Dome and Ear Mold............................... 8-9
Preparing Hearing Aid for Use ........................................................10 -11
Insert or replace battery ................................................................... 10
Low battery indicator..........................................................................11
Turning Hearing Aid On and O ......................................................... 12
Determining Left and Right Hearing Aid ......................................... 13
Wearing Hearing Aids ....................................................................... 14-15
Inserting ear tube & tip...................................................................... 14
Inserting power dome or ear mold............................................... 15
Operating Hearing Aids.................................................................... 16 -17
Program control................................................................................... 16
Volume control..................................................................................... 17
Cleaning Hearing Aids ...................................................................... 18-19
Using with Phones ................................................................................... 20
FDA Statements.................................................................................. 21-22
Ordering More Supplies......................................................................... 22
Additional Information ........................................................................... 22
Notes............................................................................................................. 23
3
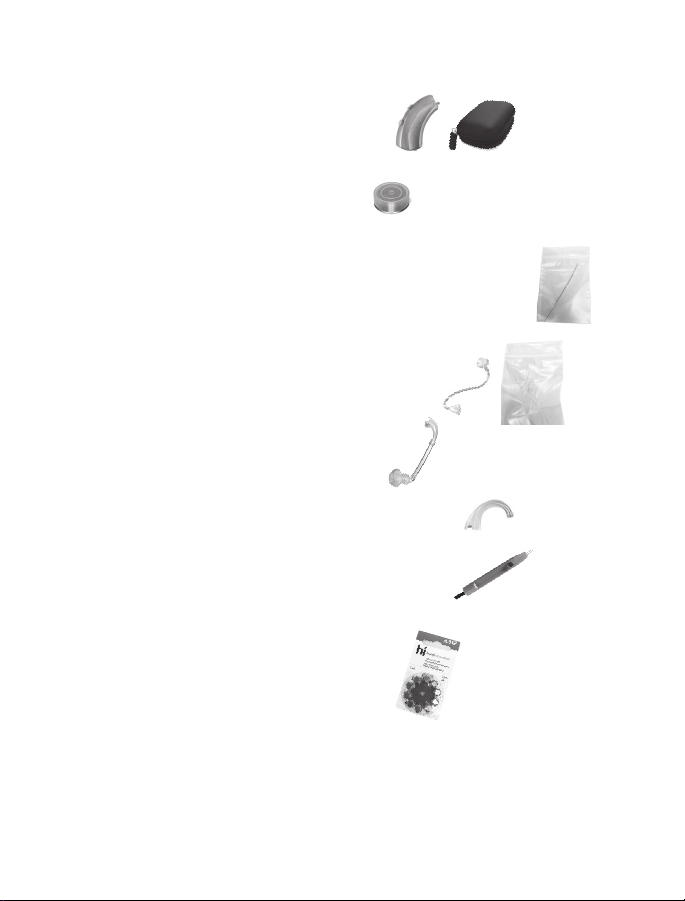
WHAT’S IN THE PACKAGE
Invoice with trial period end date and serial numbers
Bill of Sale and Notice of Cancellation documents
Hearing aid(s) - In carrying case
Batteries - One pack per hearing aid
Cleaning wire - One per hearing aid, in plastic bag,
for models with ear tube & tip
Battery replacement tool - One per order
or ear hook - One per hearing aid, attached
Ear tube & tip - One set attached to hearing
aid, and one extra set in plastic bag
or power dome - One per hearing aid,
attached
Drying capsule - In carrying case

4
1. Wear your hearing aids much as possible. It may take
a few weeks before you are completely comfortable with
them and can fully enjoy the benets.
2. To improve hearing in a noisy environment, wear two
hearing aids, directly face and move closer to the
sounds you are trying to hear.
3. You may nd that your voice sounds dierent while
wearing your hearing aids. This is very common, and
most people get used to it over time.
• If the sharpness is bothersome to you, simply reduce
the volume. Many people nd that with continued use
of their hearing aids they no longer notice these
eects within a few weeks, and can increase volume
over time.
• You may notice an “occlusion” eect, which is the
change you hear in your voice when your ears are
plugged, making your voice sounds booming.
4. Ear wax can cause whistling. See your doctor to have
your ear wax removed, or ask if you can use an over-the-
counter wax removal kit. Regularly clean the ear tubes &
tips, power domes or ear molds to remove accumulated
wax. See page 18 for cleaning information.
5. Hearing aids need to stay dry. Open battery door
overnight and wipe the battery door dry when replacing
GETTING THE BEST RESULTS

5
your battery. Do not leave your hearing aids in the
bathroom. Dry hair and hands before wearing hearing
aids, and when sweating, avoid wearing your hearing aids.
Replace the drying capsule in your case monthly.
6. Remove your hearing aids before using hair spray, spray
perfume, or shaving lotions, as these items can cause
damage.
7. It is not necessary to remove your hearing aid at
security checkpoints (e.g., airports). However, you should
remove your hearing aid for CT and MRI scans or for other
electromagnetic procedures.
8. It is possible to hear buzzing, feedback or interference
from your hearing aids when walking through store
security systems. This also may happen with exposure
to uorescent and some LED lights. This is normal
interference, caused by electromagnetic signals.
Additional Support Resources
• How-to videos on hihealthinovations.com
• Daily Phone Q&A with a Hearing Expert
Monday - Friday, 10 a.m. Central Time
888-844-7278, code 9428061#
• Facetime and Video Chat 855-523-9355 to
schedule
• Customer Service 855-523-9355, press 2

6
HEARING AID AT A GLANCE
1
2
3
5
46
5
7

7
1. Microphone port – Where sound enters the hearing aid
through the microphone.
2. Additional microphone port – Available on the
hi BTE and hi BTE telecoil only.
3. Program button – Changes the listening programs.
4. Volume button – Changes volume levels.
5. Battery door and on and o activation – Close the door
to turn on the hearing aids. Open the door to turn o
thehearing aids. See page 12 for instructions.
6. Serial number – Uniquely identies each hearing aid.
7. Speaker/receiver port– Delivers amplied sound. Ear tube &
tip, power dome or ear mold attaches to gold rod on this end.
8
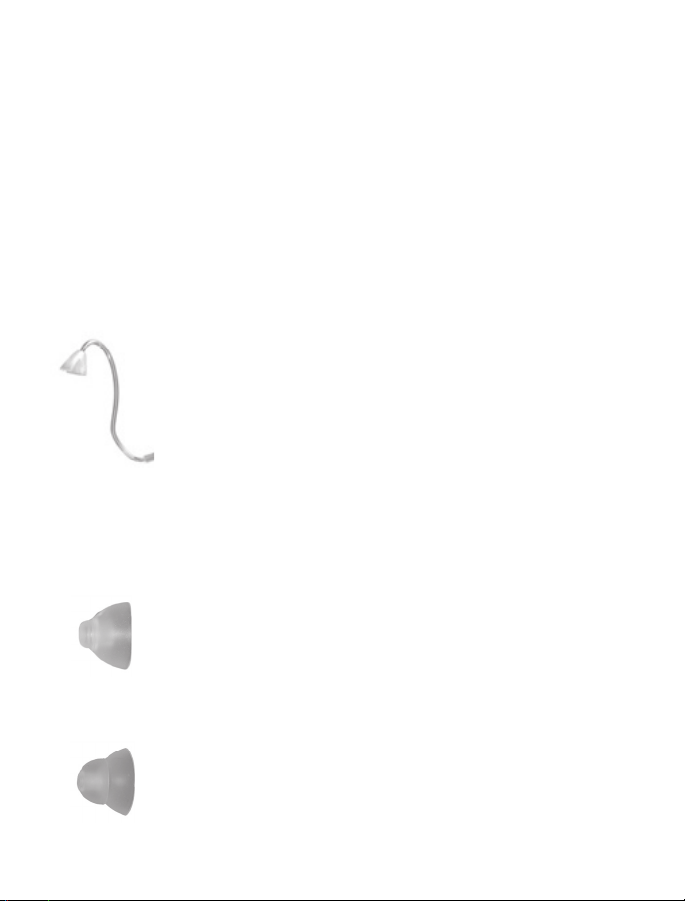
You have received an ear tube & tip, a power dome or an
ear mold that is suited for your hearing loss. For optimal
performance, replace ear tube & tip every threemonths, or
power dome every six months.
Ear Tube
An ear tube allows sound to travel through it to
the ear canal. You can locate your tube size on
the end of the tube just below the dome and on
your Bill of Sale.
Tips - Closed Domes
A closed dome provides more volume,
especially in the low frequencies. It works
well for greater hearing loss and helps reduce
feedback.
A closed double dome provides more volume,
especially for low frequency sounds. It works well
for moderate to severe hearing loss.
EAR TUBES & TIPS, POWER DOME AND
EAR MOLD

9
Tips - Open Fit Dome
An open tip has openings for sound to pass
through, providing a more natural sound
quality. This decreases the experience of the
“occlusion” eect, which is the change you
hear in your voice when your ears are plugged,
making your voice sound booming.
Tips - Power Dome
The power dome is needed for severe hearing
loss when ear tips cannot provide enough
volume without feedback occurring. The power
dome consists of an ear hook, ear tube and
dome.
Ear Mold
A custom ear mold* is needed when a power
dome does not meet your hearing loss needs.
We will help you nd a professional to make an
ear impression and attach the custom ear mold
to your hearing aid.
*Provided separately at an additional cost.
10
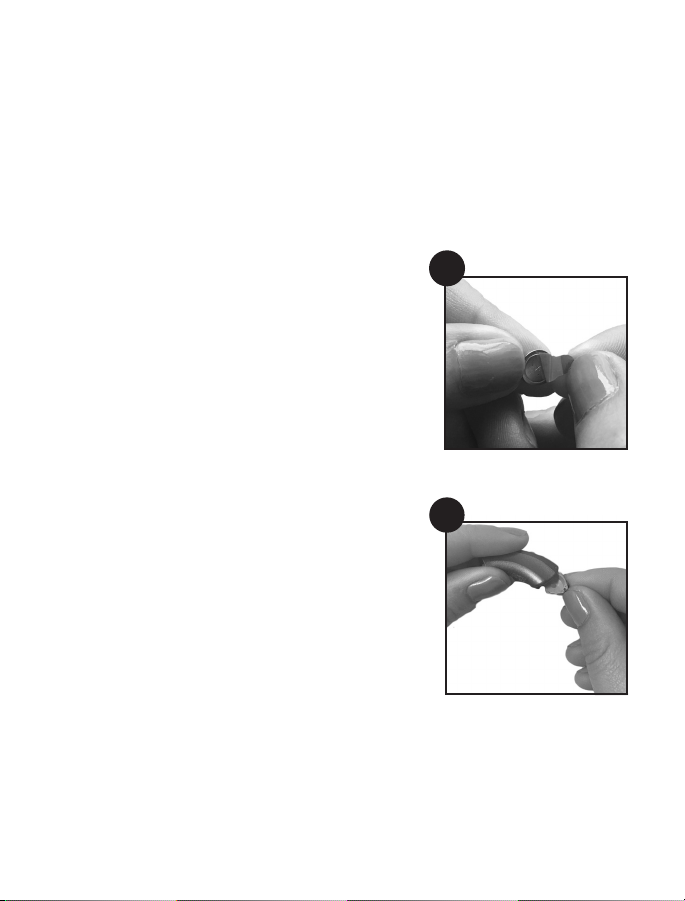
Please insert a new battery when you receive your
hearing aid.
The hearing aid uses a size 312 battery. The battery life varies
depending on the amount of hearing aid use.
To insert or replace battery:
1. Remove the tab from the new
battery. Wait one full minute to
fully activate the battery.
2. Gently pull open the battery door
with your ngernail.
PREPARING HEARING AID FOR USE
2
1

11
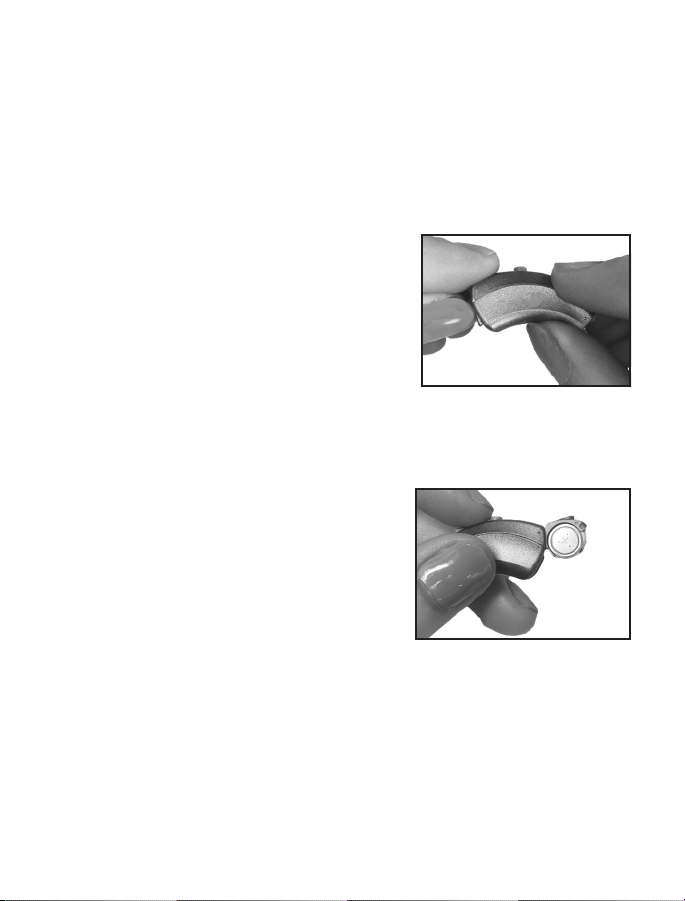
3. Insert the battery with the “+”
side up into the battery door, or
use the magnet on the battery
replacement tool. Gently close
the battery door. If the door does
not close easily, check to see if the
battery was inserted properly.
4. Remove the used battery by
turning the hearing aid over in
your hand or with the battery
replacement tool included in your
order.
3
Low battery indicator
A repeated voice warning of “low battery” indicates that the
battery needs to be replaced. If you do not change the battery,
you will hear “replace battery”, at which time your hearing aid
will automatically turn o.
4
12
TURNING HEARING AID ON AND OFF
The hearing aid battery door acts as an on/o switch. When the
door is closed and a charged battery is properly installed, the
hearing aid is on. When the door is open, the hearing aid is o.
ON: When you want to turn on the
hearing aid, place the battery in the
battery door and gently close the
door with your ngernail.
The hearing aid powers on after 5
seconds of closing the battery door.
The hearing aid voice prompt will
indicate your startup program.
OFF: When you’re not wearing the
hearing aids, keep the battery door
open to extend battery life. You do
not need to remove the battery.

13
There are several ways to determine the left and right hearing
aid. Use any of these methods:
1. Colored letters/numbers on end of tube near dome
(e.g. 2B)*
Blue = left ear
Red = right ear
2. Tip direction
When holding the hearing aid, the
tip should point towards the ear
canal
3. Dot indicator inside
battery door
No dot = left ear
Red dot = right ear
DETERMINING LEFT AND RIGHT HEARING AID
*Does not apply to power domes
and ear molds
14
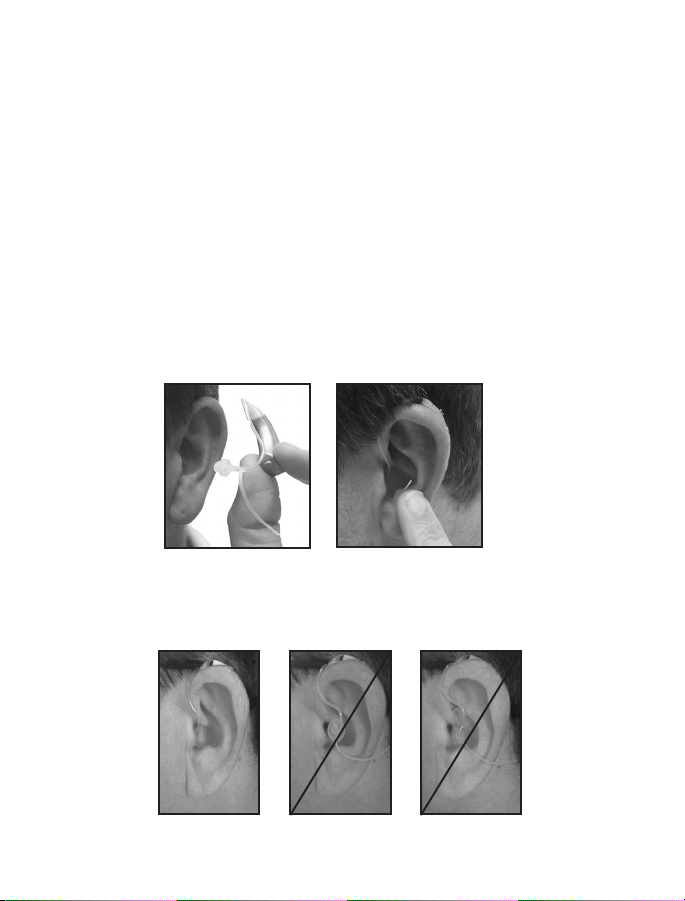
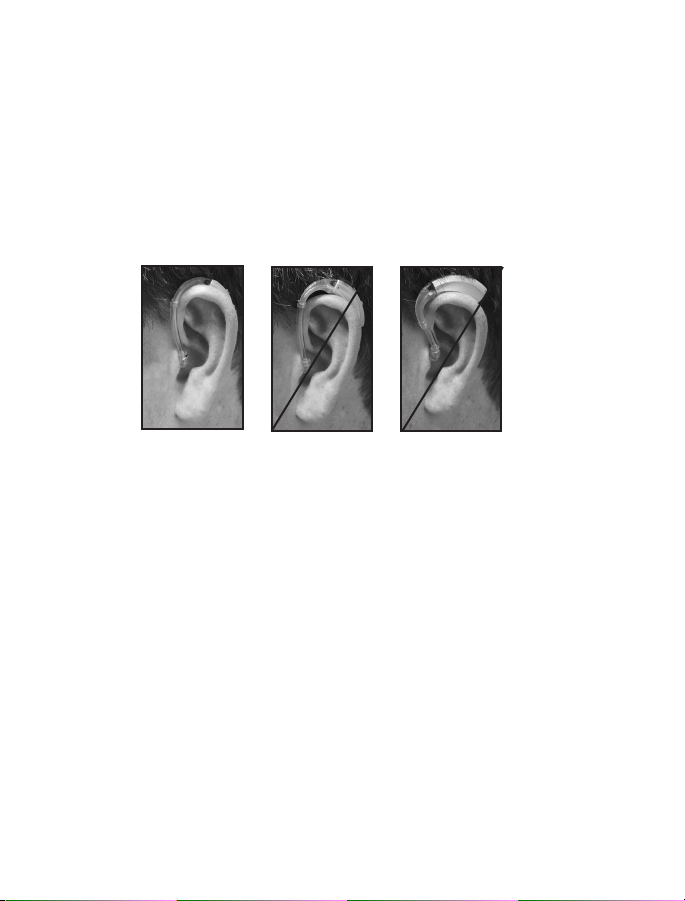
Inserting ear tube & tip
1. Place your hearing aid over the top of your ear until it rests
securely behind the ear. While holding the hearing aid in
place, insert the tip into your ear canal.
2. Gently slide the retention loop along the body of the ear.
The retention loop will eventually tuck in easily, as body heat
helps it conform to the shape of your ear.
3. For proper insertion, the goal is to have the length of the ear
tube & tip ush with your temple.
If you wear eye glasses or oxygen, put those on before you
place the hearing aid over your ear.
WEARING HEARING AIDS
15
Please call customer service if:
• Ear tube seems too long (e.g., falling o top of ear) or too
short (e.g., ear tip is pulling out of the canal)
• Power dome or ear mold is too loose or you experience
feedback (e.g., whistling/squealing)
• Hearing aid is too high up or far back on the ear
Inserting power dome or ear mold
1. While holding the hearing aid in place, insert the power
dome or ear mold into your ear canal.
2. For proper insertion, the goal is to have the length of the ear
tube ush with your temple.Proper insertion of the power
dome or ear mold* is crucial to avoid whistling and receive
enough volume.
*The ear mold is custom t by a hearing professional, and should t snugly in
your ear canal.

16
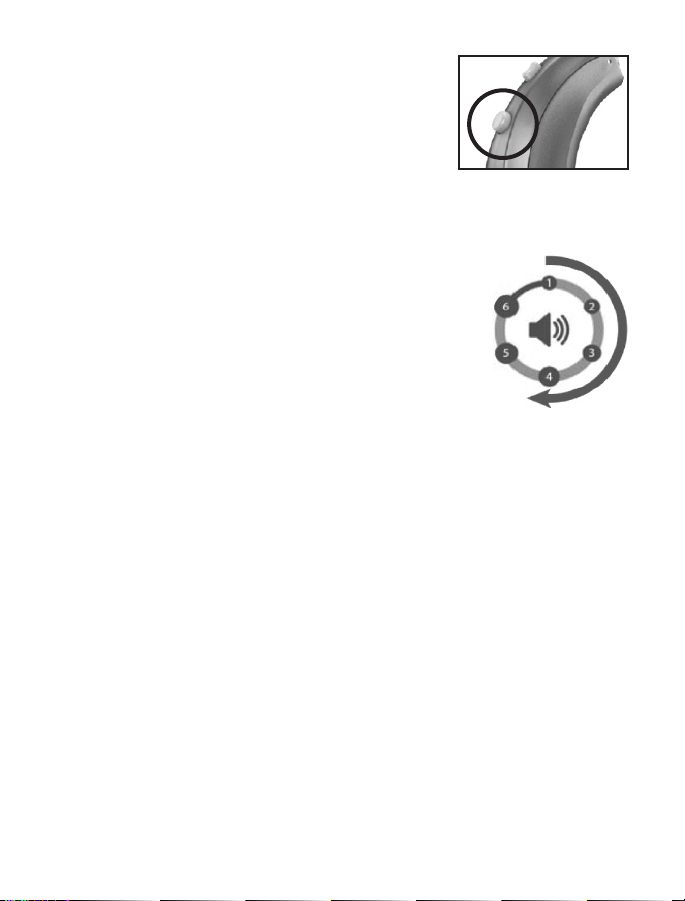
Program control
The program button allows you to choose
between two or three program settings.
Program 1 (normal, everyday)
Program 2 (noisy environments)
Program 3* (telephone or telecoil)
Spend the majority of time using program 1 or 2,
depending on the environment.
Use program 3 when using the telephone.
Within each program, you can also use the volume control
to make sounds louder or softer.
To change the program setting:
1. Simply press and release the program button.
The hearing aid will tell you which program has
beenselected.
2. Please keep the ear tube & tip, power dome, or ear
mold in your ear to hear the notication.
OPERATING HEARING AIDS
*Hearing aids dispensed by a hi HealthInnovations®’ professional at
your appointment may have less than three programs, the telecoil
setting may be in a dierent program, and the default volume may be
programmed at a dierent level than level 3.
17
Volume control
The volume button allows you to choose
between six volume levels.
Each time you
turn on the hearing aid, it will start at volume
level 3
.*
To change the volume control:
1. To increase the volume,
press and release the volume
button.
The hearing aid will tell
you which volume level has
beenselected.
2. To decrease the volume,
continue to press the button
until it cycles through the maximum volume and back to
volume 1.
The hearing aid will tell you which volume level has
been selected.
Then proceed to your desired volume level.
It is normal to have whistling when you hold the hearing aid
in your hand, or when you place your hand over your ear.
However, once the ear tube & tip, power dome or ear mold is
all the way in the ear canal, you should be able to wear your
hearing aid at a comfortable volume without whistling.
If your hearing aid whistles, turn the volume down.
Volume Maximum

18
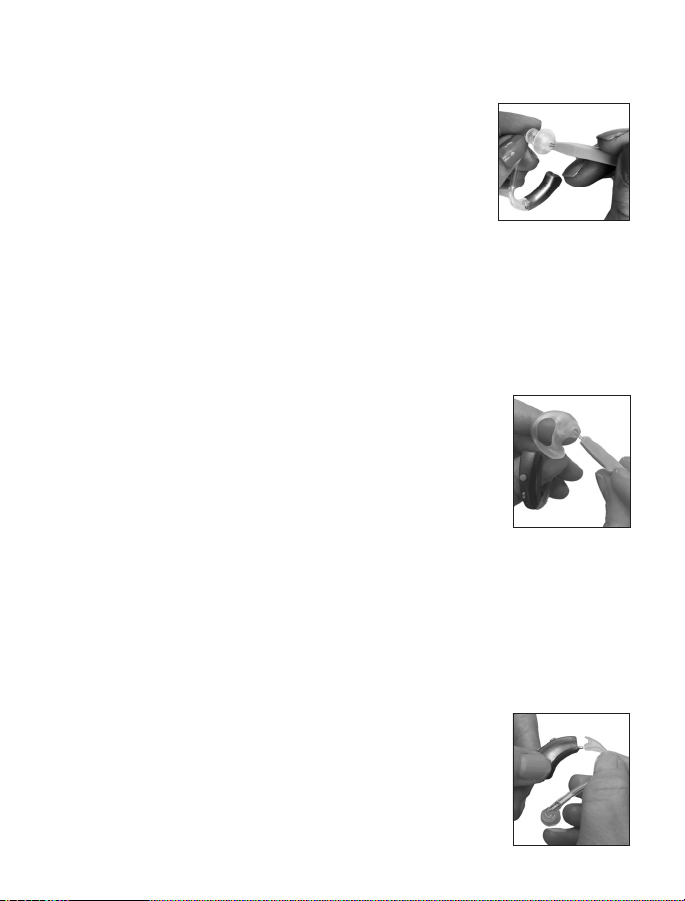
CLEANING HEARING AIDS
“triangle end”
“dome end”
• Grasp the “triangle end” of the ear tube &
tip or power dome.
• Gently twist 1/4 turn and pull to remove
from the hearing aid.
• Do not bend the ear tube & tip
back and forth to remove it.
Ear tube & tip or power dome
Do not detach ear mold from hearing aid
• Thread the cleaning wire through the
tube, starting at the “triangle end,” until it
comes out at the “dome end.”
• Pull the cleaning wire all the way through.
Be sure to wipe o the wire before the
next cleaning.
• Ensure the wire goes through the tube in only one
direction, from “triangle end” to “dome end.”
Do not reverse the wire back through the ear tube.
• Clean the ear tip with a dry cloth.
Ear tube & tip
1. Detach
2. Clean
19
Power dome
• To remove wax from the outside of the
dome, wipe it o daily with a dry cloth,
tissue or a non-alcohol wipe.
• Clean the ear mold daily with a sanitizing
wipe.
• Remove wax from the sound opening using
the loop end of the battery replacement tool.
• Have the tubing changed by a professional
every 6 - 12 months, or sooner if the tubing is
hard when squeezed.
• View our youtube videos on how to clean ear molds at
http://bit.ly/2bz5sEg.
• To remove wax from the sound opening of
the dome, use the loop end of the battery
replacement tool included with your
purchase.
3. Attach
Ear tube & tip or power dome
Ear mold
Please leave your ear hook, tube and ear mold attached to the
hearing aid while cleaning. Do not get the hearing aid wet.
• Align the triangle end of the ear tube & tip or
power dome with the gold rod on the top of
the device.
• Firmly press onto the hearing aid.

20
Your hearing aid may contain a telecoil (standard on the hi
BTE power plus, and hi BTE telecoil models) which receives
electromagnetic signals directly from the telephone and
converts it to sound. The telecoil setting, which is usually
program 3, turns o the regular microphone, so you can hear
more clearly on the telephone. The telephone must be placed
over the hearing aid. You may also need to increase the
hearing aid volume. After nishing your phone call, change
back to your preferred program, usually program 1 or 2, to
turn on the hearing aid microphone again.
Other uses of a telecoil
Many people use the telecoil with assistive
listening devices called FM or audio loops. If you
go to any events or religious services and the
room is “looped” that means you can use your
telecoil.
1. Set your hearing aids to the telecoil program.
When the speaker talks into the microphone, the sound will
be picked up by the “loop.”
2. The sound then goes directly into your hearing aid’s
telecoil.
3. After the event, change back to your preferred program,
usually program 1 or 2, to turn on the hearing aid
microphone again.
USING WITH PHONES
This manual suits for next models
3
Table of contents
Other hi Health Innavations Hearing Aid manuals


