Lite-Puter Junior 2001 User manual

ISO 9001 CERTIFIED
Index
Chapter I JUNIOR Introduction
1-1 Features...................................................................................2
1-2 Specifications .........................................................................2
1-3 Power on..................................................................................3
1-4 LCD power-saving device ......................................................3
1-5 Auto setting memorizing........................................................3
1-6 Notice.......................................................................................3
Chapter II Device Introduction
2-1 Control panel functions..........................................................4
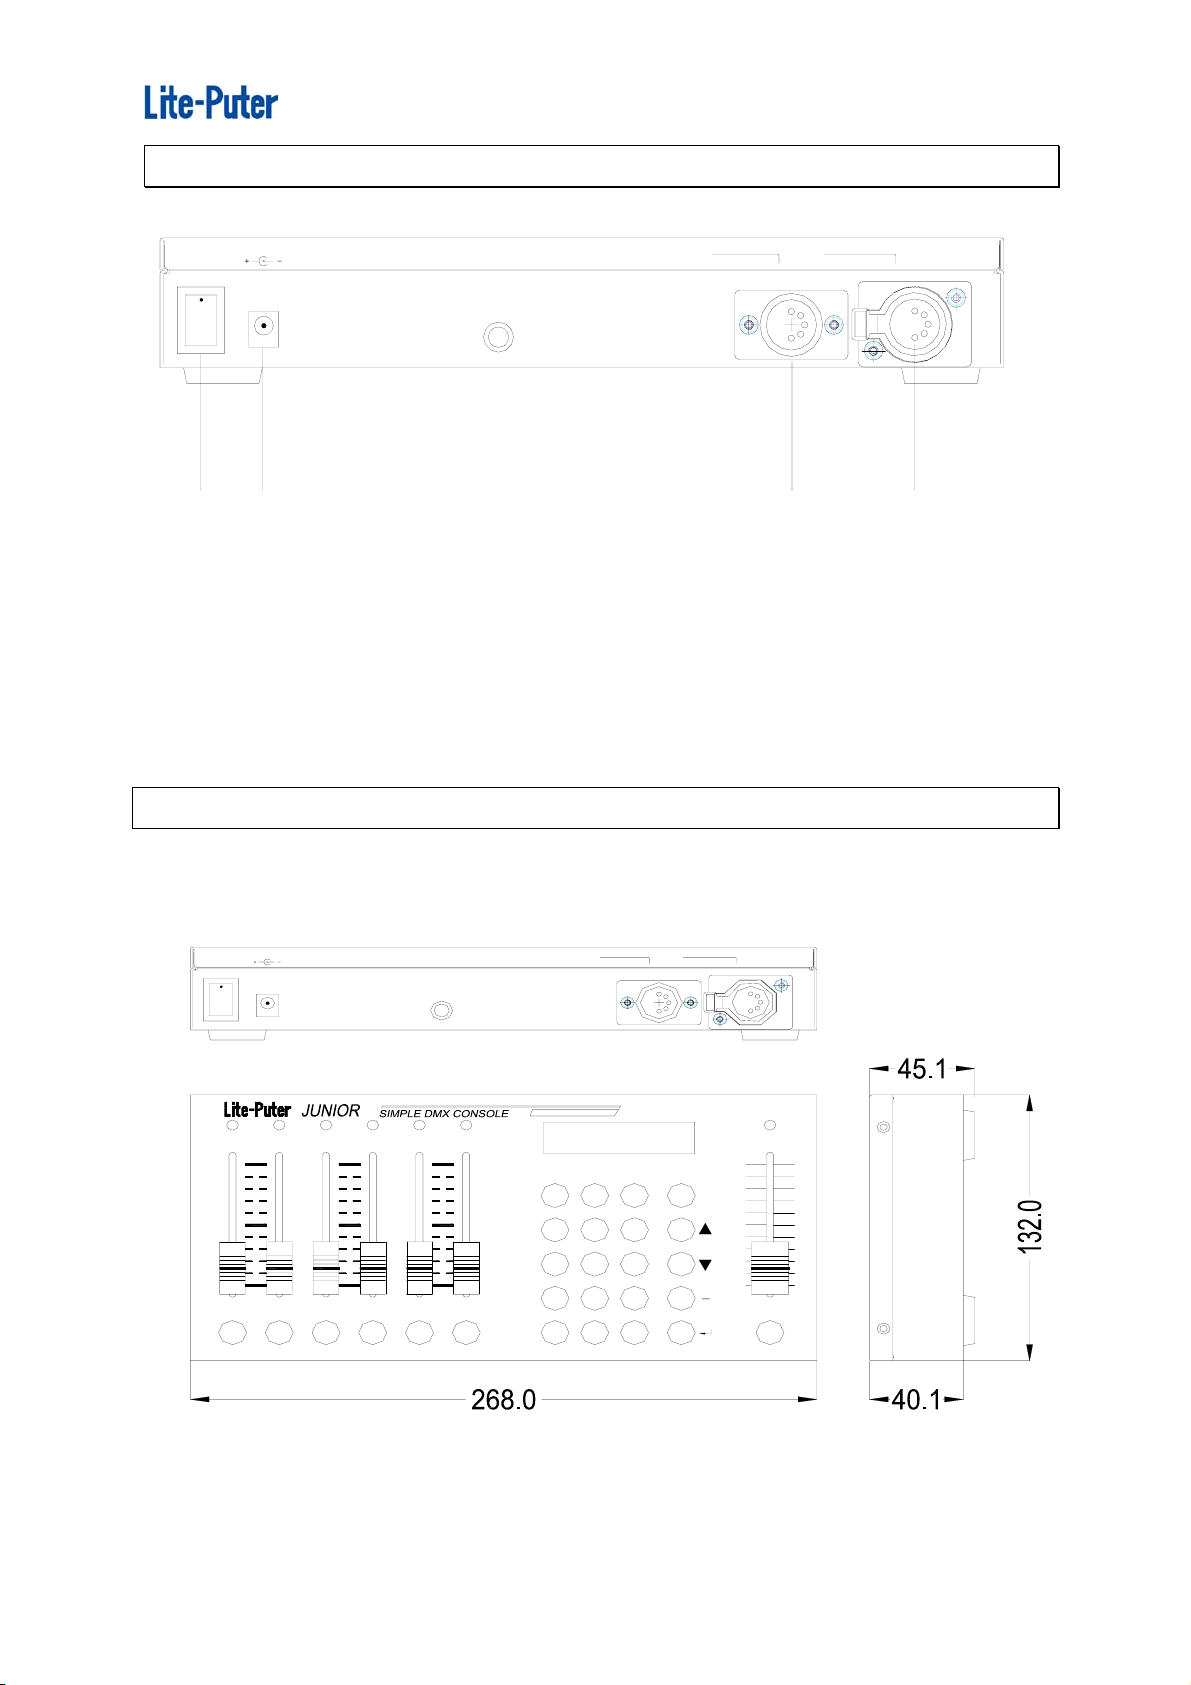
2-2 Rear panel functions ..............................................................5
2-3 Dimensions .............................................................................5
Chapter III Operations and Setting
3-1 Channel Value Setting
3-1-1 Start channel setting.......................................................6
3-1-2 Individual channel value setting......................................7
3-1-3 Constant channels value setting.....................................7
3-1-4 Clear the setting of all channels......................................9
3-2 Scenes Setting
3-2-1 Save scenes to SUB1 ~ SUB6 .....................................10
3-2-2 Save scenes to SCENE1 ~ SCENE40 .........................11
3-2-3 Call out by SUB1 ~ SUB6.............................................12
3-2-4 Call out by SCENE1 ~ SCENE40 .................................13
3-2-5 Amend the data in SCENE ...........................................13
3-2-6 Clear the output of SCENE...........................................14
3-3 Chase
3-3-1 Channel chase setting ..................................................15
3-3-2 Change the start channel of channel chase..................16
3-3-3 Setting of Chase+Back .................................................17
3-3-4 Chase Fader.................................................................18
3-3-5 SUB chase....................................................................19
3-4 Auto Fade
3-4-1 Auto Fade of individual channel....................................20
3-4-2 Auto Fade of constant channels ...................................21
Lite-Puter
JUNIOR[EUM-C]
1

ISO 9001 CERTIFIED
Chapter I JUNIOR Introduction
1-1 Features
Small and light.
Control 512 channels.
Can save 46 sets scens: 40 sets + 6 sets(hot keys)。
6 sets "hot keys" design. The users can save the most often used scenes to the
hot keys and call the scenes out quickly during performances.
The inner battery can work for 3 hours without external power input.
Can do simultaneous signal output with another console.
LOAD
DIMMER
LOAD
DIMMER
LOAD
DMX
CONSOLE
DIMMER
1-2 Specifications
Power supply DC 15V / 1A
DMX signal input / output DMX512 / 1990
DMX signal connector XLR 5-pin
Dimensions 262(L) x 132(W) x 45(H)mm
Weight 3Kg
CE Certificate ET87S-09-058
Lite-Puter
JUNIOR[EUM-C]
2

ISO 9001 CERTIFIED
1-3 Power on
There is DC POWER JACK on the rear panel providing the users to use 15V/1A
DC power input.
Please make sure the switcher on the control panel is ‘’ON’’ when the DC power
inputs.
DC POWER JACK: Inside『negative pole』, outside『positive pole』。
1-4 LCD power-saving device
To make the inner battery work longer, the LCD light will get dark if the users don’t
do any operation for 8 seconds. The LCD light will light up again when the users
press or push any key or fader.
1-5 Auto setting memorizing
The machine will auto memorize all the setting before switching off.
1-6 Notice
1. Please fill the battery for 4 hours before using this machine the first time.
2. The data will be lost if the machine is not turned on for 7 days.
Lite-Puter
JUNIOR[EUM-C]
3

ISO 9001 CERTIFIED
SUB1SUB
22
11
33
SUB2 4SUB3
22
11
33
5SUB 6SUB
22
11
33
99
66
44
77
88
99
66
44
77
88
99
66
44
77
88
6
9
ATCL 0
7
4
8
5
ENTER
MASTER
00
22
11
33
00
22
11
33
3
SC. CH.
1 2
FUNC. REC. 9999
66
55
44
77
88
66
55
44
77
88
110011 00
Chapter II Device Introduction
2-1 Control panel functions
1 LED Indicating executing channel
or scene.
2 FADER
VR
Adjust the channel value
Call out SUB scenes
Chase
3 SUB Set/ call out the SUB scenes
by these hot keys
4 CL Clear
5 0-9 Number keys / Letter keys 6 AT Indicator for channel value
7 ―Connecting key for one
channel to another channel.
8 ENTER Confirm key
9 ▲ Choose functions
Set channel
Adjust chase speed
10 ▼ Choose functions
Set channel
Adjust chase speed
11 MASTER Master dimming key 12 MASTER
VR
Master fader for dimming
value
13 LED Indicator of master dimming 14 REC key for recording scenes
15 FUNC Display all functions 16 CH Channel setting
17 SC Call out scenes 18 LCD Display
Lite-Puter
JUNIOR[EUM-C]
4

ISO 9001 CERTIFIED
2-2 Rear panel functions
DMXPOWER DC15V AUDIO IN
PUSH
OUT
1234
1) Power on / off
2) Power input 15V,1A
3) DMX signal connector: DMX IN
4) DMX signal connector: DMX OUT
2-3 Dimensions unit: mm
AT
SUB1SUB 23SUB
33
11
22
44
66
SUBSUB 4 5SUB6
33
11
22
44
66
33
11
22
44
66
87
CL 0
4
1
5
2
88
77
99
POWER DC15V
88
77
99
88
77
99 SC. CH.
AUDIO DMX
MASTER
9
ENTER
6
3
33
00
11
22
55
44
66
33
00
11
22
55
44
66
REC.
FUNC.
0011
88
77
99
0011
88
77
99
OUTIN
PUSH
Lite-Puter
JUNIOR[EUM-C]
5

ISO 9001 CERTIFIED
Chapter 3 Opertaion & Setting
※Must DO before all the setting:
Turn on the switch on the rear panel, and then push [MASTER VR] to the top -100%.
(MASTER VR affects the output value of all channels)
3-1 Channel value setting
3-1-1 Set the start channel
STEP-1:Press【FUNC】key,and LCD will display,
CH SETTING
SUB MASTER
STEP-2:Press【ENTER】key,and LCD will display,
In CHANNEL SETTING mode, each
VR controls different channels
CH.SET 1--- 6
CH 1-----= 0%
STEP-3:Use【▲】、【▼】keys to choose desired channel.
CH.SET 2--- 7
CH 2-----= 0%
Press【▲】once, and VR-1
corresponds to CH
-
2.
STEP-4:Push【VR-1】for direct output to CH-2; mean while LCD will show the output
value.
The dimming of CH-2 is 52%
CH.SET 2--- 7
CH 2----= 52%
STEP-5:In this example, start channel is CH.2. Please do the steps above to
change the start channel.
Lite-Puter
JUNIOR[EUM-C]
6

ISO 9001 CERTIFIED
3-1-2 Output setting of individual channel
! In this example, the start channel is CH-1.
STEP-1:Press【FUNC】key,and the LCD will display,
STEP-2:Press【ENTER】key.
STEP-3:Push【VR-1】for direct output to CH-1; meantime the LCD will show the
output value.
STEP-4:Then push【VR-2】.
STEP-5:Please repeat the above steps to set the output value of CH-3 to CH-6.。
3-1-3 Output setting of constant channels
EX.:How to set the output value to 50% from CH-5 to CH-20 at one time?
STEP-1:Press【CH】key then the vernier will go to CH
CH.SET 1--- 6
CH 2-----= 25%
The value 52% means the current
and exact VR
p
osition.
CH.SET 1--- 6
CH 1-----= 52%
In CHANNEL SETTING mode, each
VR controls different channels.
CH.SET 1--- 6
CH 1-----= 0%
CH.SET 1--- 6
CH 1-----= 0%
CH SETTING
SUB MASTER
Lite-Puter
JUNIOR[EUM-C]
7

ISO 9001 CERTIFIED
STEP-2:Use number keys【0…9】to enter the first channel.
CH.SET 1--- 6
CH 5-----= 0%
STEP-3:Press【―】key, then the users can enter the last channel.
STEP-4:Use number keys【0…9】to enter the last channel.
STEP-5:Press【AT】key and the vernier will go the the output value.
STEP-6:Use number keys【0…9】to enter the desired output value.
P.S. Users can also push 【VR-1】to 50% for a prompt output.
STEP-7:Press【ENTER】key to output the value of CH5 ~ CH20.
STEP-8:Please do as above steps to finish the setting of other constant channels.
CH.SET 21--- 26
CH 21-----= 0%
CH.SET 1--- 6
CH 5 -20-= 50%
CH.SET 1--- 6
CH 5 -20-= 0%
CH.SET 1--- 6
CH 5 -20-= 0%
CH.SET 1--- 6
CH 5 --= 0%
Users entered number【5】
Users entered numbers【2】&【0】
The original output value of CH5-CH20
is 0%.
Users entered the numbers【5】&【0
】
The display will show the next
channel automaticall
y
.
Lite-Puter
JUNIOR[EUM-C]
8

ISO 9001 CERTIFIED
3-1-4 Clear the setting of all channels
2 options:
(1). Press 【CL】+【CH】at the same time to clear the value setting of all channels.
(2). Push【MASTER VR】to the bottom then press the【MASTER】key.
Lite-Puter
JUNIOR[EUM-C]
9

ISO 9001 CERTIFIED
3-2 Scenes setting
3-2-1 Save scenes to SUB1 ~ SUB6
STEP-1:Follow the steps in chapter 3-1-2/ 3-1-3 to set the channels values. In
chapter 3-1-3, we have set the value of CH5 ~ CH20 as 50%, now we keep this
example for the following operation.
STEP-2:Press【REC】key and the LCD will display,
STEP-3:Press any key of【SUB1】~ [ SUB6].
STEP-4:Press【ENTER】key to save 1 set scene into SUB 1.
SAVE TO SUB1
ENT=SURE ANY=NO
Users pressed key SUB 1 to
enter the scene into SUB 1.
Yes:Press【ENTER】
No:Press any key
RECORD TO SC
KEYIN SC 1 … 40
2 setting options for memorizing 46 sets scenes in Junior:
(1). Setting with function key【SC】:Can set to 40sets
(2). Setting with hot key【SUB 1 ~ SUB 6】:Can set to 6sets
Users can memorize the most often used scenes to the 6 hot keys for quick
call-out.
Lite-Puter
JUNIOR[EUM-C]
10

ISO 9001 CERTIFIED
3-2-2 Save scenes to SCENE 1 ~ SCENE 40
STEP-1:Follow the steps in chapter 3-1-2/ 3-1-3 to set the channels values. In
chapter 3-1-3, we have set the value of CH5 ~ CH20 as 50%, now we keep this
example for the following operation.
STEP-2:Press【REC】key and the LCD will display,
RECORD TO SC
KEYIN SC 1 … 40
STEP-3:Use number keys【0…9】to enter the desired scene number.
If there is already data in Scene 5, the LCD will display as below,
If there is no data in Scene 5, then the LCD will display,
STEP-4:Use number keys【0…9】to enter a scene name.
1 A B C 2 D E F 3 G H I
4 J K L 5 M N O 6 P Q R
7 S T U 8 V W X 9 = Y Z
0 Change/ Blank
Yes:Press【1】
No
:
Press
【
2
】
OVERWRITE DATA
1: YES , 2:NO
Name: XY
Keyin ENGLISH.
Users can name Scene 5 with 9
En
g
lish letters at most.
Name:
Keyin ENGLISH.
Users entered【5】to save the
channels values into Scene 5.
RECORD TO SC 5
KEYIN SC 1 … 40
Lite-Puter
JUNIOR[EUM-C]
11

ISO 9001 CERTIFIED
STEP-5:Press【ENTER】key to conform.
3-2-3 Call out scenes saved in SUB1 ~ SUB6
STEP-1:Press【FUNC】key, and the LCD will display,
CH SETTING
SUB MASTER
STEP-2:Press【▼】key and the arrow will point to the next line,
CH SETTING
SUB MASTER
STEP-3:Press【ENTER】key to execute the output of SUB1 ~ SUB6.
SUB MASTER 1--6
LITE-PUTER CORP.
Press any hot key of【SUB1】~ [ SUB6], then the data in SUB1 ~ SUB6 will
output 100%.
Users keep on pressing 【SUB1】key
LOAD SUBSCENE 1
Push【VR1 ~VR6】, then the data will output 0--100%.
Users push【VR1】to the 30%.
SUB MASTER 1--6
SUB1= 30%
Lite-Puter
JUNIOR[EUM-C]
12

ISO 9001 CERTIFIED
3-2-4 Call out scenes saved in SCENE 1 ~ SCENE 40
After doing the [STEP-3] above, please follow next step below:
STEP-4:Press【SC】key
STEP-4:Use number keys【0…9】to enter the number of the desired scene.
STEP-4:Press【ENTER】key to confirm.
3-2-5 Amend the Scenes’ data
Following the last example: the channels values of Scene 5 is [CH5 ~ CH20 =
50%]
STEP-1:Call out the desired scene. (Please refer to [3-2-3] & [3-2-4]).
STEP-2:Press【CH】key.
1.) Push MASTER VR to 100% and SUB 1 VR to 50%, then the total output
value of Scene 1 is 50%.
2.) Push MASTER VR to 50% and SUB 1 VR to 50%, then the total output
value of Scene 1 is 25%.
SUB MASTER 1--6
LITE-PUTER CORP.
Users entered【5】. The LCD will also show
the scene name, but if the users didn’t give a
name, the second line will be blank.
LOAD SCENE 5
XY
LOAD SCENE
KEYIN SC 1 … 40
Lite-Puter
JUNIOR[EUM-C]
13

ISO 9001 CERTIFIED
CHANNEL MODIFY
CH 1-----= 0%
STEP-3:Use number keys【0…9】or【▲、▼】keys to select the desired channel.
CHANNEL MODIFY
CH 5-----= 50%
STEP-4:Press【AT】key to change the vernier position to the channel value.
CHANNEL MODIFY
CH 5-----= 50%
STEP-5:Use number keys【0…9】to enter the new output value.
CHANNEL MODIFY
CH 1-----= 60%
Users entered【6】,【0】
STEP-6:Press【ENTER】key to save the new data.
SUB MASTER 1--6
LITE-PUTER CORP.
Now the data in Scene5 is [ CH6 = 60%,CH7-CH20=50%]
P.S. If users wish to adjust the value of other channels in the same scene,
please repeat this function from the first step.
3-2-6 Clear the scenes’ output
2 options:
(1). Press【CL】+【SC】at the same time to clear all the values.
(2). Pull【MASTER VR】to the bottom and press the【MASTER】key.
Lite-Puter
JUNIOR[EUM-C]
14

ISO 9001 CERTIFIED
3-3 Chaser
3-3-1 Channel chaser setting
Chaser speed:0.1sec. -1 min.
There are 21 chaser spped for option: 0.1s , 0.3s , 0.5s , 0.6s , 0.7s , 0.8s , 1s ,
2s , 3s , 4s , 5s , 6s , 7s , 8s , 9s , 10s , 20s , 30s , 40s , 50s , 1min.
STEP-1:Press【FUNC】key
STEP-2:Press【▼】key twice.
STEP-3:Press【ENTER】key.
STEP-4:Use number keys【0…9】or【▲、▼】keys to set the start channel.
STEP-5:Press【ENTER】key and the vernier will move to the next line.
CH CHASE 1-6
MAS.=100% 0.5sec
CH CHASE 1-6
MAS.=100% 0.5sec
CH SETTING
CHANNEL CHASE
CH SETTING
SUB MASTER
MAS. is the abbreviation of MASTER
CH CHASE 1-6
MAS.=100% 0.5sec
Lite-Puter
JUNIOR[EUM-C]
15

ISO 9001 CERTIFIED
STEP-6:Use【▲】or【▼】key to select the speed.
CH CHASE 1-6
MAS.=100% 1sec
Users selected 1sec..
STEP-7:Push 【VR1】~ 【VR6】to desired level, and chaser will run from CH1 ~
CH6 automatically.
3-3-2 Change the start channel of chaser
STEP-8:If the users want to change the start channel, such as to set the chaser
starts from CH7, press【ENTER】key and the vernier will move to the channel setting
position in the first line.
CH CHASE 1-6
MAS.=100% 1sec
STEP-9:Press【7】and the LCD will display:
CH CHASE 7-12
MAS.=100% 1sec
STEP-10:Press【ENTER】and the vernier will move to the chaser speed setting in
the second line.
CH CHASE 7-12
MAS.=100% 1sec
STEP-11:Use【▲】or【▼】key to adjust to a proper chaser speed.
CH CHASE 7-12
MAS.=100% 0.7sec
Users adjusted to 0.7sec.
Lite-Puter
JUNIOR[EUM-C]
16

ISO 9001 CERTIFIED
STEP-12:Push【VR1】~【VR6】to desired level, and the chaser will run from VR1
~ VR6.
3-3-3 Setting of Chaser + Scene
‘Channel chaser‘ can be executed with one Scene(as back), and the users can
change the output value by using 【MASTER-VR】.
STEP-8:After executing a chaser, press【SC】key to call out one scene:
LOAD SCENE
KEYIN SC 1 … 40
STEP-9:Use number keys【0…9】to enter scene number.
LOAD SCENE 3
KEYIN SC 1 … 40
Users pressed【3】.
STEP-10:Press【ENTER】key to confirm.
CH CHASE 1-6
MAS.=100% 1sec
1. When the value of one channel is lower than the value of the back
scene, the output will be the higher one.
2. Press【SUB】key and the corresponding channel will output 100%.
3. After escaping from chaser mode, the chaser speed will be
memorized automatically.
Lite-Puter
JUNIOR[EUM-C]
17

ISO 9001 CERTIFIED
3-3-4 Chase Fader
STEP-1:Press【FUNC】key.
CH SETTING
SUB MASTER
STEP-2:Press【▼】key 5 times.
AUTO FADE
CHASE FADE
STEP-3:Press【ENTER】
FADE OFF
FADE ON
STEP-4:Press【▼】
FADE OFF
FADE ON
STEP-5:Press【ENTER】
CH CHASE 1-6
MAS.=100% 1sec
STEP-6:Push【VR1 ~ VR6】to the desired value then the chaser from CH-1 to CH-6
will be fade mode.
CH CHASE 1-6
MAS.=100% 1sec
Lite-Puter
JUNIOR[EUM-C]
18

ISO 9001 CERTIFIED
3-3-5 SUB Chaser
STEP-1:Press【FUNC】key.
CH SETTING
SUB MASTER
STEP-2:Press【▼】three times.
CHANNEL CHASE
SUB CHASE
STEP-3:Press【ENTER】key.
CHASE 1-6
CHASE 3-6
STEP-4:Press【▼】key.
CHASE 1-6
CHASE 3-6
‘Arrow’ will move to the second line.
STEP-4:Press【ENTER】key.
SUB CHASE 3-6
MAS.=100% 1sec
STEP-5:Use【▲】or【▼】key to adjust the chaser speed.
SUB CHASE 3-6
MAS.=100% 1sec
STEP-6:Push【VR1 ~ VR6】to desired value to adjust the output . In this setting,
users execute the chase with VR3 –VR6 and control the dimming value of the
Lite-Puter
JUNIOR[EUM-C]
19
This manual suits for next models
1
Table of contents
Other Lite-Puter Lighting Equipment manuals