LIVARNO LUX LSLB 20 A1 Product information sheet


V 1.3
English........................................................................................................................ 2
Français.................................................................................................................... 18
Nederlands .............................................................................................................. 37
Deutsch..................................................................................................................... 53

LIVARNO LUX LSLB 20 A1
2 - English
Table of contents
1. Intended use........................................................................................................... 3
2. Package contents ................................................................................................... 3
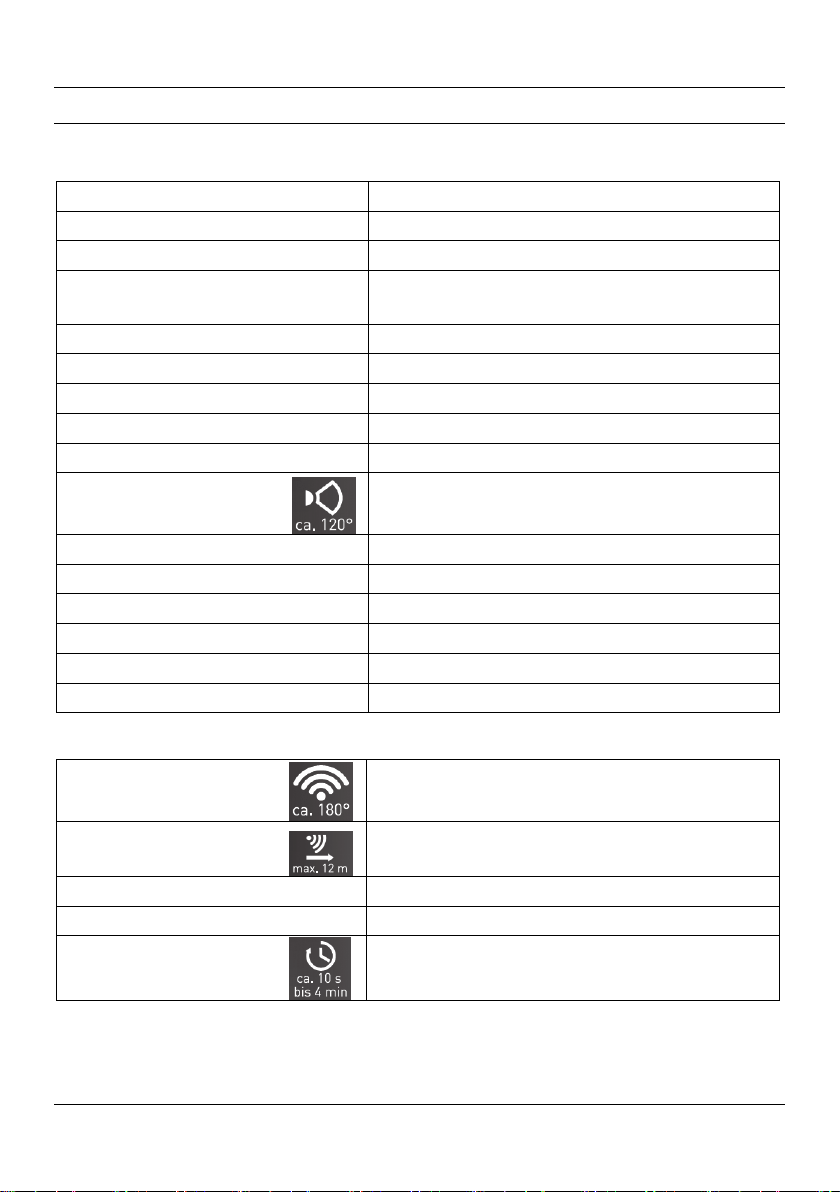
3. Technical Data ........................................................................................................ 4
4. Safety instructions .................................................................................................. 5
5. Copyright ............................................................................................................... 7
6. Before initial use..................................................................................................... 7
6.1 Proper mounting location.........................................................................................................................7
6.2 Required tools...........................................................................................................................................7
6.3 Before starting assembly..........................................................................................................................8
6.4 Mounting...................................................................................................................................................9
7. Initial use.............................................................................................................. 12
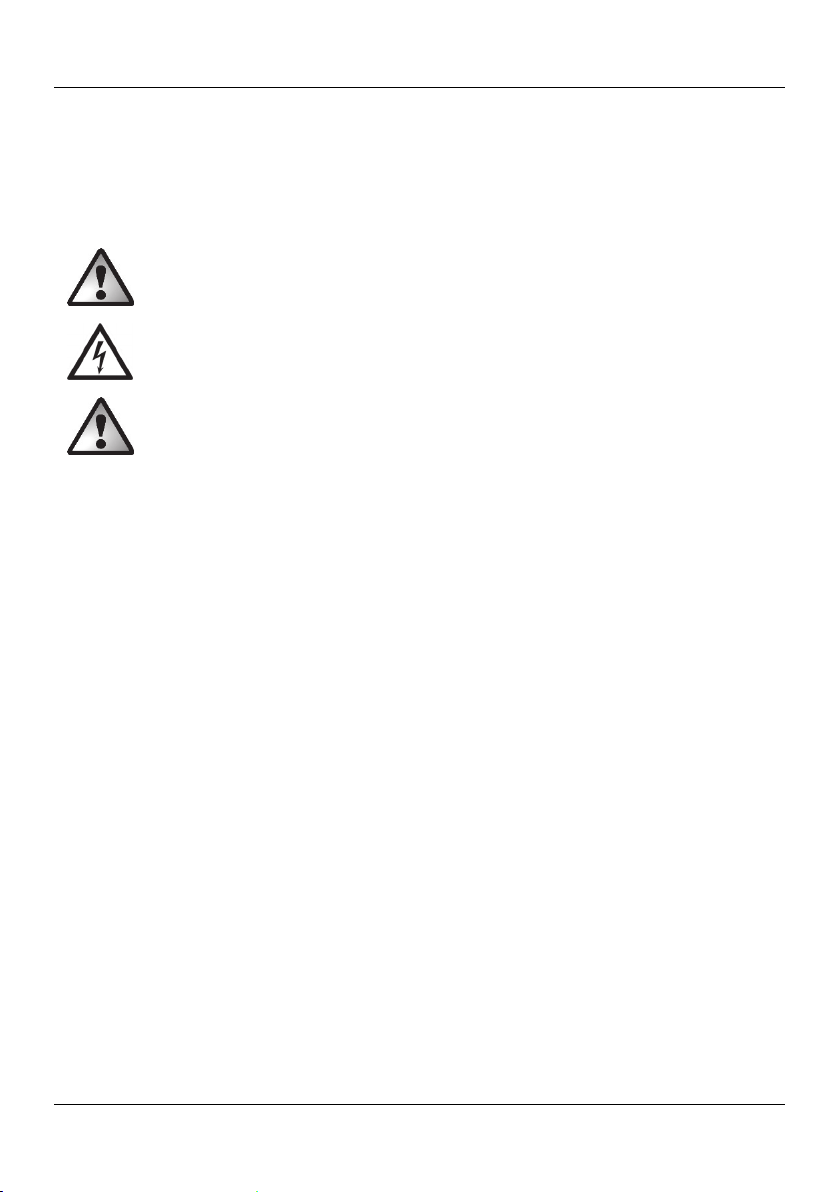
7.1 Configuring the motion sensor.............................................................................................................. 12
7.2 Configuring the illumination time (TIME).............................................................................................. 12
7.3 Configuring the photosensitivity (LUX) .................................................................................................12
7.4 Configuring the LED spotlight ...............................................................................................................13
8. Maintenance/cleaning.......................................................................................... 14
9. Troubleshooting ................................................................................................... 14
10. Environmental and waste disposal information.................................................. 15
11. Notes on conformity ........................................................................................... 15
12. Notes on guarantee and service......................................................................... 16
Congratulations!
By purchasing the LIVARNO LUX LSLB 20 A1 20-watt LED spotlight with motion sensor, hereinafter
referred to as LED spotlight, you have opted for a high-quality product.
These operating instructions are part of the product. They contain important information about the safety,
use and disposal of the device. Familiarise yourself with all the operating instructions and safety
information before using this product. Only use the product as described and for the uses indicated. If you
give the product to someone else, always pass on all the documentation.

LIVARNO LUX LSLB 20 A1
English - 3
1. Intended use
This LED spotlight is not intended for commercial use. It is only suitable for outdoor use. The LED spotlight is
a special product and, depending on the model, is able to withstand extreme negative temperatures as
low as minus 20°C. The LED spotlight is not intended to be used as interior lighting in the home.
The device meets the requirements of all relevant standards related to CE conformity. Compliance with
these standards is no longer guaranteed if a change is made to the LED spotlight without the authorisation
of the manufacturer.
2. Package contents
LIVARNO LUX LSLB 20 A1 LED spotlight
Assembly materials (two screws and two raw plugs)
Operating instructions including safety information
These operating instructions also have a cover that can be unfolded. The inside of the cover provides a
schematic of the LED spotlight and a number legend (figures Ato C). The numbers identify the following
parts/functions:
1 Swivel joint
2 Tilt joint
3 Reflector
4 Motion sensor
5 Sensor housing
6 Screw
7 Mounting plate
8 Unlock button
9 Lug
10 Power cable (not included in the package contents/house connection)
11 TIME knob
12 LUX knob
13 Screws (2, for wall mounting) - no image -
14 Dowel (2, for wall mounting) - no image -

LIVARNO LUX LSLB 20 A1
4 - English
3. Technical Data
Spotlight unit:
Brand: LIVARNO LUX
Model designation: LSLB 20 A1
Operating voltage: 220–240 V~ (AC voltage), 50/60 Hz
Power consumption
Entire LED spotlight unit:
Approx. 20 W (+/- 8%)
Protection class: I (with protective conductor terminal)
Protection class: IP44 (splash-proof)
Lamp type: (42 x 0.5 W LED)
Total luminous flux: Approx. 1,600 lm +/-5% (with cover)
Colour temperature: approx. 5,000 K (neutral white)
LED light emission angle: Approx. 120°
Ra (colour rendering index) > 80 N
LED service life: Approx. 50,000 hours
Operating position: Vertical – spotlight top, motion sensor bottom
Max. projected light area: Approx. 30 m² when assembled approx. 2 m high
Dimensions (W x H x D): approx. 18.2 x 22.7 x 15.6 cm
Weight: Approx. 650 g
Motion sensor:
Sensor detection angle: Max. 180°
Detection range: Max. 12 m
Photosensitivity: Can be adjusted
using rotary control (mechanically): Approx. 120° horizontally, approx. 30° vertically
Illumination time (adjustable): Approx. 10 sec +/- 5 sec to 4 min +/- 1 min
The specifications and design are subject to change without notice.

LIVARNO LUX LSLB 20 A1
English - 5
4. Safety instructions
Before using the LED spotlight for the first time, please read the
following instructions carefully and observe all warnings, even if you
are familiar with using electronic devices. Keep these operating
instructions in a safe place for future reference. If you give the
device away or sell it, please ensure that you also pass on this
manual.
A shattered protective cover must be replaced.
The LED spotlight has a protective conductor terminal.
The protective conductor terminal (yellow/green) must
be connected to the marked lug (9).
DANGER! This icon, together with the word
“Danger”, indicates an impending dangerous situation
that, if not prevented, can lead to serious injuries or
even death.
WARNING! This icon, with the word “Warning”,
indicates important information for the safe operation
of the device and user safety.
CAUTION! This icon, with the word ‘Caution’,
indicates important information for protection against
damage to property.
DANGER! This icon warns of dangerous electrical
voltage!
This icon gives you information on the topic.

LIVARNO LUX LSLB 20 A1
6 - English
DANGER! Electrical devices must be kept out of the reach of
children. Never leave children unattended with electrical
devices. Children may not be able to recognise hazards. Also
keep the packaging film away from children. There is a risk of
suffocation.
DANGER! A dangerous electrical voltage may be present in
the light and at the light source, and therefore poses a serious
risk to persons.
DANGER! The housing of the LED spotlight must not be
damaged. If the housing is damaged, there is a risk of electric
shock.
DANGER! Never open the housing of the LED spotlight, as
this contains parts to be maintained. If the housing is open,
there is a risk of electric shock.
WARNING! If you notice any smoke, unusual noises or
smells, immediately switch off the LED spotlight. In these cases,
you must not continue to use the device until it has been
checked by a specialist. Do not inhale smoke possibly caused
by a burning device. If you have inhaled smoke, consult a
physician. Inhaling smoke can be harmful to your health.
WARNING! Never look directly into the light beam with the
aid of optical instruments, such as a magnifying lens. There is
the risk of injuring your eyes. If you think you have damaged
your eyes, consult a physician.
CAUTION! Do not attach any objects to the LED spotlight.
The housing is not designed to carry any weights. This could
damage the LED spotlight.

LIVARNO LUX LSLB 20 A1
English - 7
5. Copyright
All contents of these operating instructions are subject to copyright law and are provided to the user solely
as a source of information. Any form of copying or reproduction of data and information without the
express written permission of the author is prohibited. This also concerns commercial use of the content
and data. The text and illustrations correspond to the technical standards at the time of printing. Subject to
alterations.
6. Before initial use
Remove the solar LED spotlight and the mounting materials from the packaging.
Check the LED spotlight for signs of damage. If the LED spotlight is damaged, it must not be put into
operation.
If the device is faulty or incomplete on delivery, please contact the manufacturer’s service department.
6.1 Proper mounting location
Carefully choose the mounting location and thoroughly prepare for assembly.
Systematically arrange all individual parts, required tools and mounting materials and place them
within easy reach.
The LED spotlight may only be mounted on a sturdy support, such as a masonry wall, for example.
The power supply must only be established via the building’s electric system.
Do not mount the solar LED spotlight above a heat source or within direct proximity of other light
sources. Also account for Figures [D and E] on the cover page when selecting the mounting location.
Choose a mounting location that protects the LED spotlight from wind, rain and soiling.
Please find out in advance which assembly materials are suitable for the location you have chosen to
mount the lamp. The solar LED spotlight is delivered with mounting materials suitable for concrete.
6.2 Required tools
The package does not include the following tools. This list is provided as a general guide. The precise
characteristics of the required tools depend on the chosen mounting location.
Ladder
Voltage tester
Spirit level, folding ruler, pencil
Drill with 6 mm masonry/concrete drill bit

LIVARNO LUX LSLB 20 A1
8 - English
Phillips screwdriver, flat-tip screwdriver
Open-ended spanner, combination pliers, wire cutter
6.3 Before starting assembly
DANGER! The device must only be assembled by an authorised qualified electrician. The
power supply must only be established via the building’s electric system.
DANGER! The electric circuit must be switched off during assembly!
WARNING! When drilling holes, ensure that you do not damage any hidden cables or
pipes.
Before assembly, make yourself familiar with the individual parts of the LED spotlight as well as with
the instructions and illustrations, and observe them during assembly.
Ensure that the cable to which the LED spotlight is to be connected, is not live. With this in mind,
remove the fuse from the relevant electric circuit in your fuse box or set the fuse to “0”.
You must also use a voltage tester to check that the cable is not live.

LIVARNO LUX LSLB 20 A1
English - 9
6.4 Mounting
The LED spotlight is designed for wall mounting only.
Before installation, ensure that the cable to
which the product is to be connected is not live.
To do this, remove the fuse or switch off the
circuit breaker in the fuse box (position 0).
Detach the mounting plate (7) from the LED
spotlight by using a Phillips screwdriver to
remove the screws (6).
Now push the unlock button (8) on the mounting
plate (7) downwards and remove the mounting
plate (7) on the tie from the LED spotlight
housing.
Once you have removed the two screws, you
can then remove the strain relief.

LIVARNO LUX LSLB 20 A1
10 - English
Push the prepared connecting cable from
behind through the rubber seal of the cable
bushing.
Pierce the pre-cut mounting holes and then mark
the position of the drill holes on the wall so that
you can then drill the wall. Insert the dowels
(14) into the drilled holes.
Now screw in the screws (13) to fix the
mounting plate (7) securely to the wall.
Now wire the connecting cable correctly into the
lug (9) on the mounting plate (7). When doing
so, observe the marking on the individual
terminals. Also account for Figure [B] on the
cover page.
DANGER! If the colour coding on
your connecting cable differs from
the illustration opposite, the
connecting cable must be measured
by a qualified electrician and the
configuration of the individual wires
determined.
Symbol
W
ire
Nblue
yellow/green
Lbrown

LIVARNO LUX LSLB 20 A1
English - 11
Then fasten the power cable (10) by reinserting
the strain relief with the two screws.
Now fit the LED spotlight onto the mounting
plate (7). Push the unlock button (8) downwards
and slide the LED spotlight towards the wall until
the unlock button (8) snaps into the recess in the
LED spotlight housing.
The final step is to fasten the screws (6) into the
mounting plate (7) through the LED spotlight
housing from underneath using a Phillips
screwdriver.
Switch the electric circuit back on. To do this,
reinsert the fuse or switch on the circuit breaker
in the fuse box (position 1).

LIVARNO LUX LSLB 20 A1
12 - English
7. Initial use
7.1 Configuring the motion sensor
Ensure that no places where traffic is common (e.g. pavements, streets) are located within the
motion sensor’s (4) range.
When setting the photosensitivity of the motion sensor (4), you should do so at a time when the
lighting conditions configured to trigger the LED spotlight are prevalent.
The rotation of the sensor housing (5) enables you to configure the “TIME” (11) and “LUX”
(12) knobs more easily. Also observe Figure [C] on the cover page.
Align the motion sensor (4) so as to ensure maximum coverage of the area to be monitored. This means
that no obstructing objects should be present in the path.
You can change the horizontal position of the motion sensor (4) by turning the sensor housing (5). It is
possible to change the motion sensor (4) to the vertical position by tilting the sensor housing (5).
7.2 Configuring the illumination time (TIME)
Use the TIME knob (11) on the sensor housing (5) to adjust the illumination time (approx. 10 sec to
4 min). Turn the TIME knob (11) clockwise (+direction) to increase the illumination time, or turn it counter-
clockwise (-direction) to reduce the illumination time.
7.3 Configuring the photosensitivity (LUX)
Use the LUX knob (12) on the sensor housing (5) to adjust the photosensitivity. This setting determines
what ambient light level will trigger the twilight sensor to turn the LED spotlight on or off.
Turn the LUX knob (12) clockwise (direction) to make the motion sensor (4) trigger in brighter ambient
conditions.
Turn the LUX knob (12) counter-clockwise (direction) to make the motion sensor (4) only trigger in
darker ambient conditions.

LIVARNO LUX LSLB 20 A1
English - 13
7.4 Configuring the LED spotlight
The LED spotlight can be rotated within a range of 100° using the swivel joint (1).
The LED spotlight can be tilted within a range of 98° using the tilt joint (2).

LIVARNO LUX LSLB 20 A1
14 - English
8. Maintenance/cleaning
Maintenance
The LED spotlight does not contain any components that require maintenance. The LED lamp cannot be
replaced.
Cleaning
DANGER! The electric circuit must be switched off during any work on the LED spotlight and
also during cleaning! There is a risk of electric shock!
DANGER! Ensure that no liquids are able to enter the housing of the solar LED spotlight.
There is a risk of electric shock.
Clean the LED spotlight using a soft, dry cloth, and never use cleaning agents or solvents that react with
plastic. If the LED spotlight is heavily soiled, use a very slightly moistened cloth.
9. Troubleshooting
The light does not go on
The motion sensor (4) is not properly aligned. Correct its alignment.
The electrical connection is faulty. Have the electrical connection checked by a qualified electrician.
The light goes on and off in rapid succession
The sensor is experiencing interference caused by an external light source or bright, reflecting
surfaces. Remove the external light source or the surfaces that cause interference.
The light does not go off
There are persons or objects in the sensor range of the motion sensor (4). Remove these.
The LED spotlight is swaying in the wind, causing the motion sensor (4) to trigger continuously. Make
sure that the solar LED spotlight is firmly attached to a sturdy surface.

LIVARNO LUX LSLB 20 A1
English - 15
10. Environmental and waste disposal information
Devices marked with one of these symbols are subject to the European Directive
2012/19/EU. Electrical and electronic equipment must not be put in the household
waste, but must be disposed of via designated public disposal centres.
The device may not be disposed of with household or bulk waste. You can find
information on collection points or collection dates from your local authorities or your
local waste management companies.
Make sure the packaging is disposed of in an environmentally friendly manner.
Cardboard packaging can be put out for waste-paper collection or taken to public
collection points for recycling. The plastic packaging used for your device is collected by
your local waste management company and disposed of in an environmentally-friendly
manner.
Please pay attention to the labels on packaging materials when you separate waste;
these are marked with abbreviations (a) and numbers (b) that mean the following:
1–7: Plastics/20–22: Paper and cardboard/80–98: Composite materials.
11. Notes on conformity
This product fulfils the requirements specified in the applicable European and
national policies. This product’s conformity has been verified. The declarations and
documents are stored with the manufacturer.
You can download the full EU declaration of conformity at the following link:
www.targa.de/downloads/conformity/309794.pdf

LIVARNO LUX LSLB 20 A1
16 - English
12. Notes on guarantee and service
Warranty of TARGA GmbH
Dear Customer,
This device is sold with three years warranty from the date of purchase. In the event of product defects,
you have legal rights towards the seller. These statutory rights are not restricted by our warranty as
described below.
Warranty conditions
The warranty period commences upon the date of purchase. Please keep the original receipt in a safe
place as it is required as proof of purchase. If any material or manufacturing faults occur within three
years of purchase of this product, we will repair or replace the product free of charge as we deem
appropriate.
Warranty period and legal warranty rights
The warranty period is not extended in the event of a warranty claim. This also applies to replaced and
repaired parts. Any damage or defects discovered upon purchase must be reported immediately when the
product has been unpacked. Any repairs required after the warranty period will be subject to charge.
Scope of warranty
The device was carefully manufactured in compliance with stringent quality guidelines and subjected to
thorough testing before it left the works. The warranty applies to material and manufacturing faults. This
warranty does not cover product components which are subject to normal wear and which can therefore
be regarded as wearing parts, or damage to fragile components such as switches, rechargeable batteries
or components made of glass. This warranty is void if the product is damaged, incorrectly used or
serviced. To ensure correct use of the product, always comply fully with all instructions contained in the
user manual. The warnings and recommendations in the user manual regarding correct and incorrect use
and handling of the product must always be observed and complied with. The product is solely designed
for private use and is not suitable for commercial applications. The warranty is rendered void in the event
of incorrect handling and misuse, if it is subjected to force, and also if any person other than our
authorised service technicians interfere with the device. No new warranty period commences if the
product is repaired or replaced.
Submitting warranty claims
To ensure speedy handling of your complaint, please note the following:
-Before using your product for the first time, please read the enclosed documentation carefully.
Should any problems arise which cannot be solved in this way, please call our hotline.
-Always have your receipt, the product article number as well as the serial number (if available)
to hand as proof of purchase.
-If it is not possible to solve the problem on the phone, our hotline support staff will initiate further
servicing procedures depending on the fault.

LIVARNO LUX LSLB 20 A1
English - 17
Service
Phone: 0800 404 7657
Phone: 1890 930 034
Phone: 800 62230
Phone: 8009 4409
IAN: 309794
Manufacturer
Please note that the following address is not a service address. First contact the service point stated above.
TARGA GmbH
Coesterweg 45
DE-59494 Soest
GERMANY

LIVARNO LUX LSLB 20 A1
18 - Français
Contenu
1. Utilisation conforme ............................................................................................. 19
2. Contenu de la livraison ......................................................................................... 19
3. Caractéristiques techniques .................................................................................. 20
4. Consignes de sécurité ........................................................................................... 21
5. Droits d’auteur ..................................................................................................... 23
6. Avant la mise en service ....................................................................................... 23
6.1 Lieu de montage idéal ..........................................................................................................................23
6.2 Outils nécessaires..................................................................................................................................24
6.3 Avant le montage.................................................................................................................................. 24
6.4 Montage ................................................................................................................................................ 25
7. Mise en service ..................................................................................................... 28
7.1 Ajustement du détecteur de mouvement..............................................................................................28
7.2 Réglage de la durée d’éclairage (TIME)............................................................................................. 28
7.3 Réglage de la sensibilité à la lumière (LUX)........................................................................................28
7.4 Ajustement du projecteur DEL...............................................................................................................29
8. Entretien/nettoyage ............................................................................................. 30
9. Résolution des problèmes..................................................................................... 30
10. Directives environnementales et indications concernant
l’élimination des déchets .......................................................................................... 31
11. Remarques relatives à la conformité .................................................................. 31
12. Remarques concernant la garantie et le service après-vente .............................. 32
Félicitations !
Grâce à l’achat duprojecteur DEL avec détecteur de mouvement 20 watts LIVARNO LUX LSLB 20 A1, ci-
après désigné « Projecteur DEL », vous avez fait le choix d’un produit de haute qualité.
Le mode d’emploi fait partie intégrante de ce produit. Il contient des informations importantes sur la
sécurité, l’utilisation et la mise au rebut de l’appareil. Familiarisez-vous avec les consignes de sécurité et
d’utilisation avant d’utiliser l’appareil. Utilisez l’appareil selon les instructions et uniquement dans les
domaines d’application décrits dans ce mode d’emploi. Veuillez également transmettre tous ces
documents en cas de cession du produit à un tiers.
Table of contents
Languages:
Other LIVARNO LUX Floodlight manuals