Live Fine LVFRAPD5 User manual

Automatic Pill Dispenser
User Guide
LVFRAPD5

Thank you for purchasing the LiveFine®Automatic Pill Dispenser. This User Guide is intended
to provide you with guidelines to ensure that operation of this product is safe and does not pose
risk to the user. Any use that does not conform to the guidelines described in this User Guide may
void the limited warranty.
Please read all directions before using the product and retain this guide for reference. This
product is intended for household use only. It is not intended for commercial use.
This product is covered by a limited one-year warranty. Coverage is subject to limits and
exclusions. See warranty for details.
Tips and Precautions
• Do not let children use or play with this device.
• Do not use any attachments not supplied or recommended by the manufacturer.
• Do not place the appliance near open flames or heat sources. Fire, electric shock, product
damage, or injury might occur.
• Make sure to keep the pill dispenser on a flat, stable surface. Do not flip it upside down
unless you are removing pills from their compartment. Please note, the internal pill
container is removable for easy filling.
• Be careful not to drop the pill dispenser, as this could damage the product or the pills inside.
• Water can damage the dispenser, cause issues with the batteries, or otherwise adversely
affect the medication contained inside. Do not immerse this pill dispenser in water or other
liquids, or expose it to liquids that might get splashed on it. Do not place it in an environment
where there is excessive moisture or humidity.
• Do not fill the internal pill container unless it is completely dry.
• Never force the locking cover open.
• Never use mismatched batteries, or batteries with wrappings that have been torn or
damaged in any way.
• Do not mix old and new batteries.
• Organizing medications correctly and assigning quantities and times is the sole responsibility
of the user and/or their caregiver or healthcare provider. LiveFine®is not liable for
missed medications.
• If you do miss a dose for any reason, please contact your healthcare provider and/or follow
the directions provided by your physician or pharmacist.
2

3
• Some medications should be stored tightly sealed and not exposed to the air. If you are
uncertain about whether this dispenser is appropriate for storing your medications, please
check with your healthcare provider or pharmacist.
• A low battery symbol will appear in the upper right corner of the LCD display when
battery power is low. Be sure to change the batteries promptly to ensure the proper operation
of the pill dispenser.
Product Features
1. Automatic Pill Alerts: The system will repeatedly flash the light indicator ring, rotate the
internal pill container, and sound a beeping alarm every seven (7) seconds, until the unit has
been fully inverted, for a period of up to 30 minutes, according to the schedule you set.
2. Automatic Dispensing System: Automatically rotates the carousel at the designated pill
times to prevent forgotten or double doses. Displays the time on an LCD display for further
accuracy in dosage monitoring.
3. 28 Spacious Pill Compartments: The internal pill container features ample space in each
compartment to accommodate multiple pills or tablets, so you can fit all the pills you need to
take at a designated time in the same slot.
4. Clear, Removable Carousel: Lift the internal pill container out of the main body of the device
for easy refilling. The container automatically rotates according to the schedule you set.
5. Interchangeable Daily Dosage Rings: The six (6) interchangeable rings included help you
keep track of the medications you take per day, and guide you through which pills go in
which slots.
6. Locking Cover: The powerful latch and the manual locking key help keep your medications
secure and prevent messes or spills, unwanted tampering, accidental removal, or theft.
7. Mini Magnifying Glass: The magnifying glass above the dosage window helps you get a
closer look at your corresponding dosage information, and see pills clearly.
8. Pill Delivery Door: The easy-slide window to access your pills at dosage times is much
easier on fingers and joints than traditional “flip-open” pill containers. Once the internal pill
container rotates into the correct position, simply slide open the door and invert the unit to
receive your medication and simultaneously stop the alarm.

4
9. Easy-to-Read LCD Display: The large numbers on the LCD display show the clock time in
either 12- or 24-hour times for your convenience. The three touch buttons underneath allow
you to set alarms, adjust the volume, switch between 12/24-hour time display, and choose
between the two types of alarms.
10. Battery Operation: The automatic pill dispenser runs on four (4) AA alkaline batteries, and
never needs to be plugged in or charged. (But make sure you have extra batteries on hand!)
You can stay on track with your medications wherever you may go, without needing to worry
about charging cables or outlet access.
Package Contents
LiveFine®Automatic
Pill Dispenser
Locking key Dosage rings
AA alkaline
batteries (4)
User guide

5
Parts and Controls
Top locking cover
Cover latch
Dispensing window
Magnifying
dosage viewer
Indicator light ring
Battery door
Speaker
Internal pill
container (removable)
LCD Display
Daily dosage ring
Battery door latch
Cover lock
Button A
Button B
Button C

6
Understanding the Daily Dosage Rings
Your automatic pill dispenser comes with 6 different rings, corresponding to the number of times
per day that medication needs to be dispensed. The rings are designed to help you in laying out
medication in the internal pill container so it is properly dispensed. The internal pill compartment
has 28 slots for medication.
The dosage ring must first be placed in the center of the internal pill container with the tab in the
bottom spot (indicated by the ▲on the plastic container) before you start filling it with medication.
Once the dosage ring is properly situated, the alternating colors help you to distinguish between
days. For example, if you are using the 2x Per Day ring (meaning medication only needs to be
dispensed at two different times each day), this will accommodate 14 days’ worth of medication.
The blue numbers to the right of the tab are the first day’s medications. The white spaces are the
following day’s medications. The colors alternate so that days do not get confused. The space
marked “1” is where you would put the first dose for that day, the space marked “2”
1 dose 2 doses 3 doses
4 doses 5 doses 6 doses

7
is where you would put all medications to be dispensed at the second time, etc. The pill
compartments should accommodate all necessary medications in a single slot.
DO NOT PUT MEDICATION IN THE SLOTS INDICATED BY THE RED
SPACES. These spaces indicate remainder times. For example, if
you need medication dispensed at 5 different times during the
day, the ring can accommodate 5 days, or 25 medication times.
Three slots are left over. These leftover slots are indicated by the
red ring, and this is why there are substantially larger red areas on
the 5x per day and 6x per day rings. Do not put medication in
those slots.
To use the Daily Dosage Rings, choose the ring with the tab that
correctly indicates how many times per day you need medication dispensed. Position the ring
around the compartment. Fill each compartment accordingly and then place the carousel back
into the dispenser with the dosage ring.
no medication
Installing the Batteries
1. Turn the dispenser upside-down. Release the battery latch by sliding it toward the outer edge
of the dispenser until it clicks.
2. Remove the battery door.
3. Insert four (4) AA alkaline batteries, making sure to match the polarities (+ and – sides) with
the + and - markings inside the compartment.
4. Replace the battery door.
5. Slide the battery latch toward the battery door until it clicks into place.
Ring # # of Meds per Day Programmable Time Period
1 1 28 days
2 2 14 days
3 3 9 days
4 4 7 days
5 5 5 days
6 6 4 days

8
Locking and Unlocking the Cover
The cover lock helps to prevent accidental spills and prevents unwanted access to your
medication dispenser. This can also help with patients who are confused and may try to take
medication at the wrong times.
1. Take the metal key and line it up with the notches on
the cover lock (located on the bottom of the dispenser
as shown).
2. You will see a vertical line at the top, and a horizontal
line with the letter L on the left side. Press down on
the cover latch and turn the key toward the L
(counterclockwise) to lock the cover in place.
3. Turn the key toward the vertical line (clockwise) to
unlock the cover.
4. Lift the cover open using the cover latch.
Setting the Time
1. Press and hold the Abutton for approximately three (3) seconds,
until the :stops flashing.
2. Press the Bbutton to adjust the hours and press the Cbutton to
adjust the minutes, until the time is correct.
3. When finished, press the Abutton again to return to Clock Mode.
Setting the Volume, Alarm Type, and 12-Hour/24-Hour Time
1. While on Clock Mode (not setting any alarms), press the Cbutton once to enter the time and
volume menu.
2. You will see a number in the bottom left corner that says 0, 1, or 2; either a
12 or 24 in the middle; and either a 1 or a 2 on the right side.
3. Press Cto switch between 12/24 hour modes. The middle number will change from 12 to 24.
24
2
2
4
02 2

9
4. Set the volume level by pressing Bto switch between 0 (mute), 1 (low volume), and 2 (high
volume). The small number on the left side will change accordingly.
5. Switch between the two alarm types from this menu by pressing the Cbutton and holding it
for three (3) seconds. The number on the right side of the menu will switch between 1 (slow
beeps) and 2 (rapid beeps).
4
02 2 4
122 4
222
42 2
42
6. When you are finished in this menu, press Aat any time to return to Clock Mode, or wait for
15 seconds and it will return to Clock Mode on its own.
Setting Medication Times
1. Press the Abutton to enter the Alarm Menu. A clock icon will appear
in the bottom left corner, with a number next to it. This number
indicates which alarm you are setting. You do not have to set all six
alarms if you do not need medication dispensed six times a day.
2. Press the Bbutton to adjust the hour of the alarm. To move through
the hours faster, you can press and hold the B button.
3. Press the Cbutton to adjust the minutes of the alarm. To move
through the minutes faster, you can press and
hold the Cbutton.
4. Make sure the AM/PM setting is correct, if you
are not using 24-hour time.
5. To confirm and finalize the alarm, press the
Abutton to move to the next alarm.
6. Repeat steps 2-5 for each alarm you wish to set.
You can set a maximum of six alarms.

10
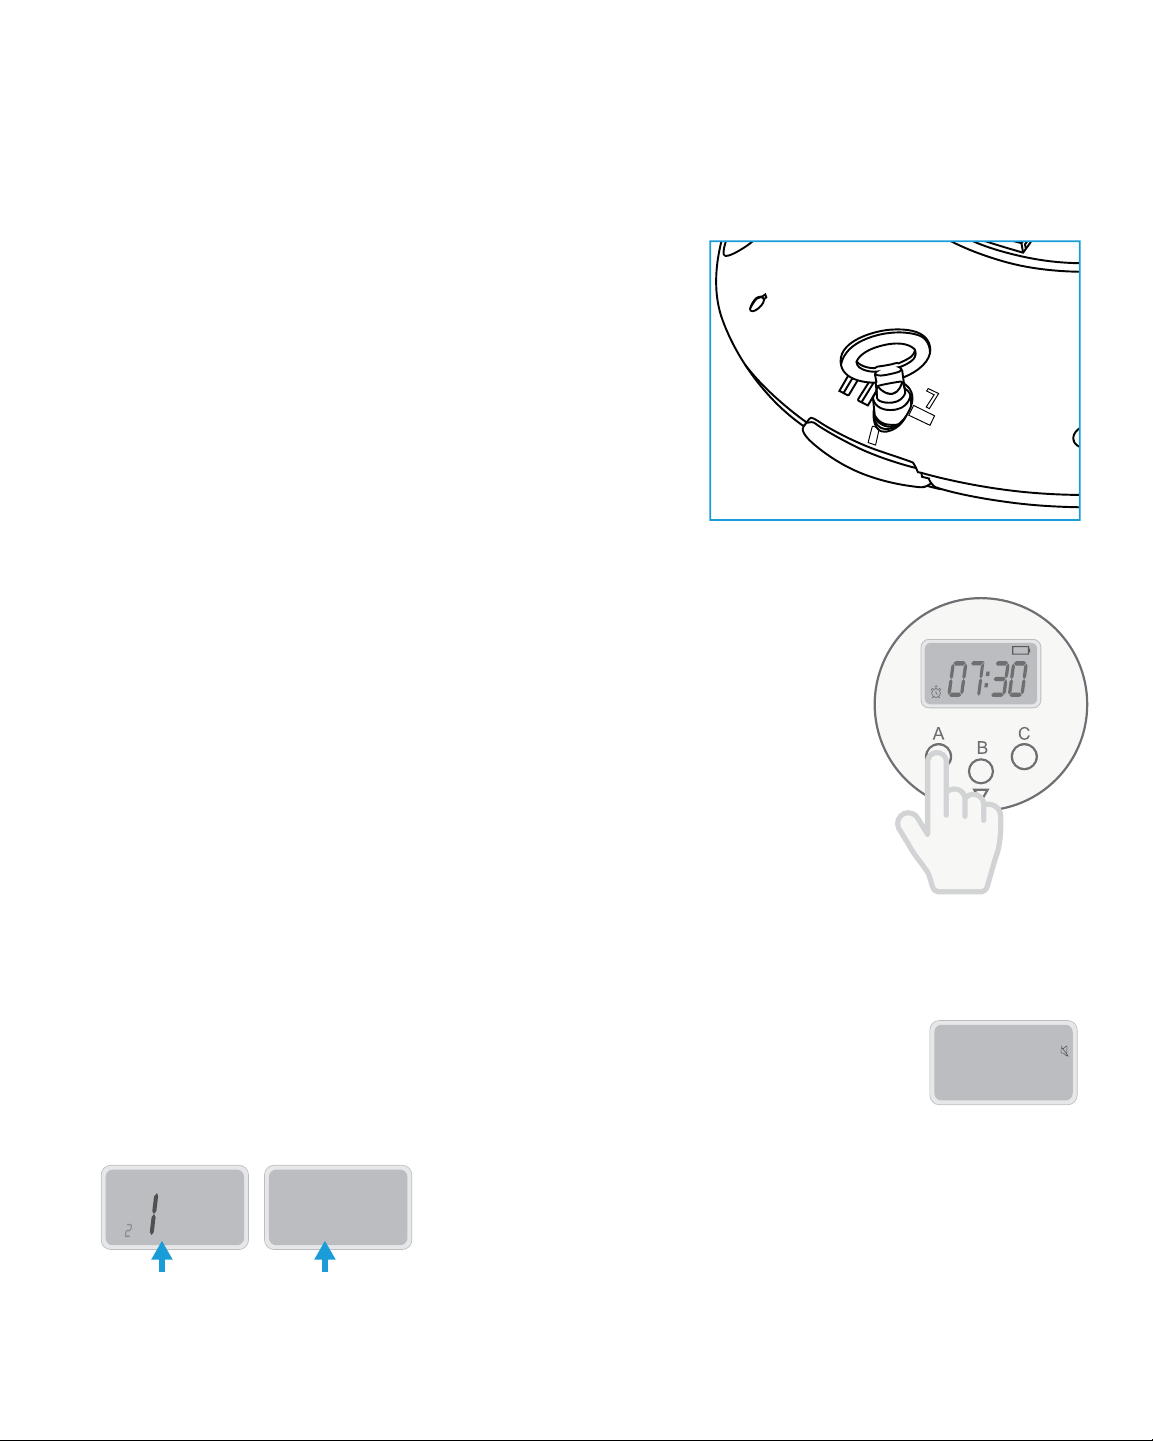
7. Once you have set anywhere from 1-6 alarms, depending on the medication schedule,
press the A button until the numbers next to the clock go away and you see the main
screen with the time. For example, if you only set one alarm, you will cycle through the
clock next to 2, 3, 4, 5, 6, and then will return to the main menu.
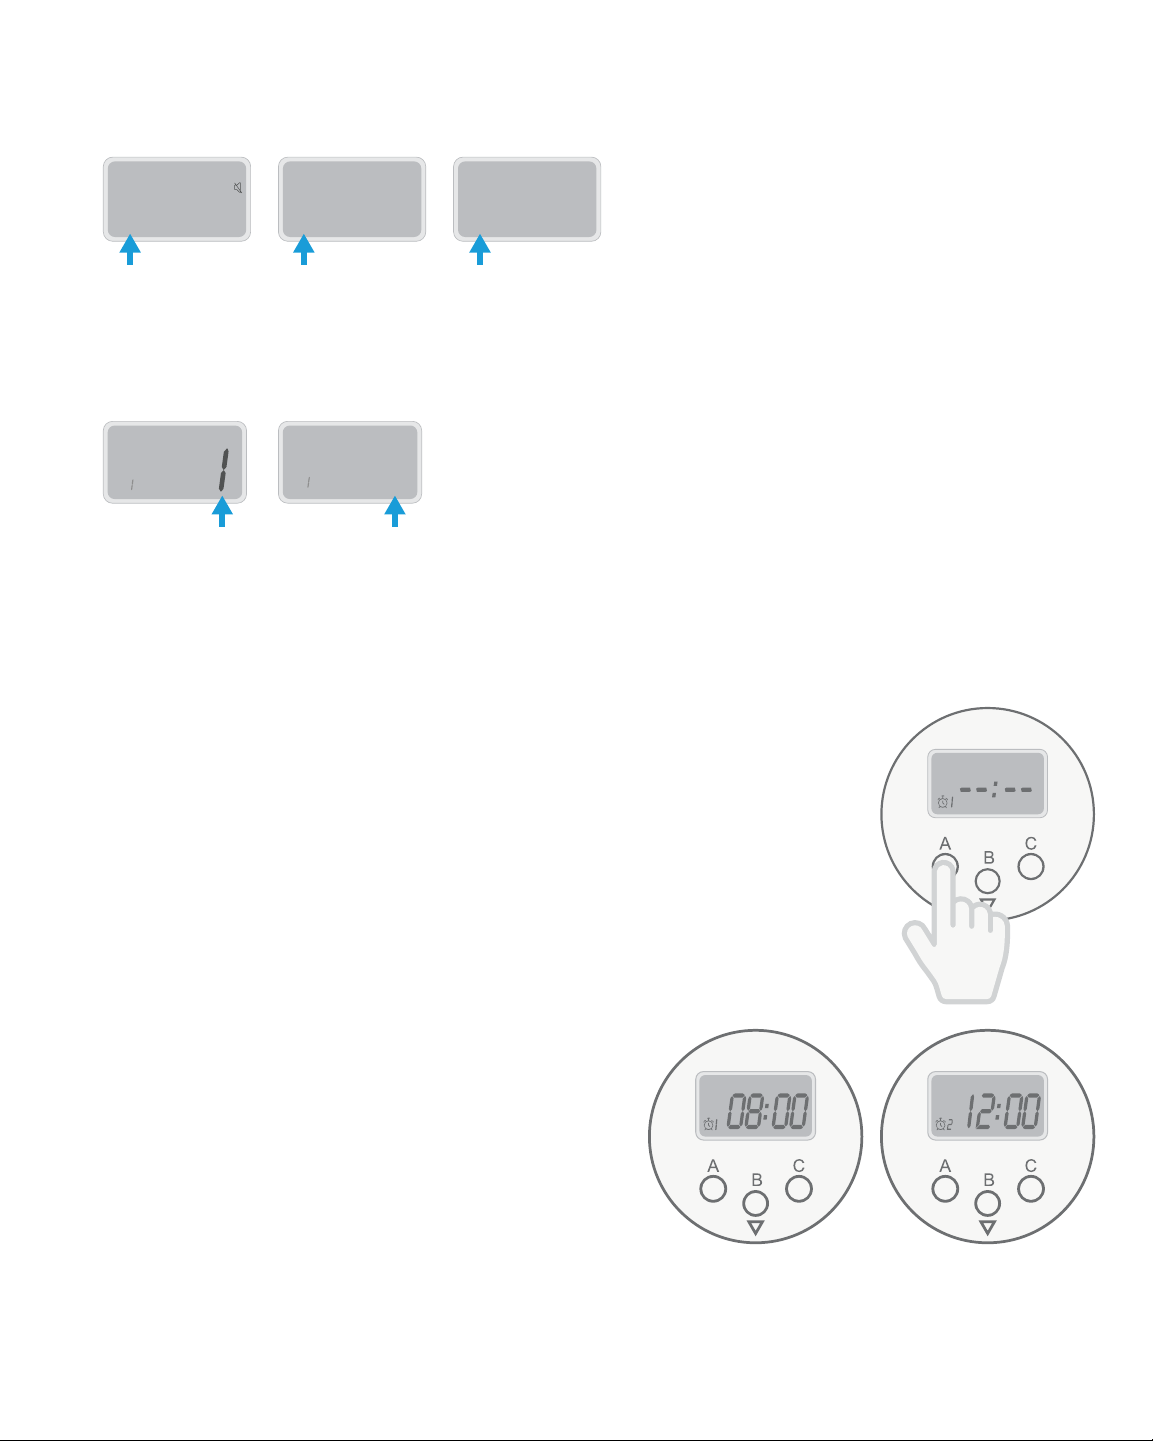
Deleting an Alarm
1. Press Ato enter the Alarm Menu.
2. Press A until you reach the alarm you want to delete.
3. Press Bto cycle through the hours until you reach 11PM, and then press Bagain. You will
see --:-- displayed on the screen.
4. Press Auntil you return to the main menu, and the alarm will be deleted.
Using your Automatic Pill Dispenser
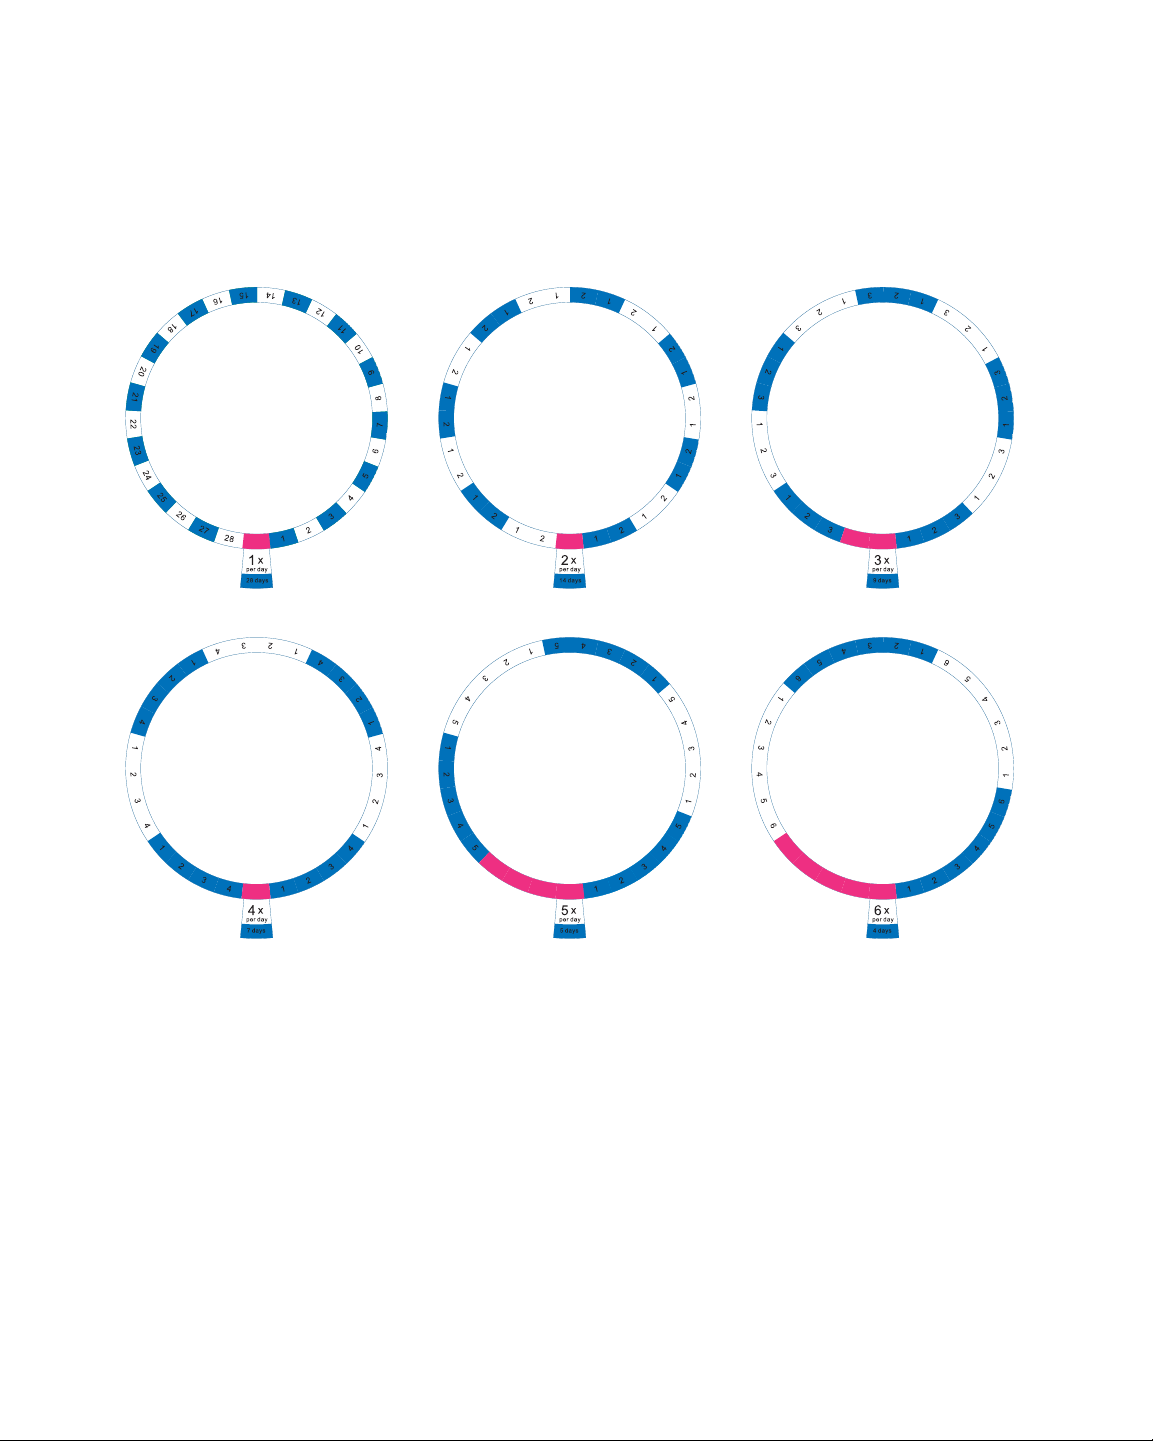
1. Choose the Daily Dosage Ring that corresponds to your needs (please refer to
“Understanding the Daily Dosage Rings” on page 6).
2. Situate the Daily Dosage Ring in the center of the internal pill container and place your
medications in the container to correspond with when they are taken (1st, 2nd, 3rd,
etc.) indicated by the numbers on the ring (1, 2, 3, etc.). Do not place any medication
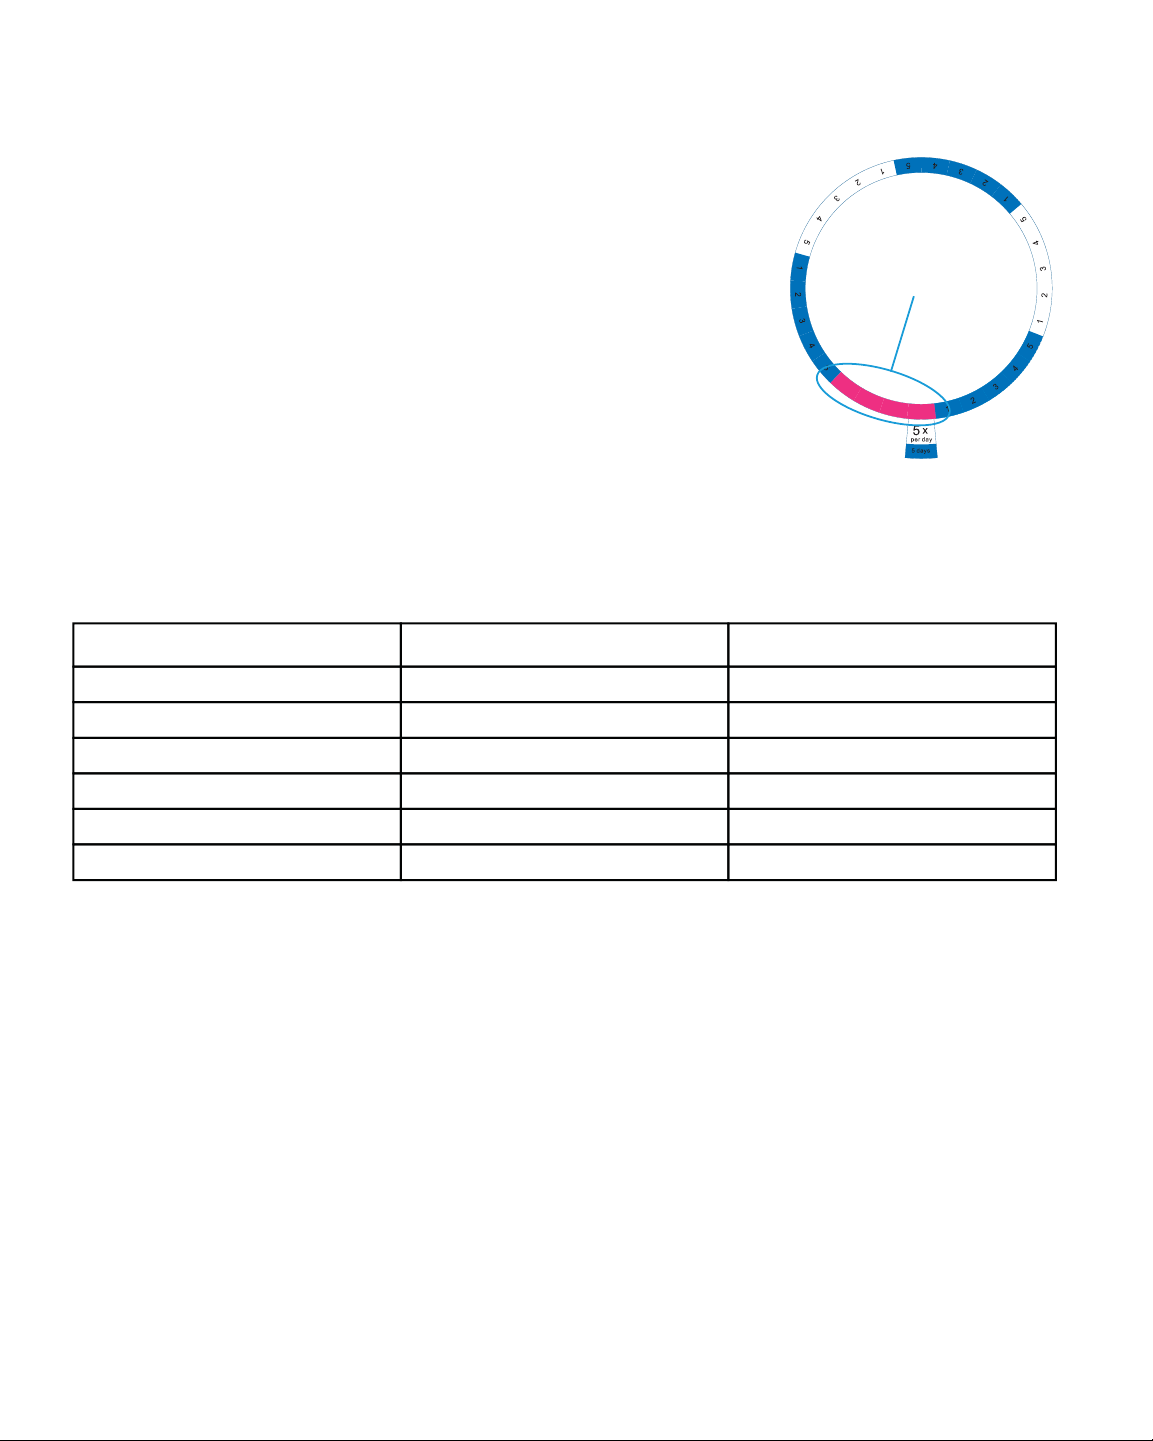
in the red sections. When you see the red approaching the dosage window, it is time
to refill the container.
3. Install the batteries (please refer to “Installing the Batteries” on page 7).
4. Unlock the cover using the key (please refer to “Locking and Unlocking the Cover” on
page 8) and place the internal pill container inside the main body.
5. Set the time (please refer to “Setting the Time” on page 8).
6. Adjust the alarm volume, alarm types, and choose 12- or 24-hour time (please refer to
“Setting the Volume, Alarm Type, and 12-Hour/24-Hour Time” on page 8).
7. Set your medication times (please refer to “Setting Medication Times” on page 9).
8. Close the cover and lock it with the provided key (please refer to “Locking and
Unlocking the Cover” on page 8).
9. At the designated medication times, the alert will sound. This will repeat every seven
(7) seconds.

11
10.Use the magnifying viewer if needed to look into the container and see your pills and
the corresponding number on the dosage ring to confirm that the internal pill container
has rotated properly.
11.Slide open the window by pushing the latch to the left.
12.Fully invert the pill dispenser by turning it totally upside-down to receive the pills.
Check to make sure all pills have come out of the compartment.
13.The alarm should stop. Close the dispensing window and replace the pill dispenser on
a flat surface.
Care and Maintenance
• Wipe the exterior with a soft, damp cloth. Do not use harsh detergents.
• If needed, remove the internal compartment and gently rinse/wipe the individual pill
compartments. Allow the compartment to dry fully before replacing it or refilling it.
• Do not immerse the outer pill dispenser in water or any other liquid.
• Make sure that the internal pill compartment is clean and dry before refilling it.
Specifications
• Power: 4x AA alkaline batteries (included)

NEED HELP?
If you experience any problems with your LiveFine®
Automatic Pill Dispenser, please contact us at
supportlfc@camarketing.com or 888-390-7622
before returning your product to the place of purchase.
WE'RE HERE TO HELP!
LIVEFINE is a trademark of C&A IP Holdings, LLC in the US.
All other products, brand names, company names, and logos are trademarks of their respective owners, used merely
to identify their respective products, and are not meant to connote any sponsorship, endorsement or approval.
Distributed by C&A Marketing, Inc., 114 Tived Lane East, Edison, NJ 08837. Made in China.
© 2019. C&A IP Holdings, LLC. All Rights Reserved.
Table of contents
Other Live Fine Dispenser manuals