Living & Co SRO8308 User manual

INSTRUCTION MANUAL
MODEL: SRO8308
L&C Deep Fryer 2000W

IMPORTANT SAFEGUARDS. ..................................................................... 1
Part Names..................................................................... 3
To Use ..................................................................... 4
General Frying Advice ..................................................................... 7
Cleaning and Maintenance ..................................................................... 9
The Reset Feature .................................................................... 10
Troubleshooting .................................................................... 11
Technical Data .................................................................... 12
Environmental protection .................................................................... 13

1
IMPORTANT SAFEGUARDS
Caution
When using electrical appliances, basic safety precautions
should always be followed, including the following:
1. READ ALL INSTRUCTIONS BEFORE USE.
2. Do not touch hot surfaces. Use handles or knobs.
3. To protect against electric shock do not immerse cord, plugs, or
housing in water or other liquid.
4. Close supervision is necessary when any appliance is used by
or near children.
5. Unplug from outlet when not in use and before cleaning. Allow to
cool down fully before putting on or taking off parts, and before
cleaning the appliance.
6. Do not put the appliance on a soft working surface or a desktop
covered with table cloth;make sure the appliance is working on
a rigid surface.
7. Do not operate any appliance with a damaged cord or plug,or
after the appliance malfunctions or has been damaged in any
manner. Return appliance to the nearest authorized service
facility for examination, repair or adjustment.
8. The use of attachments not recommended by the appliance
manufacturer may cause injuries.
9. Do not let cord hang over edge of table or counter, or touch hot
surfaces.
10. Do not use this appliance when missing oil reservoir, oil and
any other materials, or the oil is not enough.
11. Do not place on or near a hot gas or electric burner, or in a
heated oven.
12. DO NOT move the fryer when it contains hot oil.
13. Make sure handles are properly assembled to basket and
locked in place. See detailed assembly instructions.

2
IMPORTANT SAFEGUARDS
Caution
14. Before use, always ensure that the oil reservoir is positioned
correctly.
15. Never connect the fryer to the electricity supply without placing
oil in the oil reservoir first.
16. The oil in the oil reservoir will be still hot after it is switched off.
Never attempt to move your fryer until it is completely cooled
down. To lift the oil reservoir,use the handles.
17. Though the detachable oil reservoir can be completely
immersed in water for cleaning, it must be thoroughly dried
before next use to prevent electric shock.
18. Never overfill the fryer with oil. Fill only between the minimum
and maximum levels, as indicated inside the oil reservoir.
19. Do not add food with ice crystals or if it is wet to the hot oil.
20. This appliance is not intended for used by persons (including
children) with reduced physical, sensory or mental capabilities,
or lack of experience and knowledge, unless they have been
given supervision or instruction concerning use of the
appliances by a person responsible for their safety.
21. Children should be supervised to ensure that they do not play
with the appliance.
22. On completion of frying, always raise the basket and wait a few
seconds to allow steam pressure to subside.
23. Do not use appliance for other than intended use.
24. Do not use outdoors.
25. Store the appliance indoors to prevent electronic parts failure.
26. WARNING: Serious hot oil burns may result from a deep fryer
being pulled off a countertop. Do not allow the power cord to
hang over the edge of a counter where it may be grabbed by
children or become entangled with the user.
27. Save these instructions.

3
Part Name
Power light
Heating light
Timer control knob
Temperature
control knob
Filter cover
Lid handle
Viewing window
Deep fryer lid
Control panel
Housing handle
Housing
Oil reservoir
Frying basket handle
CONTROL PANEL
The Temperature Control knob
The temperature control knob turns the deep fryer on and sets the
desired temperature for frying.
The Timer Control knob
The timer control knob turns the deep fryer on and sets the desired
time for frying.
The Power Light
The power light illuminates when the deep fryer is on.
The Heating Light
The Heating light will continue to cycle on and off in order to
maintain the set temperature throughout the cooking process.

4
To Use
1.Remove all the packaging materials, labels and/or stickers from the deep
fryer.
WARNING: Do not plug in the deep fryer when the control panel is not
installed in the deep fryer body. Only plug in the deep fryer when the unit is
fully assembled and the heating element is immersed in oil.
WARNING: Do not immerse the control panel, cord or plug in water.
WARNING: This unit should not be used to boil water.
2.Lift the control panel with heating element out of its slots by pulling it up
from the bottom with one hand while holding the body of the deep fryer with
your other hand.
3.Remove the oil reservoir from the body of the deep fryer.
4. Wash the oil reservoir and the frying basket with hot water, a nonabrasive
sponge, and dishwashing liquid or other non-poisonous detergent.
Dry thoroughly before use.
Notes:
The oil reservoir, frying basket, frying basket handle, permanent filter
and the lid can be washed in warm soapywater.
The Heating light will continue to cycle on and off in order to
maintain the set temperature throughout the cooking process.
1. Place the oil reservoir into the deep fryer housing.
2. Insert the guide edges on the control panel into the guide rails mounted on
the metal body (Fig.1).
WARNING: Do not immerse the control panel, power cord, or plugs into liquid
of any kind.
ASSEMBLING THE DEEP FRYER

5
USING THE DEEP FRYER
4. Attach the fryer basket handle to the fryer basket by squeezing the handle
WARNING: Never plug in the deep fryer before filling the oil reservoir with oil.
Always make sure that the control panel is securely in place in the housing of
the deep fryer and that the heating element is inside the oil in the oil reservoir
before plugging in.
1.Pour cooking oil into the oil reservoir making sure that it is between the
“Min” and “Max” filling lines in the oil container. Do not under fill or overfill.
The oil levels must be maintained between the minimum (3.0 liters) and the
maximum levels (4.0 liters) marked inside the oil container.
3.Slide the guide edges down as far as they can go.
bars together and inserting them into the metal bracket on the basket.
Make sure that the end of the bars is inserted into the bracket holes. Lift
the handle up to lock in place (Fig. 2).
Slide down
Guide rails
Fig.1
Fig.2
Proportions exaggerated
for clarity
Metal bracket
End of bars
Notes:
The deep fryer has an automatic safety switch to ensure that the unit will
not operate unless the control panel has been inserted securely into the
guide rails on the body of the deep fryer.

6
2. You can use blended vegetable oil, corn oil, or canola oil. Do not use olive
oil, margarine, lard or drippings. Never mix old and new oil together or
different oils and fat.
3. If you want to use solid fat, you must melt it firstly;for details refer to the
section of “TIPS FOR USING SOLID FAT”.
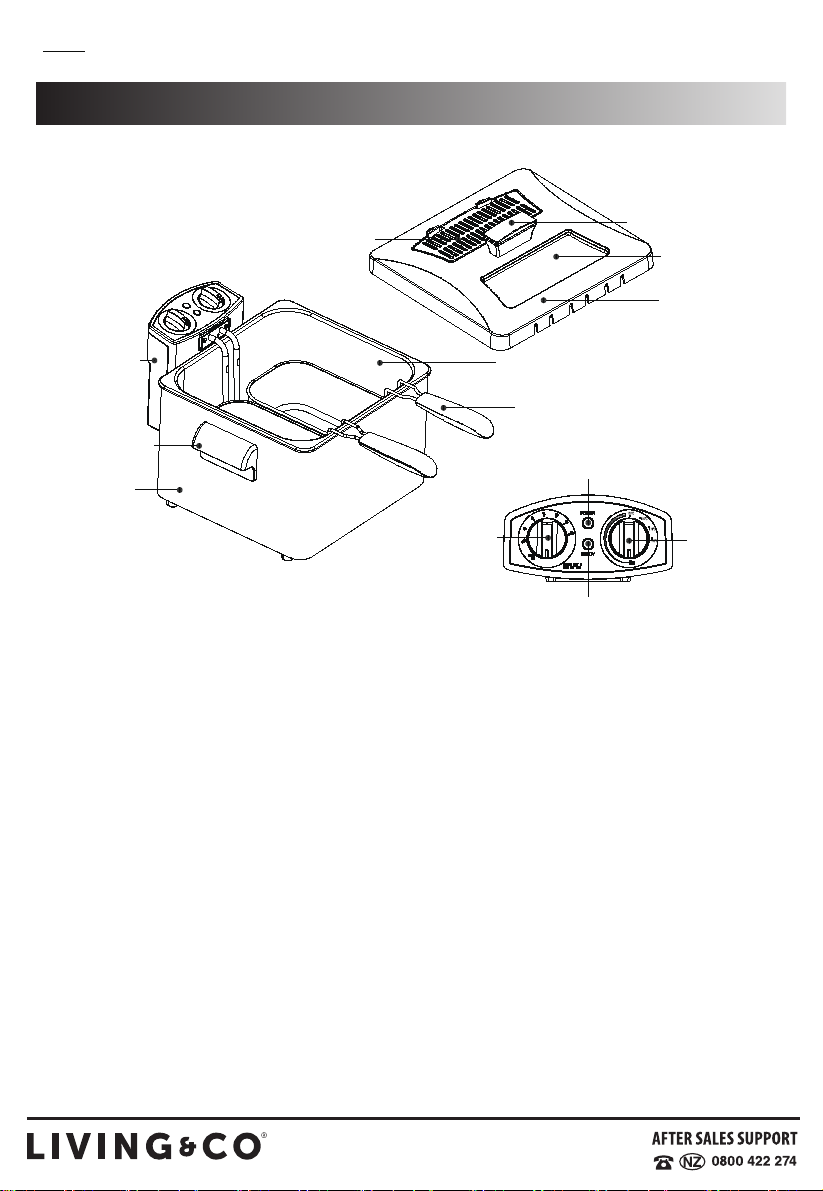
4. Place the cover onto the deep fryer.
5. Insert the plug into the electrical wall outlet. The power light and the
heating light will illuminate.
CAUTION: When frying frozen foods such as French Fries, you should not
exceed the “Max” fill line on the fryer basket. Clean off any ice from frozen
food prior to frying. Failure to do so may cause fryer to overflow when food is
placed in oil.
WARNING: When frying frozen foods, remove the frying basket from the deep
fryer before filling because oil will spatter and cause burns.
6. Turn the timer control knob to the desired time.
7. Turn the temperature control knob to the desired temperature.
8. The heating light will illuminate when the unit is heating.
9. Do not fill the frying basket when it is immersed in the hot oil. Place the
food in the frying basket. Do not drop the food into the hot cooking oil. Do
not overfill it;the maximum load is 500g. For optimum results and shorter
frying time, fry smaller quantities.
10. Immerse the frying basket into the oil reservoir carefully so that you do not
splash the oil.
11. Replace the deep fryer lid on the deep fryer while it is frying.
12. When the cooking period is over, turn the temperature control to the
“OFF” position and remove the plug from the electrical wall outlet.
13. Carefully remove the deep fryer lid lifting it up away from you to allow the
steam to escape before removing the lid completely. Keep your face away
from the top of the appliance to avoid burns caused by escaping steam.
14. Liftup the frying basket by the handle and place it on the oil container to
allow the oil to drain.
15. Once the oil has drained from the frying basket, the basket may be lifted off
and the food served or placed in a dish.
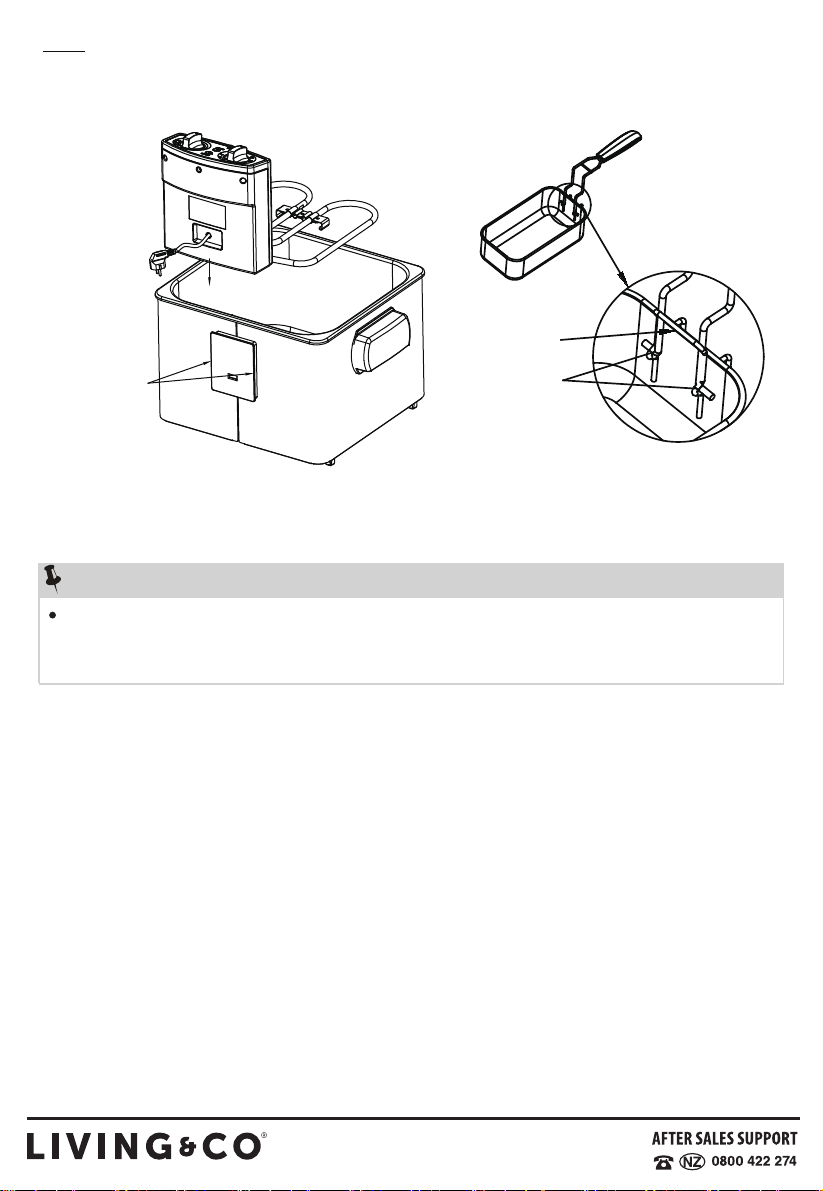
CAUTION: Never plug in the control panel when it is not assembled to the
fryer body. Do not immerse the control panel, power cord or plug in water or
any other liquid.

7
General Frying Advice
WARNING: Always let the deep fryer cool completely (approximately 2 hours)
before cleaning or storing. Never carry or move the appliance with hot oil
inside.
CAUTION: The metal surfaces of the deep fryer become hot during use. Do
not touch the sides of the appliance while it is use.
1. Always use thefrying basket to fryfood.
2. Always close thelid during frying. Replace thelid carefully.
3. The green ‘Heating’ light will continue to cycle on and
off in order to maintain the set temperature throughout the
cooking process.
4. Slowly lower thefrying basket into thehot oil. Lowering thefrying basket
tooquickly can result in theoil overflowing and splashing.
5. It is normal forsteam to escape through thesides of the lid while frying.
6. Avoid standing tooclose to thedeep fryer while it is working.
7. Do not mix new and old oil together.
8. Replace oil regularly. In general, oil will be taintedfast when frying food
containing a lot of protein, (such as poultry, meat and fish). When oil is
used mainly to frypotatoes and is filtered after each use, it can be used up
to 8 to 10 times, but do not use thesame oil formore than 6 months.
9. Always replace all oil as soon as it starts foaming when heatedor when
color becomes dark or when it has a rancid smell or taste or becomes
syrupy.
10. Make sure that the food to be fried is dry. Remove loose ice from frozen
food before frying.
11. To cook evenly, pieces should be thesame size and thickness. Thicker
pieces will take longer to cook.
12. The following cooking times reflect only theapproximate time needed to
fryone basket 1/2 full. The exact time may be different depending on actual
quantity, personal cooking preferences, size and thickness of pieces, etc.

8
Temperature Settings
In general, use lower settings for delicate foods (vegetables, fish) and higher
settings for frozen foods, French Fries and chicken.
1. If using solid vegetable shortening, melt it first in a separate container and
then very carefully pour the melted fat into the oil reservoir.
2. Previously used solid vegetable shortening which has curdled and
hardened in the oil reservoir should be removed from the oil reservoir and
melted in a separate pan before reusing.
TIPS FOR USING SOLID FAT:
WARNING: Do not put solid shortening in the oil reservoir or the frying basket.
WARNING: If you try to melt the solidified fat in the oil reservoir, there is a
risk of hot melted fat suddenly sputtering from below through the solid top
layer of fat.Use only the following procedure
Use only the following procedure
When melting solid fat in your deep fryer:
1.Make sure the fat is at room temperature. If the fat is cold, then there is a
greater risk of splashing.
2.Using afork, carefully make some holes in the fat.
3.Make sure the lid is always securely closed while the fat is melting.
FOOD
French fries 6-9 minutes 190℃
Fish fillets 3-5 minutes 150℃
Chicken fingers 6-8 minutes 170℃
Chicken pieces 13-20 minutes 170℃
Fried Zucchini 3 minutes 150℃
Fried mushrooms 3 minutes 150℃
Onion rings 3 minutes 150℃
Donuts 3-5 minutes 170℃
Apple Beignets 4 minutes 170℃
Shrimp 4-6 minutes 150℃
COOKING TIME TEMPERATURE

9
Cleaning & Maintenance
4. Set the temperature control knob to 150℃.
IMPORTANT: The power light will illuminate once the fryer is plugged into the
power outlet. The green ‘Heating’ light will continue to cycle on and off in order to
maintain the set temperature throughout the cooking process.
FILTERING & CHANGING THE OIL
ATTENTION: Make sure the deep fryer is unplugged from the electrical socket
and the oil has cooled (approximately 2 hours) before changing the oil, or
cleaning and storing the deep fryer.
To Filter the Oil:
1. Make sure the oil has cooled (approximately
2 hours) and then empty the oil from the oil
reservoir into another container or bottle. (Fig.3)
2.Wash and dry the oil reservoir and frying
basket.
3. Refill the oil reservoir with the oil by pouring
the oil through a wire strainer or paper filter.
(Fig. 4)
To ensure many years of service from your appliance, clean your deep fryer
after every use.
WARNING: Always remove the plug from the electrical wall outlet before
cleaning. Allow the deep fryer and the oil to cool completely (approximately 2
hours) before cleaning.
Notes:
The oil does not need to be changed after each use. In general, the oil will
be tainted rather quickly when frying food containing a lot of protein (such
as poultry, meat or fish). When oil is mainly used to fry potatoes and is
filtered after each use, it can be used 8 to 10 times. However, do not use
the same oil for longer than 6 months.
Fig.3
Fig.4

10
The Reset Feature
1. Never immerse thecontrol panel, cord or plug in wateror any other liquid.
2. Do not place thecontrol panel, cord or plug in thedishwasher.
3. Clean thecontrol panel with a damp cloth only.
4. The oil reservoir, and frying basket can be washed on thetoprack of a
dishwasher.
5. The deep fryer lid canbe washed in warm soapy water. Do not put the
body of the deep fryer in theliquid or dishwasher.
6. To clean thepermanent filter, remove it from thecoverand wash it in hot
soapy water. Rinse and dry well before re-inserting it into thedeep fryer
cover. Replace thefiltercover.
CAUTION: Do not clean the permanent filter in the dishwasher.
Your deep fryer is equipped with a reset feature. If for some reason the deep
fryer stops heating, the reason may be that the reset switch has tripped.
To reset the deep fryer:
1.Unplug the appliance from the electrical wall outlet.
2.Let the appliance and the oil in the oil reservoir cool completely.
3. After the appliance has cooled completely, lift the control panel and using
the tip of a ball point pen or pencil, push the thermostat reset button that is
located on the inside of the control panel (Fig. 5)
4.Re-assemble the control panel tothe housing of the deep fryer and then
you may resume frying.
Reset button
Fig.5

11
Troubleshooting
PROBLEM
The fryer is not
operating
Oil is spilling
out of the deep
fryer
Food is tasting
soggy or
greasy
Food not
cooked
completely
The cooking oil
is foaming or
emitting smoke
1. The control assembly is
not installed correctly.
2. The plug is not connected
to the electrical wall outlet.
3. The electrical outlet is not
energized.
4. The reset switch has
tripped.
1. Re-attach the control panel
assembly
2. Insert the plug into the electrical
wall outlet.
3. Reset circuit breaker or replace
fuse.
4. Turn the appliance off and let it
cool completely. Then
remove the control panel and
press the thermostat reset button.
1. Too much oil in the oil
reservoir.
2. The food basket if
overfilled.
3. Oil has been used too
oftenand is foaming.
1. Oil is not hot enough.
2. The food basket is
overfilled.
1. Food pieces too large.
2. Cooking time too short.
3. Oil temperature too hot.
1. The oil has been used too
often.
1. Turn the deep fryer off. Let the oil
cool completely and remove some
of the excess oil.
2. Remove some of the food from
thebasket.
3. Turn the deep fryer off. Let the oil
cool completely and refill the oil
reservoir with new oil.
1. Adjust the temperature control
knob to appropriate temperature
for food being fried.
2. Remove some of the food from
the basket.
1. Cut the food into smaller pieces.
2. Continue frying and check the
process continually.
3. Lower the temperature of the oil to
allow the food to cook completely.
1. Let the oil cool completely and
replace with new oil.
POSSIBLE CAUSE

12
Technical Data
SRO8308
Deep Fryer
Product name Model No. Rated voltage Rated frequency Rated power
220-240V~ 50/60Hz 1830-2180W 4.5L
Capacity

Environmental Protection
Responsible Disposal
At the end of its working life, do not throw this product out with your
household rubbish. Electrical and electronic products contain substances
that can have a detrimental effect on the environment and human health if
disposed of inappropriately. Observe any local regulations regarding the
disposal of electrical consumer goods and dispose of it appropriately for
recycling. Contact your local authorities for advice on recycling facilities in
your area.
Please keep the original packaging carton and materials in a safe place. It
will help to prevent any damage if the product needs to be transported in
the future. In the event it is to be disposed of, please recycle all packaging
material where possible.

Warranty
We pride ourselves on producing a range
of quality home appliances that are both packed with features
and completely reliable. We are so confident in our products,
we back them up with a 3 year warranty.
Now you too can relax knowing that you are covered.
Customer Helpline NZ: 0800 422 274
This Product is covered by 3 year warranty when
accompanied by proof of purchase.
Table of contents
Other Living & Co Fryer manuals
Popular Fryer manuals by other brands

Tristar Products
Tristar Products Power AirFryer Series Instructions for use

Emeril Lagasse
Emeril Lagasse Power AirFryer 360XL owner's manual

TurboTronic
TurboTronic airchef Pro TT-AFO14 instruction manual

Salter
Salter EK2118 instruction manual

Gourmia
Gourmia GTA2500 user manual

croydon
croydon F3A-G instruction manual