LNR Mountain Topper MTR-5B User manual

The MTR-5B
Five band Mountain topper
KD1JV Designs
revised 12-12-1
(shown with optional enclosure sold by LnR Precision, production kits use white backlight display)
Features:
Switch selected 40/30/20/17/15 meter bands
(no band modules to lose or change out)
Wide operating oltage range, 6 to 12 olts
15 ma Rx current at 12V supply
Efficient transmitter. Low current with 4W output
LCD display
Push button or Optional rotary tuning
24 hour clock built in, with battery back up
Three 63 character programmable message memories
Message beacon mode with adjustable pause time
Small size: can fit into a 4” x 3” x 3/4” box
MTR-5B Page -1-
Five Band Mountain Topper - KD1JV Designs Manufactured by LNR Precision, Inc. www.LNRprecision.com Manual Revision 12-12-15

Operating Instructions:
Band Selection:
Bands are selected with 2 sets of three-
position slide switches. The three switches
must be in the same position for the rig to
work properly.
The band switches on the left select the 40
and 30 meter bands. When set to the right-
most position, the second set of band
switches are enabled: 20m, 17m and 1 meter
bands.
The switches on top row state which band to
operate.
When a band is changed, a Morse number
corresponding to that band is annunciated by
a side tone: 4 for 40m, 3 for 30m, 2 for 20m,
7 for 17m and for 1 m. The last used
frequency for any band is restored when the
band is selected.
Display:
A four line, 16 character LCD is used to display radio information.
Line 1: Normal – Operating frequency.
Alternate – Decoded Morse when using a paddle - either transmitting or entering a message.
Line 2: RIT delta frequency
Line 3: Menu selections
Line 4: Normal – Keyer Speed, 24 hour timer, battery voltage.
Alternate – switch functions
Frequency Tuning:
The UP arrow (Tune Up) and DOWN arrow (Tune Down) switches change the operating frequency in 0 Hz steps.
●Holding the switch closed for longer than 1 second begins a fast-tune mode where the frequency changes in
100 Hz steps.
●If the opposite tuning switch is held closed while in fast-tune mode, the step rate will increase to 30
steps/second for real fast tuning.
The frequency can also be rotary tuned by adding an optional rotary encoder. In this case, the tuning rate is
fixed at 0 Hz steps, furthermore, the tune up and down switches are still enabled.
RIT:
●Enter RIT: HOLD RIT closed for 1 second or longer.
●Exit RIT: HOLD RIT closed for 1 second or longer.
Display: Line 2, [RIT 0.000+]
The plus (+) or minus (-) difference (delta) between the transmit frequency and the current receive frequency is
shown below the primary frequency readout. The delta frequency is limited to +/- 1. 0 kHz.
RIT toggle:
RIT can be toggled on and off to check the transmit frequency for activity.
●TAP <Fn> switch to toggle RIT.
Display: Line 2, [RIT R=T] Frequency tuning is locked out when R=T, however, radio can transmit and use
message memories.
MTR-5B Page -2-

Fn (Menu) Functions:
- Morse frequency annunciation (optional)
- Change Keyer speed
- Direct Frequency entry
- keyer Memory entry
- Tune
- Set time
- Config - Turn on/off options and store configuration
Morse Frequency Annunciation
This function can be turned ON or OFF in the CONFIG menu. Default is OFF.
●Tap the <Fn> switch.
●The current frequency is sounded by the side tone at the current keyer speed.
●Format: 000.0 kHz “T” is used for zeros, “R” indicates decimal point.
hange Keyer speed: [ADJ K SPEED]
●HOLD the <Fn> switch for 1 second until the message [ADJ K SPEED] is displayed on Line 3
●Speed is shown on Line 4 [ Sxx] where xx is current CW speed.
●Use UP/DOWN arrow switches, DOT/DASH paddle or rotary encoder to change speed in 1 WPM steps. Range 9 to
3 WPM.
●Tap the <Fn> switch to exit
Straight key Mode:
Straight key mode can be enabled in two ways:
1) A mono phone plug in the paddle jack on power-up will turn on straight key mode.
2) TAP the RIT switch while in <Adjust Code Speed> mode. Tapping will toggle straight key mode ON and OFF.
Straight key mode cannot be turned OFF if a mono plug is in the paddle jack.
●When Straight key mode is active, the code speed display will change from [ Sxx] to [SKxx].
●The code speed can be changed using the <UP/DOWN> arrow switches or rotary encoder.
●DFE, Message Memory entry and Tune modes are not available when Straight Key mode is active.
●Straight key mode is reset on power-up, unless a mono plug is in the paddle jack.
Direct Frequency Entry: [DFE]
DFE mode allows the user to directly enter a new frequency via the paddle.
Display:
Line 1: current frequency…
Line 2: ---.-
Line 3: DFE
Line 4: EXIT RE LD {Switch function labels}
●Enter four Morse digits 0 to 9
●Short cut: TAP <LD> to reset current frequency to the bottom of the band or to load remaining decades as
zero “0”
●TAP <LD> (DOWN Arrow) load the new frequency
●TAP <RE> (RIT) re-set entry to zero and start again
●TAP <EXIT> (Fn) exit with no change
MTR-5B Page -3-
This feature is not available on the WARC bands.

Message entry [ENTER MSG]
Line 1 – blanks. Will display decoded Morse characters as entered.
Line 2 – blank
Line 3 – ENTER MSG
Line 4 – EXIT CK RE BS (Switch function labels)
Message count may use up to 63 characters (including word spaces) and there can be three unique posts. Word
spaces are automatically inserted after a word-space pause of ‘7 dot’ lengths. A “Back Space” switch can be used
to correct errors or eliminate word spaces. Note: you cannot delete the first character entered. The menu display
will scroll when the message exceeds 16 characters.
Switch functions:
●<EXIT> (Fn) TAP to EXIT any time before storing a message.
●<K> (RIT) TAP to check (review) the message and hear how it sounds prior to actually storing the
message.
●<RE> (UP Arrow) TAP to Re-enter (rest) the message entry mode. The only way to clear the first
character.
●<BS> (Down Arrow) TAP to Back Space one location.
Once the Message has been reviewed and after tapping the <CK> switch, Line 4 will change to:
[M1 RE M2 M3]
●TAP M1, M2 or M3 to store the message in that memory location.
○Once tapped, line 4 will change to [STORING]. A Morse "R" will sound when done and message entry mode
will return for another message, if desired.
○When done TAP <EXIT> to escape to normal operation.
●TAP <RE> to escape back to message entry mode without storing.
TUNE [TUNE]
Tune mode allows the user to toggle the transmitter ON and OFF to adjust an antenna tuner with both hands. If the
operator uses one hand adjusting antenna tuner, sending a string of dots may be faster.
NOTE: If the DC power supply exceeds 10 volts, the output power is reduced by turning the supply to the PA ON and
OFF at about a 1:3 ratio. This ensures no damage to the PA if excessive SWR is encountered while adjusting the
antenna tuner for lowest SWR. Since this PWM of the PA supply voltage has no feedback, the output power switches
low and gradually builds until it stabilizes at about one-third its steady-state output.
●Tap <DOT> paddle to toggle ON
●TAP <DASH> paddle to toggle OFF
●TAP <Fn> switch to exit back to normal operation
SET TIME: [SET TIME]
A 24 hour clock can be enabled and displayed on the bottom line of the LCD. The DFE function is used to enter the
time via the paddle. The time is not displayed until the set time function is used. The “display time” flag is
reset on power up if battery back-up is not used.
Display:
Line 1: operating frequency
Line 2: ---.-
Line 3: SET TIME
Line 4: EXIT RE LD
MTR-5B Page -4-

●Enter the current time + 1 minute (24 hour format) using the paddle: hours, then minutes. Leading zero
must be entered if the time is before 10:00am.
●Tap <LD> (DOWN Arrow) to load the time and exit.
●Tap <RE> to clear and re-enter the time
●Tap <EXIT> to escape with no action taken.
onfiguration: [ ONFIG]
onfiguration allows the user to turn ON or OFF the Morse frequency annunciation. The display of Morse while
transmitting and storing of the current frequency for all the bands, plus the current keyer speed to be used as
the power-on, frequency and code speed is annunciated.
●TAP <EXIT> (Fn) to escape
●TAP <ST> (RIT) to store
●TAP <DM> DOWN arrow) to toggle Display of Morse characters ON and OFF. The side tone will annunciate “ON”
or “OFF” to indicate the selected state.
●TAP <MA> (UP arrow) to toggle the Morse audio annunciation ON and OFF. The side tone will annunciate “ON”
or “OFF to indicate the selected state.
Sending a previously stored message:
●TAP <RIT>
●Then TAP <Fn> (message 1), <DWN Arrow> (message 2) or <UP Arrow> (message 3) within one-half second of
tapping <RIT>
If a message has not been stored in a selected location, no message will be sent.
Pause, terminate and Beacon Mode:
Once a message has begun, it may be paused, terminated or set to repeat (beacon mode).
●HOLD <DASH> to pause a message. The message will pause at the first word space after the paddle is
closed.
●HOLD <DOT> to terminate the message. The message will terminate at the first word space after the paddle
is closed and normal operation restored when the paddle is released.
Beacon (repeat) mode:
After a message is in progress, the message may be set to repeat by HOLDING the respective switch for that memory
location closed until a word space is detected. For example, if Message 1 was started, hold the <Fn> switch
closed, if Message 2, <Down arrow> and if Message 3, <Up arrow>.
Line 3 will read: [BEACON 3] Where {3} is the repeat delay in seconds.
●During a word space, the delay can be set up to 9 seconds using the up and down arrow switches or rotary
encoder.
The message may be paused or terminated using the DOT or Dash method. The message must first be terminated
before transmitting will begin again.
Battery Backup:
A 12 mm, 3V lithium coil cell is used to power the processor when power is removed from the transceiver. When the
processor detects the input voltage below 4. V, the processor is in sleep mode, but the 32.768 kHz clock and
timer remains active to keep the RTC running. In this mode, current from the coin cell is a mere 10 uA. All the
current operating settings are retained in RAM thus the rig returns to the same state on power up as it was when
power was turned off. If the rig is to be stored for a long period of time, it would be a good idea to disconnect
the battery by slipping a small piece of paper between the top contact and battery.
MTR-5B Page -5-
To access the battery: Turn off power. Remove the two side panel screws and the knurled nuts
securing the "paddle" and "phones" jacks. Carefully separate the "bottom" of the case to expose the
battery holder.

Assembly:
●The work area should be reasonably clean and uncluttered. Good lighting is a must.
●Empty the packets containing the parts into a small bowl for this will ensure the parts will not be lost.
Some builders like to assembly over a cookie sheet as the lip around the edge helps to keep parts from
going far. The metal sheet also provides some measure of static control, especially if the sheet is
grounded. A white sheet under the work area could help in finding stray parts which might wander away.
●Very thin (0.01 ”) solder is supplied for soldering the surface mount parts where very little solder is
needed for each connection. Ideally, a convex fillet at the end of chip resistors and capacitors is
desired. Try not to finish with a solder ball at the end of the part.
●Do not use liquid solder flux. It simply creates a mess and is difficult to clean off the board and from
under parts. If not completely removed from the board, it can cause problems.
●Before placing a part onto the board, lightly tin one pad for where the part will be placed. Assembly
time may be increased by first tinning one pad at all the locations for which a particular part will be
placed. There is no need for a low wattage soldering iron. It is best to have a hot tip which will get
the job done quickly. A small tip on the iron perhaps 1/32” to 1/16” chisel or round point is best.
●Most of the surface mount parts come in part carriers. To remove the part(s), hold the carrier close
to the work surface and carefully peel back the clear plastic covering. This can be done with the tip
of a sharp hobby knife such as an #11 Xacto blade or pointy tipped tweezers. Once the clear plastic
strip is removed, lay out the part onto your work surface.
●If tweezers are used, be careful not to grab onto the part too tightly. Surface mount parts have a
way of flying out from between the tips of the tweezers--never to be seen again. Be careful!
●An alternative to using tweezers for small parts is to use a tooth pick or ‘chop stick’ with the end
rubbed onto a little bees wax. The bees wax makes the end tacky enough for the part will adhere to
it. For smaller ICs, clutch the part length wise with the tweezers.
●Tack one end of a part in its place by applying heat to the end of the part over the tinned circuit
board pad, while applying little pressure to be sure it lays flat on the PC board. Be sure to heat
both the pad and the end of the part. Generally, additional solder is not needed for this connection.
Secondly, solder the other end of the part. If both ends are not soldered at this time, there is a
blameless chance the builder will forget to return and solder all the parts which require it.
●It is nearly impossible not to make solder shorts between pins on the DDS and processor chip due to
the close pin spacing. Remove any shorts with solder wick.
Using solder paste:
Using solder paste is the ideal way to build the board. Small amounts of solder paste in an application syringe
can be purchased for about five dollars from ‘Cash Olson’ on the internet. Also needed is a warming plate to
preheat the board to about 2 0 degrees F and a low power heat gun. An “Embossing” heat gun is commonly used
(found at craft stores). A soft air flow is required as to not to blow parts off the board. A typical hot air gun
is too high-powered with air and heat.
For chip, caps and resistors, a very small dab of solder paste is placed on the pads and then the part
placed onto the pads. The SMT parts will slide around very easily, so one must be careful not to nudge them from
their correct location. For ICs, placing the IC down first and then engaging a bead of paste along the leads
appears to be a better method than placing the paste on the pads first followed by the IC.
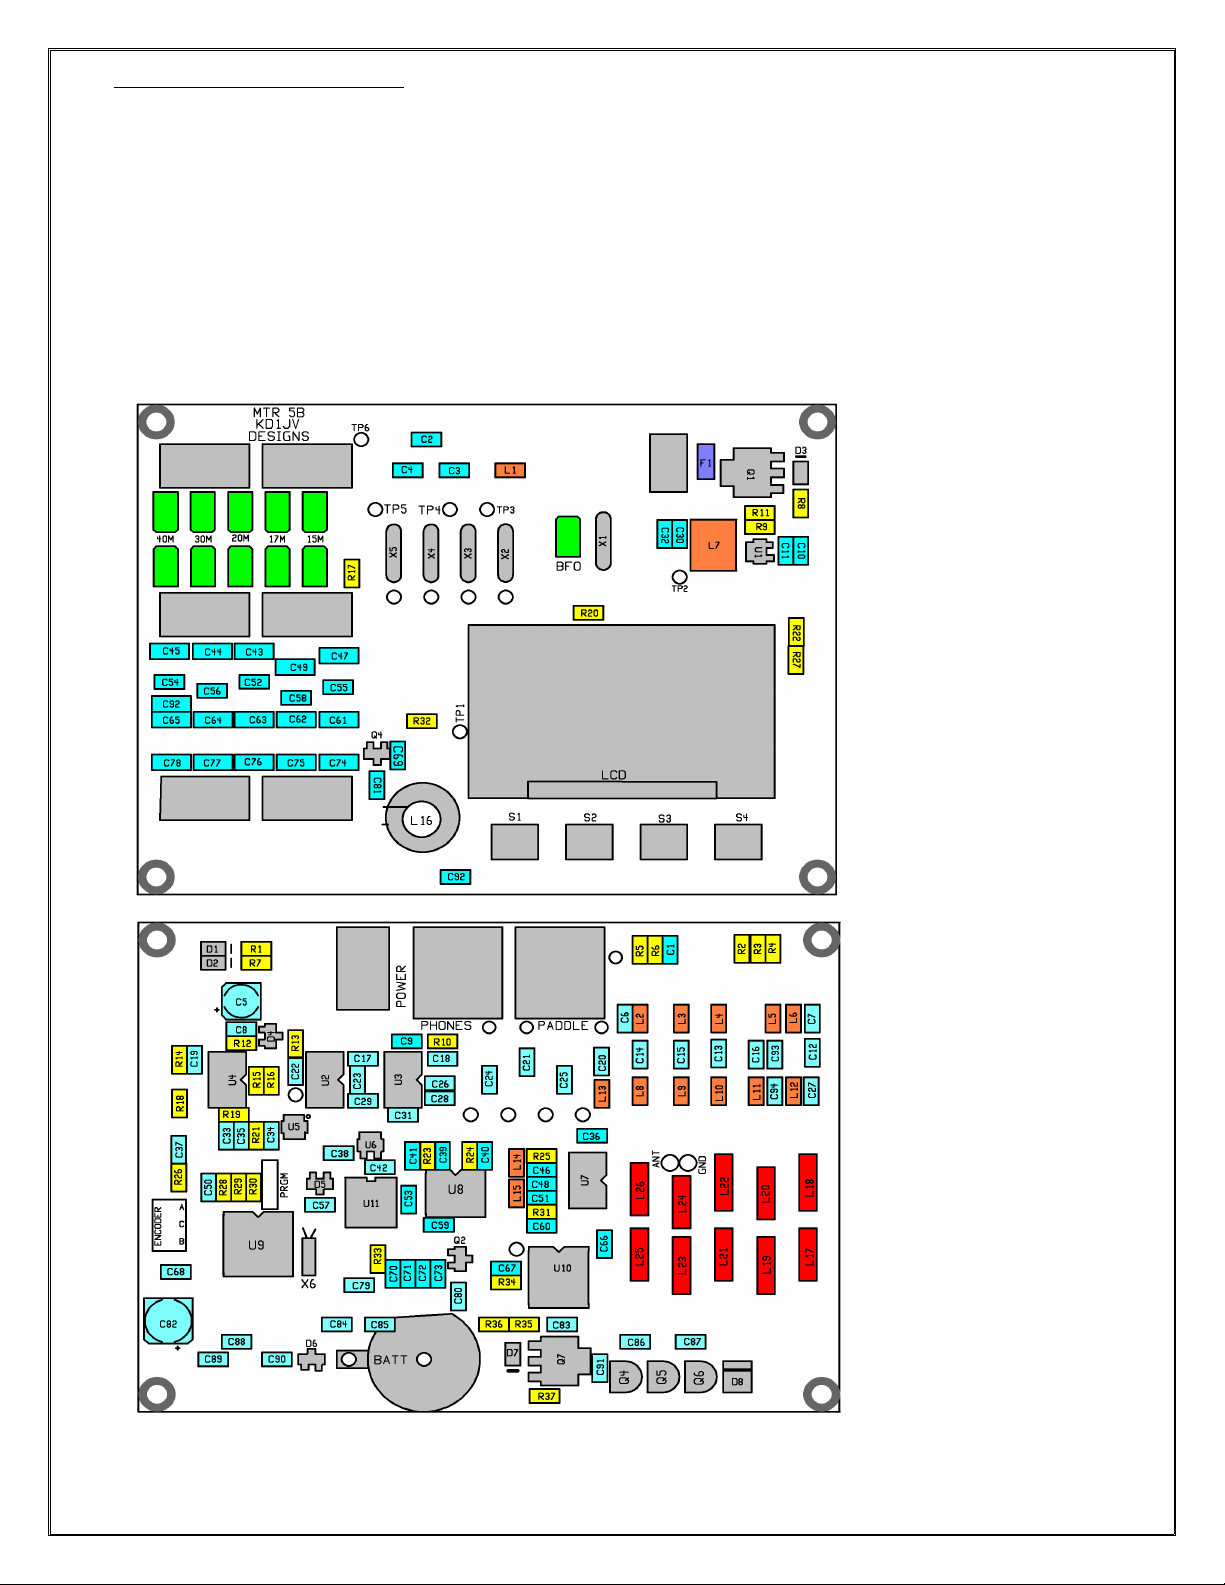
The LCD display should be hand soldered, along with all the through-hole parts. Begin with the side of the board
with the most parts first, which in this case, is the bottom for the MTR.
Once all the parts have been placed, place the board on the warming plate and heat to about 2 0 degrees
F. Slowly heat the top of the board with a hot air gun. When the solder paste reaches its melting point, the
solder will liquefy and the parts snap into alignment on the pad. Here is where the solder paste turns color from
a dull gray to shinny brown. Be aware of “tomb stoning,” which is when an SMT chip capacitor or resistor will
stand on one end making no connection. Once all the solder has reflowed, remove power from the heating plate and
let MTR cool down slowly.
A “YouTube” video showing how to solder SMT parts, both by hand and using solder paste is:
http://youtu.be/Ah5HEjDTHUo. The builder may want to view other suggested videos on SMT soldering which are done
a bit more professionally. Work slowly and be patient!
MTR-5B Page -6-

onstruction:
Reference photos of assembled board
MTR-5B Page -7-

MTR-5B Page -8-

Parts list:
QTY Resistors QTY Capacitors
1 10 1 ohms % 080 3.3 pfd GRN/GRN 0V C0G 2% 080
3 271 271 ohms % 080 9 22 pfd RED/RED 0V C0G % 080
3 471 470 ohms % 080 1 33 pfd ORG/ORG 0V C0G % 080
4 222 2.2 K % 080 2 47 pfd YEL/VOL 0V C0G % 080
2 362 3.6 K % 080 1 68 pfd BLU/GRY 0V C0G % 080
3 103 10 K % 080 8 100 pfd (101) BRN/BLK/BRN 0V C0G % 080
9 223 22 K % 080 4 1000 pfd (102) BRN/BLK/RED 0V X7R 10% 080
104 100 K % 080 22 0.01 ufd (103) BRN/BLK/ORG 0V X7R 10% 080
1 474 470 K % 080
10 0.1 ufd (104) BRN/BLK/YEL 0V X7R 10% 080
1 2761 2.76 K 1% 080 10 1.0 ufd (10 ) BRN/BLK/GRN 0V X7R 20% 080
1 1372 13.7 K 1% 080 3 10.0 ufd (106) BRN/BLK/BLU 0V X7R 20% 080
1 2002 20 K 1% 080 1 33 ufd (336) Alum electrolytic
1 10 3 10 K 1% 080 1 100 ufd (107) Alum electrolytic
1 1133 113 K 1% 080
1 2763 276 K 1% 080 4 100 pfd (101) Brown 100V C0G 10% 1206
2 1 0 pfd (1 1) Yellow 100V C0G 10% 1206
1 101 Resettable fuse 1206 4 220 pfd (221) RED 100V C0G 10% 1206
Semiconductors 3 330 pfd (331) Orange 100V C0G 10% 1206
2 SA612AD01112 MIXER/OSC SO-8 1 60 pfd ( 61) Green 100V C0G 10% 1206
1 LM386MX-1/NOPB AUDIO AMP SO-8 1 680 pfd (681) Blue 100V C0G 10% 1206
1 LM4808M AUDIO AMP/DUAL SO-8 11 30 pfd green Trimmer caps
1 MSP430G2433IPW28 16 BIT, 8K PROCESSOR TSSOP-28
1 AD9834BRUZ 24 BIT DDS TSSOP-24 4 3.3 uhy RFC 080 (Green)
1 74AC02M96 QUAD OR GATE SO-14 4 10 uhy RFC 080 (Brown)
1 SN74LVC1G31 7DBV SPDT ANALOG SWITCH SOT-23-6 2 8.2 uhy RFC 080 (Gray)
1 TPS 60200 (GRN) SWITCHING BUCK REG SOT-23- 4 4.7 uhy RFC 080 (Yellow)
1 TC1014-3.3VCT713 (ORG) 3.3V LDO SOT-23- 1 10 uhy power Inductor (100)
1 ASVMB-60.000MHZ 60.000 MHZ CLOCK 10 ppm 10 T30-2 red toroid
1 BAV99 (YELLOW) DUAL SILICON DIODE SOT-23
2 BAT 4 (Blue) DUAL SHOTKEY DIODE SOT-23 1 FT37-43 Ferrite core
4 BZT 2C V1-F .1 V 00 mw ZENER DIODE 1 32.768 kHz Cylinder watch crystal
1 DZ247000L (PG) 47 V, 2W ZENER DIODE 4.91 2 MHZ HU-49/US crystal, matched
3 BS170 N-CHANNEL MOSFET TO-92
2 NDT29 P-CHANNEL MOSFET SOT-223 4 Push button Tack switch
2 2N7002 (RED) N-CHANNEL MOSFET SOT-23 6 DP3T slide switch
1 NHD-
C12832A1ZFSW-
FBW-3V3
NEWHAVEN 128X24 LCD GRAPHICS
DISPLAY, WHITE BACKLIGHT
1 DPDT slide switch
2 3. mm phone jack 1 12mm button cell holder
1 1.7mm power jack Panel mount 1 122 3V lithium Button battery
1 1.7mm power plug 4mm dia x 10mm length
1 1 mil solder
1 9 feet #28 Magnet wire
MTR-5B Page -9-

Using the parts placement guides:
The parts placement guides on the following pages are color coded to show the location of the various types of
parts. Parts to be installed are highlighted in various colors to help identify their locations. The guides are
scaled so that the writing on them is easy to see on a computer monitor and come out crisper after the conversion
to pdf. Unfortunately, if you print all these pages out, it will use up a bunch of your ink jet ink.
Some parts do not have values marked on them or are very hard to read. Capacitors are not marked so these have
been color coded with a marker on the part carrier using the resistor color code to indicate their value in pfd.
SOT-23 parts have numbers printed on them, but are very hard to read. Therefore, these parts are also color
coded, but with a color sticker, as they come in plastic carriers. The color on the carrier matches the color
shown on the placement guide diagram.
Resistors have their value printed on them, though it might take a magnifying glass to read the numbers.
Therefore, individual values are not color coded.
Due to the tight spacing of
parts, not all of them have
their designation number
printed next to them on the
board. These two diagrams show
the part number designation
for each part location.
MTR-5B Page -10-

Part locations with values.
Capacitors are highlighted in light Blue (101 = 100 pfd, 103 = 10,000 pfd = 0.01 ufd)
Resistors are highlighted in yellow
Inductors are highlighted in Orange
Through-hole and semiconductors are highlighted in gray.
MTR-5B Page -11-

Semiconductor placement
●Finding Pin 1. Some of the ICs used in this kit have a dot or indentation
at Pin 1 corner of the chip. For others, the Pin 1 locations isn't as
obvious. The manufactures logo is sometimes used (as is the case for U1
and U3) or sometimes there is a line along the Pin 1 end of the chip. In
all cases, there is a beveled or rounded edge along the side of the Pin 1
(left) side of the IC package. When the package is orientated vertically
and the beveled edge is to the left, Pin 1 is always in the upper left
corner as shown in the diagram.
●U3 and U7, (SA612) use the manufactures log (NXP) for the pin 1 corner designator.
●Before placing an IC or transistor, tin one corner pad and then tack that lead of the part down first.
Before soldering any other pins, make sure all the leads are lined up on the pads. This is especially
important for U8 and U10, where these isn't much room for error. (See hint below to line up the leads
with the pads.) Solder the lead of the opposite corner from the tacked lead to be sure the body doesn't
move when you finish solder the rest of the leads.
●You will have to carefully check the number on the 8 pin ICs to tell them apart. Using a magnifying glass
and tilting the part slightly to the light will aid in reading a part number. The rest of the ICs are in
unique packages and are easier to determine their locations.
●Tilting an IC to the light can make reading the part number easier.
●U1 and U6 part carriers are color coded to make it easier to tell them apart.
●There are several different SOT-23 devices. The packages they are in are each color coded to match the
layout diagram.
●D1, D2, D3, and D7 have a very faint line on one end to indicate the cathode end. Look carefully for this
line and face it towards the line printed on the board.
●There may be more numbers or letters on the semiconductor packages then indicated on the layout diagram.
These numbers/letters are date or lot codes and can vary depending on when the parts were purchased.
Therefore, these are not used for part identification on the layout diagrams.
●HINT: Taping a straight edge, such as a thin metal ruler, across the board and lined up with the bottom
outline of U8 or U9 (as the case maybe) will aid in keeping the part aligned with the pads. Do U8 first
followed by U9. After soldering the leads, clean up any solder shorts with the supplied solder wick. Be
sure to only pull the wick parallel to the leads and not against the grain!
MTR-5B Page -12-

Semiconductor locations:
Semiconductors are mounted first.
Hand soldering notes:
●First mount U8 (AD9834) followed by U9 (430G2433). Use the straight edge hint on page 12 to line up the
pins on the pads.
●Soldering U11, the 60 MHz clock, will be a little tricky since there is not much of a lead sticking out
the side of the part. Tin all four corner pads and the ground pad in the center to put a little solder
bump on them. As the lettering on the part is hard to read, make sure you have it orientated properly,
then hold the part in place with a little downward pressure while heating each corner pin in turn. Flip
the board over and heat the ground pad up, flowing a little solder into the hole. It's not overly
important if this isn't soldered.
●The pin 1 dot and lettering on U is also not very easy to read. You'll have to be extra careful to get
this orientated properly. Note that when properly installed, the lettering on the part will be “upside
down,” i.e. facing the top edge of the board.
●The cathode line printed on the D1, D2, and D7 diodes is also hard to grasp.
●D8 should be easy to identify as it is the only two legged part of its size, and somewhat larger than the
D1 type diodes.
●Color coding is used on the part carriers for D4, D , D6, Q2 and U6 to make it easier to identify.
●Pin 1 of the remaining ICs should be easy to identify as they all have an obvious dot in the upper left
corner. The exception is U3 and U7. On these parts, look for “NXP” printed in the upper left corner.
●Use the supplied solder wick to remove any solder bridges between pins on the ICs. It is nearly
impossible not to make shorts when soldering the processor (U9) and the DDS chip (U8), whether if it is
done with solder paste or hand soldering. The pins on the SO-23- parts are also prone to shorts.
You will have a few left over semiconductors. The PTC fuse (used later) is also in the semiconductor bag. Put
these in a safe place to use later.
MTR-5B Page -13-
U8 AD9834
U9 430G2433
U3 SA612A
U2 LM386
U4 LM4808
U7 SA612A
U10 74AC02
U11 60.000 MHz clock
U CCP 6 pin black
D4 A7 diode Yellow
U6 A xx pin Orange
D1 W8 small 2pin
D2 W8 small 2 pin
D KL Diode Blue
D6 KL diode Blue
D7 W8 small 2 pin
D8 PG large 2 pin
Q2 702 Red
Q7 29 SOT-223

Resistors:
Resistors used in more than one location are shown color coded on the diagram to make it easier to find where
they are placed. The parts themselves are not color coded.
Be careful not to mix up R18 and R19 since they differ only by the last digit. By the same token 222 and 223
along with 103 and 104 value could be easy to mix up too, so read the numbers carefully.
Inductors:
The inductors are in a clear plastic carrier and marked with a single color representing the first digit in its
value. 10 uHy = brown, 8.2 = gray, 4.7 = yellow, 3.3 = green.
You will have a few left over resistors and one 10 uHy inductor which will go on the top side of the board. Be
sure to put these in a safe place for later use.
●If planning adding the 80M band and eliminating one of the standard bands, you will need to place L12 to
L3 and R4 to R6 values one position to the left. This assumes the operator will be eliminating 1 meters.
If desiring to eliminate one of the other bands, the same approach applies.
MTR-5B Page -14-
# Location value
3 R24/2 /31 271
3 R1/7/10 471
3 R /33/36 222
2 R6/23 362
2 R2/13 103
8 R3/14/1 /16/26/
28/30/3
223
4 R4/29/34/37 104
1 R12 474
1 R18 2761
1 R21 1133
1 R19 2763
Inductors:
3 L6/12/13 10 (brown)
2 L /11 8.2 (Gray)
4 L4/10/3/9 4.7
(yellow)
4 L2/8/14/1 3.3 (green)
80
M
L6/L12
Not supplied
18 uHy
80
M
R4 0 ohm
jumper.

apacitors:
The paper strips holding the chip caps are color coded to identify their value. The color coding is the same as
used for through-hole resistors but instead of ohms it represents picofarads. Therefore, a .01 ufd cap (10,000
pfd) is color coded Brown/Black/Orange. Values of less than 100 pfd are coded with just the two digit colors. 22
pfd is Red/Red.
The placement diagram highlights the color of the multiplier to help you locate where a particular value is
placed on the board. Values less than 100 pfd have their numerical value colored to match that on the carrier.
Because of their height, the two aluminum electrolytic caps will be installed later with the through-hole parts.
Otherwise the board will not sit flat when you install the top side parts.
You will have a few caps left over to be used on the top side of the board. Be sure to put these in a safe place
for later.
That completes the bottom side SMT components. On to the top side!
MTR-5B Page -15-
# Color code
Green/Green (3.3pfd)
6Red/Red (22 pfd)
1Yellow/Violet (47 pfd)
8 Brown/black/brown (101)
4 Brown/black/red (102)
18 Brown/black/orange (103)
6 Brown/black/yellow (104)
9 Brown/black/green (10 )
80M C7/27, 100 pfd C12, 1
pfd (parts not supplied)
C93 and C94 are not used unless
you are adding 80M, in which
case the 40M caps (C7+C27) caps
go there since all the band
filter parts will be moved one
location to the left.

Top side SMT components:
Since there aren't many SMT parts on top side, only one diagram will be used for all of them.
Notes:
L7: L7 is a power inductor which is a little tricky to solder in place due to the minimal solder tabs sticking
out the bottom. Tin the pads on the board so you have a little bump of solder. Place the part over the pads and
heat up the bottom edge of the inductor with your iron, adding a little bit of solder to help the transfer heat;
then do the other side. Use an ohm meter to verify the solder connections.
Inasmuch most of the colors were used identifying the caps, all the resistors are highlighted in the same color.
Most of the caps in the output filter use 1206 size parts and are on a clear plastic carrier. These parts are
identified with a single color equal to its most significant digit. With the exception of the 1 0 pfd caps, which
use Brown/Green, the 60 pfd cap uses green and the 100 pfd cap uses brown.
Trimmer caps: Be sure to match the notched end of the cap with the notched end of the board outline. This ensures
the adjustment screw is grounded and will not be affected when using a metal screw driver to adjust it.
F1 is a resettable fuse. It is different than the other 1206 sized cap parts, as it has a green body with notches
on the ends and has the numbers “101” printed on it. This part was found in the semiconductor parts bag.
MTR-5B Page -16-
# Loc. Color/value/type
1 F1 101,green body,1206
1 L7 Large square inductor
11 Green trimmer caps
1 D3 – Small 2 leg diode.
1 Q1 – 29 SOT-233
1 U1 – Green SOT-23-
1 Q4 – Red SOT-23
1 R8 103 Resistor
1 R11 10 3 Resistor
1 R9 2002 Resistor
1 R17 10 Resistor
1 R20 223 Resistor
1 R22 104 Resistor
1 R27 1372 Resistor
1 R32 222 Resistor
1 L1 Brown Inductor
# Location color Color code # Location color Color code
4 C2, C3, C4, C68 Orange BRN/BLK/ORG 3 C4 ,C78,63 Orange ORG, 1206 size
3 C10, C81, C92 Yellow BRN/BLK/ORG 1 C6 Blue Blue, 1206 size
3 C11, C30, C31 Blue Blue 080 size 4 C44,C77,C62,C61 Red Red, 1206 size
1 C 4 gray Blue/Gray 1 C64 Green Green, 1206 size
1 C 6 gray YEL/VOL 2 C43,C76 Yellow Yellow 1206 (not
related to value)
1 Not labeled (C 2) gray ORG/ORG 4 C47,C49,C74,C7 Brown Brown, 1206 size
1 C 8 gray Red/Red
1 C gray Red/Red
80M : C4 /78/6 /96 = 680 pfd 100V C0G 1206 C 4 = 220 pfd C0G 0V 080 (parts not supplied)

Through-hole components:
●Install the bottom side through-hole parts first, with the exception of the battery holder since the
holder sits above the pads for the push button TACK switches.
●Depending on the type of enclosure the board in mounted, the builder may elect not to install the two
phone jacks onto the board. It may be more convenient to panel mount the jacks and use jumpers to wire
them to the board.
●The toroids will be wound and installed later.
Top side:
●X6: once soldered, clip the leads flush
with the board on the top side as the
display will sit on top of these
connections. Tack solder the end of the
crystal to the solder pad to hold it in
place.
●C : 33 ufd/6.3V Note the negative end is
the side with the black “half-moon.”
●C82: 100 ufd/16V
●Q4/ /6 – BS170 TO-92
Bottom side:
●X1-5: sit flat to board.
●X1: Tack solder end of case to solder pad
to ground.
●X2-5: use lead clipping to ground case to
solder pads directly below the case. Tack
solder wire to the top edge of the can.
●S5: DPDT slide switch.
●When installing the slide switches,
solder just one pin and then double check
to make sure switch is sitting flat and
square to the board. If the switch is
cocked and more than one pin is soldered,
straightening it again will not be easy.
●S6 to S11: 3PDT slide switches
●L D: Getting all the pins to line up with
the holes can take a little prodding.
○Make sure the display sits flat and
snug to the board.
○Make sure there are no shorts between
the pads when soldered since the pads
are very closely spaced.
●S1-4: TA K PB switches. The spacing on the leads will only line up properly one way.
●Battery holder: Now that the PB switches have been installed, mount the battery holder. I made a mistake
and called out the mounting holes to be VIAs instead of solder pads so they came covered with solder
mask. The solder mask has been scraped off around the hole for you so there is a better chance of making
a good connection.
○Subsequently, there isn't much space between the switches soldered to the battery terminal pins. Be
very, very careful not to touch the switches and melt them!!! Check the positive terminal with an ohm
meter to make sure it's not shorted to ground.
Go to next page for toroid winding data.
MTR-5B Page -17-

Toroid winding data:
●Wind the wire snug to the core. A sloppy and loose winding will result in poor power output and an
increase in spurious emissions.
●After winding, arrange the wire so that the turns are as evenly spaced as possible.
●The magnet wire can be tinned with the soldering iron by melting through the insulation, but this must be
done before the wire is placed onto the pad. Tin the wire up to the core to avoid wire insulation in the
hole after the core has been snugged onto to the board.
●L16: 8 turns (~6”) on black FT-37-43 core, mount on top side of board.
●80M option: On the 80 meter inclusion, the band sequence will start with 80m in the L17/L18 positions and
all the other bands will move over one slot. Typically when adding 80m, 1 m will be deleted but any other
band can be eliminated instead. Just keep the left to right sequence of increasing frequency scheme. This
will of course also apply to the receiver input filters and band select resistors which will have to be
repositioned accordingly. NOTE: parts for 80 meter filters are not included and must be obtained by the
builder from a parts distributer.
MTR-5B Page -18-
40 M L17 18 turns 11” #28
40 M L18 20 turns 12” #28
30 M L19 13 turns 8” #28
30 M L20 16 turns 10” #28
20 M L21 12 turns 8” #28
20 M L22 1 turns 9” #28
17 M L23 11 turns 7” #28
17 M L24 14 turns 9” #28
1 M L2 9 turns 6” #28
1 M L26 13 turns 8” #28
80 M L17 23 turns #32 wire not
supplied
80 M L18 2 turns #32 wire

Fix a defect on board:
An open VIA was discovered which needs to be fixed with a short piece of magnet wire. Use the least amount of
exposed tinned lead as possible to make the connections. This fix connects the output side of the 40 meter
receiver band pass filter to the selector switch. This may not be a problem on all boards, thus check for
continuity with an ohm meter to find if it's needed before adding the jumper.
Inspect your work!
Now that the board is complete, it's time to review it very carefully looking for bad or missing solder
connections or shorts between leads on the ICs. Use a magnifying glass and inspect the connections on all the
parts. Removing flux residue can make inspecting the connections easier. “Electrical parts cleaner” which can be
found in the automotive section of Walmart works well for removing flux. Soldering issues are the number one
reason a kit does not work and catching them now will save much time and effort (and possible damage) later.
Power Jack and Antenna jack wiring:
The power jack will need to wired to
the board before the board can be
tested. The wiring of the BNC antenna
jack can be put off for now, as it
will just get in the way until you
need to align the receiver front end
and test the transmitter.
Once the power jack has been wired,
wrap the exposed connections on the
jack with electrical tape so there is
no possibility of then shorting out
to something on the board while you
move it around.
Adding a rotary tuning encoder:
The encoder is wired to the three
pads to the right of the display
viewed from the top of the board and
to the left of U9 from the bottom,
where the pads are labeled.
Any mechanical or optical encoder
with Quadrature outputs can be used.
There are many to choose from. A
suitable panel mount encoder would be
Mouser part # 652-PEC11R-4220F-S12.
This encoder also has a push switch
built in which the builder might
elect to wire to the Fn switch.
MTR-5B Page -19-
Added jumper

Alignment:
●Use a 9 volt transistor radio battery to power up the board for the first time. If there are any
problems, the 9V radio battery can't deliver enough current to do any serious damage.
●Power up the board and the display should come on. Everything should be functional but the BFO trimmer
needs to be set.
●The BFO can be adjusted by ear with off air signals, but it is best done using the BFO ADJUST mode. This
allows you to set the BFO trimmer so that the beat note is peaked in the audio band pass filter.
●The reference oscillator frequency constant used for frequency calculations can be adjusted to match the
actual frequency of the oscillator. An accurate frequency counter is required for this adjustment.
●The Local Oscillator frequency can be tweaked so it is centered better in the pass band of the IF crystal
filter. It should be pretty close to center by default, but the exact center frequency can vary by a few
100 Hz due to the sorting of the crystals which matches them to 10 Hz.This adjustment is best done with
the aid of an Oscilloscope. If you don't have one, it can be done with a sound card running an
Oscilloscope or PSK program.
Reference oscillator adjustment:
If you do not have an accurate frequency counter, advance directly to BFO adjust mode by pushing the <Fn> switch.
●Enter calibration mode by powering up the board with both the <Fn> and <RIT> switches held closed.
●The display will read “CAL REF” on the lower line.
●Connect an accurate frequency counter to TP1 (located the left of the display and just below R32)
●Use the tune up or tune down switches to set the frequency to exactly 10.000,000 MHz.
●When done, push the <Fn> switch to advance to the BFO adjustment mode.
BFO Adjustment:
●Connect an Oscilloscope at test point 3 (TP3, just below headphone jack) or plug in a set of headphones.
●While simultaneously holding closed the <Fn> and <RIT> switches, turn the power on.
●The display will read [BFO ADJUST]
●Adjust the BFO trimmer cap to peak the signal, which should occur at about 600 Hz.
L.O. Adjustment:
●Skip this if no scope and are peaking by ear.
●Connect the oscilloscope to TP2.
●Use the Up and Down tuning buttons to find where the signal starts to roll off, then return to where it
is centered in the pass band of the filter. This might be a little hard to see due to the noise on the
signal from the switching supply ripple.
●Once center of the IF filter pass band is determined, return to TP3 and readjust the BFO trimmer to peak
the signal in the audio band pass filter again.
omplete the BFO alignment:
●Tap the <Fn> switch to exit and store the data. The display will blank for a second and then the board
will rest and normal operation will begin.
Entering BFO adjustment mode later:
●Remove the backup battery.
●Turn on power while holding closed both the <Fn> and <RIT> switches.
●This will reload the default values and clear the band frequency memory locations.
●The BFO tone and LO centering can now be changed as previously described.
●TAP <Fn> to store and exit.
MTR-5B Page -20-
Table of contents
Other LNR Transceiver manuals