Lockly Pro LOCKLY GUARD ATHENA SLIDE EDITION 228SL User manual

REV᧶0.3
Date:2022-06-02
ERP 㧉⨚᧶PL35R1UQ-GL-SMT00030A-V1
Designer:Sabrina
K
㙞承᧶说明书:PL35R1UQ/PGD228W,SMT000,REV.A(UMPGD228W20220602),
140x195mm,80g书纸,双面单黑印刷,18页36面装订本,RoHS2.0,REACH,
Prop65,POPs,PAHs
ERP P/N:
R
SLIDE EDITION (228SL)
SWING EDITION (228SW)
FOR COMMERCIAL USE & PROFESSIONAL INSTALLATION
USER MANUAL
ATHENA

TABLE OF CONTENTS
Table of Contents
29
30
31
31
Section 5 - Advanced Features
Section 6 - Important Notes
Section 7 - Cleaning
Section 8 - Safety Precautions
5.1 Offline Access CodeTM (OAC)
Section 1 - Product Highlights
2
3
4
5
5
6
7
1
Section 2 - Product Overview
2.1 Product Overview- Exterior
2.2 Product Overview- Interior
2.3 Understanding Your New Lock
2.4 Reset Button
2.5 Rebooting Lockly Guard
2.6 Low Battery
2.7 Changing the Battery
1.1 Product Features
Section 3 - Using Your Smart Lock
8
9
10
11
12
13
15
16
17
18
19
19
3.1 Configuring Access
3.2 Entering Programming Mode
3.3 Adding an Access Code
3.4 Deleting an Access Code
3.5 Checking the Access Codes
3.6 Adding a Fingerprint
3.7 Fingerprint Scanning Directions
3.8 Fingerprint Scanning Tips & Troubleshoot
3.9 Deleting Stored Fingerprints
3.10 Adding an RFID card
3.11 Deleting RFID Card
3.12 Adding Lockly Guard Secure Link
Section 4 - Locking and Unlocking
20
21
22
22
23
24
26
27
28
28
4.1 Unlocking Lockly Guard with Access Codes
4.2 Unlocking
Lockly Guard
with Fingerprints
4.3 Locking/Unlocking
Lockly Guard
with App
4.4 Unlocking using RFID
4.5
Locking/Unlocking Lockly Guard with Physical Key
4.6 Safe Mode
4.7 Locking from the Outdoor
4.8
Rain Mode
4.9 Shine Mode
4.10 Welcome Mode
For additional support, visit http:// LocklyPro.com/support
or email [email protected]

SECTION 1.1 1
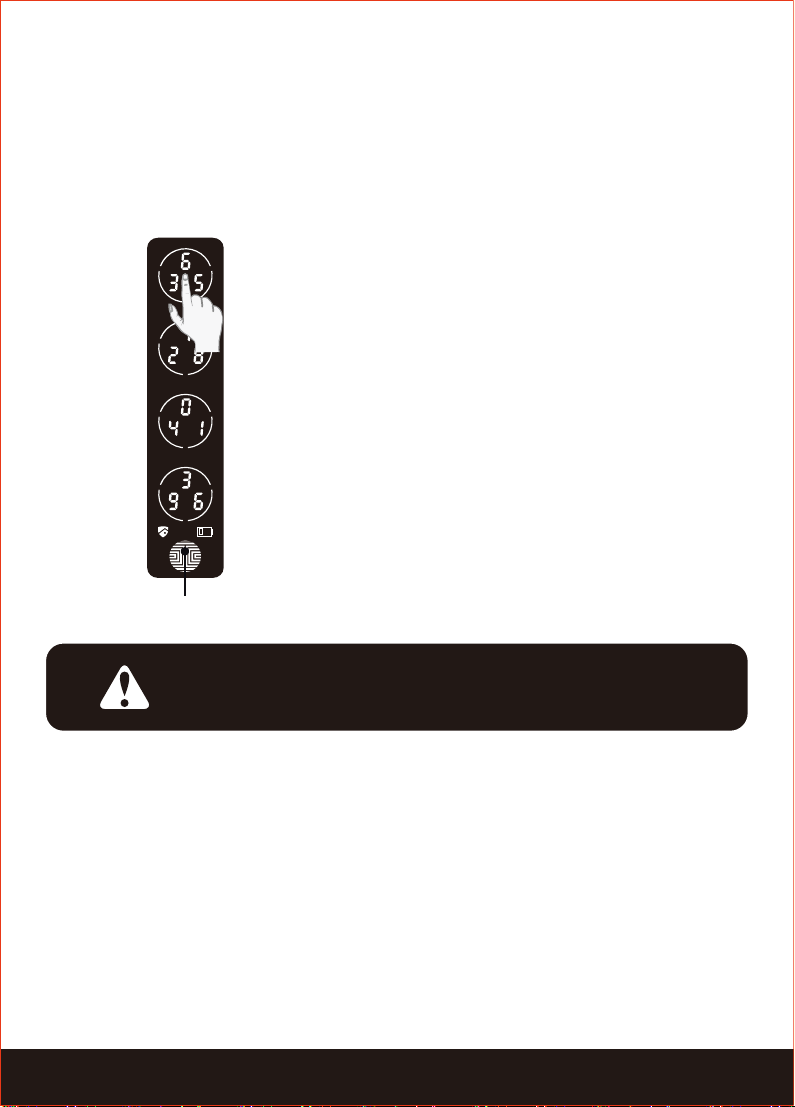
Patented Hack-proof PIN Genie
Keypad
Digits are randomly displayed on the keypad ensuring access codes to be
undetectable to intruders after repeated use. Numbers are randomly distributed
across 4 buttons, with 3 numbers in each button. Users can press any button
showing their number. Location of the numbers are always different everytime
someone uses the keypad, making it hard for prying eyes to guess the correct
code.
Multiple Access Codes & Monitoring
Store up to 18 Access Codes for family, friends and guests, as well as monitor entry
and exit records.
Advanced 3D Fingerprint Recognition
Biometric Fingerprint Recognition protocol allows up to 99 registered fingerprints
to be used and accepts only actual fingerprints - preventing lifted prints from being
used.
Live Monitoring and Voice Control
Through your smartphone, monitor door access from anywhere in the world and
securely control who comes and goes.
Offline Access Code
TM
(OAC)
The offline access codeTM can allow owners to issue access codes, set the
allowed access duration, all without Lockly ever connecting to the internet, so in
case of power outage, you can still magically and remotely issue Access Codes
without any connection to the web.
Automatic Lock
Owners no longer have to worry about forgetting to lock the door. With Auto
Lock enabled, Lockly will automatically re-lock the door based on your customized
timing set between 5-300 seconds. (NOTE: Automatic locking function is not
available on sliding doors)
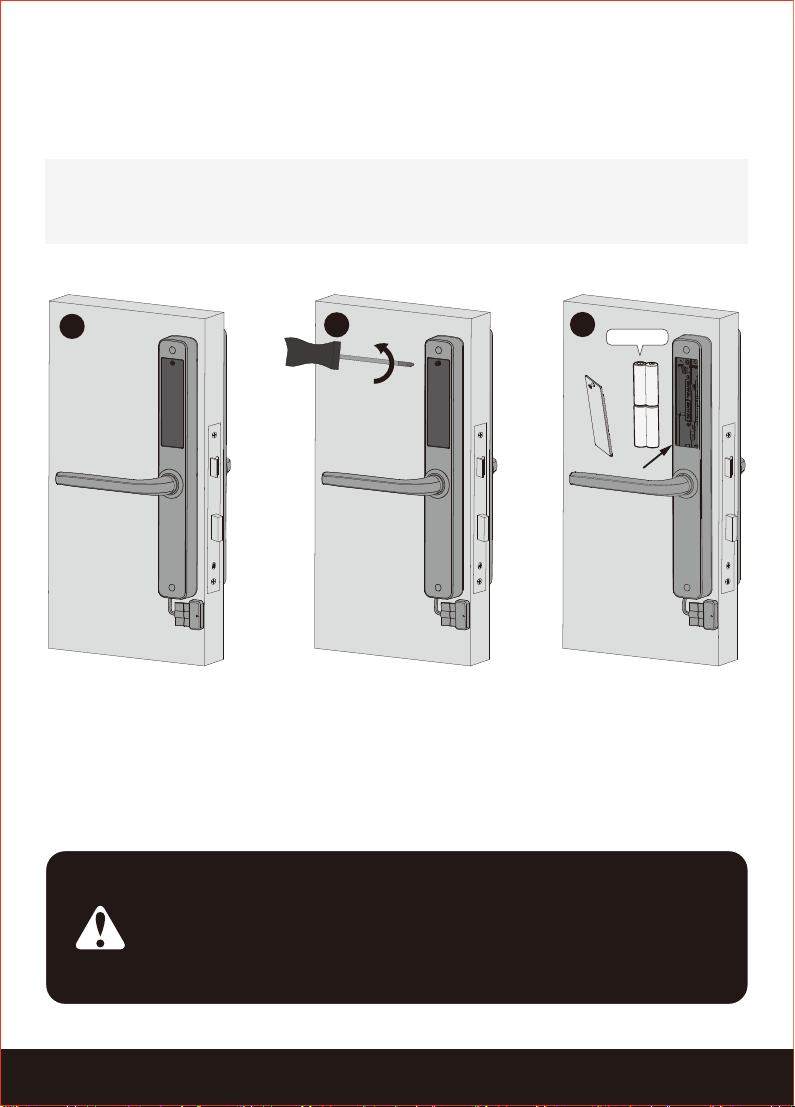
Backup Keys and Mirco USB Port
The door can be opened with physical backup keys. There is also a micro USB
charging port for emergency power backup to access the keypad in case your
smart lock runs out of battery.
1.1 Product Features

2 SECTION 2.1
2.1 Product Overview- Exterior
Welcome/ Safe Mode
Battery Indicator
OK Button
Fingerprint Reader
Handle
Touchscreen
Keypad Buttons
RFID card
Key Hole Cover
Mirco USB Port
Key Hole
Reboot

SECTION 2.2 3
2.2 Product Overview - Interior
Battery Cover
Reset
Program Button
Battery
compartment
*Operated by 4 X
AA size alkaline
batteries ( not
included )
Inside Handle
Door Sensor

4 SECTION 2.3
After the installation of your new Lockly Guard, understanding some key
functions
of
operating your smart lock is important. The following guides will walk you
through
resetting a lock, adding Access Codes, deleting Access Codes, adding and
deleting fingerprints, adding and deleting RFID cards and also how to configure your
OAC (Offline Access Code™)
For any questions you can always visit http://Lockly.com/help for assistance.
Don't forget that Lockly Guard works best with our iOS and Android app. Please
download the app by visiting the link below.
2.3 Understanding Your New Lock
The Default Access Code is 1 2 3 4 5 6
Scan or visit LocklyPro.com/app
NOTICE

SECTION 2.4 2.5 5
2.4 Reset Button
In order to restore the Lockly Guard to factory default settings, you must have
your “Activation Code” available. The Activation Code can be found on the
Activation Code Card that came with your smart lock.
After you have the Activation Code ready, push the reset button on the back
panel of the Lockly Guard to perform your reset. See below to see which Reset
Process applies for you. Once the smart lock has been reset, all the data previously
stored will be deleted.
Press Reset Button for one (1)
second
or
till you hear a short beep.
Open the LocklyPro smart-phone app
to add
your lock using the Activation
Code.
Press Reset Button for three (3) seconds
lockly smart lock reset to factory default
Reset Pin
2.5 Rebooting Lockly Guard
Press and release the reboot button
when you want to reboot the lock. Your
Lockly Guard will beep once after
reboot. Only reboot when necessary.
To reboot, find the reboot button loca-
ted below the keyhole from the exterior
of Lockly Guard.
You will need something small such as
a paperclip, to press the reboot button.
Insert the paper clip and press down
firmly.
NOTICE
Reboot Lockly Guard in case of dead battery or
malfunction. No settings will be changed and all
Access Codes will still be stored within Lockly Guard.
Reboot Button

6 SECTION 2.6
When the battery is in seriously low condition,
Lockly Guard
will make continuous
beeping sounds in addition to the flashing low battery icon on the touch screen.
You should replace batteries immediately to avoid your smart lock from shutting down.
When your smart lock low-battery warning alert finally dies, you will have 3 chances
to unlock your smart lock either by a password, APP or fingerprint. If the unlock was
successful, the low-battery warning alert will be on for 1 minute. After which, the
smart lock will go to dead-battery mode and will lock auto lock in 5 seconds and
the screen will display a low-battery icon.
Connect the USB plug to a power bank
or any 5V >0.5A power supply. It normally
takes 15 secs to boot up the lock. Once
Lockly touchscreen is activated enter
your Access Code. Do not removed the
USB plug yet until you have successfully
unlocked the door. After have successfully
unlocked, batteries should be replaced
immediately.
2.6 Low Battery
Mirco USB
Backup
Power
Key Hole
Key Cover
USB Socket
Dead Battery
Condition Indicator Solution
Low Battery
Replace batteries immediately
to avoid battery failure.
Lockly
Guard
can still operate up to 300
cycles in low battery condition.
When there is no
display and sounds;
and screen is non-f
unctional.
Replace batteries immediately.
Supplied physical backup keys
can be used to unlock the door.
Alternatively, use a micro USB port
to power up the lock to tempo-
rarily activate the lock.
Battery Icon on the
display keypad will
light up to indicate
low battery.
Touchscreen

SECTION 2.7 7
2.7 Changing the Battery
Open the battery compartment cover and insert 4 AA alkaline battery as shown
below.
• Make sure the batteries are correctly oriented.
• Replacement of batteries does not affect programmed data.
• Replace only with new batteries. DO NOT mix with used batteries.
+
+
-
-
+
+
-
-
AA 1.5V X 4
3
12
Whenever batteries are replaced, reconnecting
the smart lock to your smartphone App is required.
If you have not yet downloaded the app, visit:
LocklyPro.com/app
NOTICE

8 SECTION 3.1
The Default Access Code is 1 2 3 4 5 6
How to Use the Keypad
There are a total of five (5) buttons on the keypad
as shown in the example image to the left. The
numbers in each button may differ than what is
shown on your device than what is displayed here.
To enter your required digit, just simply press the
circle where your number is shown. You do not
need to press the actual number as anywhere
within the circle will suffice.
The button on the bottom is the OK button. You
will be pressing this button when you are done
entering your Access Code.
Your new Lockly Guard Access Code can be any combination of 6 to 8 digits.
Once a
new Access Code is entered, the Default Access Code of 123456 would be
deleted.
A Maximum of 8 sets of Access Codes can be stored for use.
Your new Lockly Guard Access Code can be any combination of 6 to 8 digits.
Once a new Access Code is entered, the Default Access Code of 123456 would
be deleted. A maximum of 16 sets of Access Codes can be stored for use at any
given time. To add more than 16 sets of Access Codes, you must delete an
existing Access Code before dding a new code. If you're not using the APP, you
can store up to 18 sets of Access Code.
3.1 Configuring Access
OK Button
NOTICE

SECTION 3.2 9
3.2 Entering Programming Mode
To end Programming Mode, press the Program button anytime. Programming Mode
will automatically exit if the keypad is inactive for more than thirty (30) seconds.
After entering Programming Mode, you should
see the screen as displayed to the right on your
Lockly Guard
keypad. Follow the following steps to
add,
delete, or check your Access Codes.
Add Passcode
ModeNumber
Delete Passcode
View Passcode
Program Button
To enter Programming Mode, remove the
battery compartment cover on the interior
side of the
Lockly Guard
to expose the Reset and
Program buttons.
Simply press the Program button to enter
programming mode.
Note: Program button will be disabled once
synced to a smart phone. Configure all settings
via synced smart phone. Access Codes previously
added by Programming mode will be cleared.

10 SECTION 3.3
If the two (2) Access Codes you entered does not
match, an error message will appear on the screen
(As shown to the left). Press OK to return to the
Programming Screen and try again. See Section 3.2
OK Button
3.3 Adding an Access Code
While in Programming Mode, select “1AD” to add an Access Code. If you are not
in Programming Mode, please see Section 3.2 to enter Programming Mode.
After pressing “1AD” press “Pd” to add an Access Code.
Enter your new 6 - 8 digit Access
Code and press when you are
finished. You will then re-enter the
code to confirm your new Access
Code.
Remember, just touch the digit you
need within the circle around each
3 numbers. There is no need to touch
the exact location of the number.
For example, based on the example
image to the left, if you need “1”,
you can touch the upper left button
. For “6”, you would touch the upper
right button.
If you have successfully entered your new Access
Code twice, you will see the new code displayed
here. In this example, we chose 654321. Press to
Confirm or to cancel.
To exit or cancel, you can always press or

SECTION 3.4 11
Once you have selected the Access Code you want to delete,
Lockly will ask you to
confirm deletion by showing you the Access
Code you are deleting, in this example, 1 3 5 7 9 0.
Press to delete, or to cancel.
There are two incidents where your
Access Code cannot be deleted.
NOTICE
3.4 Deleting an Access Code
While in Programming Mode, select “2DE” to delete an Access Code. If you are
not in Programming Mode, please see Section 3.2 to enter Programming Mode.
After pressing “2DE” press “Pd” to
delete an Access Code.
Active Access Codes will then be
displayed on the screen in sequence
from left t
o right, top to bottom.
In the example shown on the right,
the Access Code displayed is
1 3 5 7 9 0 .
Rotate through different Access
Codes shown by touching any
number on the screen. If you find
the Access Code you want to
delete, simply hold the OK button
for 3 seconds. (Continue on next
page)
Example Only
OK Button

12 SECTION 3.4 3.5
3.4 Deleting an Access Code (Continued)
There are no Access
Codes set. The factory
default Access Code
cannot be deleted.
No Access
Codes Set
Only one Active
Access Code
3.5 Checking the Access Codes
OK Button
Rotate through the different Access Codes by touching
any number on the screen. To exit Check Access Code
screen, simply press the OK button.
There is only one (1)
Access Code saved
in the smart lock. At
least one code must
be registered.
Please add another
Access Code before
attempting to delete
the existing code.
While in Programming
Mode, select “3CH”
to check registered
Access Codes. If you
are not in Programming
Mode, please see
Section 3.2 to enter
Programming Mode.
Active Access Codes will
then be displayed on
the screen in sequence
from left to right, top to
bottom. In the example
shown on the left, the
Access Code displayed
is 1 3 5 7 9 0 .
If there are no Access
Codes registered in
your smart lock, Check
Access Code mode
will be invalid. The
default Access Code
will not be shown on
the display keypad,
and you will see the
following screen shown
to the left instead.

SECTION 3.6 13
3.6 Adding a Fingerprint
We are using an advanced biometric sensor, providing the most secure fingerprint
authentication. For security reasons, Lockly Guard will only accept fingerprint
patterns that consist of cross intersection points. Patterns with no cross intersection
points will not be acceptable.
Please check your fingers before registration to make sure the finger you want to
register will be acceptable by our system. Otherwise, use an alternative finger to
ensure successful registration.
The following examples show which types of fingerprint patterns will be acceptable.
It is highly recommended to enroll at least one finger from each hand in case the
hand you are using is unavailable, such as, in instances like if you are holding
items in that hand or have sustained an injury.
Your
Lockly Guard
can register up to ninety-nine (99) fingerprints. Please read the
following sections if you want to add or delete fingerprints. We recommend using
your app to
add fingerprints, however, the following section can show you
without using the app.
Fingerprint Pattern with
Cross Intersection Lines
Concentric or Parallel Pattern
with no Cross Intersection Lines
Fingerprint with Scars
or Worn Out Ridges
OK Not OK Not OK

14 SECTION 3.6
NOTICE
Please make sure your fingers are clean from dirt
and oils before scanning your fingerprint. Make sure
the sensor is also clean by taking a soft cloth and
wiping the surface.
While in Programming Mode*, select “1AD” to add an Access Code. If you are not
in Programming Mode, please see Section 3.2 to enter Programming Mode.
After pressing “1AD” press “FP” to register a Fingerprint.
Upon pressing “FP”,
you
will enter Fingerprint
Registration Mode and
you will see a green LED
ring light up on the
fingerprint panel on the
exterior of Lockly Guard.
3.6 Adding a Fingerprint (Continued)
You must successfully scan your fingerprint six (6) times for it to properly register.
Every time you scan your fingerprint, the number on the bottom will change,
starting from 6 - then 5, 4, 3, 2, 1, until the fingerprint is successfully registered.
Note: For reference, please keep a record of your fingerprint registration number
to distinguish whom it was registered to.
* Only works when lock is not paired with a smart phone device.
Once you’re in Fingerprint
Registration Mode you
will see two numbers
displayed on keypad.
The top number is your
Fingerprint Registration
number, in this example
to the left,
“1”
. The
bottom number will
always start with a
“6”.

SECTION 3.6 3.7 15
3.6 Adding a Fingerprint (Continued)
Scan your finger by lightly placing your designated
finger on the sensor until you hear a beep. Lift your
finger and repeat the process slowly until the digit “6”
shown on the screen becomes “1”. If you have
successfully scanned and registered your fingerprint,
you will hear a long beep, and the Bluetooth icon will
flash green.
PASS will show on the keypad and press OK to exit. If
you did not successfully register your fingerprint, FAIL
will show on the keypad. If FAIL is displayed, press OK
to return to the previous screen to rescan your finger.
For instructions on scanning an optimal fingerprint,
please proceed to Section 3.7.
OK Button
The fingerprint sensor equipped in Lockly
Guard is loaded with powerful fingerprint
algorithms to extract quality features from
fingers, even
in poor conditions. Placing
your finger on the
sensor correctly helps
consistency in fingerprint recognition. The
following directions and tips will guide
you on how to scan an optimal finger-
print image.
3.7 Fingerprint Scanning Directions
Position your finger on the
center of the sensor
Sensor
Core

16 SECTION 3.7 3.8
Top View Side View
3.7 Fingerprint Scanning Directions (Continued)
OK X X OK X X
Correct Incorrect
3.8 Fingerprint Scanning Tips & Troubleshoot
Tips for Fingerprint Enrollment and Recognition
• Place your finger to completely cover the
sensor with maximum contact surface.
• Position the center of your finger (core) to
the center of the sensor.
• Hold your finger still for more than a second
until you hear a beep.
•
Scan a finger that is clean and free from
dirt.
• Children ages 12 and under are not recom
mended to use fingerprint access due to the
constant changes of their fingers during growth.
• Elderly with fading fingerprints may have
difficulty in recognition.
• If your finger has a cut, scar, or cracked skin
due to dryness, try another finger.
Troubleshooting Fingerprints
In case of poor fingerprint
conditions
• If wet - wipe excess moisture
from finger before scanning
•
If dirty - wipe stains and dirt
off from finger before scanning
• Make sure the sensor is clean
from dirt or smudges - wipe
sensor with soft cloth regularly
For more troubleshooting help,
visit http://Lockly.com/help

SECTION 3.9 17
3.9 Deleting Stored Fingerprints*
While in Programming Mode, select “2DE” to delete a Fingerprint. If you are not
in Programming Mode, please see Section 3.2 to enter Programming Mode.
After pressing “2DE” to delete, press “FP” to delete a fingerprint.
Your registered fingerprint numbers
will be displayed on the screen.
Tap number to rotate to the next
registered fingerprint. When you
have found the fingerprint ID
you
want to delete, press and hold
the OK button for 3 seconds to
delete. (Example shown - “02”)
You will then see a confirmation page displaying and with the fingerprint
number you are deleting displayed in the lower left. Select Y to delete or N to
cancel.
Alternatively, while on Programming Mode, select 2DE, then press FP and place
the registered fingerprint you want to delete on the fingerprint sensor. Your smart
lock will identify the fingerprint and jump to confirmation page displaying Y and N.
Select Y to delete or N to cancel.
*Only works when lock is not paired with a smart phone device. If paired to a
device please delete your fingerprints from the administrative device paired
to your lock.
Fingerprint
ID Number
OK Button

18 SECTION 3.10
3.10 Adding an RFID card
While in Programming Mode, select “1AD” to add an RFID card. If you are not in
Programming Mode, please
see Section 3.2 to enter Programming Mode.
After pressing “1AD” press "Id" to add an RFID card.
Place the RFID card to
the screen where the
RFID card sensor is
embedded.
PASS will show
on the keypad
once card is
registered
successfully.
This manual suits for next models
1
Table of contents
Other Lockly Pro Door Lock manuals