Logik L32HED14I User manual

Instruction Manual
32” HD Ready LED TV
with DVD Player
L32HED14I
L32HED14I_IB.indd 1 28/08/2014 17:31

WE KNOWHOW
TO HELP YOU
WITH YOUR TV
We want you to be able to enjoy your new TV for many years. From getting it home and setting it up,
to helping you get the most out of your new purchase. And in the unlikely event your TV lets you down,
we can get it working again in no time.
Here are some of our TV services, but if you want to know more look us up at www.knowhow.ie or call
us on: 1 890 818 575.
TV SET UP & DEMO
We’ll assemble the stand and connect your new TV to the existing equipment. We’ll tune your TV so it’s
ready to watch. We’ll also give you a demonstration of your new TV’s functions.
TV WALLMOUNT & DEMO
We’ll fix your TV to a suitable position on the wall and connect to your existing equipment, so it’s all
ready to go. We’ll use neat wire management so you don’t have to look at any untidy cabling and, to
complete your fuss-free installation, we’ll test and demonstrate your TV’s functions.
TV & HOME CINEMA INSTALLATION
We’ll un-box, connect and set up your new and existing equipment. We’ll then configure, calibrate and
optimise the equipment. To avoid ugly trailing cables we’ll clip them to your skirting board if you’d like
us to. Then we’ll give you a demonstration.
FAULT & FIX SERVICES
With our Fault & Fix services we can repair a wide range of products at our new state-of-the-art repair
lab. This service is available for:
• Desktop PCs • Laptops
• Netbooks • TVs
CT_459_52TG_123456_CT_A4PF
For
Ireland
Knowhow Page IRL.indd 1 25/04/2014 10:06
L32HED14I_IB.indd 2 28/08/2014 17:31

Contents
Safety Warnings .................................................................................................................................................................................5
Preparation.........................................................................................................................................................................................7
Unpacking the TV........................................................................................................................................................................................................7
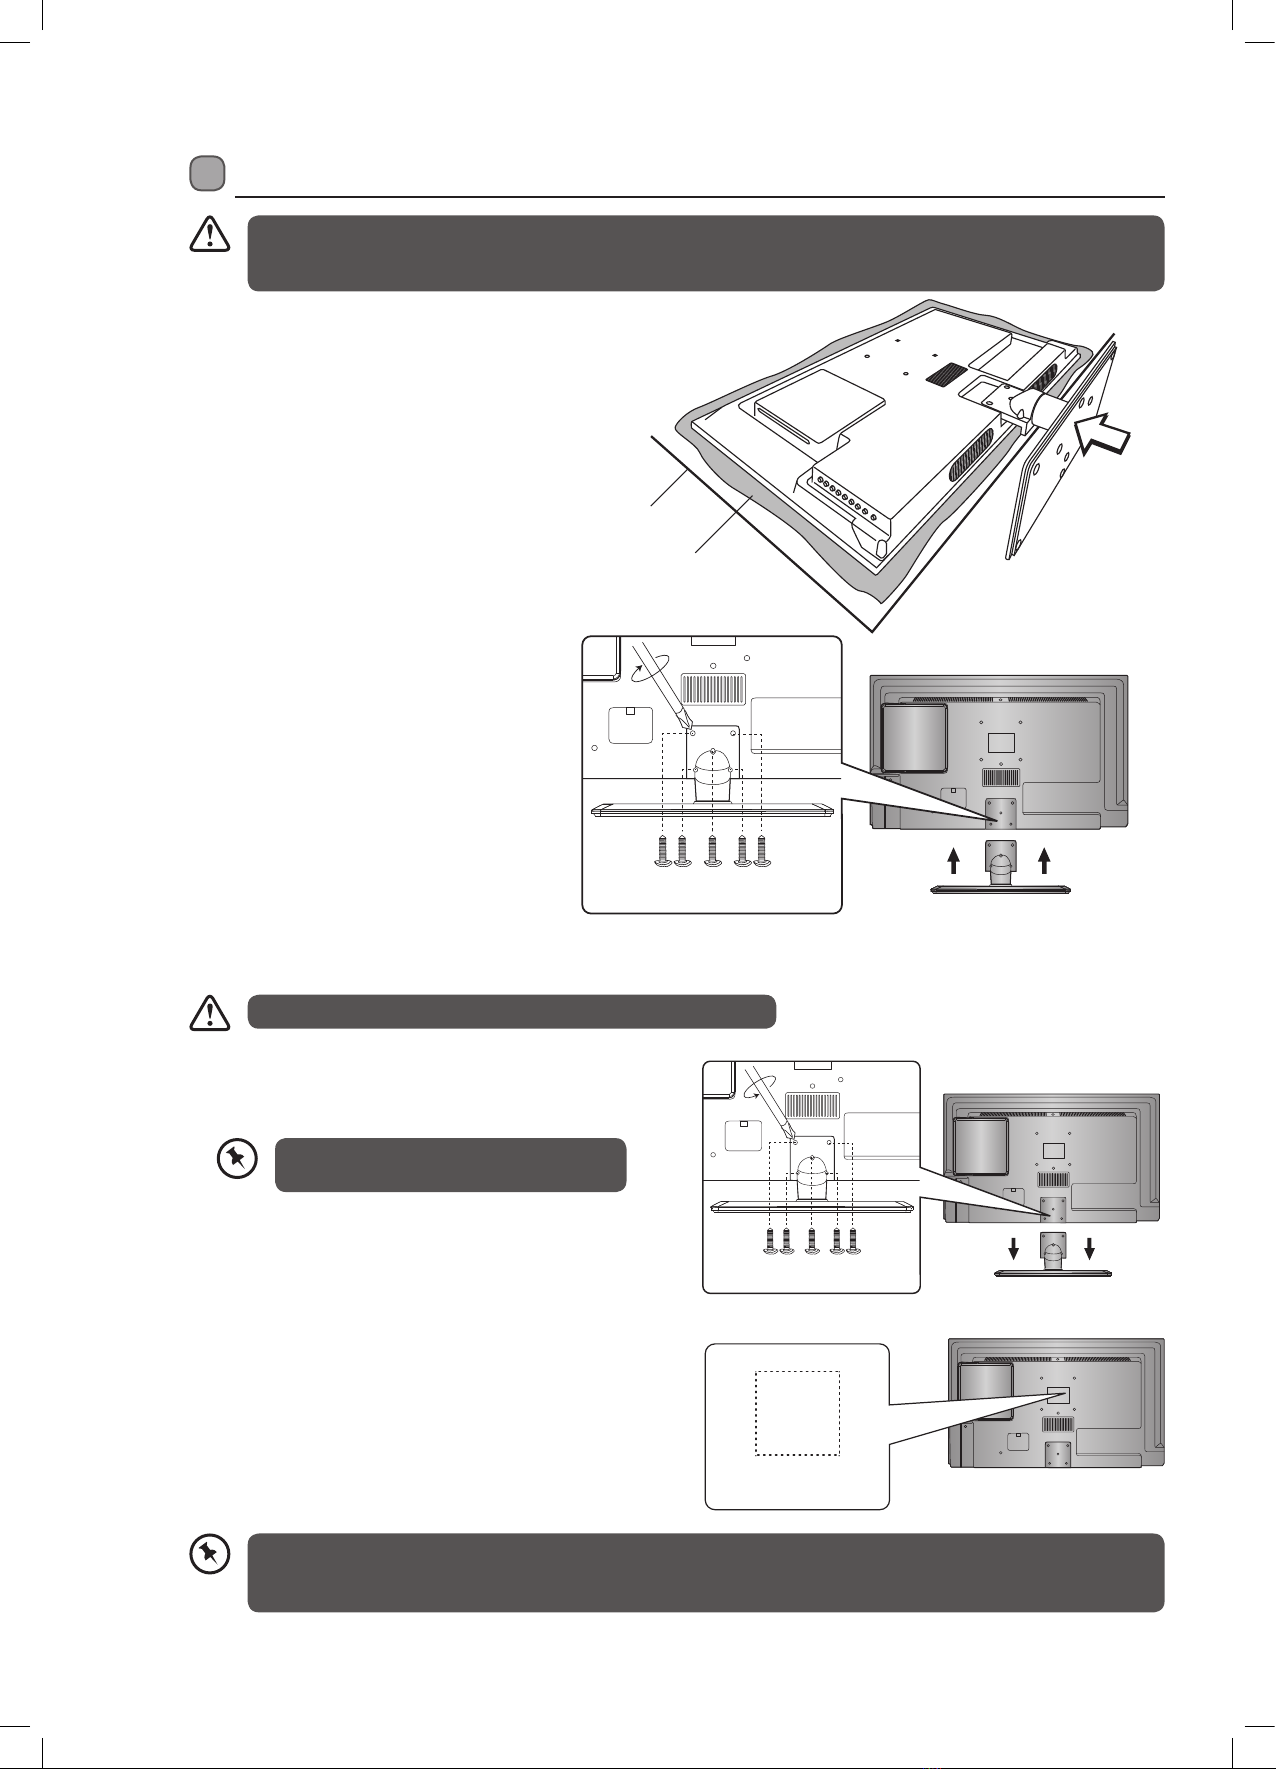
Installing / Removing the Base Stand..................................................................................................................................................................8
Mounting the TV to a Wall...............................................................................................................................................................................................8
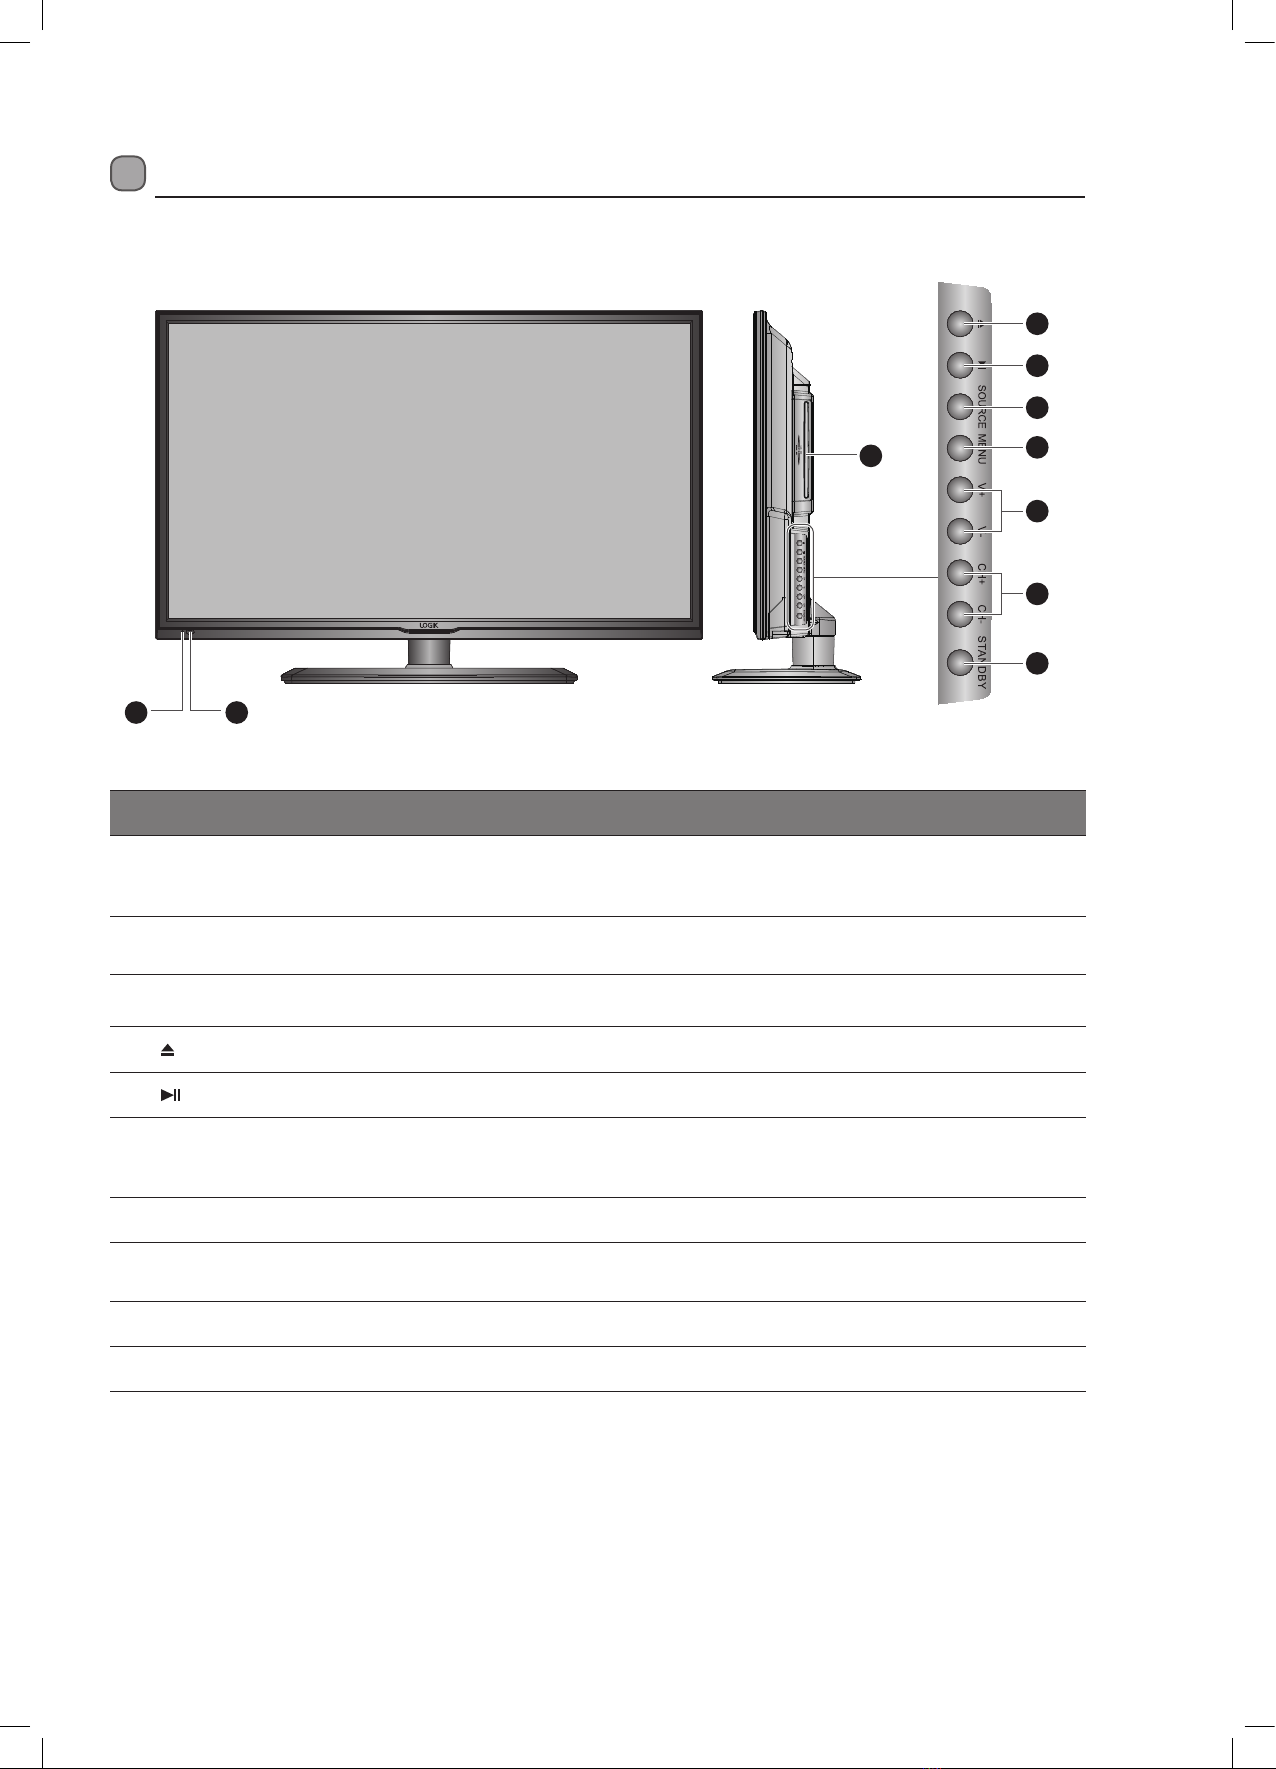
Front / Right Side View and Controls...................................................................................................................................................................9
Rear View and Sockets ............................................................................................................................................................................................10
Installing Batteries in the Remote Control.......................................................................................................................................................11
Remote Control Operation Range......................................................................................................................................................................11
Remote Control..........................................................................................................................................................................................................12
Initial Setup ......................................................................................................................................................................................14
Turning the TV On for the First Time..................................................................................................................................................................14
− Connecting an Analogue Device....................................................................................................................................................................15
− Channel Selection ...............................................................................................................................................................................................16
− Display Channel Information ...........................................................................................................................................................................16
− Volume Adjustment.............................................................................................................................................................................................16
Adjusting the Picture Settings .............................................................................................................................................................................16
− Aspect Ratio............................................................................................................................................................................................................18
Sound Setting.............................................................................................................................................................................................................19
EPG (Electronic Programme Guide) (DTV Mode).......................................................................................................................................... 20
− Switch On / O EPG............................................................................................................................................................................................. 20
− Select a Programme ........................................................................................................................................................................................... 20
Time Shift Recording onto a USB Storage Device.........................................................................................................................................21
Recording DTV Programmes onto a USB Storage Device......................................................................................................................... 22
Timer Programming................................................................................................................................................................................................ 23
Playing Recorded Programmes .......................................................................................................................................................................... 24
Digital Teletext (DTV Mode)................................................................................................................................................................................. 25
− Teletext within Digital Service........................................................................................................................................................................ 25
Listening to the Radio ............................................................................................................................................................................................ 25
Using the DVD Features...................................................................................................................................................................26
Using the Built-in DVD Player............................................................................................................................................................................... 26
Compatible Disc Types........................................................................................................................................................................................... 26
− Supported Formats............................................................................................................................................................................................. 26
− Region Code.......................................................................................................................................................................................................... 26
Basic DVD Playback Functions ............................................................................................................................................................................ 27
Using the DVD General Setup Page .................................................................................................................................................................. 29
Using the DVD Audio Setup Page...................................................................................................................................................................... 30
− Signal Information (DTV Mode).......................................................................................................................................................................31
− CI (Common Interface) (DTV Mode)...............................................................................................................................................................31
− Software Update (Over Air Download) (DTV Mode)............................................................................................................................... 32
− Software Update (USB)...................................................................................................................................................................................... 33
Time Settings............................................................................................................................................................................................................. 34
Option Setting........................................................................................................................................................................................................... 36
− OSD Language...................................................................................................................................................................................................... 36
− TT Language.......................................................................................................................................................................................................... 36
− Audio Language (DTV Mode).......................................................................................................................................................................... 36
− Subtitle Language (DTV Mode)...................................................................................................................................................................... 37
− Hearing Impaired................................................................................................................................................................................................. 37
− PVR File System (DTV Mode)............................................................................................................................................................................ 38
− Blue Screen ............................................................................................................................................................................................................ 39
− HDMI CEC (Consumer Electronics Control) (HDMI Mode).................................................................................................................... 39
− Restore Factory Default..................................................................................................................................................................................... 40
WE KNOWHOW
TO HELP YOU
WITH YOUR TV
We want you to be able to enjoy your new TV for many years. From getting it home and setting it up,
to helping you get the most out of your new purchase. And in the unlikely event your TV lets you down,
we can get it working again in no time.
Here are some of our TV services, but if you want to know more look us up at www.knowhow.ie or call
us on: 1 890 818 575.
TV SET UP & DEMO
We’ll assemble the stand and connect your new TV to the existing equipment. We’ll tune your TV so it’s
ready to watch. We’ll also give you a demonstration of your new TV’s functions.
TV WALLMOUNT & DEMO
We’ll fix your TV to a suitable position on the wall and connect to your existing equipment, so it’s all
ready to go. We’ll use neat wire management so you don’t have to look at any untidy cabling and, to
complete your fuss-free installation, we’ll test and demonstrate your TV’s functions.
TV & HOME CINEMA INSTALLATION
We’ll un-box, connect and set up your new and existing equipment. We’ll then configure, calibrate and
optimise the equipment. To avoid ugly trailing cables we’ll clip them to your skirting board if you’d like
us to. Then we’ll give you a demonstration.
FAULT & FIX SERVICES
With our Fault & Fix services we can repair a wide range of products at our new state-of-the-art repair
lab. This service is available for:
• Desktop PCs • Laptops
• Netbooks • TVs
CT_459_52TG_123456_CT_A4PF
For
Ireland
Knowhow Page IRL.indd 1 25/04/2014 10:06
L32HED14I_IB.indd 3 28/08/2014 17:31

Lock Setting.................................................................................................................................................................................................................41
− Lock System............................................................................................................................................................................................................41
− Set Password ......................................................................................................................................................................................................... 42
− Block Channel ....................................................................................................................................................................................................... 42
− Parental Guidance............................................................................................................................................................................................... 43
− Key Lock ..................................................................................................................................................................................................................44
Connecting a USB Storage Device..................................................................................................................................................................... 44
Viewing Photos......................................................................................................................................................................................................... 45
Listening to Music.................................................................................................................................................................................................... 46
Viewing Movies......................................................................................................................................................................................................... 47
My Text ......................................................................................................................................................................................................................... 48
Play Recorded Programme .................................................................................................................................................................................. 49
Maintenance.....................................................................................................................................................................................50
Hints and Tips...................................................................................................................................................................................51
YPbPr Mode ....................................................................................................................................................................................................................... 53
PC Mode.............................................................................................................................................................................................................................. 53
HDMI Mode ....................................................................................................................................................................................................................... 53
Specifications ...................................................................................................................................................................................54
L32HED14I_IB.indd 4 28/08/2014 17:31

5
Safety Warnings
• Read all the instructions carefully before using the unit
and keep them for future reference.
• Retain the manual. If you pass the unit onto a third
party make sure to include this manual.
• Check that the voltage marked on the rating label
matches your mains voltage.
Damage
• Please inspect the unit for damage after unpacking.
• Do not continue to operate the unit if you are in any
doubt about it working normally, or if it is damaged
in any way - switch off, withdraw the mains plug and
consult your dealer.
Location of Unit
• The unit must be placed on a flat stable surface and
should not be subjected to vibrations.
• Do not place the unit on sloped or unstable surfaces as
the unit may fall off or tip over.
• The mains socket must be located near the unit and
should be easily accessible.
• This unit is designed for indoor, domestic use only.
Temperature
• Avoid extreme degrees of temperature, either hot or
cold. Place the unit well away from heat sources such
as radiators or gas / electric fires.
• Avoid exposure to direct sunlight and other sources of
heat.
Naked Flames
• Never place any type of candle or naked flame on the
top of or near the unit.
Moisture
• To reduce the risk of fire, electric shock or product
damage, do not expose this unit to rain, moisture,
dripping or splashing. No objects filled with liquids,
such as vases, should be placed on the unit.
• If you spill any liquid into the unit, it can cause serious
damage. Switch it off at the mains immediately.
Withdraw the mains plug and consult your dealer.
Ventilation
• To prevent the risk of electric shock or fire hazard
due to overheating, ensure that curtains and other
materials do not obstruct the ventilation vents.
• Do not install or place this unit in a bookcase, built-in
cabinet or in another confined space. Ensure the unit is
well ventilated.
• Make sure that there is a gap of at least 10 cm on both
sides and a gap of 20 cm at the top.
Safety
• Always disconnect the unit from the mains supply
before connecting / disconnecting other devices or
moving the unit.
• Unplug the unit from the mains socket during a
lightning storm.
Mains Cable
• Make sure the unit or unit stand is not resting on top of
the mains cable, as the weight of the unit may damage
the mains cable and create a safety hazard.
• If the mains cable is damaged it must be replaced
by the manufacturer, its service agent, or similarly
qualified persons in order to avoid a hazard.
Interference
• Do not place the unit on or near appliances which may
cause electromagnetic interference. If you do, it may
adversely affect the operating performance of the unit,
and cause a distorted picture or sound.
Optimum Viewing
• View the unit in moderate light to prevent eye strain. It
is recommended to watch the unit from a distance
3-7 times that of the screen height.
LCD Screen
• The LCD screen is manufactured using high-precision
technology. However, some tiny black points and /
or bright points (red, blue or green in colour) may
constantly appear on the LCD screen. These points
are generated in the manufacturing process and are
normal.
Screen Burn
• A characteristic of Plasma and TV Panels is that
displaying the same image for a long time may cause
a permanent after-image to remain on the screen. This
is called screen burn. Most pictures shown on the unit
will be constantly moving and fill the screen.
• Examples of images that you need to watch out for are
as follows (this is not an all-inclusive list):
1. Black Bars: If black bars appear at the left / right or
top / bottom of the screen, it is recommended to
change the format so that the picture fills the entire
screen.
2. TV Channel Logos: e.g. Shopping channel logos
and pricing displays - especially if they are bright
and stationary. Moving or low-contrast graphics are
less likely to cause ageing of the screen.
3. Time Displays
4. Teletext: Do not view a stationary page for long
periods of time.
5. TV Menus
6. Pause Mode: Do not leave the screen in pause
mode for long periods of time, e.g. when watching
videos.
• To prevent screen burn if viewing any of the above for
long periods of time, reduce contrast and brightness
when viewing. Once burn-in occurs it will never
disappear completely.
10 cm 10 cm
20 cm
10 cm
Safety Warnings
L32HED14I_IB.indd 5 28/08/2014 17:31

6
Standby
• The button on the remote control does not switch
off the unit completely. The unit will continue to draw
electricity from the mains supply while in standby. In
the interests of safety and to avoid unnecessary energy
consumption, never leave the unit in standby while
unattended for long periods of time, e.g. overnight,
while on holiday or while out of the house. Disconnect
the mains plug from the mains socket.
Batteries
• Batteries used in the remote control for this unit
are easily swallowed by young children and this is
dangerous.
• Keep loose batteries away from young children and
make sure that the battery holder tray is secure in the
remote control. Seek medical advice if you believe a
cell has been swallowed.
• Please dispose of batteries correctly by following the
guidance in this manual.
• The batteries shall not be exposed to excessive heat
such as sunshine, fire or the like.
Supervision
• Children should be supervised to ensure that they do
not play with the unit and the remote control.
• Never let anyone especially children push anything
into the holes, slots or any other openings in the case -
this could result in a fatal electric shock.
DVD
• Class 1 Laser Product
This unit utilises a laser. Use
of controls, adjustments or
performance of procedures other
than those specified herein may
result in hazardous radiation
exposure.
• Before moving the unit, ensure the disc tray is empty.
• Always remove the disc when the unit is not in use.
• Failure to do so will risk severely damaging the disc
and the unit.
• Do not stack devices, heat from other devices may
aect the performance of the unit.
CLASS 1
LASER PRODUCT
CAUTION
RISK OF ELECTRIC SHOCK
DO NOT OPEN
The lightning flash with arrowhead symbol,
within an equilateral triangle, is intended to
alert the user to the presence of uninsulated
“dangerous voltage” within the unit’s
enclosure that may be of sufficient
magnitude to constitute a risk of electric
shock.
The exclamation point within an equilateral
triangle is intended to alert the user to the
presence of important operating and
maintenance (servicing) instructions in the
manual accompanying the unit.
Service
• To reduce the risk of electric shock, do not remove
screws. The unit does not contain any user-serviceable
parts. Please leave all maintenance work to qualified
personnel.
• Do not open any fixed covers as this may expose
dangerous voltages.
Maintenance
• Ensure to unplug the unit from the mains socket before
cleaning.
• Do not use any type of abrasive pad or abrasive
cleaning solutions as these may damage the unit’s
surface.
• Do not use liquids to clean the unit.
• The wall socket plug is used as a disconnect device, the
disconnect device should be readily accessible.
• This equipment is a Class II or double insulated
electrical appliance. It has been designed in such a
way that it does not require a safety connection to
electrical earth.
To prevent the spread of fire, keep
candles or other open flames away
from this product at all times.
L32HED14I_IB.indd 6 28/08/2014 17:31

7
Preparation
Unpacking the TV
Remove all packaging from the TV. Retain the packaging. If you dispose of it please do so according to local regulations.
The following items are included:
Remote Control /
AAA Batteries x 2
Instruction Manual Quick Start Guide
Instruction Manual
32” HD Ready LED TV
with DVD Player
L32HED14I
Connecting the Aerial
Connectone end of the RF coaxial cable to the aerial socket on the wall
andthe other end of the cable to the AERIAL IN socket at the rear right
ofyour T V.
Connecting to the Mains Socket
1.Connect the mains cable to the mains socket after you have
completedall the connections.
2.I n standbymode, press the button on the remote control to
turnthe TV on. The red LED indicator will turn blue.
Installing the Base StandUnpacking
Removeall packaging from the TV. Retain the packaging.
Ifyou dispose of it please do so according to local regulations.
TV
TV Stand
Remote Control/AAA Batteries x 2
Screw x 5
Component Adapter Cable (YPbPr)
Composite Adapter Cable (AV)
Instruction M anual
Operating YourRemote Control
1. Pressand lift the back cover to
openthe battery compar tment
ofthe remote control.
2. Insert two AAA size batteries.
Makesure to match the (+) and
(- ) ends of the batteries with
the(+) and ( - ) ends indicated
inthe battery compar tment.
3. Closethe battery compar tment
cover.
1. Disconnectall cables connected to the TV.
2. Laythe TV down on a flat surface ideally on the edge of a table so the
baseof the TV slightly overhangs the edge of the table, with the back
sidefacing up. Please make sure a soft cushioned material (such as
adry bath towel or thick piece of foam) is placed beneath the screen.
3. Toinstall the TV stand, place
thestand into the stand
recesson the back of
theTV.
Tothe mains socket
Well done,your new TV is now ready to use. Youwill find that there are many exciting features available. Toget to k nowall these features,
pleasetake some time to read the instruction manual provided with your TV.
Ifafter reading the instruction manual you have additional questions related to the use of your TV please call our Call Centre on 1 890 818 575.
OurCustomer Contact Centre is open Monday-Saturday 8am-8pm or Sunday 8am-6pm.
QSG-L32HE14I_HED14I-140828V1
Turning On andTuning In the TV
Quick Start Guide
32” HD Ready LED TV
L32HE14I
L32HED14I
(with DVD Player)
Table
Cushioned
material
screwin
Screwsx 5
4. Securethe stand using the 5 screws provided.
Please select an OSD Language
Deutsch
Español Français
Português Italiano
English
Please ensure aerial is plugged in!!
Then press OK button to start
Tune Type
Czech
Denamrk
France
Finland
Germany
Italy
Netherlands
UK
Menu
DTV
Hungary Channel Tuning
TV : 0 Channel
DTV : 0 Channel
Radio : 0 Channel
Data : 0 Channel
1 %... 471.25 MHz (DTV)
Pleasepress MENU key to skip
1. Thefirst time you turn the TV on, it will go straight into
theFirst Time Installation menu.
Please ensure the aerial is plugged in and then press the
OKbutton.
2. Pressthe buttonsto select your desired
languageto be displayed on the menu. The default
on-screenmenu language is set as English. Press the OK
buttonto confirm.
3. Toselect the country option press the buttons.
Pressthe OK button to confirm.
4. Channeltuning will commence. This operation may take
upto 10 minutes. The display will show the progress of
thetuning and the number of channels found.
L32HED14I_QSG.indd 1 28/08/2014 15:17
HDMI
Thank you for purchasing your new Logik 32”HD Ready LED TV with DVD Player.
Your new TV has many features and incorporates the latest technology to enhance your viewing
experience. We recommend that you spend some time reading this instruction manual so that you fully
understand these features. You will also find some hints and tips to help you resolve any issues.
Read all the safety instructions carefully before use and keep this instruction manual for future reference.
If items are missing, or damaged please contact Partmaster (UK only). Tel: 0344 800 3456 for assistance.
TV
Screw x 5 Component Adapter Cable
(YPbPr)
Composite Adapter Cable
(AV)
TV Stand
Red
Blue
Green
Red
White
Yellow
L32HED14I_IB.indd 7 28/08/2014 17:31

8
1. To remove the stand assembly, untighten the 5 screws
holding the stand assembly to the rear of the TV. Slide
the stand assembly out.
2. Mounting on the wall. This TV is designed to be
wall-mounted with a standard 100 mm x 100 mm
mounting kit (sold separately) designed for flat-panel
TVs. Mount this TV according to the instructions
included in the mounting kit. Due to space restrictions,
we recommend that you make all connections before
mounting on to the wall.
1. Disconnect all cables connected to the TV.
2. Lay the TV down on a flat surface ideally
on the edge of a table so the base of the
TV slightly overhangs the edge of the table,
with the back side facing up. Please make
sure a soft cushioned material (such as a dry
bath towel or thick piece of foam) is placed
beneath the screen.
3. To install the TV stand, place the stand into
the stand recess on the back of the TV.
Installing / Removing the Base Stand
Four mounting holes
(size M6 screw)
The LCD display is very fragile, and must be protected at all times when installing and removing the base stand. Be
sure that no hard or sharp object, or anything that could scratch or damage the LCD display, comes into contact with
it. DO NOT exert pressure on the front of the TV at any time because the screen could crack.
• Please read this instruction manual carefully while setting up your TV.
• If you require additional assistance please call our Call Centre on 1 890 818 575.
Our Customer Contact Centre is open Monday to Friday 8am to 8pm, Saturday 9am to 6pm, Sunday 10am to 5pm.
Keep all the spare screws should you want
to use the stand assembly option.
Remove the stand assembly before mounting the TV onto the wall.
Screw x 5
unscrew
screw in
Screws x 5
100 mm
100 mm
Table
Cushioned
material
Mounting the TV to a Wall
4. Secure the stand using the 5 screws provided.
L32HED14I_IB.indd 8 28/08/2014 17:31

9
Front / Right Side View and Controls
Item Description
1POWER LED
Illuminates blue when the TV is turned on. Illuminates red when the TV is in standby
mode. The LED will illuminate blue and then blink red and blue confirming that a timer
recording programme has started in the standby mode.
2IR (Infrared Receiver) Receives IR signals from the remote control.
Do not put anything near the sensor, as its function may be affected.
3 Disc Slot Insert the disc with the label side facing the rear of the TV. (12 cm discs only. Don't
insert 8 cm discs.)
4 Press to eject disc. (DVD mode)
5 Press to start playback or pause. (DVD mode)
6 SOURCE
Press to select among different input signal sources:
DTV / ATV / DVD / AV / PC / SCART / YPBPR / HDMI 1 / HDMI 2 / HDMI 3 / MEDIA.
Confirmed the selection on OSD menu.
7MENU Displays the OSD (on screen display) menu.
8 V + / – Adjusts the volume.
Press to select and adjust a setting in the OSD menu.
9 CH + / – Press to select a channel or select a sub-menu from the OSD menu.
10 STANDBY Switches the TV on or into standby mode.
8
9
3
4
5
6
7
10
1 2
L32HED14I_IB.indd 9 28/08/2014 17:31

10
Rear View and Sockets
4 51 2 3
3
6
7
8
9
10
Item Description
1 Heaphone Connects to the headphones.
2 Coaxial Out Connects to the audio socket on the digital/standard 5.1 audio system.
3 HDMI 1 / HDMI 2 / HDMI 3 Connects to a High-Definition (HD) signal output device, such as a set-top box, blu-ray
disc player or AV receiver.
4 SCART Connects to a VCR, DVD Player, or other AV device with a SCART output socket.
5 PC-RGB In / PC AUDIO In Connects to a computer or other devices with a VGA interface.
6 CI CARD In Allows the insertion of a Common Access Module.
7 AV IN Connects to the Composite output sockets on external video devices.
8 YPbPr Connects to a DVD player, Digital Set-Top-Box, or other AV devices with component
(YPbPr) video and audio output sockets.
9 USB Allows the insertion of a USB storage device to play video, audio, photo and text files
(USB mode) and record DTV programmes on to a USB storage device.
10 RF In Connects to the aerial socket on the wall with the RF coaxial cable.
L32HED14I_IB.indd 10 28/08/2014 17:31

11
Remote Control Operation Range
Point the remote control at the TV no more than 5 metres from the
remote control sensor on the TV and within 60° in front of the TV. The
operating distance may vary depending on the brightness of
the room.
Installing Batteries in the Remote Control
1. Press and lift the back cover to open the battery compartment of the
remote control.
2. Insert two AAA size batteries. Make sure to match the (+) and ( - ) ends
of the batteries with the (+) and ( - ) ends indicated in the battery
compartment.
3. Close the battery compartment cover.
HDMI
30° 30°
5M
Handling the Batteries
• Improper or incorrect use of batteries may cause
corrosion or battery leakage, which could cause
fire, personal injury or damage to property.
• Only use the battery type indicated in this manual.
• When the batteries are exhausted, the remote will
not function. Replace both batteries at the same
time with new ones.
• Do not install new batteries with used ones and do
not mix different types of batteries.
• Do not dispose of used batteries as domestic
waste. Dispose of them in accordance with local
regulations.
Handling the Remote Control
• Take care of your fingernails when you press and
hold the battery release tab.
• Do not drop or cause impact to the remote control.
• Do not spill water or any liquid on the remote
control.
• Do not place the remote control on a wet object.
• Do not place the remote control under direct
sunlight or near sources of excessive heat.
• Remove the battery from the remote control
when not in use for a long period of time, as it
could cause corrosion or battery leakage and may
result in physical injury and/or property damage
including fire.
L32HED14I_IB.indd 11 28/08/2014 17:31

12
HDMI
1.
Switch the TV between on and standby mode.
2. MUTE
Mute and restore your TV sound.
3. 0-9 Number Button
• Press to select a programme. (DTV / RADIO mode)
• Select numbered items in a menu. (DVD mode)
4. -/--
Feature not available.
5. RECALL
Return to the previous viewing channel. (DTV mode)
6. TV GUIDE
Display the EPG (Electronic Programme Guide). (DTV mode)
7. VOL + / –
Adjust the volume.
8. CH + / –
Select a channel.
9. FAV
Display the favourite channel list. (DTV mode)
10. DTV (TV/RADIO)
A short-cut to switch input source to TV / Digital radio channels.
(DTV mode)
11. HDMI
A short-cut to switch input source to HDMI 1, 2, or 3.
12. DVD
A short-cut to switch input source to DVD. (DVD mode)
13. USB
A short-cut to switch input source to TV / Digital radio channels.
(DTV mode)
14. SOURCE
Select among the dierent input signal sources:
DTV / ATV / DVD / AV / PC / SCART / YPBPR / HDMI 1 / HDMI 2 /
HDMI 3 / MEDIA.
15. INFO
• Display the present channel information such as the current
time and channel name. (DTV mode)
• Display the present disc information. (DVD mode)
16.
Allow you to navigate the OSD menus and adjust the system
settings to your preference.
OK
• Conrm the selection in the OSD menus.
• Display channel list. (DTV / RADIO mode)
17. MENU
• Display the OSD (On Screen Display) menu.
• Return to the previous menu in the OSD menus.
18. Exit
Exit the OSD menu.
Remote Control
12
5
8
12
15
18
9
13
3
4
7
11
14
16
17
6
10
L32HED14I_IB.indd 12 28/08/2014 17:31

13
HDMI
19. SLEEP
Set the TV sleep timer: OFF / 10 / 20 / … / 180 / 240 min.
20. ASPECT
Watch the screen in various formats: Auto / 4:3 / 16:9 /
Zoom / Smart Zoom / Subtitle.
21. AUDIO
• Switches between the audio languages (only applicable
when the TV programme / disc has this features). (DTV /
DVD mode)
22. SUBTITLE
• Select subtitles which are broadcast with the programme.
(DTV mode)
• Select subtitles on the DVD. (DVD mode)
23.
To skip to the beginning of the previous chapter / track /
photo. (DVD / USB mode)
24.
Record the current programme. (DTV mode)
25.
To skip to the beginning of the next chapter / track / photo.
(DVD / USB mode)
26.
To stop the playback or recording.
(DTV / DVD / USB mode)
27.
To reverse playback rapidly. (DVD / USB mode)
28. REC LIST
Display the record list. (DTV mode)
29.
To advance playback rapidly. (DVD / USB mode)
30.
• To start the timeshift playback. (DTV mode)
• To start playback or pause. (DTV / DVD mode)
31. DVD SETUP
Display and exit the DVD setup menu. (DVD mode)
32. DVD MENU
Display the DVD menu. (DVD mode)
33.
Eject a disc. (DVD mode)
34. DVD TITLE
Display the DVD title content. (DVD mode)
35. TEXT
Turn on and o the teletext function. (DTV mode)
36. TEXT HOLD
Freeze a multi-page passage on screen in teletext. (Feature
not available)
37. DISPLAY
Displays channel and programme information.
38. TEXT/DVD ZOOM
• Zoom in on the displayed frame. (DVD mode)
39. Coloured buttons
Access the TELETEXT items ( DTV mode) or menu options.
GOTO (RED)
To skip to a specic location on a DVD / CD. (DVD mode)
A–B (GREEN)
Repeat a segment between A and B. (DVD mode)
ANGLE (YELLOW)
Select dierent angles for the video. (DVD mode)
REPEAT (BLUE)
Select between dierent repeat modes. (DVD mode)
26
30
33
34
24
25
29
28
32
31
2220
2119
23
27
38
37
36
39
35
L32HED14I_IB.indd 13 28/08/2014 17:31

14
5. Your TV should be automatically sent to the correct OSD language and
Country. So simply press OK to start tuning in your TV.
If you need to change the OSD language and Country press the
buttons. Leave the TV in Home mode.
Initial Setup
Turning the TV On for the First Time
1. Connect one end of the RF coaxial cable to the aerial socket on the wall and the other end of the cable to the RF IN socket at
the rear of your TV.
Do not connect the TV to the mains supply until you have completed all the connections.
RF coaxial cable
(not included)
OR
2. Connect the mains cable to the mains socket after
you have completed all the connections.
3. In standby mode, press the button on the remote
control to turn the TV on. The red LED indicator will
turn blue.
• Always disconnect the TV from the mains socket when not in use for a long period of time.
• The STANDBY button on the front right side panel of the TV or the button on the remote control is only used for
switching the TV into standby, it does not disconnect the TV from the mains power. To completely disconnect the
mains power, please remove the mains plug from the mains socket.
To the mains
socket
4. The first time you turn the TV on, it will go straight into the First Time
Installation menu. Please ensure the aerial is plugged in and then press
the OK button. (If you have already installed the TV using the Quick Start
Guide, please skip this section). Please ensure aerial is plugged in!!
Then press OK button to start
First Time Installation
Country Ireland
Home Mode
Next
OK
OSD Language English
L32HED14I_IB.indd 14 28/08/2014 17:31

15
6. Channel tuning will commence. This operation may take up to 10
minutes. The display will show the progress of the tuning and the
number of channels found.
If you want to exit the tuning menu, press the MENU button to interrupt
the tuning process. A pop-up screen will be displayed, press the button.
7. After tuning is complete, the channels are arranged in a preset order.
If you wish to skip channels, modify the preset order or add them as
favourite channel, select Channel Edit under the Channel menu.
Channel Tuning
DTV : 0 Channel
Radio : 0 Channel
DATA : 0 Channel
1 %... UHF CH 1 (DTV)
Please press MENU key to skip
Connecting an Analogue Device
If you have connected an analogue device such as a video recorder via the
aerial socket on you TV you will have to tune it in using ATV mode. Ensure
the device is switch on before you start the tuning process.
1. Press the SOURCE button, press the buttons to select ATV and
press OK.
2. Press the MENU button, then press the buttons to select CHANNEL
and press OK.
ATV Manual Tuning
Software Update(OAD) Off
Software Update(USB)
Channel Edit
ATV Manual Tuning
Colour System PAL
Sound System I
Current CH 1
Fine - Tune 470.25 MHz
AFC Off
Search
3. Press the buttons to select ATV MANUAL TUNING and press OK.
4. Press the buttons to select SEARCH then press one of the
buttons to start the search for your device. The search will automatically
stop when the device is found.
5. Press the EXIT button to exit the menu.
L32HED14I_IB.indd 15 28/08/2014 17:31

16
Channel Selection
• Press the CH + / – buttons on the remote control repeatedly or the 0-9 buttons to select the channel.
Alternative
Press the OK button to enter the Channel List. Then use the buttons to highlight and select the channel.
Press the OK button to view the selected channel.
• If a blocked channel is selected, the password screen will be displayed. Press the 0-9 buttons to enter the password, the
channel will then be unlocked (refer to Block Channel for details).
• Press the FAV button to view the Favourite List. Then use the buttons to highlight and select the channel. Press the OK
button to view the selected channel, the Favourite List will be blank unless you have added your favorites.
• Press the button to return to the previously viewed channel.
Display Channel Information
• Press the INFO button to view the current information.
Volume Adjustment
• Press the V + or –button on the right side panel of the TV or the VOL + or –button on the remote control to adjust the
volume.
• If you wish to switch the sound off, press the MUTE button. Press the MUTE button again or the VOL + or –button to
resume audio listening.
2. Press the buttons to select the following picture options and then
press the OK button.
• Press the buttons to adjust the levels in the menus.
Adjusting the Picture Settings
Allows you to set your preferred picture mode.
1. Press the MENU button and then press the buttons to select the
PICTURE menu and then press the OK button. CHANNEL
PICTURE
SOUND
TIME
OPTION
LOCK
EXIT
Picture Mode
Contrast
Brightness
Colour
Tint
Sharpness
Colour Temp
Noise Reduction
Standard
50
50
50
50
50
Normal
Off
SCREEN
L32HED14I_IB.indd 16 28/08/2014 17:32

17
Picture Mode Select among picture mode: Standard / Mild / Personal / Dynamic.
The default setting is Standard. Select Personal if you want to adjust
the picture settings yourself.
Contrast Adjusts the difference between light and dark levels in the picture. (for Personal mode)
Brightness Increases or decreases the amount of white in the picture. (for Personal mode)
Colour Controls the colour intensity. (for Personal mode)
Tint (For NTSC
format)
Adjusts the balance between red and green levels.
(Tint is only available for NTSC signal input via the SCART or AV IN.)
Sharpness Adjusts the level of crispness in the edges between light and dark areas of the picture. (for
Personal mode)
Colour
Temperature
Select among colour temperature: Cold / Normal / Warm.
Adjusts the colour components independently to achieve a warm or
cool colour. (for Personal mode)
• Cold: Increases blue tint
• Normal
• Warm: Increases red tint
Noise Reduction Reduces the noise level of the connected device: Off / Low / Middle
/ High / Default.
Screen
(PC mode)
Adjusts the PC desktop content.
Auto
Adjust
Allows you to synchronise a PC signal
automatically.
Auto Adjust
H-Offset
V-Offset
Size
Phase
Position Reset
50
50
50
50
H-Offset Adjusts the position of the picture
left and right in the window.
V-Offset Adjusts the position of the picture up
and down in the window.
Size Adjusts the picture horizontally, in
linear properties
Phase Controls the signal phase, which
can improve focus clarity and image
stability based on the PC mode.
Position
Reset
Press to set the best screen position.
3. Press the MENU button to return to the previous menu, press again to
return to the main menu.
4. Press the EXIT button to exit the menu.
Picture Mode
Dynamic
Standard
Mild
Personal
BACK M ENU
EXIT
Colour Temp
Cold
Normal
Warm
BACK M ENU
EXIT
Noise Reduction
Off
Low
Middle
High
Default
BACK M ENU
EXIT
L32HED14I_IB.indd 17 28/08/2014 17:32

18
Aspect Ratio
Allows you to watch the screen in various picture formats: Auto / 4:3 / 16:9 / Zoom / Smart Zoom / Full Screen.
The default setting is AUTO.
1. Press the ASPECT button to scroll through the aspect rations.
The aspect Ratio can also be selected from the OPTION menu.
HDMI
Input Signal 4:3 Input Signal 16:9
Auto This selection will display
the picture according to
the aspect ratio of the input
source. Black bars will appear
on both the left and right of
the screen.
This selection will display the
picture according to the aspect
ratio of the input source.
4:3 This selection will allow you to
view a picture with an original
4:3 aspect ratio. Black bars will
appear on both the left and
right of the screen.
This selection will allow you to
adjust the picture horizontally,
in linear proportion. Black bars
will appear on both the left and
right of the screen.
16:9 This selection will allow you to
adjust the picture horizontally,
in linear proportion, to fill the
entire screen.
This selection will allow you to
view a picture with an original
16:9 aspect ratio.
Zoom This selection will allow you to
zoom in the picture without
any alteration, while filling the
entire screen. However, the
top and bottom of the picture
will be cropped.
This selection will allow you to
zoom in the picture without any
alteration, while the 4 sides of
the picture will be cropped.
Smart Zoom This selection is similar to 16:9
mode, but the picture slightly
stretches horizontally and clips
off a little from the top and
bottom.
This selection is similar to 4:3
mode, but the picture slightly
stretches vertically and clips off
a little from the top and bottom.
Full Screen This selection will take whatever
is on the screen and expand it
to fill the screen.
This selection will take whatever
is on the screen and expand it
to fill the screen.
L32HED14I_IB.indd 18 28/08/2014 17:32

19
2. Press the buttons to select the following sound options and then
press the OK button.
Sound Setting
Allows you to adjust the sound settings on your TV.
1. Press the MENU button and then press the buttons to select the
SOUND menu and then press the OK button. CHANNEL
PICTURE
SOUND
TIME
OPTION
LOCK
EXIT
Sound Mode
Treble
Auto Volume
SPDIF Mode
AD Switch
Bass
Balance
Standard
50
On
Auto
Off
50
0
3. Press the buttons to adjust each option’s setting.
Sound Mode Allows the selection of an audio-enhancement technique: Standard / Music /
Movie / Sports / Personal.
Treble Controls the relative intensity of higher pitched sounds. (for Personal mode)
Bass Controls the relative intensity of lower-pitched sounds. (for Personal mode)
Balance Adjusts the relative volume of the speakers in a multiple speaker system.
Auto Volume Volume levels are automatically controlled (e.g., advertisements tend to be louder than the programmes).
SPDIF Mode Selects the digital audio output mode.
AD Switch
(For DTV mode)
Audio Description is an auxiliary audio function that provides an additional audio track for visually
challenged persons. This function handles the Audio Stream for the AD (Audio Description), when it is
sent along with the main audio from the broadcaster.
• Set to “Off” for normal broadcasting sound coming out from speakers.
• Set to “On” to activate the description sound track if available. The availability of Audio Description
sound track is indicated by the visually impaired icon "V.I." in the information banner. When you select
ON you can adjust the volume of the Audio Description by pressing the buttons.
4. Press the MENU button to return to the previous menu, press again to return to the main menu.
5. Press the EXIT button to exit the menu.
Sound Mode
Standard
Music
Movie
Sports
Personal
BACK M ENU
EXIT
L32HED14I_IB.indd 19 28/08/2014 17:32

20
EPG (Electronic Programme Guide) (DTV Mode)
This system has an Electronic Programme Guide (EPG) to help you navigate through all the possible viewing options.
The EPG supplies information such as programme listings, start and end times for all available services. In addition, detailed
information about the programme is often available in the EPG (the availability and amount of programme information will vary,
depending on the particular broadcaster).
This function can be used only when the EPG information is broadcast by broadcasting companies.
The EPG displays the programme details for the next 7 days.
Switch On / Off EPG
1. Press the TV GUIDE button to switch on EPG.
2. Press the TV GUIDE button or the EXIT button again to switch off EPG and return to normal TV viewing.
Select a Programme
Press the buttons to select the desired channel and then press the buttons to select the desired programme. Press the
OK button to confirm.
Button Functions in a 7-Days Guide
Remote Control Button Function
RED (Record)
• Timer Programming
Select a programme then press the RED button to set a recording.
Press once to record once, press twice to record daily or press three times to record weekly.
GREEN (Reminder) Select a programme then press the GREEN button to set a reminder.
Press once to remind once, press twice to remind daily or press three times to remind weekly.
YELLOW (Previous Day) Press the YELLOW button see the previous days programmes.
BLUE (Next Day) Press the BLUE button see the next days programmes.
or or or Press to move around the guide.
OK Press to confirm and view the selected channel.
TV GUIDE / EXIT Press to switch off the EPG.
Record
Move
PROGRAMME GUIDE
Remind
Schedule Setup
Prev Day
Details
Next Day
Exit
21 Jan 2014 16:34:09 21 Jan 2014
NOW
NEXT
16:30 - 17:15 Antiques Road Trip
2 RTÉTwo 17:15 - 18:00 Pointless
3 TV3 18:00 - 18:30 BBC News at Six
4 TG4 18:30 - 19:00 BBC London News
5 RTÉ News Now 19:00 - 19:30 The One Show
6 3e 19:30 - 20:00 Eastenders
7 RTÉ jr 20:00 - 21:00 Holby City
9 BBC One 21:00 - 22:00 Death in Paradise
27/30. On the second leg of their road trip, Charlie Ross and Thomas Plant begin in Bath,
then head up through the Cotswolds, ending up at an auction in Stroud, Gloucestershire.
Also in HD. [S]
15:45 - 16:30 21 Jan 2014
HOLD iEXIT
1 RTÉ One
current date and time
current programme title & time
current channel name
programme date
programme information
channel no. and
channel name
To view all of the scheduled recording, reminders or previously recorded programmes stored on your USB memory stick press the
REC LIST button. Press or to change the list view to Recorded List or Schedule list.
L32HED14I_IB.indd 20 28/08/2014 17:32
Table of contents
Other Logik LED TV manuals

Logik
Logik L32HE17 User manual

Logik
Logik L26HE12N User manual

Logik
Logik L26FE12N User manual

Logik
Logik L65UE18 User manual

Logik
Logik L24FE12N User manual

Logik
Logik L32HED15 User manual

Logik
Logik L32HE23 User manual

Logik
Logik L24HE14 User manual

Logik
Logik L22FE12 User manual

Logik
Logik L46FE22 User manual

Logik
Logik L19HE13N User manual

Logik
Logik L19LDVB11E User manual

Logik
Logik L19HED12 User manual

Logik
Logik L19HE12 User manual

Logik
Logik L65UE18 User manual

Logik
Logik L24HED18 User manual

Logik
Logik L24HED13 User manual

Logik
Logik L473ED11 User manual

Logik
Logik L22LDIB11E User manual

Logik
Logik l22fe13n User manual