manuals.online logo
Brands
  1. Home
  2. •
  3. Brands
  4. •
  5. Lominck
  6. •
  7. Control System
  8. •
  9. Lominck VeloComfort ConveyorBelt User manual

Lominck VeloComfort ConveyorBelt User manual

VeloComfort®
www.lo-minck.nl
Mobiliteitsoplossingen - Mobility Solutions - Mobilitätslösungen - Solutions de Mobilité
Gansoord 80 | 2165 BD Lisserbroek (NL) | T: +31-(0)252-420384 | www.lo-minck.nl | [email protected]
KvK: 77815092 | BTW: NL861156687B01 | BIC: RABONL2U | IBAN: NL95RABO 0328101524 | SC: 990260 | EORI: 861156687
Op al onze offertes, op alle opdrachten aan ons en op alle met ons gesloten overeenkomsten zijn de Metaalunie-voorwaarden van toepassing, gedeponeerd
ter Griffie van de Rechtbank te Rotterdam, volgens de laatste aldaar neergelegde tekst. Deze leveringsvoorwaarden worden u op verzoek toegezonden.
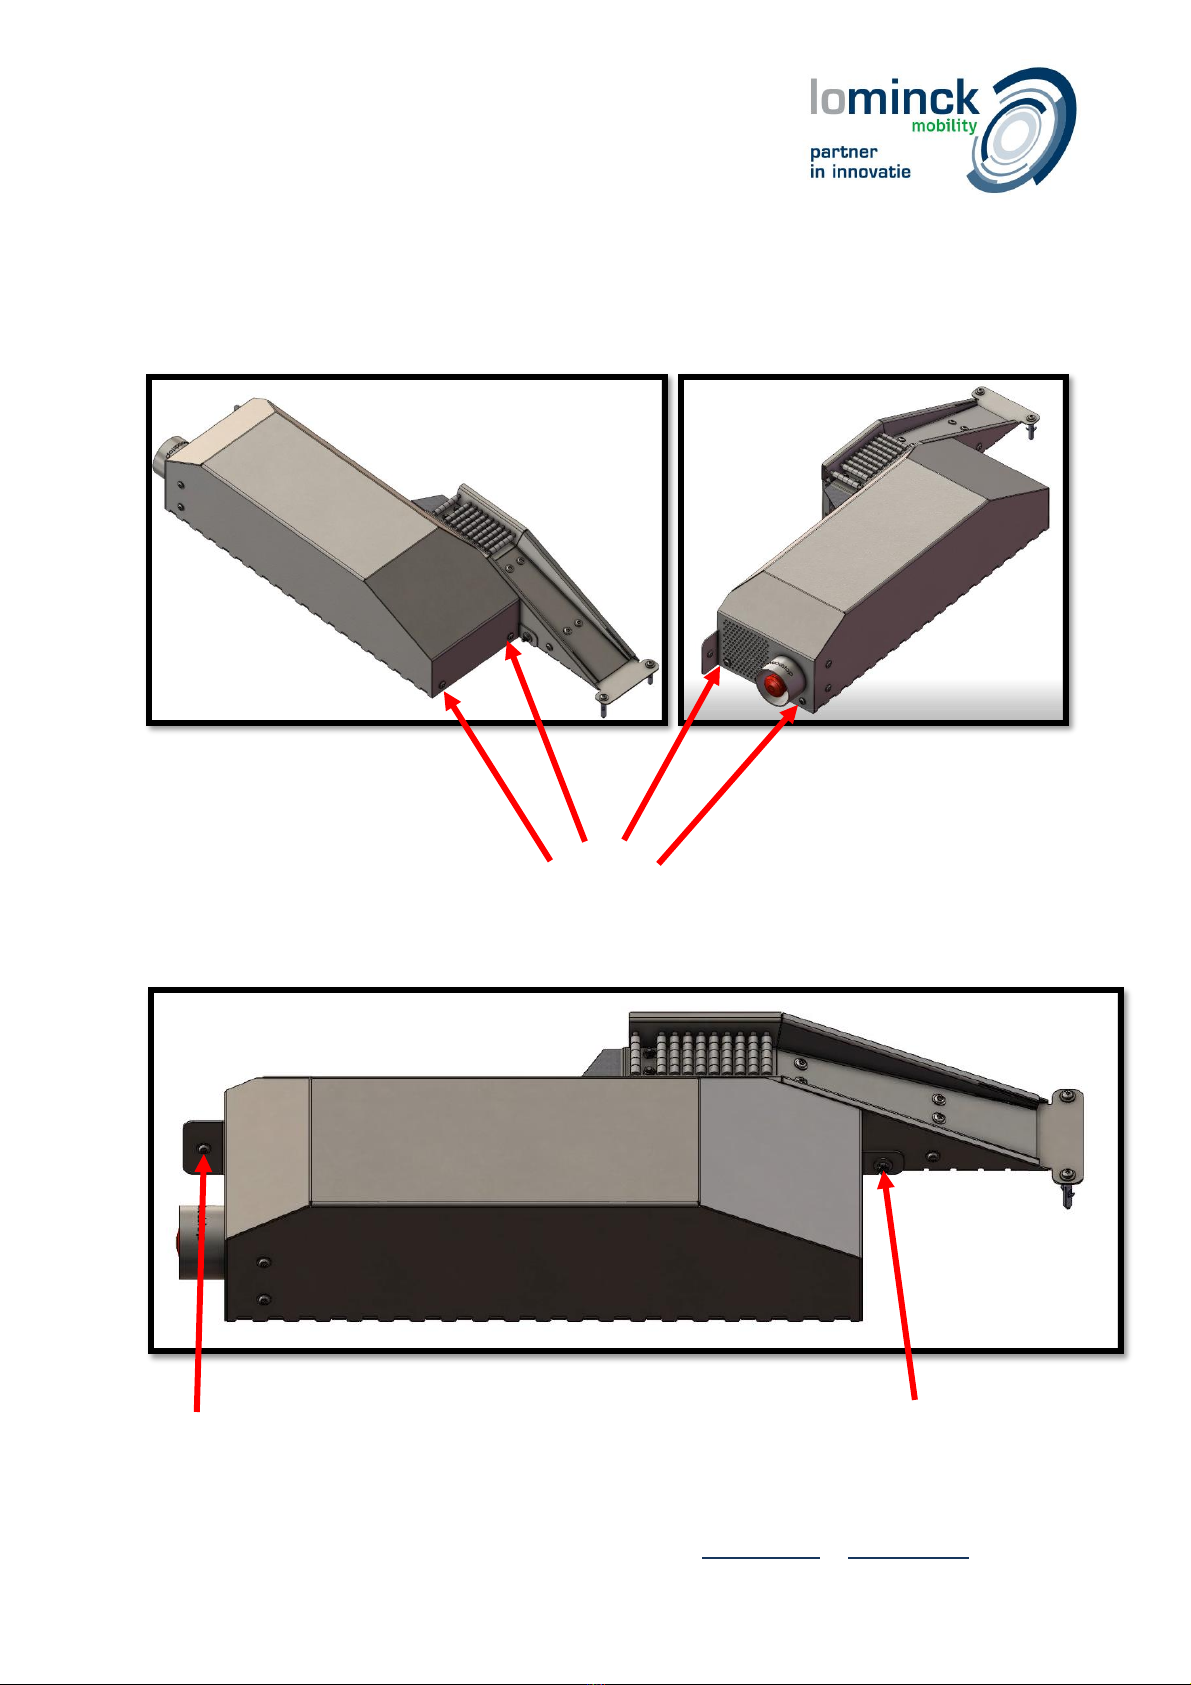
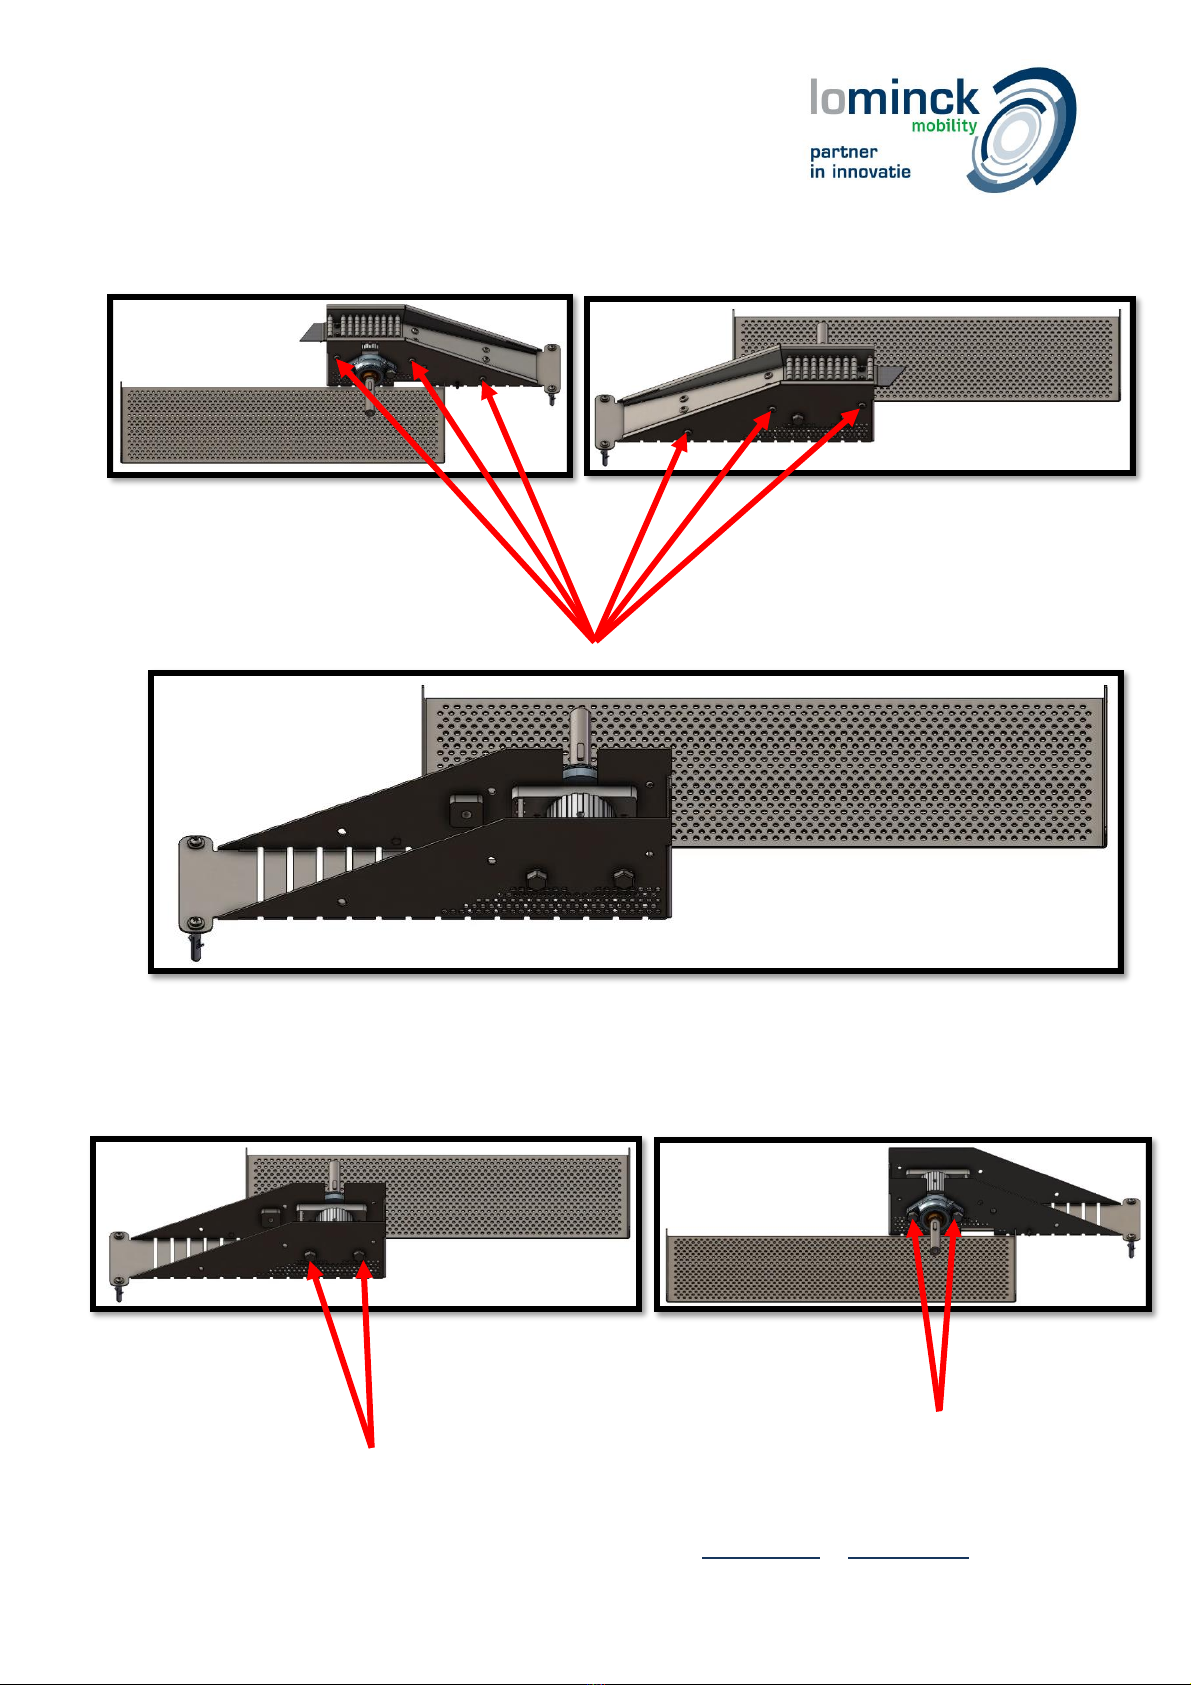
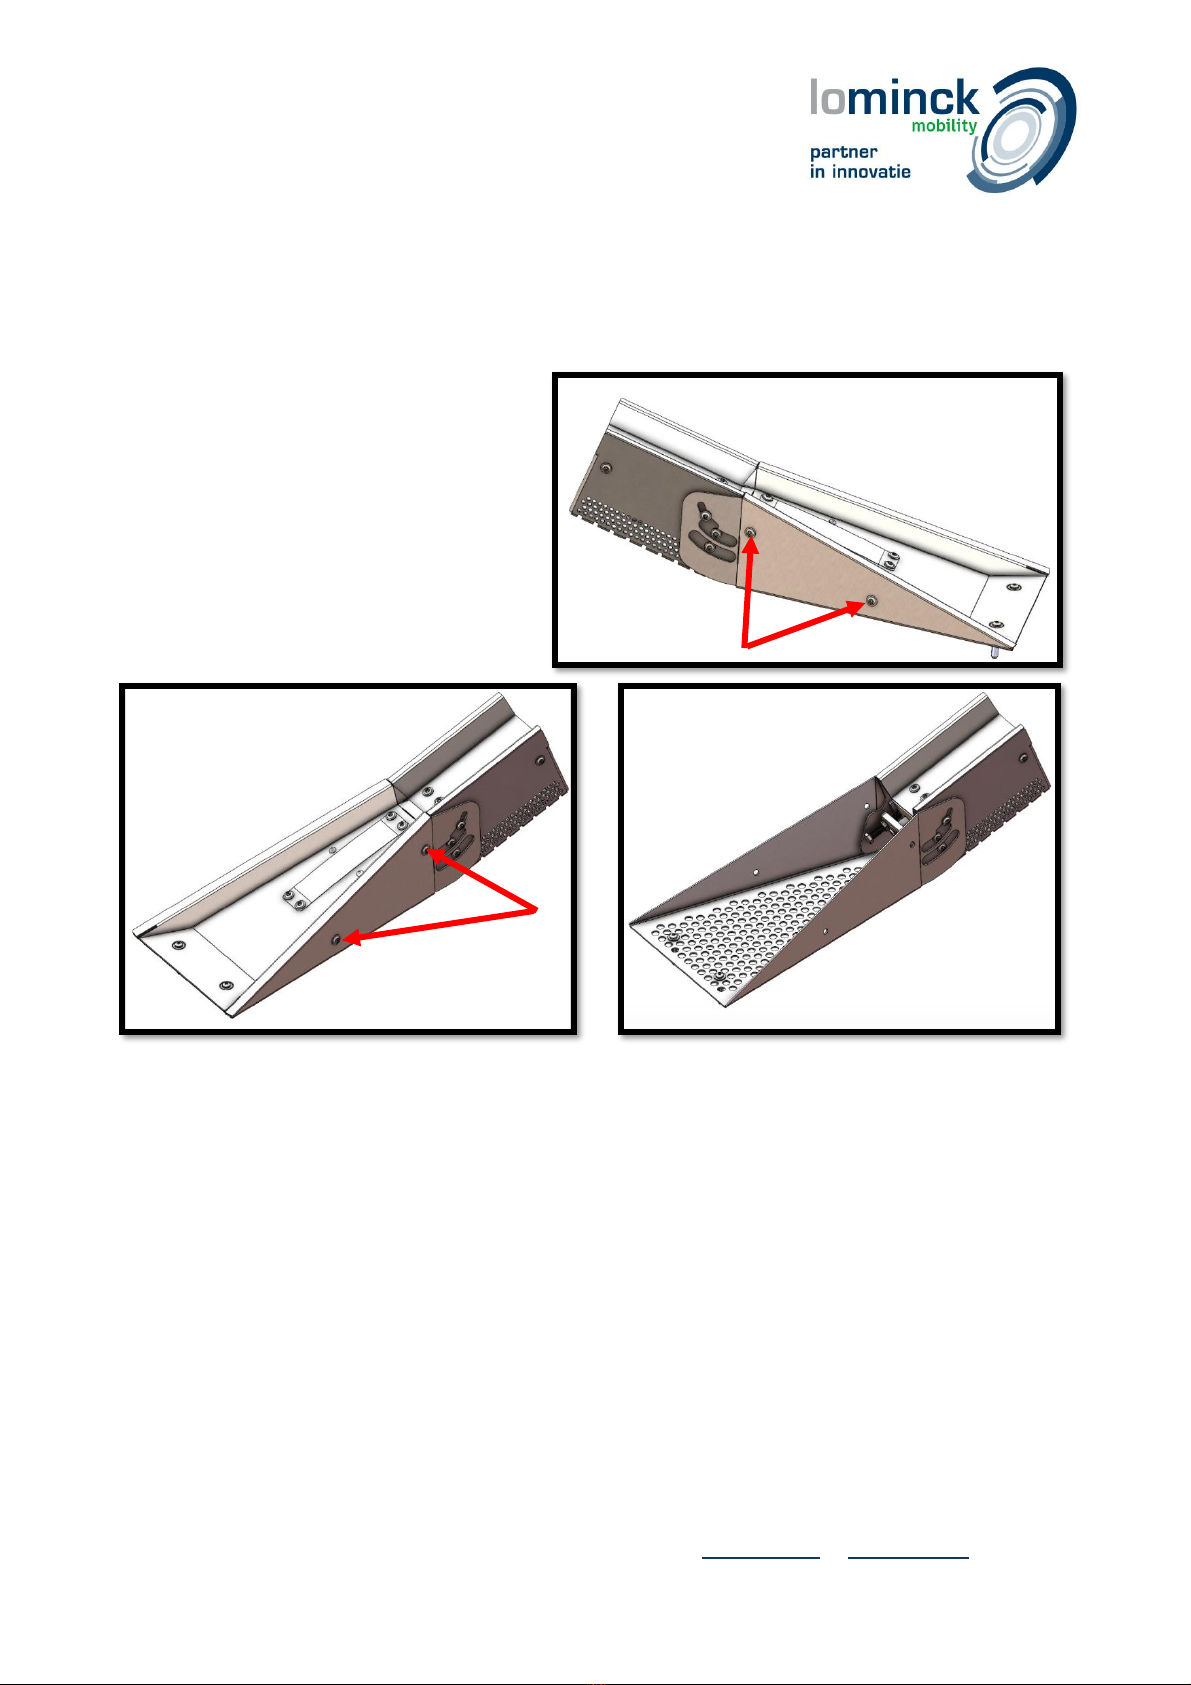
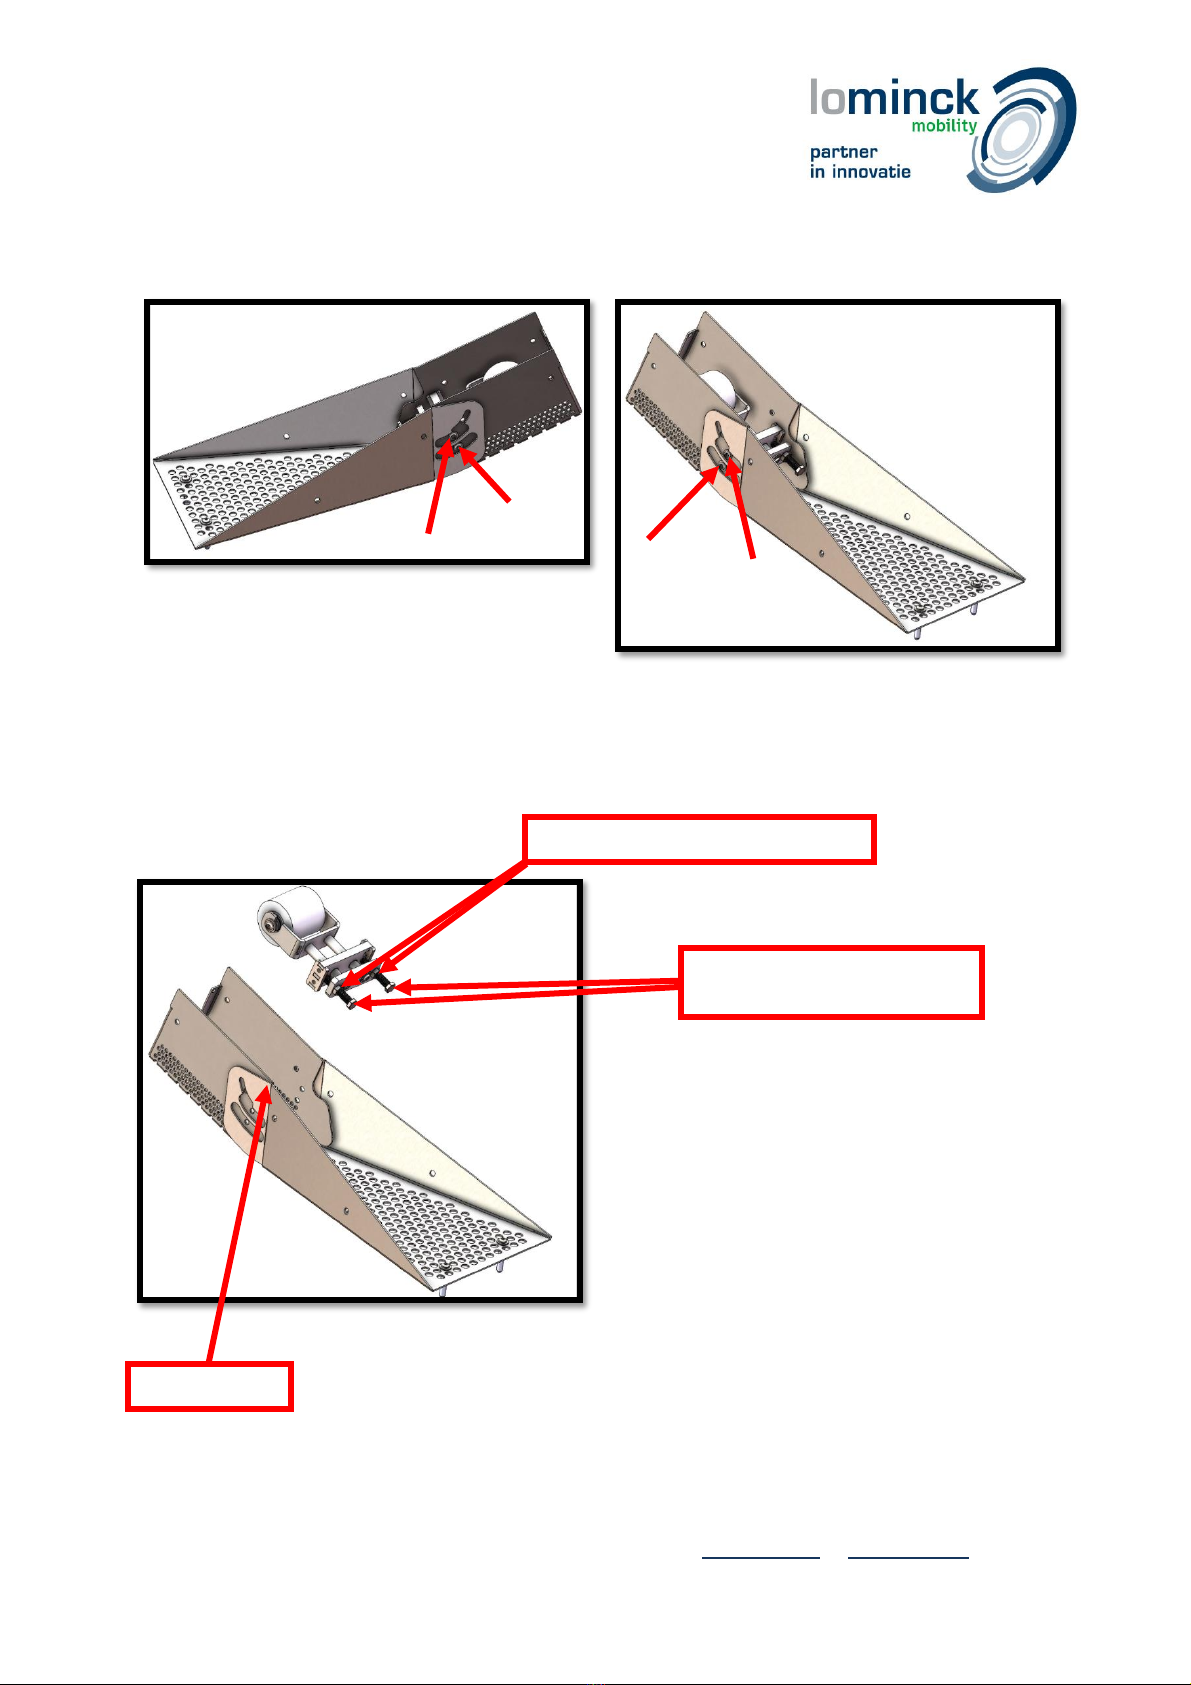
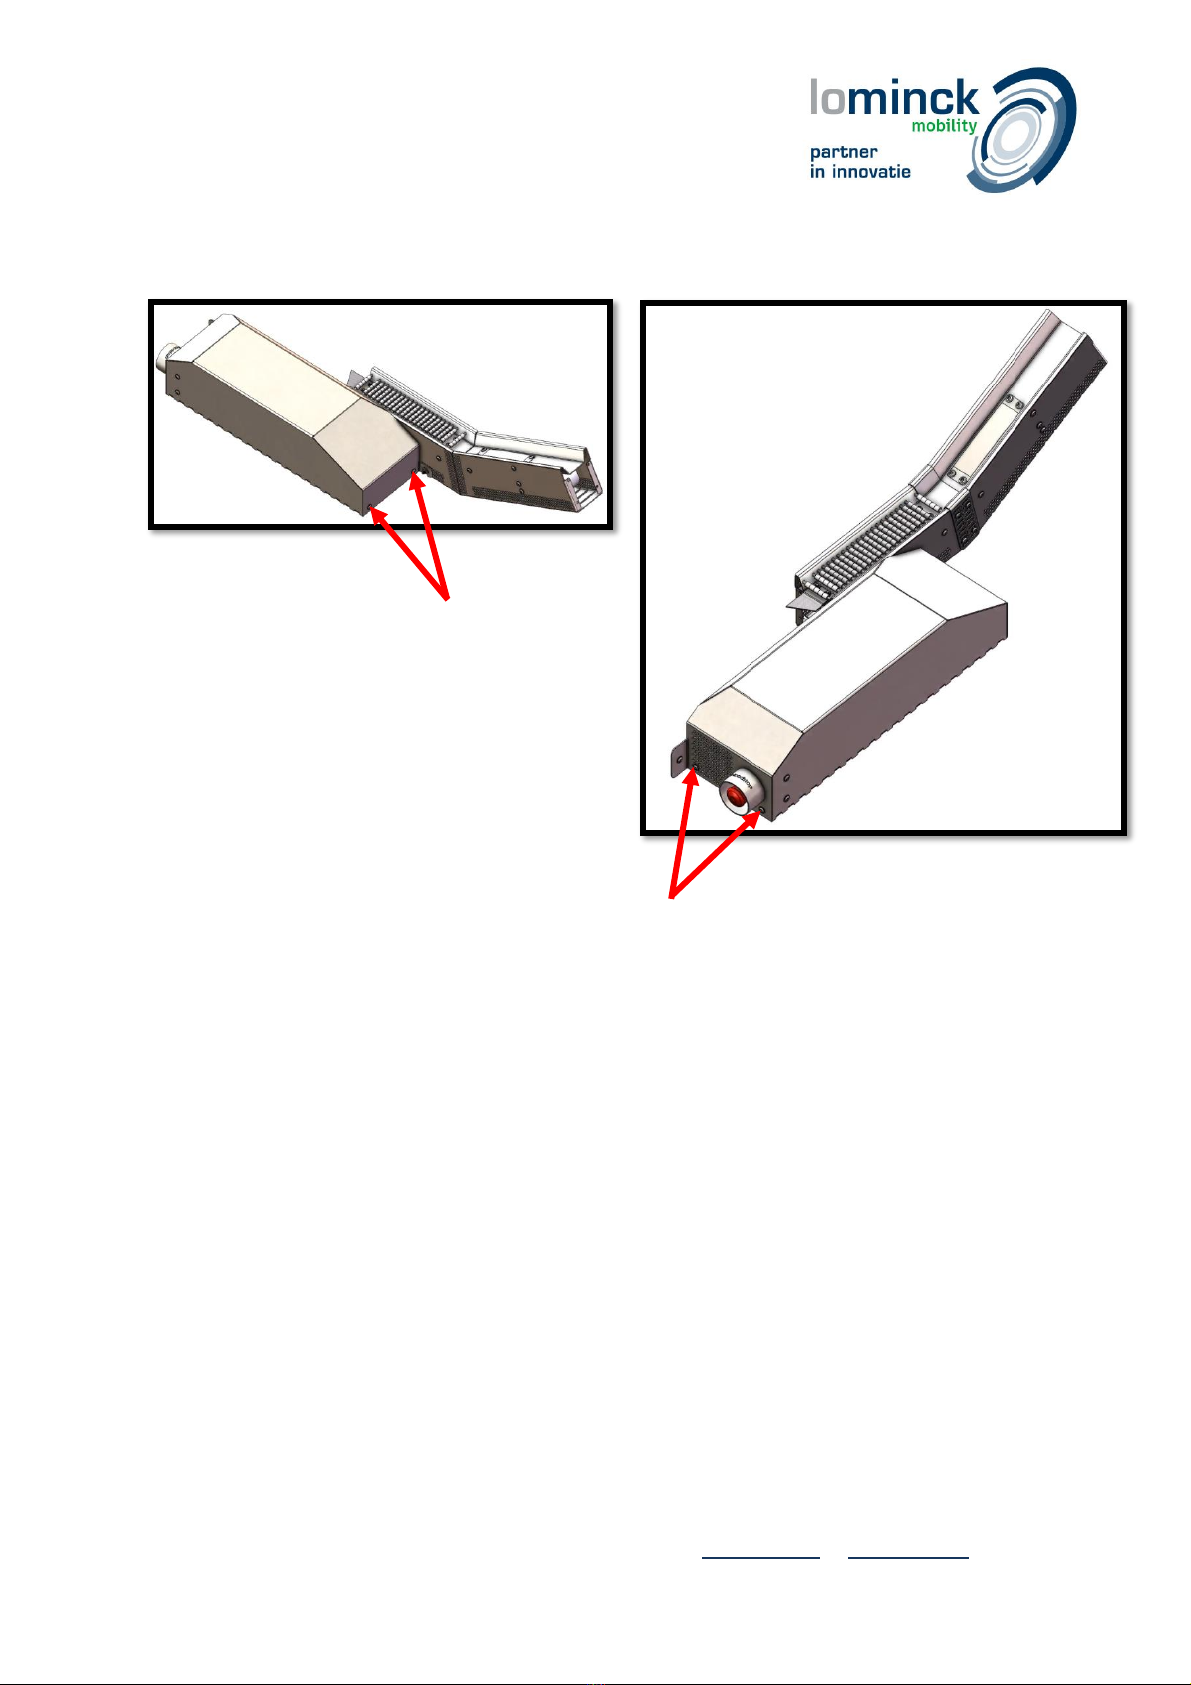
Maintenance Manual VeloComfort®ConveyorBelt:
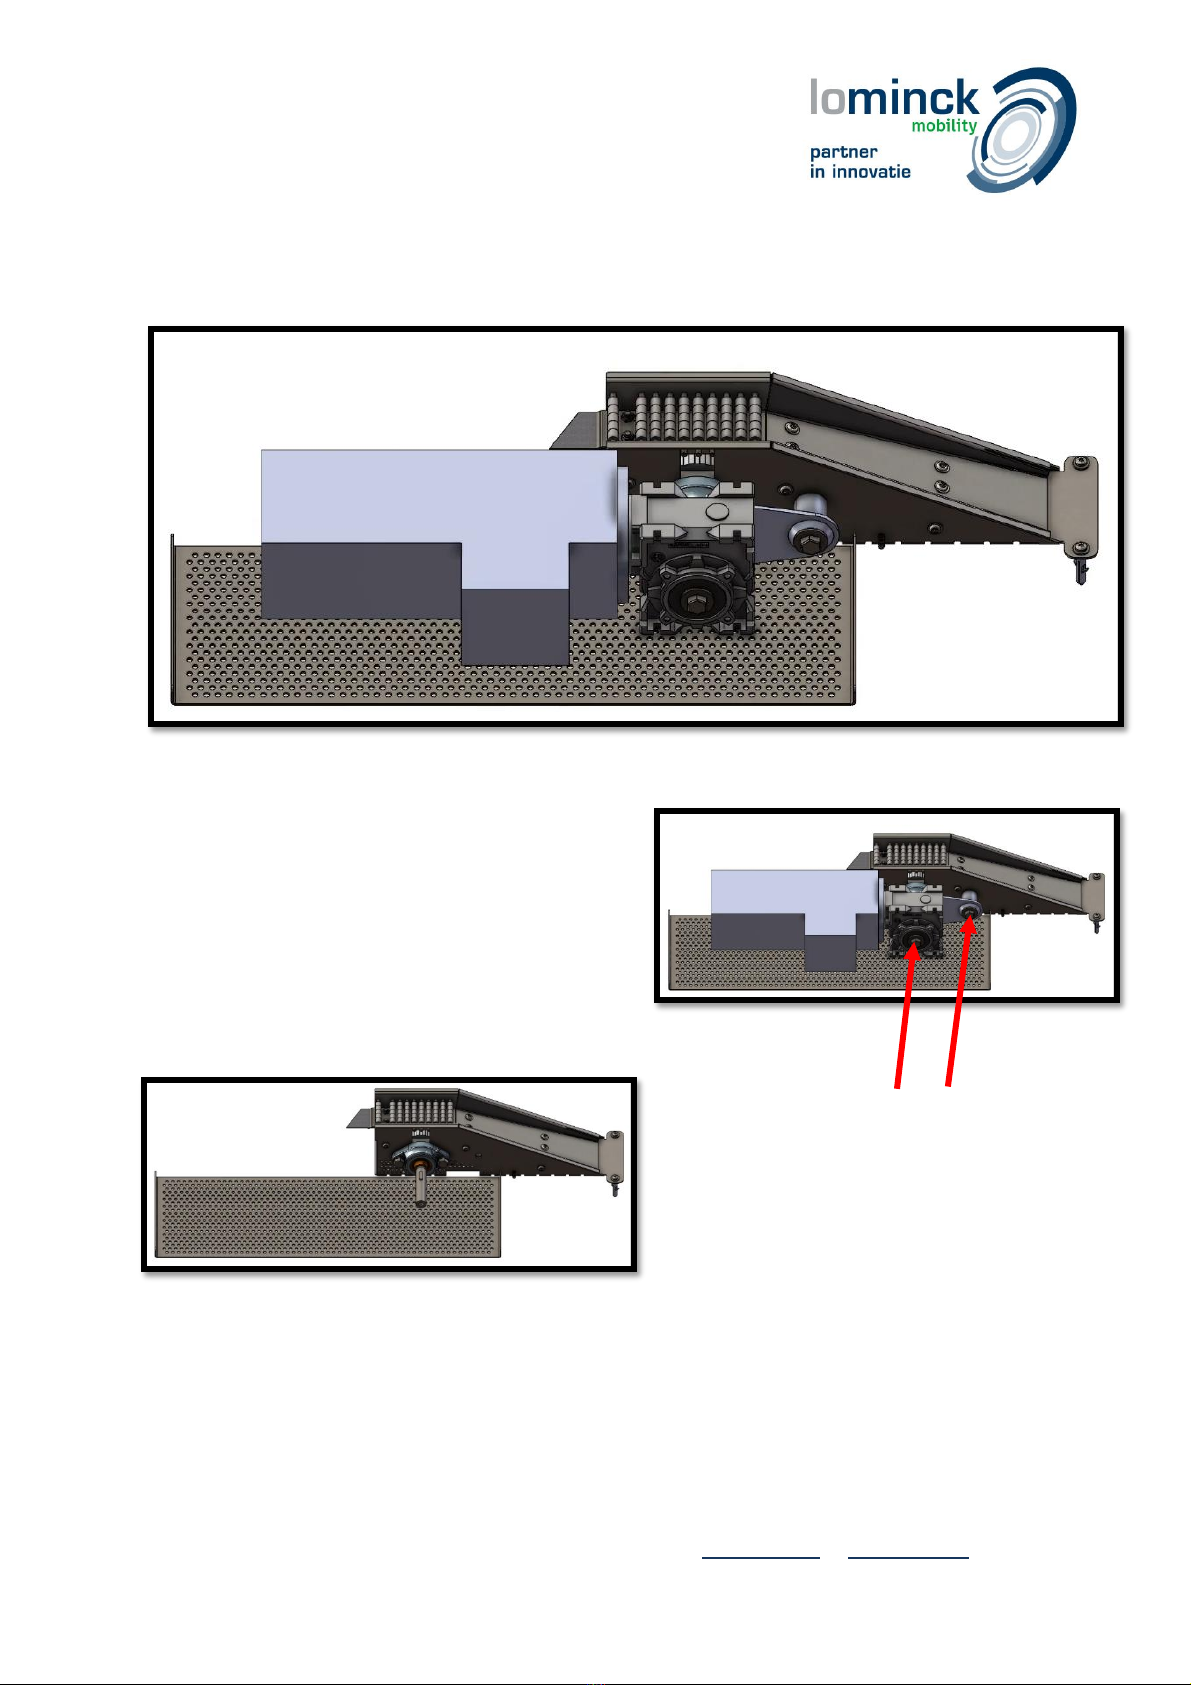
1. Safety first!
Step 1
Check the green light(s) on the control box.
•Light is constant on: the system works
•Light is flashing (1 sec, on 1 sec, off): the emergency stop is on
•Light is flashing (2,5sec on 2,5 sec off): the system is in overload safety ( The overload safety will
deactivate in 10 minutes or if the control box is rebooted.)
•Light is off: the power is disabled. (always check the main switch to be sure)
Step 2
•Press the Emergency button(s).
•Put the main switch to off in the control box.
•Wait till the green light on the control box turns off.
Now it is safe to start maintenance
VeloComfort®
www.lo-minck.nl
Mobiliteitsoplossingen - Mobility Solutions - Mobilitätslösungen - Solutions de Mobilité
Gansoord 80 | 2165 BD Lisserbroek (NL) | T: +31-(0)252-420384 | www.lo-minck.nl | [email protected]
KvK: 77815092 | BTW: NL861156687B01 | BIC: RABONL2U | IBAN: NL95RABO 0328101524 | SC: 990260 | EORI: 861156687
Op al onze offertes, op alle opdrachten aan ons en op alle met ons gesloten overeenkomsten zijn de Metaalunie-voorwaarden van toepassing, gedeponeerd
ter Griffie van de Rechtbank te Rotterdam, volgens de laatste aldaar neergelegde tekst. Deze leveringsvoorwaarden worden u op verzoek toegezonden.
2. Disassemble VeloComfort® Output
Step 1 (optional)
Remove 4x M6x12 Torx 30 bolts from the motor cover
Step 2
Remove 1x M6x12 Torx bolt and 1x M6 Nut
VeloComfort®
www.lo-minck.nl
Mobiliteitsoplossingen - Mobility Solutions - Mobilitätslösungen - Solutions de Mobilité
Gansoord 80 | 2165 BD Lisserbroek (NL) | T: +31-(0)252-420384 | www.lo-minck.nl | [email protected]
KvK: 77815092 | BTW: NL861156687B01 | BIC: RABONL2U | IBAN: NL95RABO 0328101524 | SC: 990260 | EORI: 861156687
Op al onze offertes, op alle opdrachten aan ons en op alle met ons gesloten overeenkomsten zijn de Metaalunie-voorwaarden van toepassing, gedeponeerd
ter Griffie van de Rechtbank te Rotterdam, volgens de laatste aldaar neergelegde tekst. Deze leveringsvoorwaarden worden u op verzoek toegezonden.
Step 3
Remove Motor cover
Attention: (the Emergency stop cable is attached to the motor cover)
Step 4
Remove 1x Bolt M10x20 and 1x Bolt M10x60
Remove Motor
Attention: the Motor cable and
Temperature cable* is attached to the output
* optional
VeloComfort®
www.lo-minck.nl
Mobiliteitsoplossingen - Mobility Solutions - Mobilitätslösungen - Solutions de Mobilité
Gansoord 80 | 2165 BD Lisserbroek (NL) | T: +31-(0)252-420384 | www.lo-minck.nl | [email protected]
KvK: 77815092 | BTW: NL861156687B01 | BIC: RABONL2U | IBAN: NL95RABO 0328101524 | SC: 990260 | EORI: 861156687
Op al onze offertes, op alle opdrachten aan ons en op alle met ons gesloten overeenkomsten zijn de Metaalunie-voorwaarden van toepassing, gedeponeerd
ter Griffie van de Rechtbank te Rotterdam, volgens de laatste aldaar neergelegde tekst. Deze leveringsvoorwaarden worden u op verzoek toegezonden.
Step 5
Remove 6x M6x12 Torx bolt
Remove Cover
Step 6
Remove 2x M10x20 and 2x M10x25 bolts
VeloComfort®
www.lo-minck.nl
Mobiliteitsoplossingen - Mobility Solutions - Mobilitätslösungen - Solutions de Mobilité
Gansoord 80 | 2165 BD Lisserbroek (NL) | T: +31-(0)252-420384 | www.lo-minck.nl | [email protected]
KvK: 77815092 | BTW: NL861156687B01 | BIC: RABONL2U | IBAN: NL95RABO 0328101524 | SC: 990260 | EORI: 861156687
Op al onze offertes, op alle opdrachten aan ons en op alle met ons gesloten overeenkomsten zijn de Metaalunie-voorwaarden van toepassing, gedeponeerd
ter Griffie van de Rechtbank te Rotterdam, volgens de laatste aldaar neergelegde tekst. Deze leveringsvoorwaarden worden u op verzoek toegezonden.
Step 7
Clean the output and lubricate the motor shaft*
*Lubricant: Kajo Chipping Hammer Paste
•Clean input
•Lubricate Motor shaft
•Assemble drive pulley
Clean input
Lubricate motor shaft*
VeloComfort®
www.lo-minck.nl
Mobiliteitsoplossingen - Mobility Solutions - Mobilitätslösungen - Solutions de Mobilité
Gansoord 80 | 2165 BD Lisserbroek (NL) | T: +31-(0)252-420384 | www.lo-minck.nl | [email protected]
KvK: 77815092 | BTW: NL861156687B01 | BIC: RABONL2U | IBAN: NL95RABO 0328101524 | SC: 990260 | EORI: 861156687
Op al onze offertes, op alle opdrachten aan ons en op alle met ons gesloten overeenkomsten zijn de Metaalunie-voorwaarden van toepassing, gedeponeerd
ter Griffie van de Rechtbank te Rotterdam, volgens de laatste aldaar neergelegde tekst. Deze leveringsvoorwaarden worden u op verzoek toegezonden.
3. Disassemble VeloComfort® Input
Step 1
Remove 4x M6x12 Torx 30 bolts from the input
And remove the cover
The sensor is attached to the cover
Attention: the sensor cable is attached to
the cover input
VeloComfort®
www.lo-minck.nl
Mobiliteitsoplossingen - Mobility Solutions - Mobilitätslösungen - Solutions de Mobilité
Gansoord 80 | 2165 BD Lisserbroek (NL) | T: +31-(0)252-420384 | www.lo-minck.nl | [email protected]
KvK: 77815092 | BTW: NL861156687B01 | BIC: RABONL2U | IBAN: NL95RABO 0328101524 | SC: 990260 | EORI: 861156687
Op al onze offertes, op alle opdrachten aan ons en op alle met ons gesloten overeenkomsten zijn de Metaalunie-voorwaarden van toepassing, gedeponeerd
ter Griffie van de Rechtbank te Rotterdam, volgens de laatste aldaar neergelegde tekst. Deze leveringsvoorwaarden worden u op verzoek toegezonden.
Step 2
Remove 4x M6x12 Torx 30 bolts and remove cover
VeloComfort®
www.lo-minck.nl
Mobiliteitsoplossingen - Mobility Solutions - Mobilitätslösungen - Solutions de Mobilité
Gansoord 80 | 2165 BD Lisserbroek (NL) | T: +31-(0)252-420384 | www.lo-minck.nl | [email protected]
KvK: 77815092 | BTW: NL861156687B01 | BIC: RABONL2U | IBAN: NL95RABO 0328101524 | SC: 990260 | EORI: 861156687
Op al onze offertes, op alle opdrachten aan ons en op alle met ons gesloten overeenkomsten zijn de Metaalunie-voorwaarden van toepassing, gedeponeerd
ter Griffie van de Rechtbank te Rotterdam, volgens de laatste aldaar neergelegde tekst. Deze leveringsvoorwaarden worden u op verzoek toegezonden.
Step 3
Remove 4x M6x12 Torx bolts and remove driven pulley
•Check bearings and roller
of the driven pulley
•Assemble driven pulley
•Adjust belt tension and
aligning by turning
the M8 bolts
•Lock the position by tighten
The M8 nuts to the
stainless steel plate
Tighten nuts to lock position
Adjust bolts to tension
and align belt
Clean input
VeloComfort®
www.lo-minck.nl
Mobiliteitsoplossingen - Mobility Solutions - Mobilitätslösungen - Solutions de Mobilité
Gansoord 80 | 2165 BD Lisserbroek (NL) | T: +31-(0)252-420384 | www.lo-minck.nl | [email protected]
KvK: 77815092 | BTW: NL861156687B01 | BIC: RABONL2U | IBAN: NL95RABO 0328101524 | SC: 990260 | EORI: 861156687
Op al onze offertes, op alle opdrachten aan ons en op alle met ons gesloten overeenkomsten zijn de Metaalunie-voorwaarden van toepassing, gedeponeerd
ter Griffie van de Rechtbank te Rotterdam, volgens de laatste aldaar neergelegde tekst. Deze leveringsvoorwaarden worden u op verzoek toegezonden.
4. Disassemble VeloComfort® Transition (optional)
Step 1
Remove 8x M6x12 Torx bolts and remove transition plate
VeloComfort®
www.lo-minck.nl
Mobiliteitsoplossingen - Mobility Solutions - Mobilitätslösungen - Solutions de Mobilité
Gansoord 80 | 2165 BD Lisserbroek (NL) | T: +31-(0)252-420384 | www.lo-minck.nl | [email protected]
KvK: 77815092 | BTW: NL861156687B01 | BIC: RABONL2U | IBAN: NL95RABO 0328101524 | SC: 990260 | EORI: 861156687
Op al onze offertes, op alle opdrachten aan ons en op alle met ons gesloten overeenkomsten zijn de Metaalunie-voorwaarden van toepassing, gedeponeerd
ter Griffie van de Rechtbank te Rotterdam, volgens de laatste aldaar neergelegde tekst. Deze leveringsvoorwaarden worden u op verzoek toegezonden.
Step 2 (optional)
Remove 4x M6x12 Torx 30 bolts from the motor cover
VeloComfort®
www.lo-minck.nl
Mobiliteitsoplossingen - Mobility Solutions - Mobilitätslösungen - Solutions de Mobilité
Gansoord 80 | 2165 BD Lisserbroek (NL) | T: +31-(0)252-420384 | www.lo-minck.nl | [email protected]
KvK: 77815092 | BTW: NL861156687B01 | BIC: RABONL2U | IBAN: NL95RABO 0328101524 | SC: 990260 | EORI: 861156687
Op al onze offertes, op alle opdrachten aan ons en op alle met ons gesloten overeenkomsten zijn de Metaalunie-voorwaarden van toepassing, gedeponeerd
ter Griffie van de Rechtbank te Rotterdam, volgens de laatste aldaar neergelegde tekst. Deze leveringsvoorwaarden worden u op verzoek toegezonden.
Step 3
Remove 1x M6x12 Torx bolt and 1x M6 Nut
VeloComfort®
www.lo-minck.nl
Mobiliteitsoplossingen - Mobility Solutions - Mobilitätslösungen - Solutions de Mobilité
Gansoord 80 | 2165 BD Lisserbroek (NL) | T: +31-(0)252-420384 | www.lo-minck.nl | [email protected]
KvK: 77815092 | BTW: NL861156687B01 | BIC: RABONL2U | IBAN: NL95RABO 0328101524 | SC: 990260 | EORI: 861156687
Op al onze offertes, op alle opdrachten aan ons en op alle met ons gesloten overeenkomsten zijn de Metaalunie-voorwaarden van toepassing, gedeponeerd
ter Griffie van de Rechtbank te Rotterdam, volgens de laatste aldaar neergelegde tekst. Deze leveringsvoorwaarden worden u op verzoek toegezonden.
Step 4
Remove Motor cover
Attention: (the Emergency stop cable is attached to the motor cover)
Step 5
Remove 1x Bolt M10x20 and 1x Bolt M10x60
Remove Motor
Attention: the Motor cable and
Temperature cable* is attached to the Transition cover
* optional
VeloComfort®
www.lo-minck.nl
Mobiliteitsoplossingen - Mobility Solutions - Mobilitätslösungen - Solutions de Mobilité
Gansoord 80 | 2165 BD Lisserbroek (NL) | T: +31-(0)252-420384 | www.lo-minck.nl | [email protected]
KvK: 77815092 | BTW: NL861156687B01 | BIC: RABONL2U | IBAN: NL95RABO 0328101524 | SC: 990260 | EORI: 861156687
Op al onze offertes, op alle opdrachten aan ons en op alle met ons gesloten overeenkomsten zijn de Metaalunie-voorwaarden van toepassing, gedeponeerd
ter Griffie van de Rechtbank te Rotterdam, volgens de laatste aldaar neergelegde tekst. Deze leveringsvoorwaarden worden u op verzoek toegezonden.
Step 6
Remove 8x M6x12 Torx bolt
Remove Covers
Step 7
Remove 2x M10x20 and 2x M10x25 bolts
VeloComfort®
www.lo-minck.nl
Mobiliteitsoplossingen - Mobility Solutions - Mobilitätslösungen - Solutions de Mobilité
Gansoord 80 | 2165 BD Lisserbroek (NL) | T: +31-(0)252-420384 | www.lo-minck.nl | [email protected]
KvK: 77815092 | BTW: NL861156687B01 | BIC: RABONL2U | IBAN: NL95RABO 0328101524 | SC: 990260 | EORI: 861156687
Op al onze offertes, op alle opdrachten aan ons en op alle met ons gesloten overeenkomsten zijn de Metaalunie-voorwaarden van toepassing, gedeponeerd
ter Griffie van de Rechtbank te Rotterdam, volgens de laatste aldaar neergelegde tekst. Deze leveringsvoorwaarden worden u op verzoek toegezonden.
Step 8
Remove 4x M6x12 torx bolts
Step 9
Clean transition and lubricate* the motor shaft
*Lubricant: Kajo Chipping Hammer Paste
•Clean transition
•Lubricate* shaft
•Assemble drive pulley
•Check bearings and roller
of the driven pulley
•Assemble driven pulley
•Adjust belt tension and
aligning by turning
the M8 bolts
•Lock the position by tighten
The M8 nuts to the
stainless steel plate
Clean transition
Lubricate* shaft
Tighten nuts to lock position
Adjust bolt to tension
and align belt
VeloComfort®
www.lo-minck.nl
Mobiliteitsoplossingen - Mobility Solutions - Mobilitätslösungen - Solutions de Mobilité
Gansoord 80 | 2165 BD Lisserbroek (NL) | T: +31-(0)252-420384 | www.lo-minck.nl | [email protected]
KvK: 77815092 | BTW: NL861156687B01 | BIC: RABONL2U | IBAN: NL95RABO 0328101524 | SC: 990260 | EORI: 861156687
Op al onze offertes, op alle opdrachten aan ons en op alle met ons gesloten overeenkomsten zijn de Metaalunie-voorwaarden van toepassing, gedeponeerd
ter Griffie van de Rechtbank te Rotterdam, volgens de laatste aldaar neergelegde tekst. Deze leveringsvoorwaarden worden u op verzoek toegezonden.
5. Disassemble VeloComfort® Belt guiders
Step 1
Remove 1x M6x12 Torx bolt
Step 2
Remove Belt guider small by pushing the shaft out through the fixing collar (attention: do not
push the fixing collar in the profile)
Step 3
Remove 1x M6x12 Torx bolt
Fixing collar stays in
place
VeloComfort®
www.lo-minck.nl
Mobiliteitsoplossingen - Mobility Solutions - Mobilitätslösungen - Solutions de Mobilité
Gansoord 80 | 2165 BD Lisserbroek (NL) | T: +31-(0)252-420384 | www.lo-minck.nl | [email protected]
KvK: 77815092 | BTW: NL861156687B01 | BIC: RABONL2U | IBAN: NL95RABO 0328101524 | SC: 990260 | EORI: 861156687
Op al onze offertes, op alle opdrachten aan ons en op alle met ons gesloten overeenkomsten zijn de Metaalunie-voorwaarden van toepassing, gedeponeerd
ter Griffie van de Rechtbank te Rotterdam, volgens de laatste aldaar neergelegde tekst. Deze leveringsvoorwaarden worden u op verzoek toegezonden.
Step 4
Remove Belt guider large
Step 5
Remove Fixing collar from belt guider large
Step 6
Remove and check the plastic rollers and lubricate* the shafts.
*Lubricant: Kajo Chipping Hammer Paste
Lubricate shafts
VeloComfort®
www.lo-minck.nl
Mobiliteitsoplossingen - Mobility Solutions - Mobilitätslösungen - Solutions de Mobilité
Gansoord 80 | 2165 BD Lisserbroek (NL) | T: +31-(0)252-420384 | www.lo-minck.nl | [email protected]
KvK: 77815092 | BTW: NL861156687B01 | BIC: RABONL2U | IBAN: NL95RABO 0328101524 | SC: 990260 | EORI: 861156687
Op al onze offertes, op alle opdrachten aan ons en op alle met ons gesloten overeenkomsten zijn de Metaalunie-voorwaarden van toepassing, gedeponeerd
ter Griffie van de Rechtbank te Rotterdam, volgens de laatste aldaar neergelegde tekst. Deze leveringsvoorwaarden worden u op verzoek toegezonden.
6. Assemble and test
Step 1
Assemble the components below without covers!
1. Assemble VeloComfort® Belt guiders
2. Assemble VeloComfort® Output
3. Assemble VeloComfort® Transition (optional)
4. Assemble VeloComfort® Input
Step 2
1. Put the main switch ON in the control box.
2. Deactivate the Emergency buttons.
3. Press the sensor two times.
a. The motor is running
b. Check if the belt is in the middle of the pulley at the platform transit and input.
c. Check if the belt is in the middle of the driven pulley’s
4. Put the main switch to OFF in the control box.
5. Push the Emergency button
6. Mount the covers (from top to bottom)
a. Output cover
b. Motor Cover
c. Platform transit cover
d. Motor cover
e. Input cover
7. Deactivate the Emergency buttons.
8. Put the main switch to ON in the control box.
9. Press the sensor switch two times.
10. Press the emergency button while the motor is running
11. Check if the system has stopped (push minimal two times on the sensor switch to check)
12. Deactivate the Emergency buttons.
13. Press sensor switch twice
14. The conveyor system is rebooted and the motor is running.
VeloComfort®
www.lo-minck.nl
Mobiliteitsoplossingen - Mobility Solutions - Mobilitätslösungen - Solutions de Mobilité
Gansoord 80 | 2165 BD Lisserbroek (NL) | T: +31-(0)252-420384 | www.lo-minck.nl | [email protected]
KvK: 77815092 | BTW: NL861156687B01 | BIC: RABONL2U | IBAN: NL95RABO 0328101524 | SC: 990260 | EORI: 861156687
Op al onze offertes, op alle opdrachten aan ons en op alle met ons gesloten overeenkomsten zijn de Metaalunie-voorwaarden van toepassing, gedeponeerd
ter Griffie van de Rechtbank te Rotterdam, volgens de laatste aldaar neergelegde tekst. Deze leveringsvoorwaarden worden u op verzoek toegezonden.
Step 3
Reset the counters in the program. (only the counters since maintenance will be reset)
•Press the ↓ cursor till the display with the date
•Press ← and the display with 4 arrows will appear
•Press and hold the ESC and ↑ cursor till the display turns red (after 5 seconds).

Popular Control System manuals by other brands

Anilam 3000M manual

Anilam

Anilam 3000M manual

BLAUBERG BLAUBOX MW750-4 user manual

BLAUBERG

BLAUBERG BLAUBOX MW750-4 user manual

RDZ CoRe Air Control User Sheet

RDZ

RDZ CoRe Air Control User Sheet

NCE POWER PRO DCC quick start guide

NCE

NCE POWER PRO DCC quick start guide

OPTICLIMATE ZEVOMAX II Installation & user guide

OPTICLIMATE

OPTICLIMATE ZEVOMAX II Installation & user guide

Siemens SIPLUS HCS3200 Compact operating instructions

Siemens

Siemens SIPLUS HCS3200 Compact operating instructions

LLURIA DE-5-DMX-6A quick start guide

LLURIA

LLURIA DE-5-DMX-6A quick start guide

ADB AGLAS user manual

ADB

ADB AGLAS user manual

Compool Pool or Spa Control System CP-1000 owner's manual

Compool

Compool Pool or Spa Control System CP-1000 owner's manual

Emec DIN DIGITAL CD operating manual

Emec

Emec DIN DIGITAL CD operating manual

Rockford Systems SSC-1000 installation manual

Rockford Systems

Rockford Systems SSC-1000 installation manual

Hurco Autobend 6 installation manual

Hurco

Hurco Autobend 6 installation manual

Promation Engineering P2-120PN4 Installation & operation manual

Promation Engineering

Promation Engineering P2-120PN4 Installation & operation manual

Fike CyberCat 1016 installation manual

Fike

Fike CyberCat 1016 installation manual

Niles MVC100IR Specification sheet

Niles

Niles MVC100IR Specification sheet

heat-timer DiGi-SPAN Elite Series Installation and operation manual

heat-timer

heat-timer DiGi-SPAN Elite Series Installation and operation manual

MUELLER CO. Hydro-guard Operating instructions manual

MUELLER CO.

MUELLER CO. Hydro-guard Operating instructions manual

SMC Networks EX160-SDN2 instruction manual

SMC Networks

SMC Networks EX160-SDN2 instruction manual

manuals.online logo
manuals.online logoBrands
  • About & Mission
  • Contact us
  • Privacy Policy
  • Terms and Conditions

Copyright 2025 Manuals.Online. All Rights Reserved.