Long Range Systems T7400A User manual

IInnttaallllaattiioonn,, WWaarrrraannttyy aanndd SSeerrvviiccee IInnffoorrmmaattiioonn
Long Range Systems, In .
44555500 EExxcceell PPaarrkkwwaayy,, SSuuiittee 220000
AAddddiioonn,, TTXX 7755000011
880000..443377..44999966 ••wwwwww..ppaaggeerr..nneett
SETUP
MGR1
MGR2
STAFF
CLEAR
ENTER
1
2
3
4
5
6
7
8
9
0
ABC
DEF
GHI
JKL
MNO
PQR
STU
VW
XYZ
[
T7400
LongRangeSystems
800.437.4996
F1
F2
F3
F4
T7400A
Paging System Transmitter
U S E R M A N U A L
01.09.09

Warranty
Long Range Systems, In . warrants this produ t against any defe ts that are due to faulty material or work-
manship for a two-year period after the original date of onsumer pur hase. This warranty does not in lude
damage to the produ t resulting from a ident, misuse or improper ele tri al onne tion. If this produ t
should be ome defe tive within the warranty period, we will repair or repla e it with an equivalent produ t,
free of harge. LRS will return your produ t via UPS ground shipping. All warranty laims must be initiated
through our ustomer servi e department.
Customer Service: 800.437.4996
4 0 Excel Parkway, Suite 200
Addison, TX 7 001
This warranty gives you spe ifi legal rights and you may also have rights that vary from state to state.
Copyright © March 2008, Long Range Systems, Inc. All Rights Reserved
This manual ontains proprietary information of Long Range Systems, In . (LRS) and is intended for use
only by its employees or ustomers. None of the material ontained herein may be opied, reprodu ed, re-
published, downloaded, displayed, posted, or transmitted in any form or by any means, in luding but not lim-
ited to, ele troni , me hani al, photo opying, re ording, or otherwise without the prior written permission
of LRS. Additional opies of this manual may be obtained by onta ting LRS.
S reen displays, keyboard layouts, hardware des riptions, or software are proprietary to LRS and are sub-
je t to opyright and other intelle tual property rights of LRS and shall be treated in a ordan e with the
previous paragraph.
All attempts have been made to make the information in this do ument omplete and a urate. LRS is not
responsible for any dire t or indire t damages or loss of business resulting from ina ura ies or omissions.
Spe ifi ations and other information ontained within this do ument are subje t to hange without noti e.
EU DECLARATION OF CONFORMITY
We, Long Range Systems hereby de lare under our sole responsibility that the T7450 paging transmitters and
on-site pagers omply with the essential requirements in the European RE&TTE Dire tive 1999/5/EC of the
European Parliament of the Coun il of 9 Mar h 1999 on radio equipment and tele ommuni ation terminal
equipment and the mutual re ognition of their onformity. The following standards were utilized:
ETS 300 224: 1998 EN 301 489-2: 2002
EN61000-3-2: 1998 EN 61000-3-3: 199
EN 609 0: 1992 with A1, A2, & A3.
Long Range Systems 1T7 00A User Manual

Table Of Contents
Long Range Systems . . . . . . . . . . . . . . . . . . . . . . . . . . . . . . . . . . . . . . . . . . . . . 4
General Information . . . . . . . . . . . . . . . . . . . . . . . . . . . . . . . . . . . . . . . . . . . . . . 4
Compatible Pgers . . . . . . . . . . . . . . . . . . . . . . . . . . . . . . . . . . . . . . . . . . . . . . . .
Installation and Setup . . . . . . . . . . . . . . . . . . . . . . . . . . . . . . . . . . . . . . . . . . . . 6
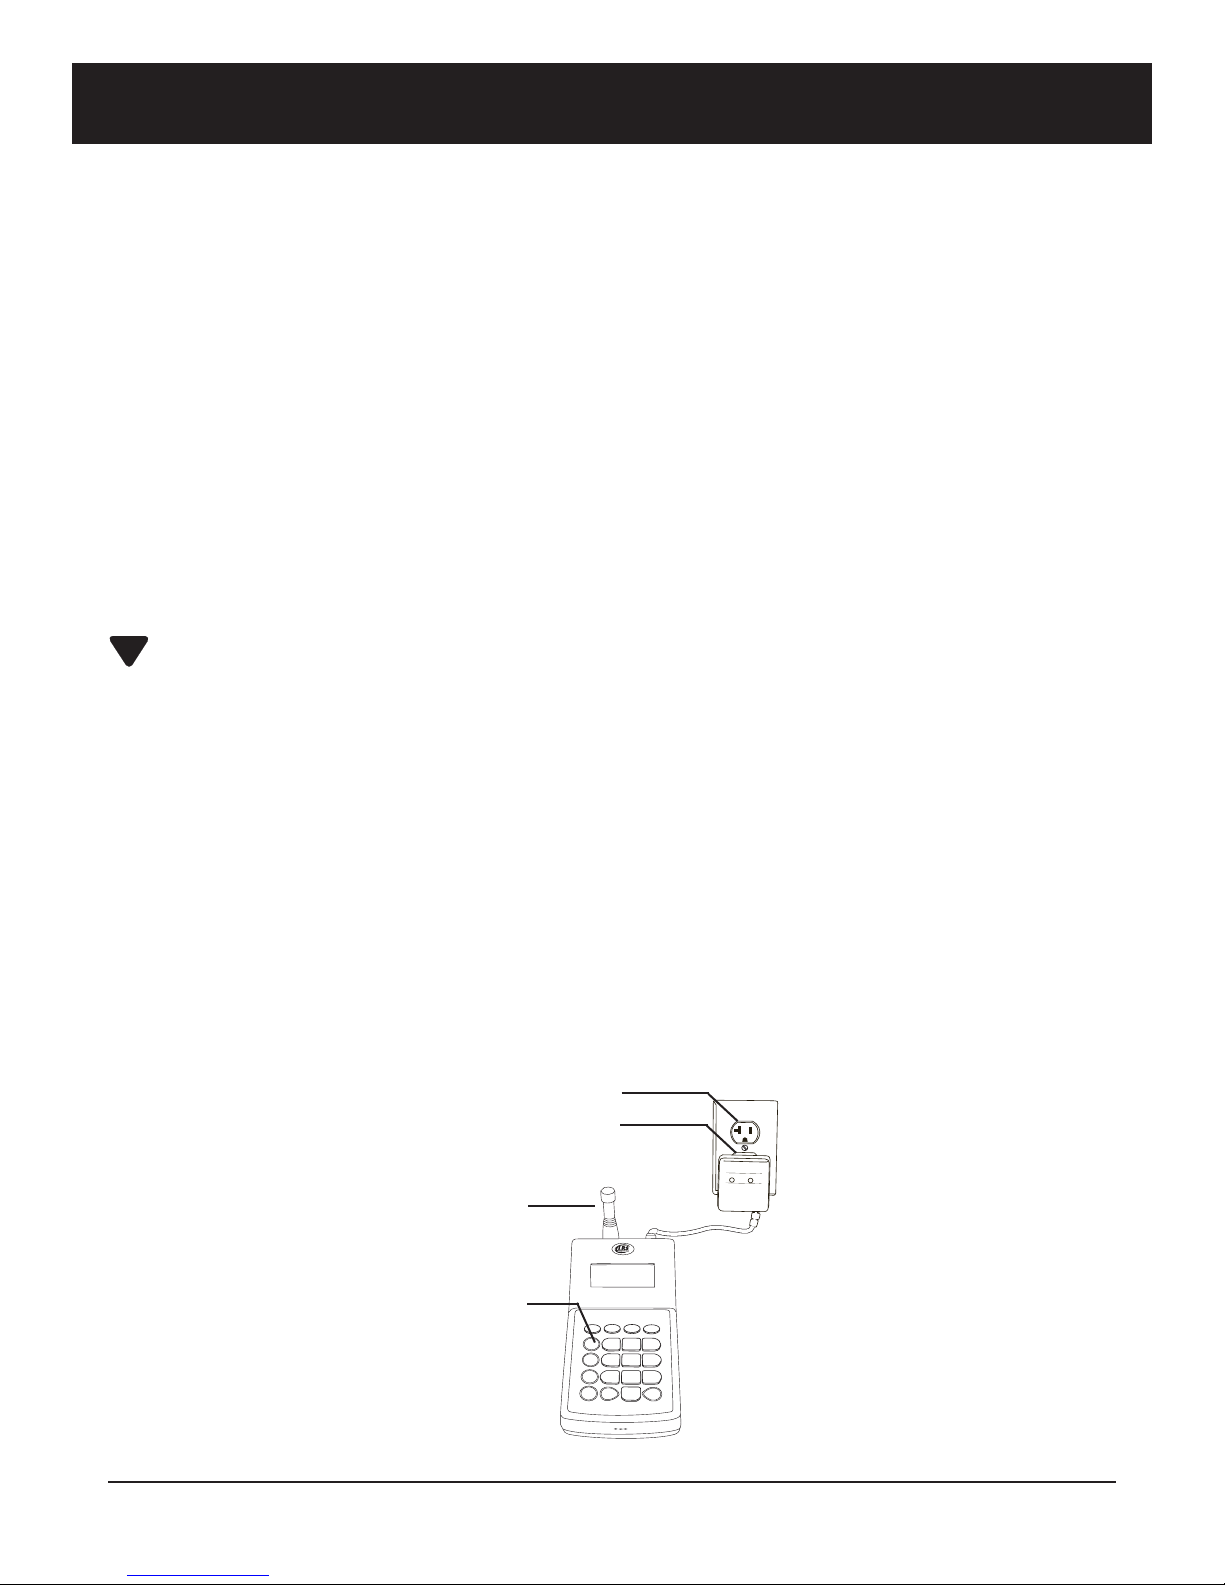
Hardware Provided . . . . . . . . . . . . . . . . . . . . . . . . . . . . . . . . . . . . . . . . . . . . . . . . . . . 6
Installation Pro edure . . . . . . . . . . . . . . . . . . . . . . . . . . . . . . . . . . . . . . . . . . . . . . . . . 6
Ele tri al Conne tions . . . . . . . . . . . . . . . . . . . . . . . . . . . . . . . . . . . . . . . . . . . . . . . . . 6
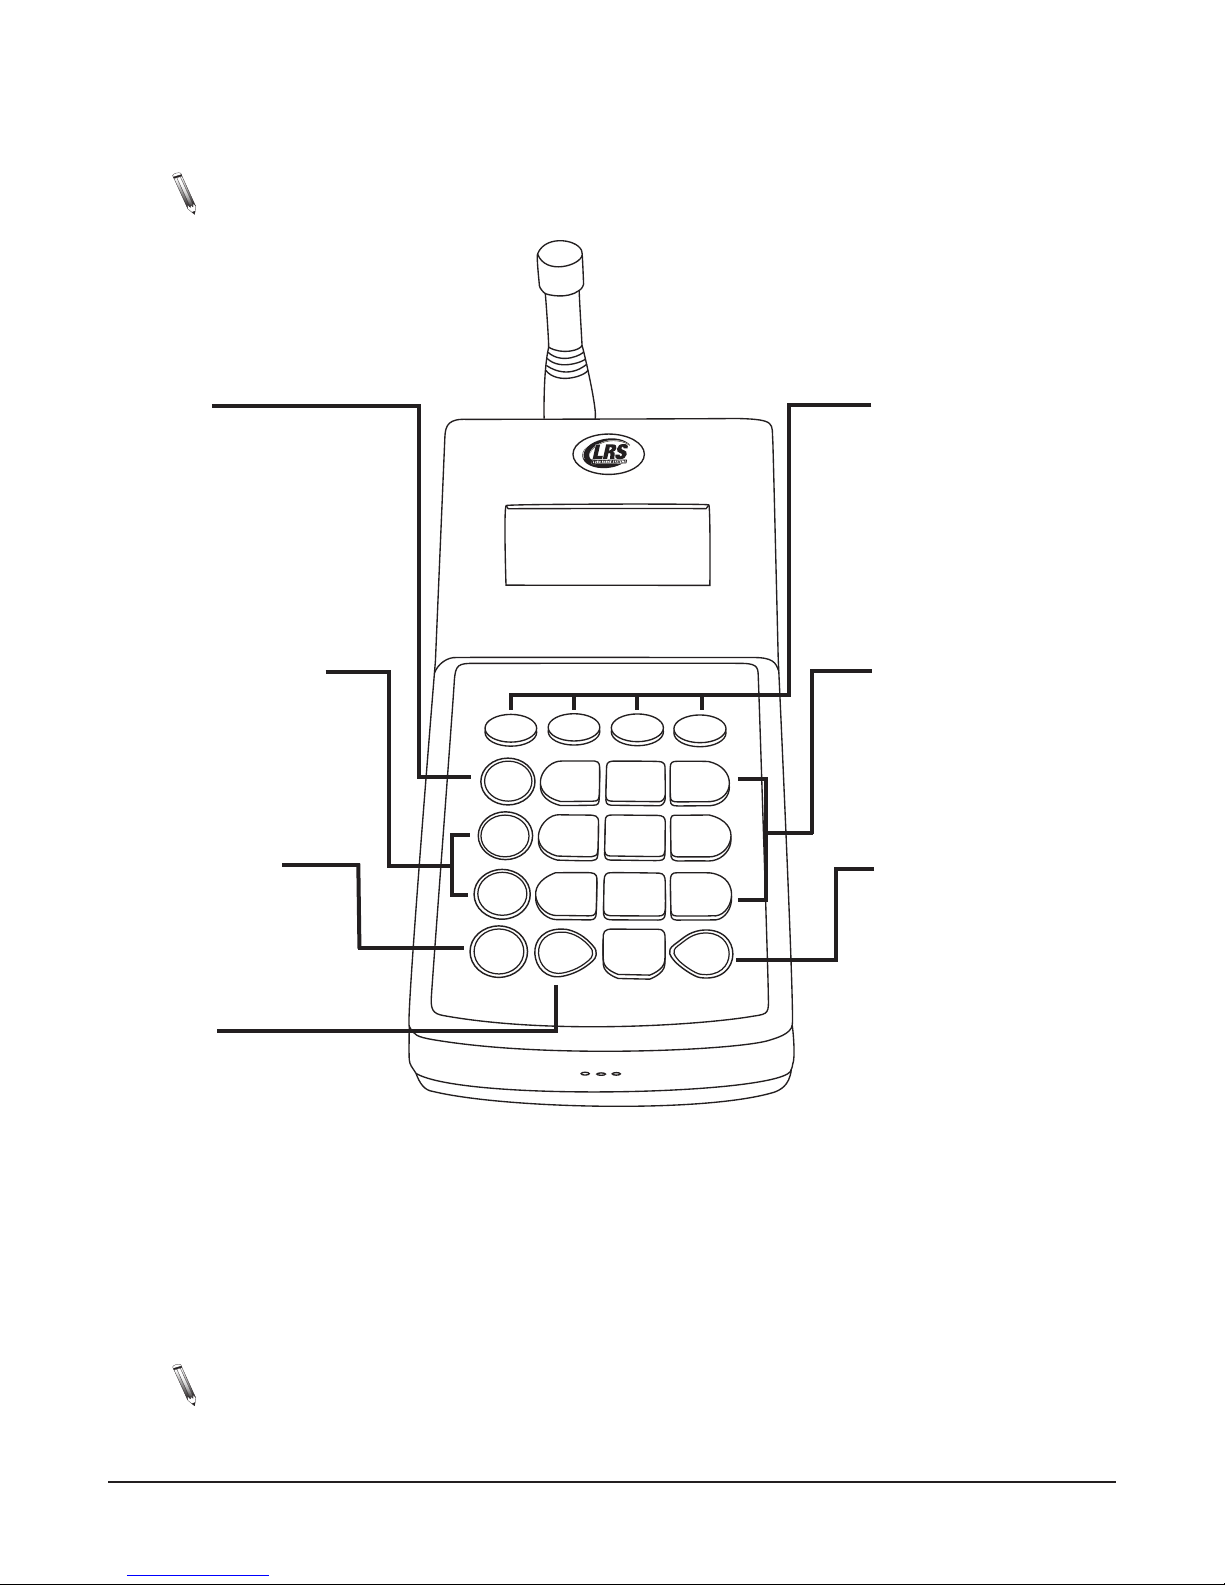
Keypad Des ription . . . . . . . . . . . . . . . . . . . . . . . . . . . . . . . . . . . . . . . . . . . . . . . . . . . 7
Initial Power Up and Time Set . . . . . . . . . . . . . . . . . . . . . . . . . . . . . . . . . . . . . . . . . . 7
Basic Paging Operation Guide . . . . . . . . . . . . . . . . . . . . . . . . . . . . . . . . . . . . . . 8
Page Guest Pagers . . . . . . . . . . . . . . . . . . . . . . . . . . . . . . . . . . . . . . . . . . . . . . . . . . . . 8
Page Individual Staff Pagers . . . . . . . . . . . . . . . . . . . . . . . . . . . . . . . . . . . . . . . . . . . . 8
Special Operational Procedures . . . . . . . . . . . . . . . . . . . . . . . . . . . . . . . . . . . . . 10
Wait List Fun tion . . . . . . . . . . . . . . . . . . . . . . . . . . . . . . . . . . . . . . . . . . . . . . . . . . . . 10
Theft-Deterrent Fun tion . . . . . . . . . . . . . . . . . . . . . . . . . . . . . . . . . . . . . . . . . . . . . . . 11
Lo ate Mispla ed Pagers . . . . . . . . . . . . . . . . . . . . . . . . . . . . . . . . . . . . . . . . . . . . . . . 11
Tra king Modes . . . . . . . . . . . . . . . . . . . . . . . . . . . . . . . . . . . . . . . . . . . . . . . . . . . . . . 12
Group Paging . . . . . . . . . . . . . . . . . . . . . . . . . . . . . . . . . . . . . . . . . . . . . . . . . . . . . . . . 14
Feature Setup Procedures . . . . . . . . . . . . . . . . . . . . . . . . . . . . . . . . . . . . . . . . . 1
User’s A ess Code . . . . . . . . . . . . . . . . . . . . . . . . . . . . . . . . . . . . . . . . . . . . . . . . . . . 15
Set Page Mode . . . . . . . . . . . . . . . . . . . . . . . . . . . . . . . . . . . . . . . . . . . . . . . . . . . . . . . 15
Set to Page Staff or Guest Pagers . . . . . . . . . . . . . . . . . . . . . . . . . . . . . . . . . . . . . . . 16
Create Alpha Messages . . . . . . . . . . . . . . . . . . . . . . . . . . . . . . . . . . . . . . . . . . . . . . . . 16
Set Language . . . . . . . . . . . . . . . . . . . . . . . . . . . . . . . . . . . . . . . . . . . . . . . . . . . . . . . . 16
Set Alarms . . . . . . . . . . . . . . . . . . . . . . . . . . . . . . . . . . . . . . . . . . . . . . . . . . . . . . . . . . 17
Set System Time/Date for Staff Pagers . . . . . . . . . . . . . . . . . . . . . . . . . . . . . . . . . . . 18
Maintenance Functions . . . . . . . . . . . . . . . . . . . . . . . . . . . . . . . . . . . . . . . . . . . 19
Paging Types in Mixed Systems . . . . . . . . . . . . . . . . . . . . . . . . . . . . . . . . . . . . . . . . . 19
System ID . . . . . . . . . . . . . . . . . . . . . . . . . . . . . . . . . . . . . . . . . . . . . . . . . . . . . . . . . . . 19
Station ID . . . . . . . . . . . . . . . . . . . . . . . . . . . . . . . . . . . . . . . . . . . . . . . . . . . . . . . . . . . 20
Adjust Transmit Power . . . . . . . . . . . . . . . . . . . . . . . . . . . . . . . . . . . . . . . . . . . . . . . . 20
Range Test . . . . . . . . . . . . . . . . . . . . . . . . . . . . . . . . . . . . . . . . . . . . . . . . . . . . . . . . . . 20
Repeat Delay . . . . . . . . . . . . . . . . . . . . . . . . . . . . . . . . . . . . . . . . . . . . . . . . . . . . . . . . . 21
ID Span . . . . . . . . . . . . . . . . . . . . . . . . . . . . . . . . . . . . . . . . . . . . . . . . . . . . . . . . . . . . . 21
Dry Conta t . . . . . . . . . . . . . . . . . . . . . . . . . . . . . . . . . . . . . . . . . . . . . . . . . . . . . . . . . . 21
Time and Date Format . . . . . . . . . . . . . . . . . . . . . . . . . . . . . . . . . . . . . . . . . . . . . . . . . 22
Long Range Systems 2T7 00A User Manual

Message Mode . . . . . . . . . . . . . . . . . . . . . . . . . . . . . . . . . . . . . . . . . . . . . . . . . . . . . . . 23
Programming Pagers . . . . . . . . . . . . . . . . . . . . . . . . . . . . . . . . . . . . . . . . . . . . . 24
Individual Pagers . . . . . . . . . . . . . . . . . . . . . . . . . . . . . . . . . . . . . . . . . . . . . . . . . . . . . 24
Program Pager Groups . . . . . . . . . . . . . . . . . . . . . . . . . . . . . . . . . . . . . . . . . . . . . . . . 27
Alpha En ryption . . . . . . . . . . . . . . . . . . . . . . . . . . . . . . . . . . . . . . . . . . . . . . . . . . . . . 28
Additional Alpha Fun tions . . . . . . . . . . . . . . . . . . . . . . . . . . . . . . . . . . . . . . . . . . . . . 29
Set Pager Vibrator ON/OFF . . . . . . . . . . . . . . . . . . . . . . . . . . . . . . . . . . . . . . . . . . . . . 30
System Specifications . . . . . . . . . . . . . . . . . . . . . . . . . . . . . . . . . . . . . . . . . . . . 31
Transmitter . . . . . . . . . . . . . . . . . . . . . . . . . . . . . . . . . . . . . . . . . . . . . . . . . . . . . . . . . . 31
Battery Powered Pagers . . . . . . . . . . . . . . . . . . . . . . . . . . . . . . . . . . . . . . . . . . . . . . . 31
Re hargeable Pagers . . . . . . . . . . . . . . . . . . . . . . . . . . . . . . . . . . . . . . . . . . . . . . . . . . 31
Troubleshooting . . . . . . . . . . . . . . . . . . . . . . . . . . . . . . . . . . . . . . . . . . . . . . . . . 32
Display shows Nothing . . . . . . . . . . . . . . . . . . . . . . . . . . . . . . . . . . . . . . . . . . . . . . . . 32
Pagers Don’t Re eive Pages . . . . . . . . . . . . . . . . . . . . . . . . . . . . . . . . . . . . . . . . . . . . 32
Battery Powered Pagers Don’t Re eive Pages . . . . . . . . . . . . . . . . . . . . . . . . . . . . . . 32
Service Questions and Answers . . . . . . . . . . . . . . . . . . . . . . . . . . . . . . . . . . . . . 33
LRS Pagers Available for the T7400A . . . . . . . . . . . . . . . . . . . . . . . . . . . . . . . . 33
Using the 4-Line Alpha Numeri Pager . . . . . . . . . . . . . . . . . . . . . . . . . . . . . . . . . . . 33
Using the Star Pager . . . . . . . . . . . . . . . . . . . . . . . . . . . . . . . . . . . . . . . . . . . . . . . . . . 34
Using the SP5 1-Line Re hargeable Alpha Numeri Pagers . . . . . . . . . . . . . . . . . . 36
Using the Non-Alpha Guest Pagers . . . . . . . . . . . . . . . . . . . . . . . . . . . . . . . . . . . . . . 38
Using the Alpha Coaster Guest Pagers . . . . . . . . . . . . . . . . . . . . . . . . . . . . . . . . . . . 39
Long Range Systems 3T7 00A User Manual

Long Range Systems
Long Range Systems is a provider of utting-edge onsite paging solutions. We offer ex eptional produ ts and
servi es that satisfy our ustomer’s needs for years to ome. Thorough familiarity with these instru tions and
pro edures will ensure proper operation and maintenan e of the system.
Note: This uide should be kept readily available for mana ers and key staff.
General Information
The Guest Paging System is an onsite paging solution used to in rease effi ien y in operations by instantly
alerting patrons, lients, and guests of the availability of servi es. Additional staff paging apabilities an alert
management of immediate needs. The T7400A is used to page guest pagers (Alpha Coaster, Coaster Call,
Pizza Pager, Lobster Call, AdverTeaser), and staff pagers (Alphanumeri , Star).
Notice: Operation is subje t to the following:
• This devi e may or may not ause interferen e
• This devi e will a ept any interferen e in luding interferen e that may ause undesired oper-
ation of the unit.
Notice: To redu e potential radio interferen e to other users, the antenna type and gain should be so
hosen that the equivalent isotropi ally radiated power (EIRP) is not more than required for
su essful ommuni ation.
Long Range Systems T7 00A User Manual

1
2
3
4
800.437.4996
www.pager.net
StarPager
www.pager.net
www.pager.net
1
2
3
4
800.437.4996
www.pager.net
1
4
1
800.437.4996
www.pager.n et
WaitTimeisapprox.
5minutes
Staff Pagers:Customer Pagers:
Compatible Pagers
• Coaster Call
• SP5 1-Line
Re hargeable Alpha
Numeri Pager
• Alpha Coaster • Star Pager
• AdverTeaser
(Paddle) Pager • RX-E 4-Line Alpha
Numeri Pager
(Battery Operated)
• Pizza Pager
• Lobster Pager
Long Range Systems 5T7 00A User Manual

Installation and Setup
Hardware Provided
The system ontains the transmitter keypad, an instru tion booklet, an antenna, a strip of Vel ro, rubber feet,
and a 10-VAC power adapter.
Notice: Operation is subje t to the following:
• This devi e may or may not ause interferen e.
• This devi e will a ept any interferen e in luding interferen e that may ause undesired oper-
ation of the unit.
Notice: To redu e potential radio interferen e to other users, the antenna type and gain should be so
hosen that the equivalent isotropi ally radiated power (EIRP) is not more than required for
su essful ommuni ation.
Installation Procedure
The following is the basi installation pro edure
CAUTION::Do not mount the transmitter antenna near any lar e metal objects.
1. Un-wrap all system omponents
2. Twist the 3” antenna onto the silver onne tor lo ated on the rear of the transmitter
3. Plug the power adapter into a standard 110V outlet and insert the barrel onne tor end into the
port lo ated on the rear of the antenna
4. Upon ompletion of setup, make sure pagers are fully harged and/or have good batteries and are
powered on.
5. The systems are shipped ready for the most general use. If you need to modify settings, refer to
the table of ontents to lo ate a spe ifi fun tion guideline.
6. You should perform a range test (see pg. 20) to see if pagers an be paged in all lo ations of your
fa ility.
Electrical Connections
The following diagram shows the ele tri al onne tions.
T7400
Long Range Systems
800.437.4996
F1 F2 F3 F4
SETUP
MGR1
MGR2
STAFF
CLEAR ENTER
1
2
3
4
5
6
7
8
9
0
ABC DEF GHI
JKL
MNO
PQR
STU
VW
XYZ
[
12
:
00
:
36 am
Guest #: - - - -
CONDOR
CLASS2TRANSFORMER
(408)745-7141
INPUT:AC12OV60Hz19w
OUTPUT:AC9V1800mA
P/N:A91A8
RoHS
UU
LL
LISTED
C
MODEL:48A-9-1800
EIA3630635S
MADEINCHINA
110 VAC ELECTRICAL SUPPL
10 VAC POWER ADAPTER
ANTENNA
KE PAD/TRANSMITTER
!
Long Range Systems 6T7 00A User Manual

Long Range Systems 7T7 00A User Manual
T7400
Long Range Systems
800.437.4996
F1 F2 F3 F4
SETUP
MGR1
MGR2
MODE
CLEAR ENTER
1
2
3
4
5
6
7
8
9
0
ABC DEF GHI
JKL
MNO
PQR
STU
VW
XYZ
[
12:00:36 am
Guest #: ---
Keypad Description
Before using the keypad, read the following keypad des riptions.
Note: As the display chan es, the keys may perform different functions.
Initial Power Up and Time Set
1. After the transmitter initializes, the time set menu is shown, enter the urrent time and press the
ENTER key
Note: Pressing F1 (EXIT) bypasses this fun tion and sets the time to 12:00am.
2. When the display asks for AM or PM, press the F1 Key for AM or the F4 key for PM. (Note that AM
is right above the F1 key and PM is right above the F4 key). The display shows MM/DD/YY
F Keys
The F (fun tion) keys are
the first row of keys under
the display. The F1 - F4
keys orrespond to the
bottom row of text in the
keypad display window.
Number Keys
Keys 1 through 0 enter
numeri data su h as the
pager number. In some
modes they will also
enter alpha data.
Setup Key
The Setup key enables
menus when he king or
hanging the transmitter’s
programmed settings.
Mgr 1 and Mgr 2 Keys
Mgr1, Mgr2, and Staff
keys are used to page a
manager. Mgr1 and
Mgr2 keys an be as-
signed to a spe ifi pager.
Staff (Pager) Key
The Staff key is used to
temporarily hange the
paging fun tion to page
Staff pagers.
Clear Key
The Clear key is used to
lear the input when
paging a pager or
oaster and return to the
Guest paging display or
to restart an input when
programming.
Enter Key
The Enter key is used to
start the paging fun tion,
and to omplete pro-
gramming where re-
quired.

Basic Paging Operation Guide
The following are the most ommonly used pro edures for paging. Make sure that all re hargeable guest or
staff pagers are not on the harging unit and all battery-operated pagers are turned on.
Page Guest Pagers:
Non-Alphanumeric (AdverTeaser, Pizza, Lobster, Coaster Call pagers)
1. Main s reen displays – Guest #: - - - -
2. Enter number assigned to guest at handout
3. Press ENTER to send page
4. Return guest pagers to harging unit after paging
Alphanumeric (Alpha Coaster pager)
1. Main s reen displays – Guest #: - - - -
2. Enter number assigned to guest at handout - then press enter.
3. Enter message ode (000-099) (see Preset Messages Table pg. 9)
4. Press ENTER to send page
5. Return guest pagers to harging unit after paging
Page Individual Staff Pagers:
Non-Alphanumeric (Star Pager)
1. On keypad press STAFF (Display will show: Pager #: - - - -)
2. Enter staff pager number to be paged - then press enter.
3. Press ENTER to send page
OR
4. Press F1 (V1), F2 (V2) or F3 (V3) for 1, 2 or 3 vibrations.
Alphanumeric (Alphanumeric, Rechargeable alphanumeric pagers)
1. On keypad press STAFF (Display will show: Pager #: - - - -)
2. Enter staff pager number to be paged - then press enter.
3. Enter message ode (000-099) (see Canned Messages Table pg. 9)
4. Press ENTER to send page
OR
5. Press F1 (V1), F2 (V2) or F3 (V3) for 1, 2 or 3 vibrations
Page Manager Pagers
If Manager pagers are assigned (see Assigning Manager Pagers p. 27), MGR1 and MGR2 page those
assigned pagers.
1. On keypad press MGR1 or MGR2
2. Press F1 (YES) to ontinue or F4 (NO) to an el
Long Range Systems 8T7 00A User Manual

000 Phone Call
001 Sales Call
002 Manager
003 Customer
004 Room
005 Visitor
006 all Ext
007 MTG Room
008 Lane
009 Aisle
010 Void
011 Stamps
012 Change
013 Station
014 Ma hine
015 Operator
016 Emergen y
017 XX Minutes
018 Tee
019 Pro Shop
020 Starter
021 Servi e drive
022 Showroom
023 Parked Call
024 Voi e Mail
025 Dressing room
026 Pri e he k
027 Department
028 Cashier
029 Offi e
030 Table
031 Winner
032 Pi kup
033 Do k
034 You have mail
035 Table ready
036 No spe ial
037 Hole
038 Kit hen
039 Bar
040 Door
041 Survey
042 T-nnn Q-mm
043 Break
044 Fire
045 Unit
046 Window
047 Nurse
048 Register
049 Owner
050 Che k
051 Drink
052 Food
053 Servi e
054 Seat
055 Booth
056 Lobby
057 Help
058 Restroom
059 Valet
060 Car
061 Bus
062 Bay
063 Low battery
064 Error
065 Exit
066 Fax
067 host
068 Spa e
069 Lo ation
070 Nursery
071 Teller
072 Offi er
073 Buffet
074 Diaper hange
075 Child rying
076 To nursery
3. Enter message number ode (000-099) (see Preset Messages Table pg. 9) and press ENTER
OR (for star pagers)
4. Choose F1 (V1), F2 (V2), F3 (V3) or F4 (Exit) for 1, 2 or 3 vibrations
All Call Page: Page all guest pagers simultaneously
At (Guest #: - - -) S reen Display:
1. Enter 000 then press ENTER
2. At Page All? Press F1 (YES) or F4 (NO)
All Staff Page: Page all staff pagers simultaneously
1. Press STAFF.
2. Press 9-1-1 then ENTER
3. Enter message number ode (000-099) (see Preset Messages Table pg. 9)
4. Press ENTER to send page
OR
5. Choose F1 (V1), F2 (V2), F3 (V3) or F4 (Exit) for 1, 2 or 3 vibrations
Preset or Special Alpha-Messages
Using Message Codes
When prompted for a message on the T7400A transmitter:
1. Enter message number ode (and an extension number – optional)
2. Press ENTER
Example: Send a message to all extension 123
• From Preset Message Table hoose – 006 (Call Ext)
• Enter ode 0-0-6-1-2-3 (Displays: CALL EXT 123)
Note: These non-editable messa es are built into the transmitter. If usin Alpha pa ers, addi-
tional messa es can be created (see Create Additional Alpha Messa es on p . 16).
Code Message
Long Range Systems 9T7 00A User Manual
006 MESSAGE
EXTENSION #

Special Operational Procedures
Wait List Function
This feature allows the host to a urately inform guests of their wait time. In order to get a urate readings,
the keypad must know when oasters are handed out to the guests. This feature does not require an au-
thorization ode.
Basic Concept
Wait time is determined by the number of oasters handed out multiplied by the Wait/Party setting.
Example:
• The wait per party default is 2 minutes.
• After oasters are given to 10 parties the keypad would indi ate a wait time of 20 minutes.
• The Wait/Party time is adjustable so if you feel you are turning tables faster than 2 minutes, you
an enter your new value into the Wait/Party setting and the keypad will begin using the new
value.
Enabling, Clearing, and Adjusting the Function
After some use, the wait time may be adjusted to fit the needs of your restaurant.
1. Press SETUP
2. Press F1 (MORE) until display shows 2: Set Wait List
3. Press 2 (2: Set Wait List)
4. At the Wait List Option menu press:
• 1 to lear the wait list for a new day
• 2 to turn wait list ON or OFF using the F1 (ON) and F2 (OFF)
• 3 to set the average wait time expe ted for ea h party
5. Press ENTER
Using the Wait List function
Note: The wait time is not available until coasters have been iven out.
• Always lear the wait time prior to ea h shift (see pro edure above).
• Be sure the wait list fun tion is enabled (When wait list is ON main s reen should display: “Wait
= N/A” (N/A - no wait time).
• Set the average wait time expe ted.
When handing out a coaster/pager:
1. From main s reen display: Enter oaster/pager number when the oaster/pager is given out to
the guest (Ex. Guest #: 167)
2. Press F1 (HANDOUT) to onfirm (This updates the wait time on the display s reen) (Ex. Wait – 2 min)
When the guest’s table is available:
1. Enter oaster/pager number (Ex. Guest #: 167) and press ENTER
2. Enter message number ode
3. Press ENTER (Wait time will update (redu ed) on the display s reen) (Ex. Wait – N/A)
Long Range Systems 10 T7 00A User Manual
1
1
,
,
(
(
7
7
$
$
(
(
0
0
9
9
0
0
8
8
9
9
$
$
(
(
0
0
9
9
!
!
,
,
9
9
$
$
(
(
0
0
9
9
(
(
7
7
9
9
<
<
4
4
7
7
,
,
,
,
1
1
5
5
;
;
0
0
9
9

Theft-Deterrent Function
Theft deterrent is used to alert staff and guests that they are leaving the premises while still arrying the
oaster/pager.
When Activated:
• The transmitter sends a signal to the oaster/pager, and if the signal is not re eived, the
oaster/pager will emit a ontinuous beep sound until it is returned to the harging unit or ba k
in range.
• The LED s reen on the alphanumeri pagers will display “OUT OF RANGE”.
• When theft deterrent mode is a tive, a “T” will display on the upper left orner of the transmit-
ter display of the transmitter/T7400A.
To Activate:
1. Press SETUP
2. Press 3 (THEFT ON/OFF)
3. Press F1 (ON) to turn theft mode on (press F2 to turn OFF)
4. Main s reen display will show “T “ on upper left orner when turned on
Locating Misplaced Pagers
Two lo ation modes are available for finding lost or mispla ed pagers/ oasters. Auto Lo ate automati ally
sear hes at a preset time, Run Lo ate sear hes on demand.
CAUTION::Do not set auto locate to run or use run locate feature while pa ers are handed out.
All pa ers will be pa ed!
Auto Locate
Auto Lo ate sends a signal to ALL oasters/pagers at a preset time. The oasters/pagers will beep so that staff
an lo ate them.
Example: If losing at 11:30PM, the transmitter an be set to auto lo ate at 12:30AM, ausing all miss-
ing oasters/pagers to beep at that time.
!
1
2
3
4
800.437.4996
www.pager.net
StarPager
IN RANGE AREA PAGERS
OPERATE NORMALL
OUT OF RANGE AREA
PAGERS ALARM
BEEP..
BEEP...
BEEP
SETUP
MGR1
MGR2
STAFF
CLEAR
ENTER
1
2
3
4
5
6
7
8
9
0
ABC
DEF
GHI
JKL
MNO
PQR
STU
VW
XYZ
[
T7400
LongRangeSystems
800.437.4996
F1
F2
F3
F4
Long Range Systems 11 T7 00A User Manual

When activated:
• A signal is sent out to ALL oaster/ pagers.
• Pagers will Beep or Flash until returned to harging unit or batteries removed (pager).
To activate:
1. Press SETUP
2. Press F1 (MORE) until asked for authorization ode
3. Enter Authorization Code: 5-6-7-8-9
4. Press 1 (1: Prg Auto Fun .)
5. Choose 1 (1:Prgm Auto Lo .) to program auto lo ate
6. Press F1 (ON) to turn Auto-Lo ate mode on or press
F2 (OFF) to turn off
7. Press F4 (DONE) to exit or F3 (HELP) for help
If turning function ON:
8. Enter Start Time for Auto Lo ation (- -: - -) and
press ENTER to ontinue
9. Press F1 (AM) or F4 (PM)
Run Locate
Run lo ate is used to immediately lo ate any mispla ed oasters around the restaurants (ideal during los-
ing hours).
When activated:
• A signal is sent out to ALL guest pagers.
• Pagers will Beep or Flash until returned to harging unit or batteries removed.
To activate
1. Press SETUP
2. Press F1 (MORE) until asked for authorization ode
3. Enter Authorization Code: 5-6-7-8-9
4. Press F1 (MORE) until display shows 3: Run LOCATE
5. Press 3 (Run LOCATE)
6. Sele t F3 (MODE)
8. Press F1 (Go) to start lo ating
Tracking Modes
There are 2 tra king modes:
•
Continuous Tra king
– repeatedly sends paging signals until leared.
•
Custom Tra king
– sends paging signals for a spe ified length of time, based on a user-defined time
interval.
Continuous Tracking
This fun tion allows the host to set paging to o ur ontinuously, and monitor whi h Guest or Staff pager
has been paged. Paging ontinues until the number is leared on the keypad unit.
Long Range Systems 12 T7 00A User Manual

Caution: When the pa er is returned, the number MUST be cleared on the keypad unit in order
to stop pa in .
To turn Continuous Tracking on (or off):
1. Press SETUP
2. Press F1 (MORE) until asked for an
authorization ode
3. Type 5-6-7-8-9
4. Sele t 2 (Prgrm Tra king)
5. Press F1 (ON) or F2 (OFF)
6. Sele t 1 (Continuous)
To Use Continuous Tracking
1. Page the guest or staff pager using the basi
paging pro edure
2. The pager number will appear at the bottom of
the s reen signifying that the pager is being paged
3. When the page has been re eived and a knowledged,
lear the page by pressing the F1, F2 or F3 key under
the pager number shown on the keypad display
• If more than 3 pagers are in the queue “MORE”
will be shown at the right of the display.
• Press F4 (MORE) to see the rest of the list.
Custom Tracking
This fun tion allows the host to monitor whi h Guest or Staff pager has been paged, and ontinues paging,
based on a user defined interval and run time setting. The pager number is leared on the keypad unit when
run time is omplete.
To turn Custom Tracking on (or off):
1. Press SETUP
2. Press F1 (MORE) until asked for the authorization ode
3. Type 5-6-7-8-9
4. Sele t 2 (2: Prgm Tra king)
5. Press F1 (ON) or F2 (OFF)
6. Sele t 2 (2: Custom)
7. Press any key
8. Enter value for repeat time (between 10-255 se .) (Ex. Repeat Time = 20)
To use Custom Tracking:
1. Set the repeat time between 10 and 255 se onds, and then press ENTER. The repeat time defines
how many se onds between ea h page.
2. Set the run time between 30 and 3600 se onds, and then press ENTER. The run time defines the
total amount of time the repeated pages will ontinue for. For example, if you hoose 120 se onds,
the T7400A will ontinue to page at the defined repeat time until the overall 2 minutes (120 Se -
onds) is timed out.
!
Long Range Systems 13 T7 00A User Manual
PRESS TO
CANCEL
STAFF 99
PRESS TO
CANCEL
GUEST 82
PRESS TO
CANCEL
STAFF 92
PRESS TO SCROLL
THROUGH THE PAGE LIST
PAGERS IN THE
QUEUE
PAGER MENU
T7400
Long Range Systems
800.437.4996
F1 F2 F3 F4
SETUP
MGR1
MGR2
MODE
CLEAR ENTER
1
2
3
4
5
6
7
8
9
0
ABC DEF GHI
JKL
MNO
PQR
STU
VW
XYZ
[
12:00:36 am
Guest #: ---
T7400
Long Range Systems
800.437.4996
F1 F2 F3 F4
SETUP
MGR1
MGR2
MODE
CLEAR ENTER
1
2
3
4
5
6
7
8
9
0
ABC DEF GHI
JKL
MNO
PQR
STU
VW
XYZ
[
12:00:36 am
Guest #: ---
T7400
Long Range Systems
800.437.4996
F1 F2 F3 F4
SETUP
MGR1
MGR2
MODE
CLEAR ENTER
1
2
3
4
5
6
7
8
9
0
ABC DEF GHI
JKL
MNO
PQR
STU
VW
XYZ
[
12:00:36 am
Guest #: ---
T7400
Long Range Systems
800.437.4996
F1 F2 F3 F4
SETUP
MGR1
MGR2
MODE
CLEAR ENTER
1
2
3
4
5
6
7
8
9
0
ABC DEF GHI
JKL
MNO
PQR
STU
VW
XYZ
[
12:00:36 am
Guest #: ---
5
5
2
2
:
:
,
,
8
8
9
9
.
.
7
7
.
.
7
7

3. Display s reen will automati ally lear when run time is omplete.
Group Paging
General Purpose
This fun tion is used with Alpha pagers. These pagers an be programmed to respond to group alls. Ten
groups are available and ea h pager an be a member of 5 groups. Ea h pager will respond to its individ-
ual number and to any groups it belongs to. See example below.
Group Paging Rules
General rules for paging groups are:
• Pagers must be programmed in the group mode (see page 27).
• Pagers must be numbered above 10.
• If using staff pagers they annot be numbered 0 – 9.
• If using pagers numbered above 499, the outgoing telephone paging feature must be disabled.
• Any alphanumeri pager an be a member of up to 5 groups.
Paging Groups
1. Enter the number for the pager or the group.
• If only paging staff pagers and have the transmitter default set to Pager, enter the pager or group
number dire tly.
• If paging, default is set to Guest, press Staff before entering the pager or group number.
2. Enter the message to send.
3. Press Enter
GROUP 1 GROUP 2
Pager
99 Pager
51
Pager
77
Pager
94
Run time 30-3600 Seconds
REPEAT TIME
10-255 Seconds
PAGE TIME
• • •
PAGE TIME
PAGE TIMEOFF TIME
OFF TIME
Long Range Systems 1 T7 00A User Manual

FEATURE SETUP PROCEDURES
User’s Access Code
Many of the fun tions that adjust paging preferen es are prote ted by an a ess ode
• To redu e tampering with riti al settings, the keypad is password prote ted.
• The a ess ode 56789 allows you to enter most restri ted programming s reens.
• Press F4 at any menu to return to the Guest menu.
Set Page Mode
This programs how guest and staff pagers will respond when paged. Guest pagers an flash, beep, glow,
flash and beep, et . All page modes are staff programmable and do not require an authorization ode. To
set the modes:
1. Press SETUP.
2. Sele t 2 (2: Set Page Mode)
3. Sele t 1 (1: Guest Pager) or (2: Manager Pager)
Guest Pager - Select:
1 (1: Flash) sets how long the pager flashes before shutting off.
• Choose 1 (1 Se .), 2 (30 Se .), 3 (Cont) or 4 (Beep) (Default is 5 minutes)
• Sele t vibration mode F1 (ON), F2 (OFF), F4 (EXIT)
2 (2: Beep Only) sets how many times the pager beeps before shutting off
• Choose 1 (Beep 3 Times), 2 (Beep Cont) and Press ENTER
• Adjust beep volume (Loud/Quiet) level F1 (UP), F2 (DN), F3 (HELP), F4 (EXIT)
• Sele t vibration mode F1 (ON), F2 (OFF), F4 (EXIT)
3 (3: Glow) sets how long the pager will glow before shutting off
• Choose 1 (Glow 15 Times), 2 (Glow 5 Minutes)
• Sele t vibration mode F1 (ON), F2 (OFF), F4 (EXIT)
Manager Pager (Non Alpha only) - Select:
1 (1: Vibrate) set the number of vibrations for the pager
• Choose 1 (Vib 1), 2 (Vib 2), 3 (Vib 3) (Default is 3)
2 (2: Beep) set how the pager will beep before shutting off
• Choose 1 (Beep 3 Times), 2 (Beep Cont) 3 (Look Down Mode) [look down requires a pager reset]
• Adjust beep volume (Loud/Quiet) level F1 (UP), F2 (DN), F3 (HELP), F4 (EXIT)
3 (3: Both) set the number of times the pager will beep and vibrate before shutting off
• Choose 1 (Vib/Beep 1), 2 (Vib/Beep 2), 3 (Vib/Beep 3)
• Adjust beep volume (Loud/Quiet) level F1 (UP), F2 (DN), F3 (HELP), F4 (EXIT)
Long Range Systems 15 T7 00A User Manual

Set to Page Staff or Guest Pagers
In ases where the unit will always be paging staff pagers, the transmitter default an be set to page either
Guest or Staff pagers. Fa tory default is Guest:
1. Press SETUP
2. Press F1 (MORE) until asked for the authorization ode
3. Type 5-6-7-8-9
4. Press F1 (MORE) until display shows 3: Default Mode
5. Sele t 3 (3: Default Mode)
6. Sele t F1 (Guest) for guest pager or F4 (Pager) for staff pager
Create Alpha Messages
If your staff pagers are Alphanumeri , they an display 77 different pre-set messages (numbered 000 through
076), and 22 additional user-defined messages of up to 32 hara ters per message (077 through 099).
1. Press SETUP
2. Press F1 (MORE) until asked for the authorization ode
3. Type 5-6-7-8-9
4. Press F1 (MORE) until the display shows (2: Canned Msgs) on the menu
5. Sele t 2 (2: Canned Msgs.)
6. At the Canned Msg.# s reen sele t F1 (EDIT) to edit message, (use (F2 (up) or F3 (dn) to s roll
through messages to edit)
7. At the Edit User Msg s reen press F1 (EDIT) to edit message or F2 (NEW) to write a new message
8. Enter the desired message using the number keys, waiting until the ursor moves between letters
(i.e. for letter ‘E’ press #2 twi e)
9. When finished, press ENTER to save
10. At the Edit User Msg s reen, press F1 (EDIT) to edit displayed message, F2 (NEW) to write a new
message or F4 (EXIT) to return to the Canned Msg.# display s reen
11. At the Canned Msg.# s reen, sele t F1 (EDIT) to edit displayed message, (F2 (up) or F3 (dn) to
s roll through messages to edit) or F4 (EXIT) to return to the main menu
Set Language
Setting the language will hange the Guest and Pager views and what messages are re eived by Alpha
Pagers.
1. Press Setup
2. Press F1 (MORE) until you are asked for the authorization ode
3. Now type 5-6-7-8-9
4. Press the F1 (MORE) until display shows 1: Set Language
5. Press 1 (1: Set Language)
6. Press F1 (NEXT) or F2 (PREV) to s roll through languages to sele t:
• English
• Fren h
• Spanish
• Italian
• Portuguese
• Polish
Long Range Systems 16 T7 00A User Manual

7. Press F4 (DONE) when done
Set Alarms
This fun tion is used to set the transmitter to page an individual or all STAFF pagers at a spe ifi time or on
a timed interval. The transmitter an send 10 different time alarms or periodi alarms. Alarms may be set
to page a spe ifi pager (or all pagers) at a spe ifi time every day.
1. Press Setup.
2. Press F1 (MORE) until asked for the authorization ode.
3. Type 5-6-7-8-9.
4. Press F1 (MORE) until display shows 1: Set ALARMS.
5. Sele t 1 (1: Set ALARMS).
6. From the Pi k Alarm menu, sele t the number of the alarm to set (0 through 9).
7. The Alarm Display s reen shows the status of the sele ted alarm. Sele t Change (F1) to en-
able/disable or modify the alarm.
Note: If the alarm is already enabled as an interval alarm:
• Press F1 (YES) to reset the timer and return to the paging menu.
• Press F4 (NO) to ontinue to the ON/OFF menu.
8. At Turn ON or OFF menu sele t F1 (ON) to enable the alarm or F2 (OFF) to disable the alarm.
9. At Set Pager Number menu, either:
• Enter the number of the pager to be alarmed followed by Enter.
Or
• Press F1 (KEEP) to use the existing number.
Note: Enterin pa er number 911 will pa e all Alpha pa ers.
10. At the Msg: prompt enter the message to send followed by Enter (see list of anned messages on
pg. 8)
Interval Alarms are alarms that re-page a staff pager at regular intervals.
1. At the Interval Alarm? menu sele t F1 (YES.)
2. Enter the desired time interval in hours and minutes (HH:MM) and Press Enter.
Timed Alarms are alarms that re-page a staff pager at a parti ular time every day.
1. At the Interval Alarm? menu, sele t F4 (NO).
2. At the Set Start Time menu enter the time for the alarm followed by Enter.
3. Sele t F1 (AM) or F4 (PM).
&
&
'
'
5
55
5,
,1
1
"
",
,1
1,
,5
5/
/4
43
30
06
6:
:,
,
View of Guest in
Frenc Language
View of Staff in
Frenc Language
Alp a Pager View of
Message 000 in
Frenc Language
1
10
0,
,3
39
9
5
52
2
0
05
5,
,:
:7
7
Long Range Systems 17 T7 00A User Manual

Set System Time/Date for Staff Pagers
The time on Alphanumeri pagers may be reset ea h time batteries are repla ed. The time/date may be reset
at ea h individual pager, or the time/date an be reset on all pagers simultaneously from the transmitter.
Set and Send Time/Date to all Staff Pagers: Be sure that all battery-powered pagers are on.
1. Press SETUP.
2. Press F1 (MORE) until display shows 1:Set Time/Date.
3. Press 1 (1: Set Time/Date.)
4. Press F1 (SET) to set time/date.
5. Enter Time (- -: - -) (e.g. 08:30) and press ENTER.
6. Press F1 (AM) or F4 (PM).
7. Enter Date (MM/DD/YY) (e.g. Mar 11, 2008 = 03/11/08) and press ENTER.
8. Press 1 (1: Send to Pager) to send time/date information to all staff pagers.
Long Range Systems 18 T7 00A User Manual

Maintenance Functions
Caution:The followin features are not normally adjusted unless directed by LRS.
Paging Types in Mixed Systems
When using different types of pagers, be sure that alphanumeri pagers are numbered higher than the non-
alphanumeri pagers.
Setting Crossover Points
This fun tion is used to set the rossover points where non-alphanumeri end and alphanumeri pagers
begin. Crossover points must be set using the following rules:
The default rossover point for Staff Pagers is 50.
• 50 and above are Alpha Pagers.
• Below 50 is for Star Pagers.
The default rossover point for Guest Pagers is 100.
• 1000 and above for Alpha Coasters.
• Below 1000 for Coaster Call and Paddle pagers (AdverTeaser).
To hange the rossover points:
1. Press Setup
2. Press F1 (MORE) until asked for the authorization ode
3. Type 5-6-7-8-9
4. Press F1 until the display shows 3: POCSAG Start on the menu
5. Press 3 (3: POCSAG Start)
6. For Staff Alpha Pagers, press the asso iated number key, press ENTER
Note: Choose number from 1 – 9999. Press ENTER to keep a default value - 50.
7. After a epting value, s reen will move to Guest Pagers.
8. For Guest Alpha Pagers, press the asso iated number key, press ENTER. Starting value from 1 – 9999.
System ID
The System ID is used to prevent interferen e when more than one paging system is in use in a small geo-
graphi al area (e.g., next door). USE ONLY AT THE DIRECTION OF LRS..
To set the ID:
1. Press Setup.
2. Press F1 (MORE) until you are asked for the authorization ode.
3. Now type 5-6-7-8-9.
4. Press the F1 (MORE) until the display shows 2: Set Rest ID.
5. Press the 2 (2: Set Rest ID).
6. When the display shows Rest ID = XXX (XXX is 0 - 999) enter the desired number.
7. Press the Enter key.
8. Press F1 (OK).
Note: If the transmitter ID is hanged you must also program the pagers to mat h.
!
Long Range Systems 19 T7 00A User Manual
Table of contents
Other Long Range Systems Transmitter manuals

Long Range Systems
Long Range Systems Butler XP Operating instructions

Long Range Systems
Long Range Systems LRS Connect TX-7471 User manual

Long Range Systems
Long Range Systems T74USB User manual

Long Range Systems
Long Range Systems T74C232 User manual

Long Range Systems
Long Range Systems T7470 User manual

Long Range Systems
Long Range Systems T9560 Multitouch User manual

Long Range Systems
Long Range Systems T9560 EZ User manual

Long Range Systems
Long Range Systems T9101 User manual

Long Range Systems
Long Range Systems T7460 User manual

Long Range Systems
Long Range Systems T7400 User manual