09
anual de Instalación / Installation Manual
www.lorenzetti.com.br
export@lorenzetti.com.br
S.A. IndústriasBrasileiras Eletrometalúrgicas
residente Wilson, 1230 - CEP 03107-901
Mooca - São Paulo - SP -
echo en Brasil / Made in Brazil
C.N.P.J. 61.413.282/0001-43
372484 REV. C
10 - RESOLUCIÓN DE PROBLEMAS / TROUBLESHOTTING
Problema / Problem Probable Causa
Possible Reason Solución / Solution
Agua no está caliente
lo suficiente
The water is
not hot enough
Reduzca el caudal via la llave de paso/grifo.
Reduce the flow rate via shower valve/tap.
Seleccione una posición más alta de temperatura.
Set the temperature selector at higher position.
Solicite la revisión de su instalación eléctrica a un electricista calificado
verificando el cableado (grosor) y el suministro de voltaje/amperaje a la
ducha.
Contact a qualified technician/electrician to review your electrical
installation by checking the cables/wiring conditions (thickness) and
voltage/amperage supply to the appliance.
El agua está muy caliente
The water is very hot
1) Aumente el caudal de agua o
2) Ajuste el selector de temperatura en la posición inferior
1) Increase the water rate via shower valve/tap orflow
2) Set the temperature selector at lower position
No sale agua.
No water running
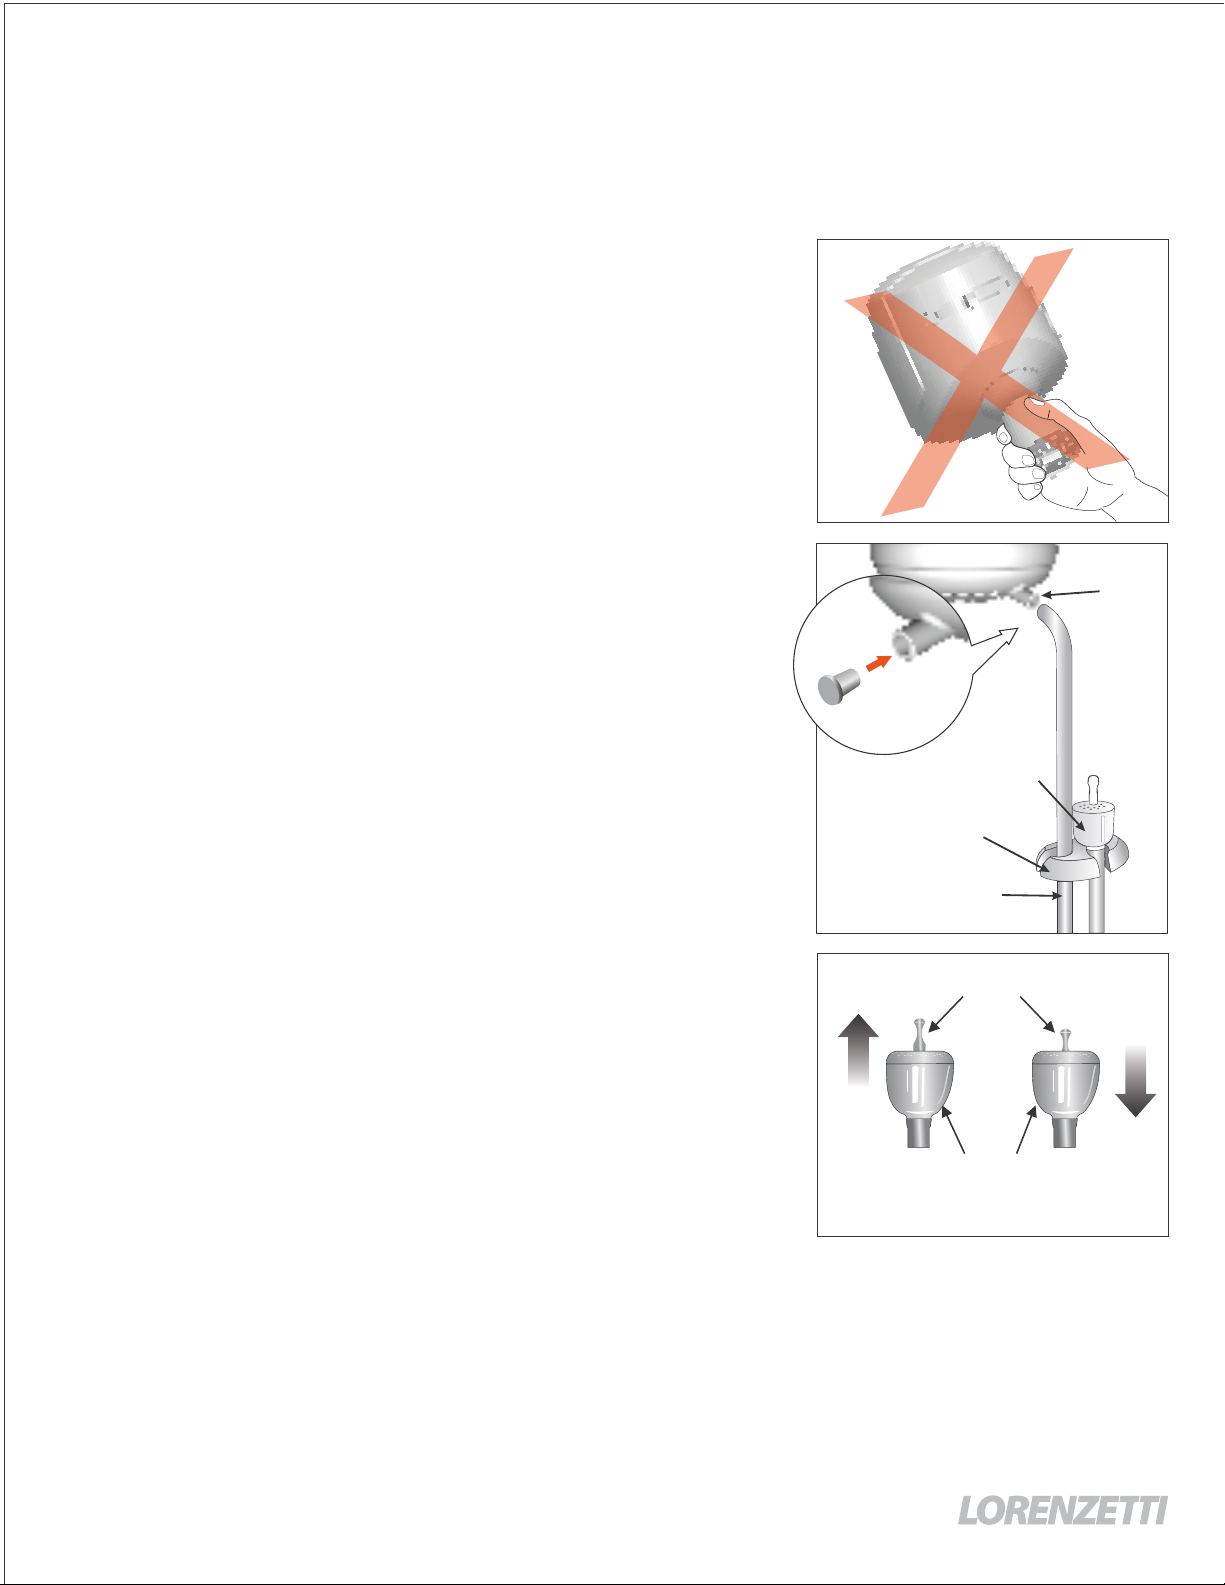
El esparcidor debe ser periódicamente limpio para
prevenir bloqueos de los agujeros
The jet spreader must be periodically clean to ensure no
blockage occurred on holes
Verifique si el grifo/válvula principal y/o de la ducha están abiertos.
Check if the Main and/or Shower Tap/Valve are open
Desconecte el disyuntor de la ducha y purgue las burbujas de aire.
Disconnect the power and Purge
out any air bubbles/pockets.
El agua está fría o el
aparato no funciona.
ater is cold or the
appliance is not working
Encienda el disyuntor o la ducha.
Turn the breaker or the shower on
Seleccione una posición más alta de temperatura
Set the temperature selector at higher position
Sustituya la resistencia de la ducha.
Replace the Heating Element.
El disyuntor está
desarmando.
The circuit
breaker is tripping off
Adecuar el sistema de puesta a tierra consultando un electricista calificado.
Fix the grounding system by consulting a qualified electrician
Conexión eléctrica compartida con otro aparato
Sharing electrical connection with another
appliance.
Providenciar una instalación exclusiva y dimensionada para el aparato.
Provide an exclusive and sized installation for the appliance
Goteo después del cierre
de la llave
ater drip after shut the
shower tap off
Flujo natural de agua almacenada
dentro del producto después de su uso
Natural flow of water stored
inside the appliance after use.
Al final del baño, cierre la llave, abra la ducha manual y deje correr
el agua. Después de este procedimiento, cierre la ducha manual
At the end of the bath, close the shower tap, open the hand shower
and let all the water run out. After this, shut the hand shower off
Alto flujo de agua / High water flow
Muy baja temperatura de entrada del agua.
Very low temperature of the incoming water
Posición baja del selector de temperatura.
Low setting temperature position
Mal funcionamiento de la
instalación eléctrica (suministro de voltaje)
Electrical Installation
Malfunction (voltage supply)
Bajo caudal de agua / Low water flow
Obstrucción del esparcidor de agua.
Jet spreader blockage
No hay suministro de agua.
No water supply
Aire dentro de la tubería.
Air inside the pipe
El disyuntor o la ducha están apagados
Circuit Breaker or Shower are turned off
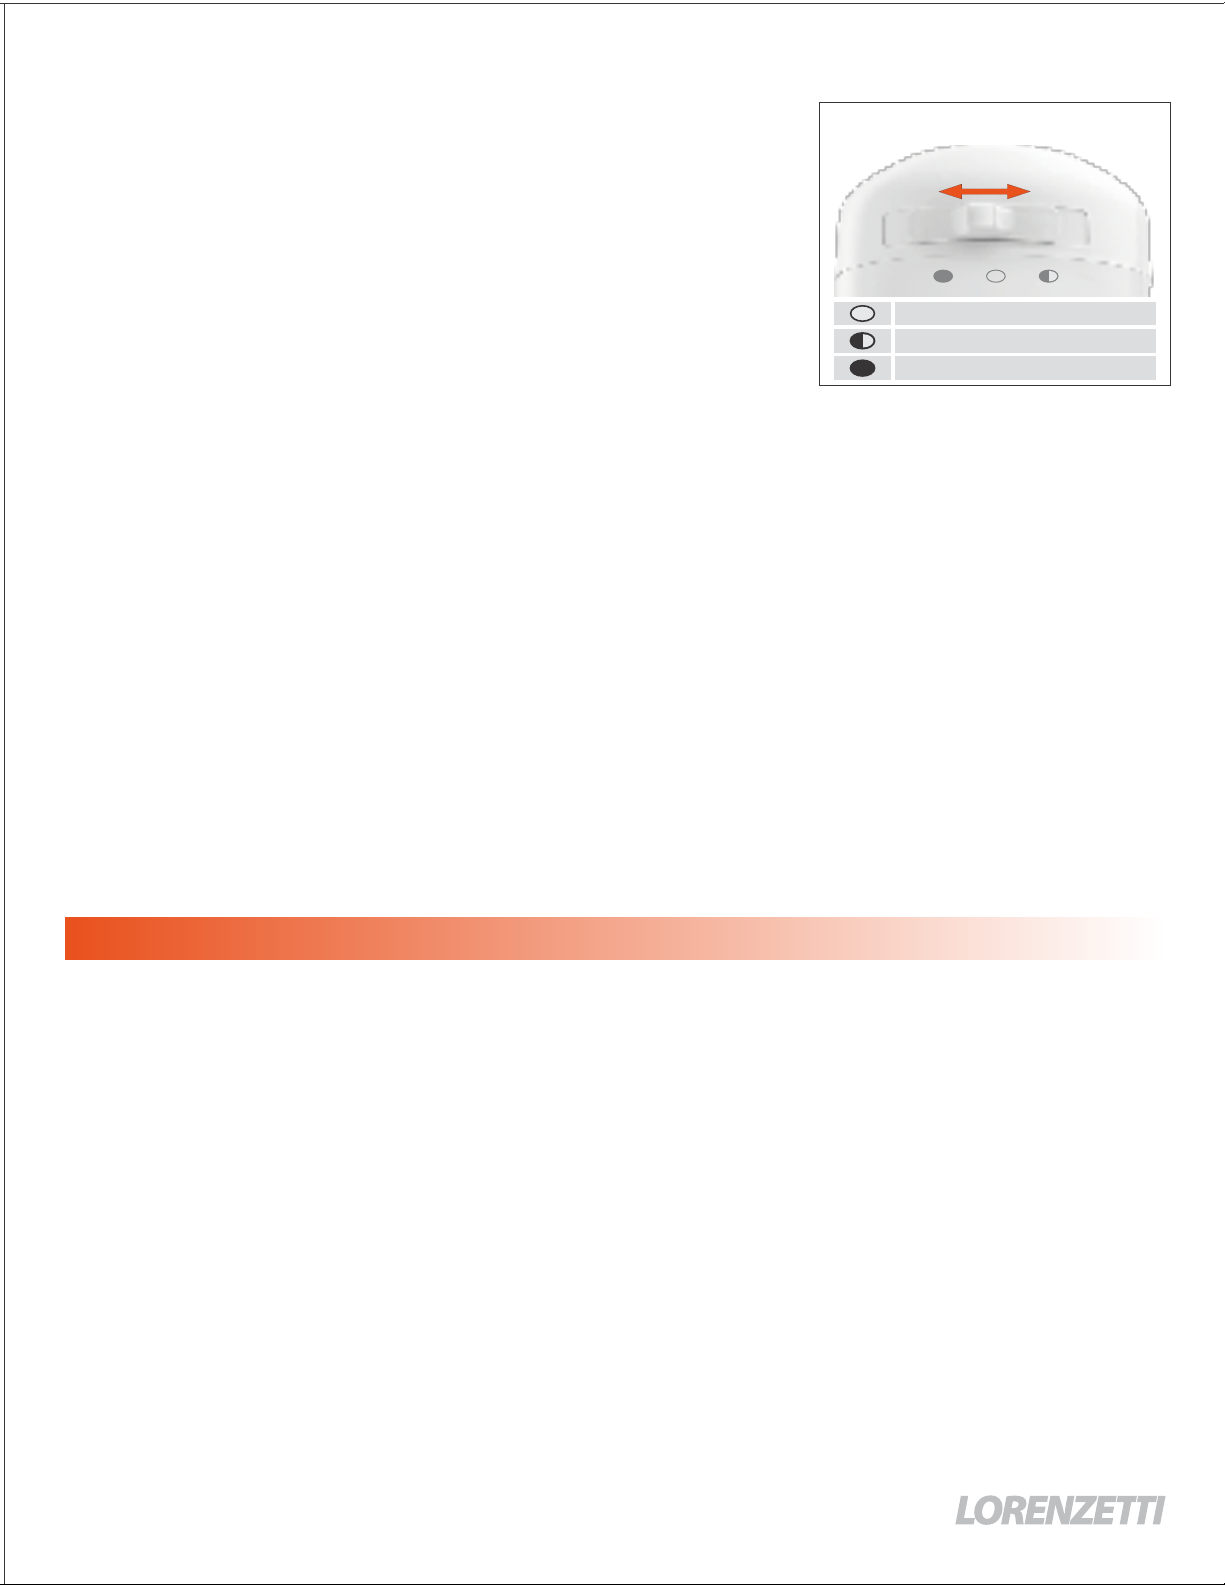
Posición desconectada del
selector de temperatura.
Off Position of the temperature selector.
Resistencia Electrica quemada (*)
Burning of the heating element (*)
Sistema de puesta a tierra inadecuado
Failing of the grounding system
En caso de daño a los cables de alimentación del aparato, no los reemplace. Consulte el servicio técnico.
The supply cord must not be replaced by the consumer. If the cord is damaged, take the appliance to technical service.
(*) 1) Desgaste natural debido al uso normal. La calidad del agua impacta considerablemente en la longevidad de la resistencia.
ear due to normal use. Water quality impacts considerably on the element’s longevity.
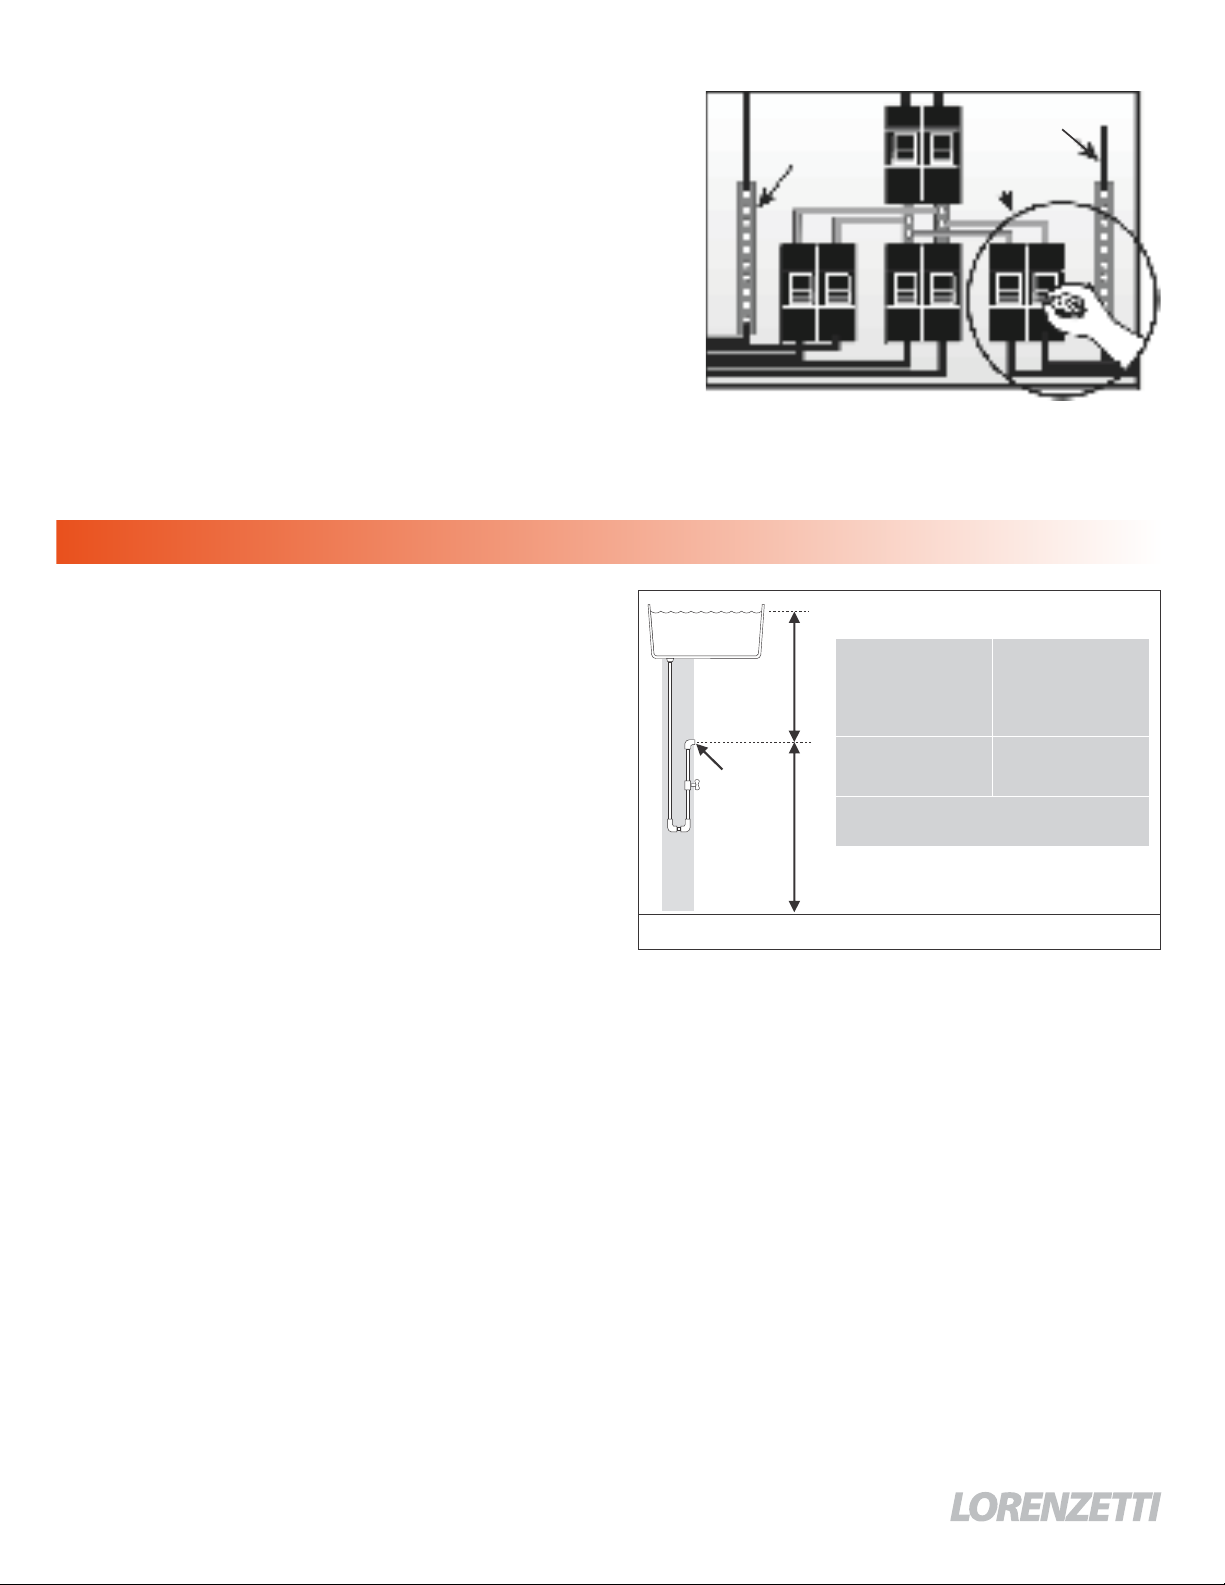
Nunca intente instalar, desarmar, inspeccionar o reparar el aparato sin antes desconectar la alimentación eléctrica del aparato por medio del disyuntor exclusivo en el tablero eléctrico.
Never attempt to install, disassemble, inspect or repair the appliance without first shutting off all power to the unit by means of the circuit breaker on the main electrical switchboard.
2) Quema prematura debido a fallas en la instalación eléctrica o por falta de agua en la cámara de calentamiento (consulte la tabla de resolución anterior).
2) Premature burning due to electrical installation malfunction or lack of water in the heating chamber (see previous solution chart).
3) Ninguno de los puntos arriba está cubierto por la garantía.
3) None of the points above is warranty covered.
09
anual de Instalación / Installation Manual
www.lorenzetti.com.br
export@lorenzetti.com.br
etti S.A. IndústriasBrasileiras Eletrometalúrgicas
. Presidente Wilson, 1230 - CEP 03107-901
Mooca - São Paulo - SP -
echo en Brasil / Made in Brazil
C.N.P.J. 61.413.282/0001-43
372484 REV. C
10 - RESOLUCIÓN DE PROBLEMAS / TROUBLESHOTTING
Problema / Problem Probable Causa
Possible Reason Solución / Solution
Agua no está caliente
lo suficiente
The water is
not hot enough
Reduzca el caudal via la llave de paso/grifo.
Reduce the flow rate via shower valve/tap.
Seleccione una posición más alta de temperatura.
Set the temperature selector at higher position.
Solicite la revisión de su instalación eléctrica a un electricista calificado
verificando el cableado (grosor) y el suministro de voltaje/amperaje a la
ducha.
Contact a qualified technician/electrician to review your electrical
installation by checking the cables/wiring conditions (thickness) and
voltage/amperage supply to the appliance.
El agua está muy caliente
The water is very hot
1) Aumente el caudal de agua o
2) Ajuste el selector de temperatura en la posición inferior
1) Increase the water rate via shower valve/tap orflow
2) Set the temperature selector at lower position
No sale agua.
No water running
El esparcidor debe ser periódicamente limpio para
prevenir bloqueos de los agujeros
The jet spreader must be periodically clean to ensure no
blockage occurred on holes
Verifique si el grifo/válvula principal y/o de la ducha están abiertos.
Check if the Main and/or Shower Tap/Valve are open
Desconecte el disyuntor de la ducha y purgue las burbujas de aire.
Disconnect the power and Purge
out any air bubbles/pockets.
El agua está fría o el
aparato no funciona.
ater is cold or the
appliance is not working
Encienda el disyuntor o la ducha.
Turn the breaker or the shower on
Seleccione una posición más alta de temperatura
Set the temperature selector at higher position
Sustituya la resistencia de la ducha.
Replace the Heating Element.
El disyuntor está
desarmando.
The circuit
breaker is tripping off
Adecuar el sistema de puesta a tierra consultando un electricista calificado.
Fix the grounding system by consulting a qualified electrician
Conexión eléctrica compartida con otro aparato
Sharing electrical connection with another
appliance.
Providenciar una instalación exclusiva y dimensionada para el aparato.
Provide an exclusive and sized installation for the appliance
Goteo después del cierre
de la llave
ater drip after shut the
shower tap off
Flujo natural de agua almacenada
dentro del producto después de su uso
Natural flow of water stored
inside the appliance after use.
Al final del baño, cierre la llave, abra la ducha manual y deje correr
el agua. Después de este procedimiento, cierre la ducha manual
At the end of the bath, close the shower tap, open the hand shower
and let all the water run out. After this, shut the hand shower off
Alto flujo de agua / High water flow
Muy baja temperatura de entrada del agua.
Very low temperature of the incoming water
Posición baja del selector de temperatura.
Low setting temperature position
Mal funcionamiento de la
instalación eléctrica (suministro de voltaje)
Electrical Installation
Malfunction (voltage supply)
Bajo caudal de agua / Low water flow
Obstrucción del esparcidor de agua.
Jet spreader blockage
No hay suministro de agua.
No water supply
Aire dentro de la tubería.
Air inside the pipe
El disyuntor o la ducha están apagados
Circuit Breaker or Shower are turned off
Posición desconectada del
selector de temperatura.
Off Position of the temperature selector.
Resistencia Electrica quemada (*)
Burning of the heating element (*)
Sistema de puesta a tierra inadecuado
Failing of the grounding system
En caso de daño a los cables de alimentación del aparato, no los reemplace. Consulte el servicio técnico.
The supply cord must not be replaced by the consumer. If the cord is damaged, take the appliance to technical service.
(*) 1) Desgaste natural debido al uso normal. La calidad del agua impacta considerablemente en la longevidad de la resistencia.
ear due to normal use. Water quality impacts considerably on the element’s longevity.
Nunca intente instalar, desarmar, inspeccionar o reparar el aparato sin antes desconectar la alimentación eléctrica del aparato por medio del disyuntor exclusivo en el tablero eléctrico.
Never attempt to install, disassemble, inspect or repair the appliance without first shutting off all power to the unit by means of the circuit breaker on the main electrical switchboard.
2) Quema prematura debido a fallas en la instalación eléctrica o por falta de agua en la cámara de calentamiento (consulte la tabla de resolución anterior).
2) Premature burning due to electrical installation malfunction or lack of water in the heating chamber (see previous solution chart).
3) Ninguno de los puntos arriba está cubierto por la garantía.
3) None of the points above is warranty covered.
09
Manual de Instalación / Installation Manual
www.lorenzetti.com.br
export@lorenzetti.com.br
orenzetti S.A. IndústriasBrasileiras Eletrometalúrgicas
Av. Presidente Wilson, 1230- CEP 03107-901
Mooca - São Paulo - SP -
Hecho en Brasil/ Made in Brazil
C.N.P.J. 61.413.282/0001-43
372484 REV. C
10 - RESOLUCIÓN DE PROBLEMAS / TROUBLESHOTTING
Problema / Problem Probable Causa
Possible Reason Solución / Solution
Agua no está caliente
lo suficiente
The water is
not hot enough
Reduzca el caudal via la llave de paso/grifo.
Reduce the flow rate via shower valve/tap.
Seleccione una posición más alta de temperatura.
Set the temperature selector at higher position.
Solicite la revisión de su instalación eléctrica a un electricista calificado
verificando el cableado (grosor) y el suministro de voltaje/amperaje a la
ducha.
Contact a qualified technician/electrician to review your electrical
installation by checking the cables/wiring conditions (thickness) and
voltage/amperage supply to the appliance.
El agua está muy caliente
The water is very hot
1) Aumente el caudal de agua o
2) Ajuste el selector de temperatura en la posición inferior
1) Increase the water rate via shower valve/tap orflow
2) Set the temperature selector at lower position
No sale agua.
No water running
El esparcidor debe ser periódicamente limpio para
prevenir bloqueos de los agujeros
The jet spreader must be periodically clean to ensure no
blockage occurred on holes
Verifique si el grifo/válvula principal y/o de la ducha están abiertos.
Check if the Main and/or Shower Tap/Valve are open
Desconecte el disyuntor de la ducha y purgue las burbujas de aire.
Disconnect the power and Purge
out any air bubbles/pockets.
El agua está fría o el
aparato no funciona.
Water is cold or the
appliance is not working
Encienda el disyuntor o la ducha.
Turn the breaker or the shower on
Seleccione una posición más alta de temperatura
Set the temperature selector at higher position
Sustituya la resistencia de la ducha.
Replace the Heating Element.
El disyuntor está
desarmando.
The circuit
breaker is tripping off
Adecuar el sistema de puesta a tierra consultando un electricista calificado.
Fix the grounding system by consulting a qualified electrician
Conexión eléctrica compartida con otro aparato
Sharing electrical connection with another
appliance.
Providenciar una instalación exclusiva y dimensionada para el aparato.
Provide an exclusive and sized installation for the appliance
Goteo después del cierre
de la llave
Water drip after shut the
shower tap off
Flujo natural de agua almacenada
dentro del producto después de su uso
Natural flow of water stored
inside the appliance after use.
Al final del baño, cierre la llave, abra la ducha manual y deje correr
el agua. Después de este procedimiento, cierre la ducha manual
At the end of the bath, close the shower tap, open the hand shower
and let all the water run out. After this, shut the hand shower off
Alto flujo de agua / High water flow
Muy baja temperatura de entrada del agua.
Very low temperature of the incoming water
Posición baja del selector de temperatura.
Low setting temperature position
Mal funcionamiento de la
instalación eléctrica (suministro de voltaje)
Electrical Installation
Malfunction (voltage supply)
Bajo caudal de agua / Low water flow
Obstrucción del esparcidor de agua.
Jet spreader blockage
No hay suministro de agua.
No water supply
Aire dentro de la tubería.
Air inside the pipe
El disyuntor o la ducha están apagados
Circuit Breaker or Shower are turned off
Posición desconectada del
selector de temperatura.
Off Position of the temperature selector.
Resistencia Electrica quemada (*)
Burning of the heating element (*)
Sistema de puesta a tierra inadecuado
Failing of the grounding system
En caso de daño a los cables de alimentación del aparato, no los reemplace. Consulte el servicio técnico.
The supply cord must not be replaced by the consumer. If the cord is damaged, take the appliance to technical service.
(*) 1) Desgaste natural debido al uso normal. La calidad del agua impacta considerablemente en la longevidad de la resistencia.
1) Wear due to normal use. Water quality impacts considerably on the element’s longevity.
Nunca intente instalar, desarmar, inspeccionar o reparar el aparato sin antes desconectar la alimentación eléctrica del aparato por medio del disyuntor exclusivo en el tablero eléctrico.
Never attempt to install, disassemble, inspect or repair the appliance without first shutting off all power to the unit by means of the circuit breaker on the main electrical switchboard.
2) Quema prematura debido a fallas en la instalación eléctrica o por falta de agua en la cámara de calentamiento (consulte la tabla de resolución anterior).
2) Premature burning due to electrical installation malfunction or lack of water in the heating chamber (see previous solution chart).
3) Ninguno de los puntos arriba está cubierto por la garantía.
3) None of the points above is warranty covered.
09
Manual de Instalación / Installation Manual
www.lorenzetti.com.br
export@lorenzetti.com.br
Lorenzetti S.A. IndústriasBrasileiras Eletrometalúrgicas
Av. Presidente Wilson, 1230 - CEP 03107-901
Mooca - São Paulo - SP -
Hecho en Brasil / Made in Brazil
C.N.P.J. 61.413.282/0001-43
372484 REV. C
10 - RESOLUCIÓN DE PROBLEMAS / TROUBLESHOTTING
Problema / Problem Probable Causa
Possible Reason Solución / Solution
Agua no está caliente
lo suficiente
The water is
not hot enough
Reduzca el caudal via la llave de paso/grifo.
Reduce the flow rate via shower valve/tap.
Seleccione una posición más alta de temperatura.
Set the temperature selector at higher position.
Solicite la revisión de su instalación eléctrica a un electricista calificado
verificando el cableado (grosor) y el suministro de voltaje/amperaje a la
ducha.
Contact a qualified technician/electrician to review your electrical
installation by checking the cables/wiring conditions (thickness) and
voltage/amperage supply to the appliance.
El agua está muy caliente
The water is very hot
1) Aumente el caudal de agua o
2) Ajuste el selector de temperatura en la posición inferior
1) Increase the water rate via shower valve/tap orflow
2) Set the temperature selector at lower position
No sale agua.
No water running
El esparcidor debe ser periódicamente limpio para
prevenir bloqueos de los agujeros
The jet spreader must be periodically clean to ensure no
blockage occurred on holes
Verifique si el grifo/válvula principal y/o de la ducha están abiertos.
Check if the Main and/or Shower Tap/Valve are open
Desconecte el disyuntor de la ducha y purgue las burbujas de aire.
Disconnect the power and Purge
out any air bubbles/pockets.
El agua está fría o el
aparato no funciona.
Water is cold or the
appliance is not working
Encienda el disyuntor o la ducha.
Turn the breaker or the shower on
Seleccione una posición más alta de temperatura
Set the temperature selector at higher position
Sustituya la resistencia de la ducha.
Replace the Heating Element.
El disyuntor está
desarmando.
The circuit
breaker is tripping off
Adecuar el sistema de puesta a tierra consultando un electricista calificado.
Fix the grounding system by consulting a qualified electrician
Conexión eléctrica compartida con otro aparato
Sharing electrical connection with another
appliance.
Providenciar una instalación exclusiva y dimensionada para el aparato.
Provide an exclusive and sized installation for the appliance
Goteo después del cierre
de la llave
Water drip after shut the
shower tap off
Flujo natural de agua almacenada
dentro del producto después de su uso
Natural flow of water stored
inside the appliance after use.
Al final del baño, cierre la llave, abra la ducha manual y deje correr
el agua. Después de este procedimiento, cierre la ducha manual
At the end of the bath, close the shower tap, open the hand shower
and let all the water run out. After this, shut the hand shower off
Alto flujo de agua / High water flow
Muy baja temperatura de entrada del agua.
Very low temperature of the incoming water
Posición baja del selector de temperatura.
Low setting temperature position
Mal funcionamiento de la
instalación eléctrica (suministro de voltaje)
Electrical Installation
Malfunction (voltage supply)
Bajo caudal de agua / Low water flow
Obstrucción del esparcidor de agua.
Jet spreader blockage
No hay suministro de agua.
No water supply
Aire dentro de la tubería.
Air inside the pipe
El disyuntor o la ducha están apagados
Circuit Breaker or Shower are turned off
Posición desconectada del
selector de temperatura.
Off Position of the temperature selector.
Resistencia Electrica quemada (*)
Burning of the heating element (*)
Sistema de puesta a tierra inadecuado
Failing of the grounding system
En caso de daño a los cables de alimentación del aparato, no los reemplace. Consulte el servicio técnico.
The supply cord must not be replaced by the consumer. If the cord is damaged, take the appliance to technical service.
(*) 1) Desgaste natural debido al uso normal. La calidad del agua impacta considerablemente en la longevidad de la resistencia.
1) Wear due to normal use. Water quality impacts considerably on the element’s longevity.
Nunca intente instalar, desarmar, inspeccionar o reparar el aparato sin antes desconectar la alimentación eléctrica del aparato por medio del disyuntor exclusivo en el tablero eléctrico.
Never attempt to install, disassemble, inspect or repair the appliance without first shutting off all power to the unit by means of the circuit breaker on the main electrical switchboard.
2) Quema prematura debido a fallas en la instalación eléctrica o por falta de agua en la cámara de calentamiento (consulte la tabla de resolución anterior).
2) Premature burning due to electrical installation malfunction or lack of water in the heating chamber (see previous solution chart).
3) Ninguno de los puntos arriba está cubierto por la garantía.
3) None of the points above is warranty covered.
09
Manual de Instalación / Installation Manual
Lorenzetti S.A. IndústriasBrasileiras Eletrometalúrgicas
Av. Presidente Wilson, 1230- CEP 03107-901
Mooca - São Paulo - SP -
Hecho en Brasil / Made in Brazil
C.N.P.J. 61.413.282/0001-43
10 - RESOLUCIÓN DE PROBLEMAS / TROUBLESHOTTING
Problema / Problem Probable Causa
Possible Reason Solución / Solution
Agua no está caliente
lo suficiente
The water is
not hot enough
Reduzca el caudal via la llave de paso/grifo.
Reduce the flow rate via shower valve/tap.
Seleccione una posición más alta de temperatura.
Set the temperature selector at higher position.
Solicite la revisión de su instalación eléctrica a un electricista calificado
verificando el cableado (grosor) y el suministro de voltaje/amperaje a la
ducha.
Contact a qualified technician/electrician to review your electrical
installation by checking the cables/wiring conditions (thickness) and
voltage/amperage supply to the appliance.
El agua está muy caliente
The water is very hot
1) Aumente el caudal de agua o
2) Ajuste el selector de temperatura en la posición inferior
1) Increase the water rate via shower valve/tap orflow
2) Set the temperature selector at lower position
No sale agua.
No water running
El esparcidor debe ser periódicamente limpio para
prevenir bloqueos de los agujeros
The jet spreader must be periodically clean to ensure no
blockage occurred on holes
Verifique si el grifo/válvula principal y/o de la ducha están abiertos.
Check if the Main and/or Shower Tap/Valve are open
Desconecte el disyuntor de la ducha y purgue las burbujas de aire.
Disconnect the power and Purge
out any air bubbles/pockets.
El agua está fría o el
aparato no funciona.
Water is cold or the
appliance is not working
Encienda el disyuntor o la ducha.
Turn the breaker or the shower on
Seleccione una posición más alta de temperatura
Set the temperature selector at higher position
Sustituya la resistencia de la ducha.
Replace the Heating Element.
El disyuntor está
desarmando.
The circuit
breaker is tripping off
Adecuar el sistema de puesta a tierra consultando un electricista calificado.
Fix the grounding system by consulting a qualified electrician
Conexión eléctrica compartida con otro aparato
Sharing electrical connection with another
appliance.
Providenciar una instalación exclusiva y dimensionada para el aparato.
Provide an exclusive and sized installation for the appliance
Goteo después del cierre
de la llave
Water drip after shut the
shower tap off
Flujo natural de agua almacenada
dentro del producto después de su uso
Natural flow of water stored
inside the appliance after use.
Al final del baño, cierre la llave, abra la ducha manual y deje correr
el agua. Después de este procedimiento, cierre la ducha manual
At the end of the bath, close the shower tap, open the hand shower
and let all the water run out. After this, shut the hand shower off
Alto flujo de agua / High water flow
Muy baja temperatura de entrada del agua.
Very low temperature of the incoming water
Posición baja del selector de temperatura.
Low setting temperature position
Mal funcionamiento de la
instalación eléctrica (suministro de voltaje)
Electrical Installation
Malfunction (voltage supply)
Bajo caudal de agua /Low water flow
Obstrucción del esparcidor de agua.
Jet spreader blockage
No hay suministro de agua.
No water supply
Aire dentro de la tubería.
Air inside the pipe
El disyuntor o la ducha están apagados
Circuit Breaker or Shower are turned off
Posición desconectada del
selector de temperatura.
Off Position of the temperature selector.
Resistencia Electrica quemada (*)
Burning of the heating element (*)
Sistema de puesta a tierra inadecuado
Failing of the grounding system
En caso de daño a los cables de alimentación del aparato, no los reemplace. Consulte el servicio técnico.
The supply cord must not be replaced by the consumer. If the cord is damaged, take the appliance to technical service.
(*) 1) Desgaste natural debido al uso normal. La calidad del agua impacta considerablemente en la longevidad de la resistencia.
1) Wear due to normal use. Water quality impacts considerably on the element’s longevity.
Nunca intente instalar, desarmar, inspeccionar o reparar el aparato sin antes desconectar la alimentación eléctrica del aparato por medio del disyuntor exclusivo en el tablero eléctrico.
Never attempt to install, disassemble, inspect or repair the appliance without first shutting off all power to the unit by means of the circuit breaker on the main electrical switchboard.
2) Quema prematura debido a fallas en la instalación eléctrica o por falta de agua en la cámara de calentamiento (consulte la tabla de resolución anterior).
2) Premature burning due to electrical installation malfunction or lack of water in the heating chamber (see previous solution chart).
3) Ninguno de los puntos arriba está cubierto por la garantía.
3) None of the points above is warranty covered.