Lorex Live LW200 User manual

VIDEO BABY MONITOR
USER’S GUIDE
ENGLISH VERSION 1.0
www.lorextechnology.com
LW200

0
Welcome!
Thank you for purchasing this Lorex LIVE video monitor. This
manual covers the following models:
• LW200
Before you start...
Please make sure to charge the handheld monitor and
camera(s) before use. See the Quick Start Guide or “Getting
Started” on page 5 for instructions.
Contents
Make sure you have the following:
• 1x Handheld monitor
• 1x Camera*
• 1x Rechargeable Li-Ion battery for the handheld monitor
• 1x Camera power adapter*
• 1x Handheld monitor power adapter
• 1x Camera mounting kit*
• 1x User’s Guide
• 1x Quick Start Guide
* Contents may vary by model.

i
English
Safety Instructions
WARNING
This baby monitor is compliant with all relevant standards
regarding electromagnetic fields and is, when handled as
described in the User’s Guide, safe to use. Therefore, always
read the instructions in this User’s Guide carefully before using
the device.
• Adult assembly is required. Keep small parts away from children
when assembling.
• This product is not a toy. Do not allow children to play with it.
• This video monitor is not a substitute for responsible adult
supervision.
• Do not place the camera or cords in the cot or within arm's reach
of the baby (the unit and cords should be at least 3ft / 1m away).
• Keep the cords out of reach of children.
• Do not cover the video monitor with a towel or blanket.
• Never use extension cords with power adapters.
• Test the video monitor before use. Become familiar with its
functions.
• Do not use the video monitor near water.
• Do not install the video monitor near a heat source.
• Only use the chargers and power adapters provided. Do not use
other chargers or power adapters as this may damage the device
and battery pack.
• Only insert battery pack of the same type.
• Do not touch the plug contacts with sharp or metal objects.
• Keep this User’s Guide for future reference.
CAUTION
Risk of explosion if battery is replaced by an incorrect type.
Dispose of used batteries according to the instructions.

ii
To Avoid Injury to Children/Infants:
We advise you to take the following precautions to avoid
possible injury to infants:
• DO NOT place baby audio and video camera monitors too
close to cribs, bassinets, play yards, and other safe sleep
environments for infants.
• MAKE SURE to run all power adapter cords where they are
unlikely to be tripped over and are out of arms reach of your
infant. Keep them at least 3ft / 1m away.
• MAKE SURE baby audio and video camera monitors are on
a stable footing so they cannot be easily knocked over.
NOTE: These precautions are important even if your infant is
not yet standing or mobile
3ft / 1m
.

iii
TABLE OF CONTENTS
English
1. Handheld Monitor Overview . . . . . . . . . . . . . . . . . . . . . . 1
2. Camera Overview . . . . . . . . . . . . . . . . . . . . . . . . . . . . . . . 4
3. Getting Started . . . . . . . . . . . . . . . . . . . . . . . . . . . . . . . . . 5
3.1 Charging the Camera . . . . . . . . . . . . . . . . . . . . . . . . . . . . . . . . . . .5
3.2 Installing the Handheld Monitor Battery . . . . . . . . . . . . . . . . . . .6
3.3 Charging the Handheld Monitor . . . . . . . . . . . . . . . . . . . . . . . . . .7
4. Positioning The Camera. . . . . . . . . . . . . . . . . . . . . . . . . . 8
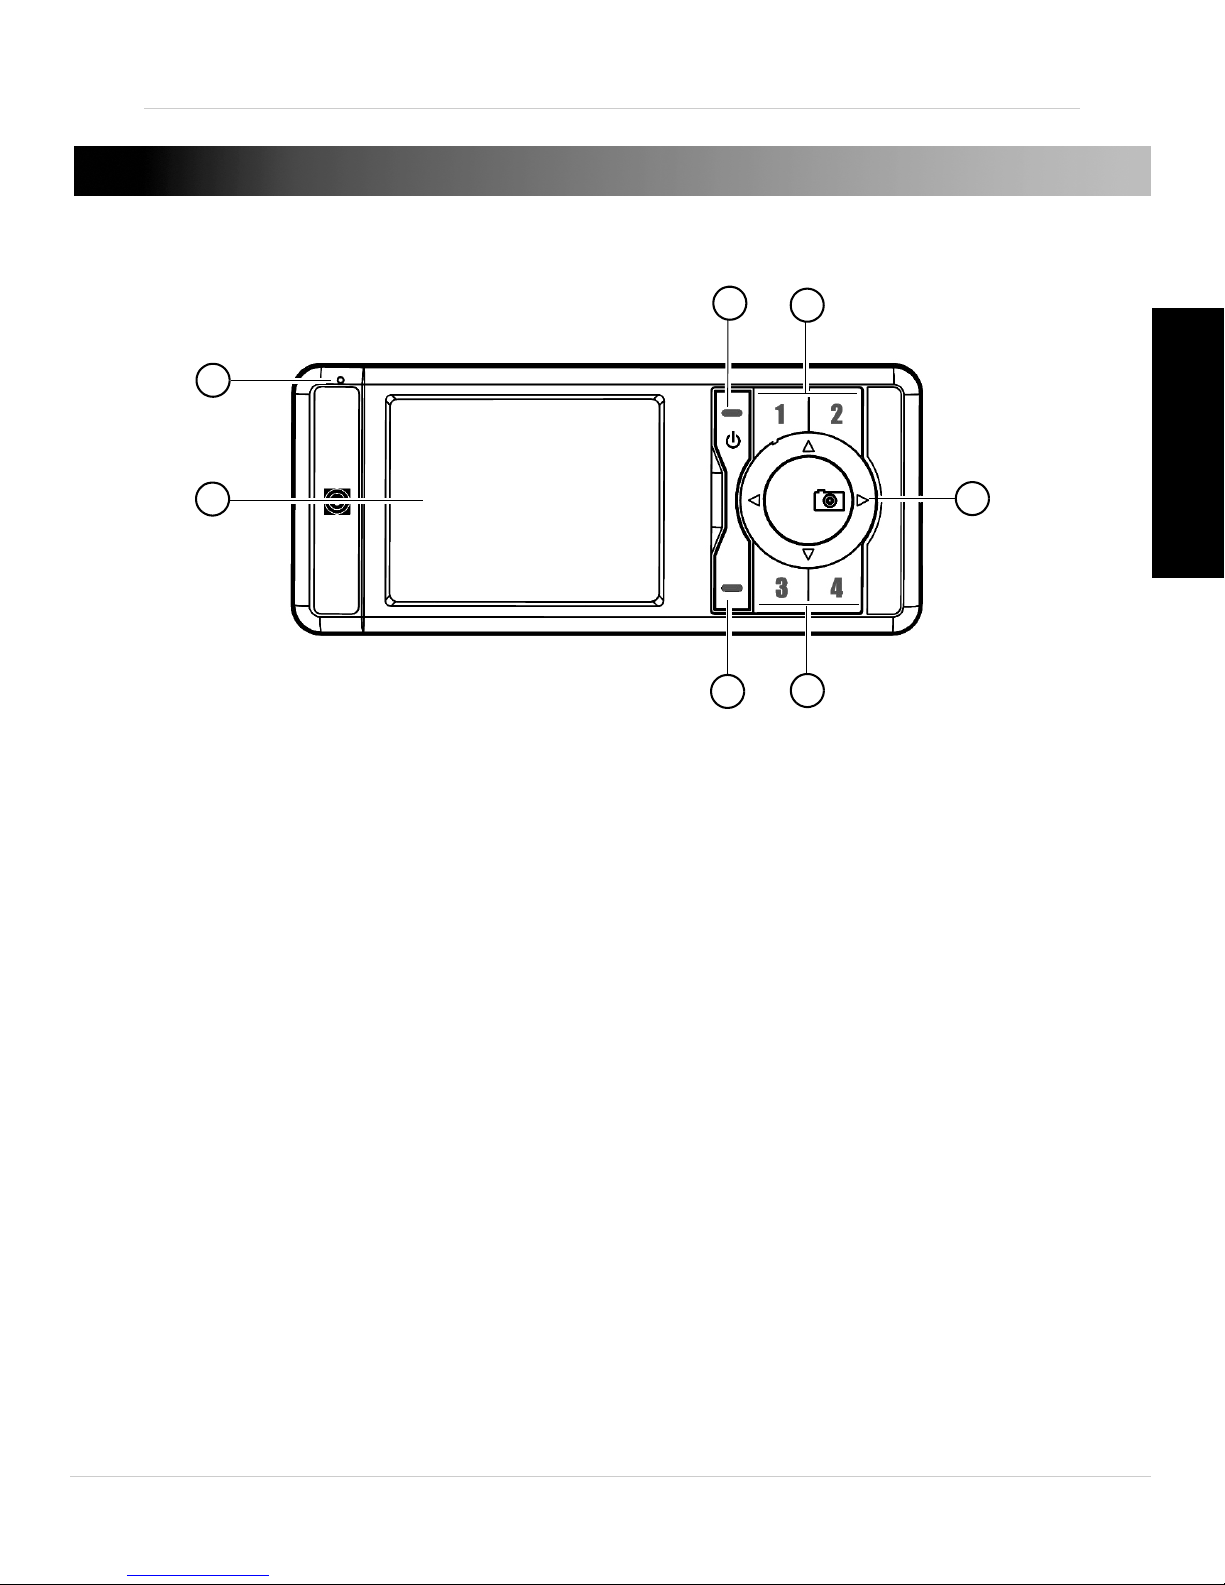
5. Using the Handheld Monitor . . . . . . . . . . . . . . . . . . . . . . 9
5.1 Changing Camera Views . . . . . . . . . . . . . . . . . . . . . . . . . . . . . . . .9
5.2 Adjusting the Volume . . . . . . . . . . . . . . . . . . . . . . . . . . . . . . . . . . .9
5.3 Adjusting Screen Brightness . . . . . . . . . . . . . . . . . . . . . . . . . . . . .9
5.4 Configuring the Power Save Feature . . . . . . . . . . . . . . . . . . . . .10
6. Snapshot and Video Recording . . . . . . . . . . . . . . . . . . . 11
6.1 Inserting or Removing the microSD Card . . . . . . . . . . . . . . . . .11
6.2 Taking a Snapshot . . . . . . . . . . . . . . . . . . . . . . . . . . . . . . . . . . . .12
6.3 Recording Video . . . . . . . . . . . . . . . . . . . . . . . . . . . . . . . . . . . . . .13
6.4 Viewing Pictures and Videos on your Handheld Monitor . . . . .14
6.5 Opening Images and Videos on Mac or PC . . . . . . . . . . . . . . . . .15
7. Pairing Up Cameras . . . . . . . . . . . . . . . . . . . . . . . . . . . . 16
8. Help. . . . . . . . . . . . . . . . . . . . . . . . . . . . . . . . . . . . . . . . . . 17
9. Cleaning and Disposal . . . . . . . . . . . . . . . . . . . . . . . . . . 19
9.1 Cleaning . . . . . . . . . . . . . . . . . . . . . . . . . . . . . . . . . . . . . . . . . . . .19
9.2 Disposal of the Device . . . . . . . . . . . . . . . . . . . . . . . . . . . . . . . . .19
10. Notices . . . . . . . . . . . . . . . . . . . . . . . . . . . . . . . . . . . . . . 20
11. Wall Mounting the Camera . . . . . . . . . . . . . . . . . . . . . 21

iv

1
English
1. HANDHELD MONITOR OVERVIEW
1
2
35
45
6
1. Power LED: Glows green to indicate handheld monitor is powered on.
2. Display: Displays video from the camera(s).
3. Power / OK: Press and hold to turn handheld monitor ON/OFF. Press
to confirm certain menu options.
4. Menu button: Press to open/close the menu.
5. Camera buttons: Press to select cameras 1~4.
6. Directional buttons:
•Right / Snapshot: Presstochangesettingsinthe menu. Whileviewing,
press to take a photo snapshot. Press and hold to record video; press
again to stop recording. A microSD card is required (not included) for
snapshot or video recording.
•Up/Increasevolume:Presstoscrollupinthemenu. Presstoincrease
volume.
• Left: Press to change settings in the menu.
• Down / Decrease Volume: Press to scroll down in the menu. Press to
decrease volume.

2
Handheld Monitor Overview
7.
7
9
8
10
microSD memory slot: Insert a microSD memory card (not included)
to enable snapshot and video recording. The handheld monitor
supports microSD cards up to a maximum size of 16GB.
8. Battery cover: Press firmly and slide to remove battery cover.
9. Speaker: Allows you to listen to audio from the camera.
10.Power adapter port: Connect the included power adapter to charge
the battery.

3
Handheld Monitor Overview
English
Icons Overview
Reading the battery indicator
Reading the signal indicator
NOTE:
If your handheld monitor displays "CAMERA NOT DETECTED":
• The camera may be out of range. Try placing the camera and handheld
monitor closer together.
• The camera may be out of batteries or off. Check the camera power
switch and connect the camera power adapter.
• For more details, see “Help” on page 17.
11
Battery life
indicator
Charging indicator
Audio indicator
Power Save mode
Camera signal strength
Camera number
Low battery Full battery
Low signal Full signal

4
Camera Overview
2. CAMERA OVERVIEW
8
1
2
46
7
5
3
1. Status LED: Glows green to indicate camera is active.
2. Charging LED:Glows red to indicate camera is charging.
3. Infrared LEDs: Allow the camera to view in the dark. Glow red during
night time viewing.
4. Light Sensor: Detects the light level in the room to automatically turn
on/off the night time LEDs.
5. Camera lens
6. Microphone
7. Power adapter port: Connect the included power adapter to charge
the camera.
8. ON/OFF Switch: Turns camera on/off.

5
Getting Started
English
3. GETTING STARTED
It is recommended to charge your handheld monitor and camera for 6
hours before initial use.
3.1 CHARGING THE CAMERA
To charge the camera:
1. Plug the power adapter into the power adapter port on the camera
and connect the other end to a power outlet.
• The charging LED glows red to indicate the camera is charging.
• Charge the camera for 6 hours to fully charge.
2. Turn the power switch to ON to turn on the camera.
NOTE: Only use the included power adapter to charge the camera(s).
Power adapter port
Power Outlet
Power adapter

6
Getting Started
3.2 INSTALLING THE HANDHELD MONITOR
BATTERY
To install the handheld monitor
battery:
-+
-+
Metallic
contact points
1. Slide the cover off of the back of
the handheld monitor.
2. Align the metallic contact points
on the battery with the metallic
contact points on the handheld
monitor by ensuring the
-+
symbols are shown in the bottom
right corner.
3. Press down on the battery so it is
held firmlyin place inside the
compartment.
4. Replace the cover on the
handheld monitor.
The handheld monitor automatically turns on once the battery is
inserted. It is recommended to charge the handheld monitor for 6 hours
before use.
NOTE: Remove battery during long periods of non-use.
Reading the battery life indicator
Low battery Full battery
Battery icon flashes when battery is low.

7
Getting Started
English
3.3 CHARGING THE HANDHELD MONITOR
TIP: Charge the handheld monitor for 6 hours to fully charge. The
handheld monitor can remain on while charging.
Power Outlet
Power adapter
1. Connect the power adapter to the handheld monitor. Connect the
other end of the power adapter to a power outlet.
• The battery life indicator will show a lightning bolt beside the battery
icon when the handheld monitor is charging.
Charging symbol

8
Positioning The Camera
4. POSITIONING THE CAMERA
• Place the camera in a location where the baby cannot easily reach or
knock over the camera.
• Keep all power cables out of arms reach of your baby (at least 3ft /
1m away)
• Place the camera on a flat surface, such as a table.
• Adjust the camera as shown in step 3 to improve camera balance
when positioning on a flat surface.
• The camera head swivels 360 degrees.
Step 2 Step 3
For details on wall mounting, See “Wall
Mounting the Camera” on page 21.
Step 1
TIP

9
Using the Handheld Monitor
English
5. USING THE HANDHELD MONITOR
5.1 CHANGING CAMERA VIEWS
• Press 1, 2, 3, or 4to view the desired camera.
5.2 ADJUSTING THE VOLUME
• Press or to increase or decrease the volume.
5.3 ADJUSTING SCREEN BRIGHTNESS
1. Press the Menu button
2. Press or and select .
Camera buttons (1~4)

10
Using the Handheld Monitor
3. Press or to select the desired brightness level. Press
Menu to exit.
NOTE: Decreasing brightness will help save battery power, so you can
use the handheld monitor longer without charging.
5.4 CONFIGURING THE POWER SAVE FEATURE
Power Save mode allows the handheld monitor display to be turned off
while continuing audio monitoring. This allows you to save battery power
and use the handheld monitor for longer without charging. You will still
be able to listen to your cameras during Power Save mode.
To enable Power Save mode:
1. Press the Menu button.
2. Press or and select .
3. Press or to change the duration of how long the handheld
monitor display remains on before turning off.
4. Press the Menu button to exit and save your settings.
After the selected duration (e.g. 15 seconds), the handheld monitor’s
display turns off. The handheld monitor will continue to play sound.
Press any button on the handheld monitor to turn on the display. Note
that you may need to press the button a couple times to turn the display
back on.

11
Snapshot and Video Recording
English
6. SNAPSHOT AND VIDEO RECORDING
You can take picture snapshots or videos on the handheld monitor. A
microSD card (not included) is required for snapshot or video recording.
NOTE: The handheld monitor supports microSD cards up to a maximum
size of 16GB.
6.1 INSERTING OR REMOVING THE MICROSD CARD
A microSD card (not included) is required to save snapshots or videos.
To insert a microSD memory card:
• Orient the microSD card as shown below. Push the microSD card into
the slot until the card clicks into place.
NOTE: The microSD card goes in one way only. Do not force the microSD
card into the slot.
Orient the microSD card as
shown above, before inserting
it into the handheld monitor.

12
Snapshot and Video Recording
To remove a microSD memory card:
• Press the microSD card with a small, rigid object (such as a paper
clip or finger nail). The microSD card should eject from the slot.
6.2 TAKING A SNAPSHOT
The Snapshot function lets you take pictures of what you see on screen.
A microSD card (not included) is required to take snapshots.
NOTE: Snapshots are saved in JPEG (.jpg) format.
To take a picture:
1. Select the camera you want to take a Snapshot picture with by
pressing 1, 2, 3, or 4on the handheld monitor.
2. Press the / ( ) button to take a picture.
• A icon momentarily appears on the display when a picture is
being taken.
microSD card slot

13
Snapshot and Video Recording
English
6.3 RECORDING VIDEO
You can record live video onto a microSD card (not included).
NOTE: Videos are saved in AVI (.avi) format.
To record live video:
1. Press and hold the / ( ) button until a timer appears in the
top-left corner of the screen.
Press and hold for
approximately 5 seconds
00:18
Timer indicates recording is in progress
2. Press the / ( ) button to stop recording.

14
Snapshot and Video Recording
6.4 VIEWING PICTURES AND VIDEOS ON YOUR
HANDHELD MONITOR
You can view images and videos recorded on your handheld monitor.
To view pictures or video on your handheld monitor:
1. Press the Menu button.
2. Press to select Memory ( ), and press the OK button.
OK
3. Press or to select a desired video or image to view.
• Videos will have a time stamp on the top left corner.
• Pictures will display the order that the picture was taken (e.g. Picture
1 is 1/2, picture 2 is 2/2 etc.).
4. If viewing video, press the OK button to begin playback.
00:18
23/23
Video Time stamp
Picture number
Table of contents
Other Lorex Baby Monitor manuals

Lorex
Lorex LW2401 Series User manual

Lorex
Lorex sweet peek User manual

Lorex
Lorex LW2004 series User manual

Lorex
Lorex BB2411AC1 User manual

Lorex
Lorex SWEET PEEP User manual

Lorex
Lorex LNC234 Series User manual

Lorex
Lorex LW2401 Series User manual

Lorex
Lorex BB2411 User manual

Lorex
Lorex Litle Link User manual

Lorex
Lorex LW2001 User manual

Lorex
Lorex LW2400 Series User manual

Lorex
Lorex LW2001 User manual

Lorex
Lorex CARE 'N' SHARE User manual

Lorex
Lorex LW2003 User manual

Lorex
Lorex Care'n'share User manual

Lorex
Lorex SWEET PEEP MINI User manual

Lorex
Lorex sweet peek mini User manual

Lorex
Lorex SWEET PEEP MAX VIDEO BABY MONITOR User manual

Lorex
Lorex ACCWIFI1 User manual

Lorex
Lorex LBN511 User manual