manuals.online logo
Brands
  1. Home
  2. •
  3. Brands
  4. •
  5. Lorex
  6. •
  7. DVR
  8. •
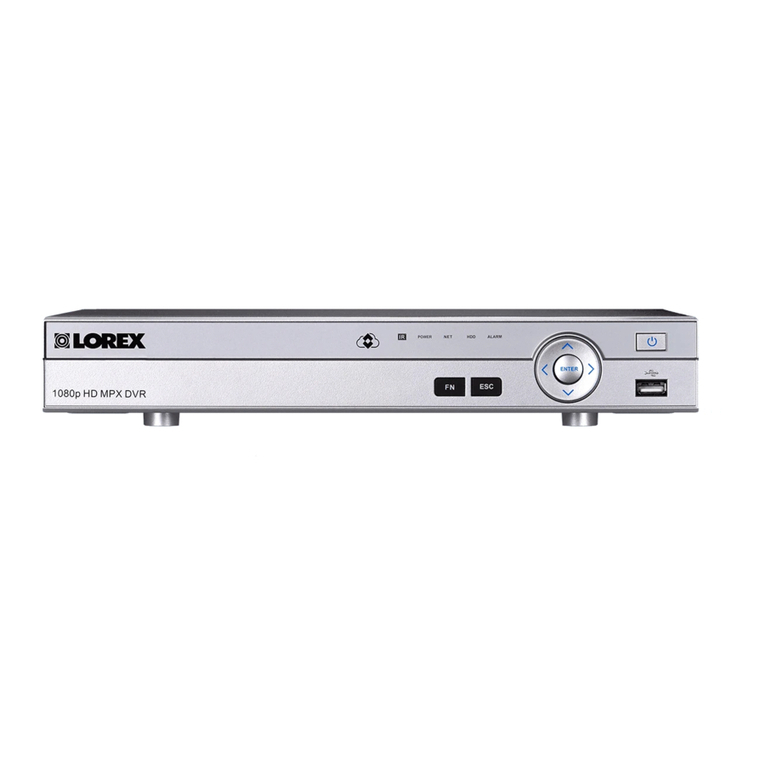
  9. Lorex LH400 LINK SERIES User manual

Lorex LH400 LINK SERIES User manual

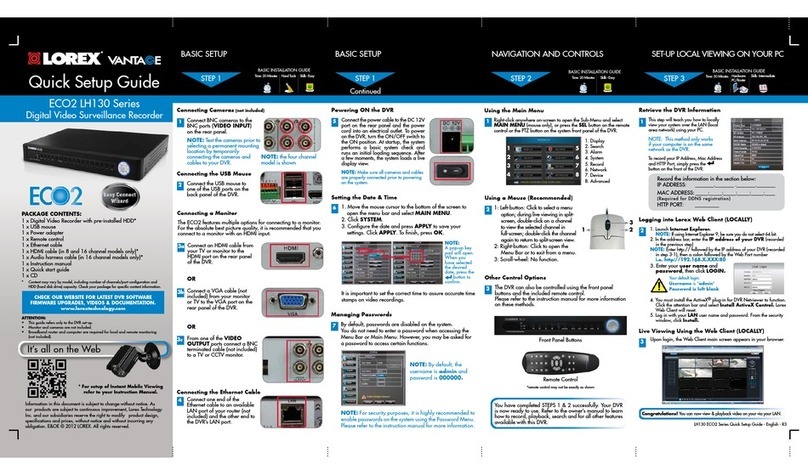
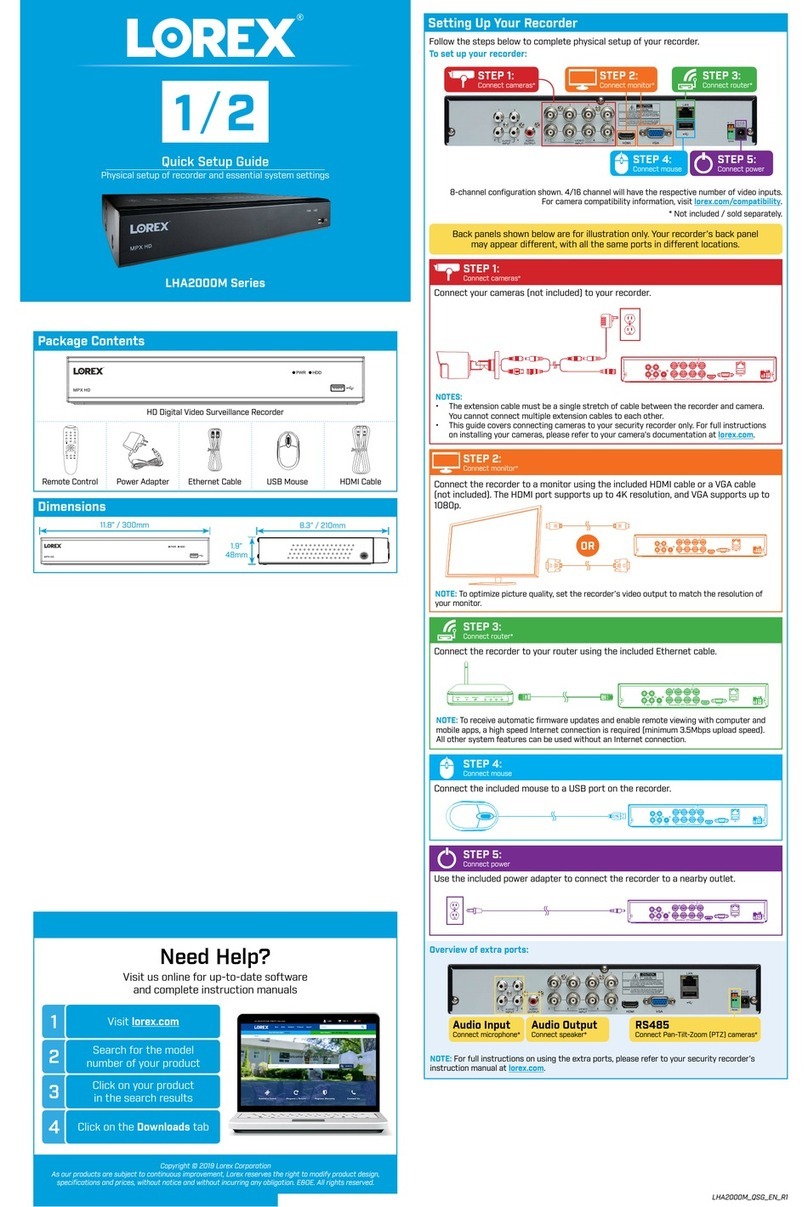
PACKAGE CONTENTS:
QUICK SETUP GUIDE
SkillLevel
Intermediate
easy advanced
Time
under30 minutesunder15 minutes under60 minutes
HandTools Hardware
Router
HiSpeed
over60 minutes
SkillLevel
Intermediate
easy advanced
Time
under30 minutesunder15 minutes under60 minutes
HandTools Hardware
Router
HiSpeed
over60 minutes
Time: 20 Minutes Hand Tools Skills - Easy
BASIC INSTALLATION GUIDE
BASIC SETUP
STEP 1
SET-UP LOCAL VIEWING ON YOUR PC
STEP 2
SET-UP LOCAL VIEWING ON YOUR PC
STEP 2
Record the IP and MAC Addresses in the section below:
IP ADDRESS : . . .
MAC ADDRESS : : : : : :
(Required for DDNS registration)
This step relates to remote viewing over the LAN (local area network)
by using a PC located on the same network as that of the DVR.
Retrieve the DVR Information
To find the IP and MAC addresses, press the  (REWIND) button
on the remote control or
1. Open the MAIN MENU and select SYSTEM.
2. Under the INFO tab, you will find your system’s IP address.
1
SkillLevel
Intermediate
easy advanced
Time
under30 minutesunder15 minutes under60 minutes
HandTools Hardware
Router
HiSpeed
over60 minutes
SkillLevel
Intermediate
easy advanced
Time
under30 minutesunder15 minutes under60 minutes
HandTools Hardware
Router
HiSpeed
over60 minutes
Time: 20 Minutes Hand Tools Skills - Easy
BASIC INSTALLATION GUIDE
BASIC SETUP
STEP 1
CONTINUED
LOCAL VIEWING INSTALLATION GUIDE
Time: 30 Minutes Skills - Intermediate
Hardware
PC/Router
SkillLevel
Intermediate
easy advanced
Time
under30 minutesunder15 minutes under60 minutes
HandTools Hardware
Router
HiSpeed
over60 minutes
SkillLevel
Intermediate
easy advanced
Time
under30 minutesunder15 minutes under60 minutes
HandTools Hardware
Router
HiSpeed
over60 minutes
LH400Series
Lorex Link DVR
1Connect BNC cameras to the BNC
ports on the rear panel.
Connecting Cameras (not included)
NOTE: Test the cameras prior to selecting a
permanent mounting location by temporarily
connecting the Cameras and Cables to your
DVR.
2
Connecting the USB Mouse
Connect the included USB/PS2
mouse to the USB port on the
rear panel.
4
Connecting the Ethernet Cable
Connect one end of the Ethernet
cable to one of the router’s (not
included) LAN ports and the other
end to the DVR’s Network Port.
3a
Connecting a Monitor (not included)
Connect a VGA cable (not included)
from your LCD monitor to the VGA
port on the rear panel of the Link
DVR.
5
Powering ON the DVR
Connect the power cable to the
DC port on the rear panel of the
DVR. Connect the power cord to
an electrical outlet. Press the
POWER button on the front panel
OR press the POWER button on
the remote control. At startup,
the system performs a basic
system check and runs an initial
loading sequence. After a few
moments, the system loads a live
display view.
NOTE: You will need to input your
system password (by default,
000000) to power off the system.
If you are using the front panel of
the DVR, select “+” and “»”.
3b From one of the Video-Out ports
connect a BNC terminated cable
(not included) to a TV or CCTV
monitor.
OR
MOUSE TIPS
When using the mouse, the ENTER and
EXIT buttons appear in the top-right corner
of every menu window. When you change
system settings and configurations, click
to confirm your changes.
Computer - not included
Install Software (on your local computer):
Insert the software CD into your
computer’s CD/DVD-R drive. At
the prompt, run or double-click
LOREXClient8Installer.exe
2
Lorex Client 8.0 Software (on your local computer):
Follow the installation screens to
complete Lorex Client 8.0
Software installation.
3
Once the installation finishes,
click Close. A shortcut icon
appears on your desktop.
4
LH400 Link Series Quick Setup Guide - English - R1
NOTE: Pressing the “Power”
button after plugging in the power
cable is only necessary for initial
startup (first time out of the box).
8
IN
OUT
OUT
1 x DIGITAL VIDEO RECORDER WITH
PRE-INSTALLED HDD*
1 x POWER ADAPTER
1 x REMOTE CONTROL
1 x MOUSE
Quick Setup - (Mouse operation recommended)
By default, the system has Quick Setup enabled. Quick Setup lets you quickly
adjust the time and record mode on the system. The system menu will appear as
the Quick Setup menu with only Time and Record options available.
6
Disabling Quick Setup
You must disable Quick
Setup in order to access the
full system main menu.
To disable Quick Setup:
1. In Quick Setup Menu under
the ADVANCED tab, select
RUN ADVANCED.
2. Select ON and press the
ENTER button. The window
closes. Quick Setup has been
disabled. The full main menu
will appear when you press
the MENU/ESC button.
The Octopus Cable provided with the LH416
Series DVRs only allows for 16 BNC camera
connection.
16 channel DVR with the Octopus Cable
It’s all on the Web
www.lorexcctv.com
For detailed setup
information, please refer
to your included User’s
Manual. For additional
information, please visit
our website
www.lorexcctv.com
ATTENTION:
• * Number of Channels/ Port conguration and HDD (hard disk drive)
capacity may vary by model. Check your package for specific content
information.
• Monitor and Cameras are not included.
• Broadband Router and Computer are required for local and
remote monitoring (not included).
Infor mation in th is document is subj ect to change wit hout notice. As o ur products are subje ct
to continuous improvement, Lorex Technology INC. and our subsid iaries re ser ve the right to
modify pr oduct design, specifications and price s, without notice and w ithout incurring any
obligatio n. E&O E © 2009 LOR EX . All right s res er ved.
* For setup of Instant Mobile
Viewing and MAC Compatibility
refer to your User Manual.
1 x ETHERNET CABLE
1 x USER MANUAL
1 x QUICK START GUIDE
1 x SOFTWARE CD
1 x OCTOPUS CABLE (included
only with LH416 series 16 Channel Link
DVRs)
Instant Mobile Viewing
on Blackberry™, iPhone™ and
compatible touch screen
smart phones*
LOCAL VIEWING INSTALLATION GUIDE
Time: 30 Minutes Skills - Intermediate
Hardware
PC/Router
SkillLevel
Intermediate
easy advanced
Time
under30 minutesunder15 minutes under60 minutes
HandTools Hardware
Router
HiSpeed
over60 minutes
SkillLevel
Intermediate
easy advanced
Time
under30 minutesunder15 minutes under60 minutes
HandTools Hardware
Router
HiSpeed
over60 minutes
Quick Setup - Time
1. Under the TIME tab, click on DATE
and using the virtual keyboard
enter the month, day, and year.
2. Select TIME and enter the time
(hh/mm/ss).
3. Press the ENTER button to save
your changes.
7
Quick Setup - Record
9
5
Local Live Viewing using Lorex Client 8.0 Software
(on your local computer):
To add a DVR:
1. From the main screen, click at
the bottom right corner. The SET
LIST MANAGER window opens.
2. Click AUTO SCAN. Any DVRs
connected to the local network
will appear in the list frame.
3. If your DVR does not appear after
Auto Scan, you can add it manually
to the list (this step is applicable
only if the DHCP is turned OFF):
• SET NAME: enter a title for the
DVR (e.g. DVR1)
• IP/DDNS: enter the IP address of
the DVR (recorded in Step 2-1)
(e.g. http://192.168.1.16)
• PORT: 7000 (default)
• PASSWORD: Enter the system
password (by default, 000000)
• Click ADD TO LIST to save the
DVR
6
Once you have
added and
connected to a
DVR, you can
monitor and
control the
system in real
time.
LOCAL LIVE SITE
Run Lorex Client 8.0 Software (on your local
computer):
1. Double-click the Lorex Client 8.0 icon
on the desktop. The Lorex Client 8.0
main screen opens.
NOTE: Make sure you have connected the DVR to your
network.
4. Click OK to save your
settings or click CANCEL
to exit without saving.
5. Right click on the DVR
icon and select LIVE.
You will automatically log
in to the DVR when you
launch Lorex Client 8.0.
Congratulations! You have completed Step 2 successfully. You can now
view, playback video on your Local Computer via LAN (local area network).
NOTE: By default, Lorex Client 8.0
opens to a black multi-screen display.
You must add a DVR to Lorex Client
8.0 before images will be visible on the
main screen.
CONTINUED

ENTER EXIT
NOTE: It is important to set the correct time
and date to assure accurate recording. You
should stop all recording (including Manual
and Schedule recording) on the system by
pressing/on the front panel, or pressing
the button on the remote control and
enter your 6-digit system password (by
default, 000000) prior to setting the Time
and Date.
By default your system will record
continuously. See User Manual
to customize your recording for
advanced recording options based
on motion or scheduled.
1. Open the MAIN MENU and click NETWORK.
2. Select the DDNS tab.
3. Under USE, select LOREX.
4. Under DOMAIN NAME, enter only the first portion of your DDNS
domain from the confirmation email. For example, if your domain
name is “tomsmith@lorexddns.net”, you only need to enter
“tomsmith” in the text field.
5. Under USER ID, enter your Lorex DDNS User ID.
6. Under PASSWORD, enter your Lorex DDNS Password.
NOTE: Obtain your Lorex DDNS user ID and password from the
confirmation email.
7. Under DDNS TEST, select START. You should receive a “GOOD”
message. If there is an error, check your network connections;
check that you have entered the correct domain name, user ID, and
password.
8. Press ENTER to save your settings. Press MENU/ESC to close
remaining windows.
Port Forward your Router:
1Port forward your router first before proceeding with the set-up.
You must forward Port: 7000
All routers are different. To port forward your router, please
refer to your router’s user manual.
An example of a port forwarding screen is shown for illustration
purposes.
System 7000 7000 12
EXAMPLE
2Open your web browser (Internet Explorer by default) and enter
http://www.lorexddns.net in the address bar.
DDNS (Dynamic Domain Name System) Set-up:
http://www.lorexddns.net
Create Account
3
Create Account:
1. FOR PRODUCT LICENSE select the LH400 Series option
from the drop down menu.
2. FOR PRODUCT CODE enter the MAC address (recorded in step
2, section 1).
3. FOR URL REQUEST enter a unique URL name (e.g. tomsmith).
NOTE: URL name should not be more than 15 characters.
Complete New Account Information:
12
3
4
An automated REGISTRATION CONFIRMATION EMAIL will be
sent to your email. Print and Save this confirmation. You will
need this information to access your System remotely.
Registration Email:
Service Provider: dns1.lorexddns.net
Domain Name: tomsmith.lorexddns.net
User ID: tomsmith
Password: (your password)
5
SET-UP INTERNET REMOTE SECURITY
MONITORING
STEP 3B
CONTINUED
Enter DDNS Set-up on your DVR:
6
SET-UP INTERNET REMOTE SECURITY
MONITORING
CONTINUED
Once the installation finishes,
click Close. A shortcut icon
appears on your desktop.
9
Run Lorex Client 8.0 Software (on your remote
computer):
1. Double-click the Lorex Client 8.0
icon on the desktop. The Lorex
Client 8.0 main screen opens.
Using Lorex Client 8.0 Software (on your remote
computer):
11
SET-UP INTERNET REMOTE SECURITY
MONITORING
CONTINUED
Congratulations! You have completed 3B successfully. You can now
view, playback and Remotely control the system on your Remote
computer over the Internet (Wide Area Network).
10
SET-UP INTERNET REMOTE SECURITY
MONITORING
STEP 3B
SkillLevel
Intermediate
easy advanced
Time
under30 minutesunder15 minutes under60 minutes
HandTools Hardware
Router
HiSpeed
over60 minutes
SkillLevel
Intermediate
easy advanced
Time
under30 minutesunder 15 minutes under60minutes
HandTools Hardware
Router
HiSpeed
over60 minutes
REMOTE VIEWING INSTALLATION GUIDE
Time: 60 Minutes Skills - Advanced
Hardware
PC/Router
SkillLevel
Intermediate
easy advanced
Time
under30 minutesunder15 minutes under60 minutes
HandTools Hardware
Router
HiSpeed
over60 minutes
SkillLevel
Intermediate
easy advanced
Time
under30 minutesunder15 minutes under60 minutes
HandTools Hardware
Router
HiSpeed
over60 minutes
SkillLevel
Intermediate
easy advanced
Time
under30 minutesunder 15 minutes under60minutes
HandTools Hardware
Router
HiSpeed
over60 minutes
REMOTE VIEWING INSTALLATION GUIDE
Time: 60 Minutes Skills - Advanced
Hardware
PC/Router
SkillLevel
Intermediate
easy advanced
Time
under30 minutesunder15 minutes under60 minutes
HandTools Hardware
Router
HiSpeed
over60 minutes
Lorex Client 8.0 Software (on your remote
computer):
Follow the installation screens to
complete Lorex Client 8.0
Software installation.
8To add a DVR:
1. From the main screen, click at
the bottom right corner. The SET
LIST MANAGER window opens.
2. In the corresponding text fields
enter the information:
Once you have
added and
connected to a
DVR, you can
monitor and
control the
system in real
time.
REMOTE LIVE SITE
ATTENTION: You MUST enter your DDNS information LOCALLY
in your system before attempting remote access.
LH400 Link Series Quick Setup Guide - English - R1
Install Software (on your remote computer):
Insert the software CD into your
computer’s CD/DVD-R drive. At
the prompt, run or double-click
LOREXClient8Installer.exe
7
NOTE: By default, Lorex Client 8.0
opens to a black multi-screen display.
You must add a DVR to Lorex Client
8.0 before images will be visible on
the main screen.
• SET NAME: enter a title for
the DVR (e.g. DVR1)
• IP/DDNS: enter the DDNS DOMAIN
NAME from the Registration Email
sent to you. (e.g. tomsmith.lorexddns.net)
• PORT: 7000 (by default)
• PASSWORD: Enter the system password (by default, 000000)
• Click ADD TO LIST to save the DVR
4. Click OK to save your settings or click CANCEL to exit without
saving.
5. Right click on the DVR icon and select LIVE.
You will automatically log in to the DVR Remote View when you
launch Lorex Client 8.0 .
NOTE: Remote viewing is only compatible with Internet Explorer. Mozilla
Firefox, Opera, Safari and other browsers are not supported.
Computer - not included
EASY CONNECT INSTANT REMOTE
VIEWING USING YOICS
STEP 3A
SkillLevel
Intermediate
easy advanced
Time
under30 minutesunder15 minutes under60 minutes
HandTools Hardware
Router
HiSpeed
over60 minutes
REMOTE VIEWING INSTALLATION GUIDE
Time: 20 Minutes Skills - Easy
Hardware
- PC
Easy Connect Setup
Router port forwarding is not required
Detailed instructions
available in the User Manual.

1Go to http://lorex.yoics.com and
create an account.
NOTE: there is no “www” in front of the address. Use Internet
Explorer web browser only. The system must be connected to your
local network router for Yoics to automatically detect the system.
A pop-up window opens.
Click CONTINUE in the
registration screen to
enable Yoics Easy Connect.
2
Under Yoics Device Name,
you can rename your
system (e.g. myoffice).
Click REGISTER NOW.
After the registration, your
system will be detected
automatically.
3
Your system now appears
on the left side bar under
“My Stuff”
4
Click on the name of your device
under “My Stuff” on the left side
bar. Install ActiveX when
Internet Explorer prompts you.
5
NOTE: This service is
provided free of charge.
You do not have to click the
Upgrade Now button to use
the Remote Viewer service.
Connect
Enter your User Name (ADMIN)
and Password (000000) to login.
On the Welcome window click
on Web Viewer (Use overlay for
higher resolution) option to view
your device.
6
Congratulations! Now that you
have a Yoics account set up you
can log in to http://lorex.yoics.com
to remotely view your cameras
from anywhere in the world using
Internet Explorer web browser.
tomsmith
tomsmith_1
******
STEP 3B STEP 3B
SkillLevel
Intermediate
easy advanced
Time
under30 minutesunder15 minutes under60 minutes
HandTools Hardware
Router
HiSpeed
over60 minutes
* For setup of Instant Mobile Viewing and
MAC Compatibility refer to your User
Manual.

This step offers more advanced internet remote
monitoring features. If you are only interested
in instant remote viewing (Step 3A) you can skip
Step 3B.

Other manuals for LH400 LINK SERIES

1

Other Lorex DVR manuals

Lorex ECO Series Operator's manual

Lorex

Lorex ECO Series Operator's manual

Lorex N843 Series User manual

Lorex

Lorex N843 Series User manual

Lorex LHV2000 series Instruction Manual

Lorex

Lorex LHV2000 series Instruction Manual

Lorex L154P-81 Instruction Manual

Lorex

Lorex L154P-81 Instruction Manual

Lorex N841 Series User manual

Lorex

Lorex N841 Series User manual

Lorex L3104000 User manual

Lorex

Lorex L3104000 User manual

Lorex LH030 ECO BLACKBOX3 SERIES User manual

Lorex

Lorex LH030 ECO BLACKBOX3 SERIES User manual

Lorex N883 Series User manual

Lorex

Lorex N883 Series User manual

Lorex LHD100 SERIES User manual

Lorex

Lorex LHD100 SERIES User manual

Lorex D241 Series User manual

Lorex

Lorex D241 Series User manual

Lorex L404 User manual

Lorex

Lorex L404 User manual

Lorex N842 Series User manual

Lorex

Lorex N842 Series User manual

Lorex L504 User manual

Lorex

Lorex L504 User manual

Lorex TR 1285 User manual

Lorex

Lorex TR 1285 User manual

Lorex D863A8 Series User manual

Lorex

Lorex D863A8 Series User manual

Lorex QLR464 Instruction Manual

Lorex

Lorex QLR464 Instruction Manual

Lorex L200 Series User manual

Lorex

Lorex L200 Series User manual

Lorex L284161 User manual

Lorex

Lorex L284161 User manual

Lorex SC325000 User manual

Lorex

Lorex SC325000 User manual

Lorex N841 Series User manual

Lorex

Lorex N841 Series User manual

Lorex LHA2000 Series Operator's manual

Lorex

Lorex LHA2000 Series Operator's manual

Lorex L516321 User manual

Lorex

Lorex L516321 User manual

Lorex LHV2000 series Operator's manual

Lorex

Lorex LHV2000 series Operator's manual

Lorex LH600 SERIES User manual

Lorex

Lorex LH600 SERIES User manual

Popular DVR manuals by other brands

Hommax Sistemas DS-8104HMI-M SERIES user manual

Hommax Sistemas

Hommax Sistemas DS-8104HMI-M SERIES user manual

Astak DIGITAL VIDEO RECORDER user manual

Astak

Astak DIGITAL VIDEO RECORDER user manual

iDVR iDVR-E Mac client software guide

iDVR

iDVR iDVR-E Mac client software guide

Sony HVO1000MD brochure

Sony

Sony HVO1000MD brochure

Safety Vision OBSERVER 4112 HVR manual

Safety Vision

Safety Vision OBSERVER 4112 HVR manual

Panasonic AJ-SPD850MC parts list

Panasonic

Panasonic AJ-SPD850MC parts list

XtendLan DVR-475EL Quick user manual

XtendLan

XtendLan DVR-475EL Quick user manual

Godrej Eyetrace Elite ET-8D12 user manual

Godrej

Godrej Eyetrace Elite ET-8D12 user manual

APEC TVR 3000 user manual

APEC

APEC TVR 3000 user manual

Digimerge DGR100 Installation & user manual

Digimerge

Digimerge DGR100 Installation & user manual

Honeywell HRSD16 user guide

Honeywell

Honeywell HRSD16 user guide

Spyclops SPY-DVR4960 instructions

Spyclops

Spyclops SPY-DVR4960 instructions

Velleman DVR4L5 Quick installation guide

Velleman

Velleman DVR4L5 Quick installation guide

KGuard Security KG-SH330 user manual

KGuard Security

KGuard Security KG-SH330 user manual

Qvis I-ZEUS-HYBRID1 user manual

Qvis

Qvis I-ZEUS-HYBRID1 user manual

TiVo Series2 DT Features guide

TiVo

TiVo Series2 DT Features guide

VOLTA VEDVR 2304B user manual

VOLTA

VOLTA VEDVR 2304B user manual

Cisco Explorer 8000 Getting started guide

Cisco

Cisco Explorer 8000 Getting started guide

manuals.online logo
manuals.online logoBrands
  • About & Mission
  • Contact us
  • Privacy Policy
  • Terms and Conditions

Copyright 2025 Manuals.Online. All Rights Reserved.