manuals.online logo
Brands
  1. Home
  2. •
  3. Brands
  4. •
  5. Lorex
  6. •
  7. Intercom System
  8. •
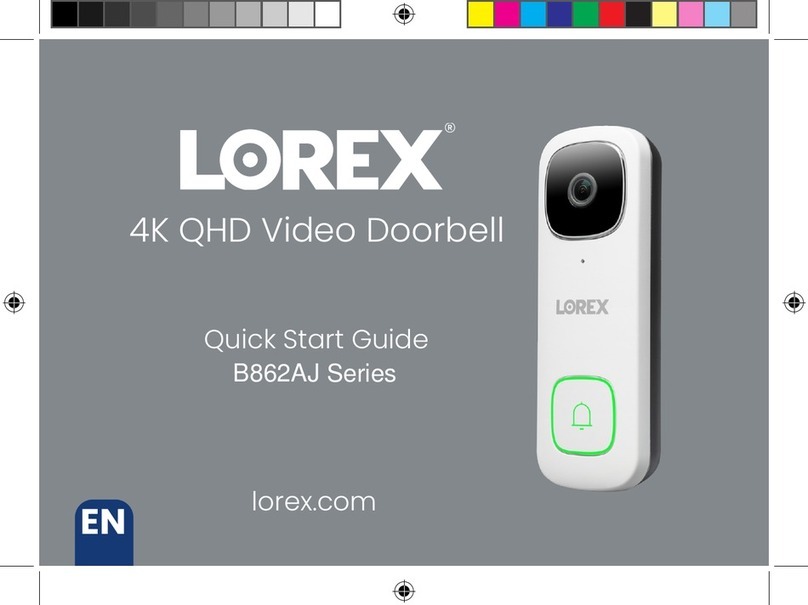
  9. Lorex B862AJ Series User manual

Lorex B862AJ Series User manual

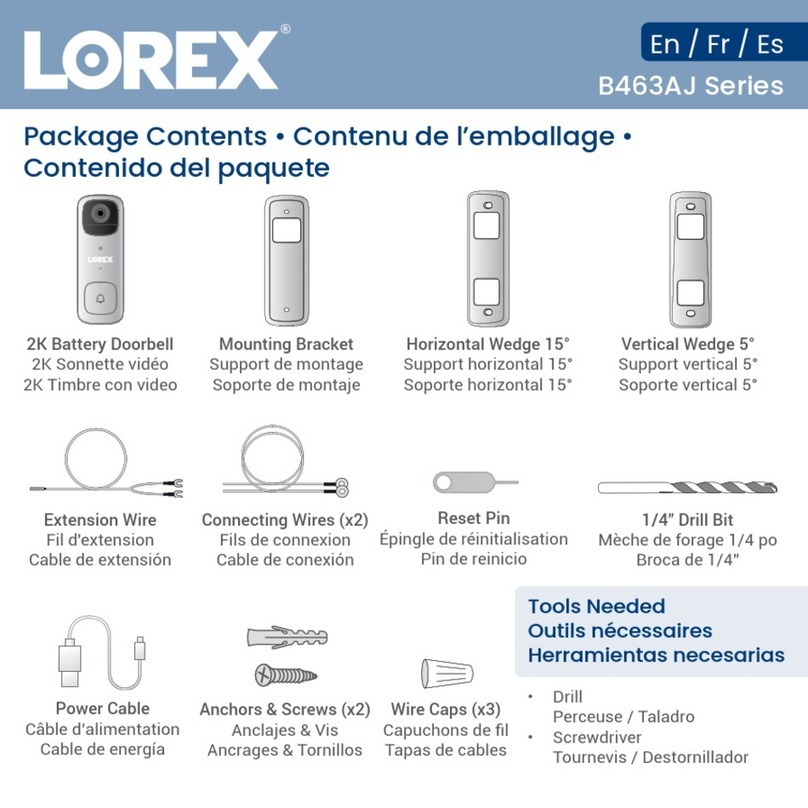
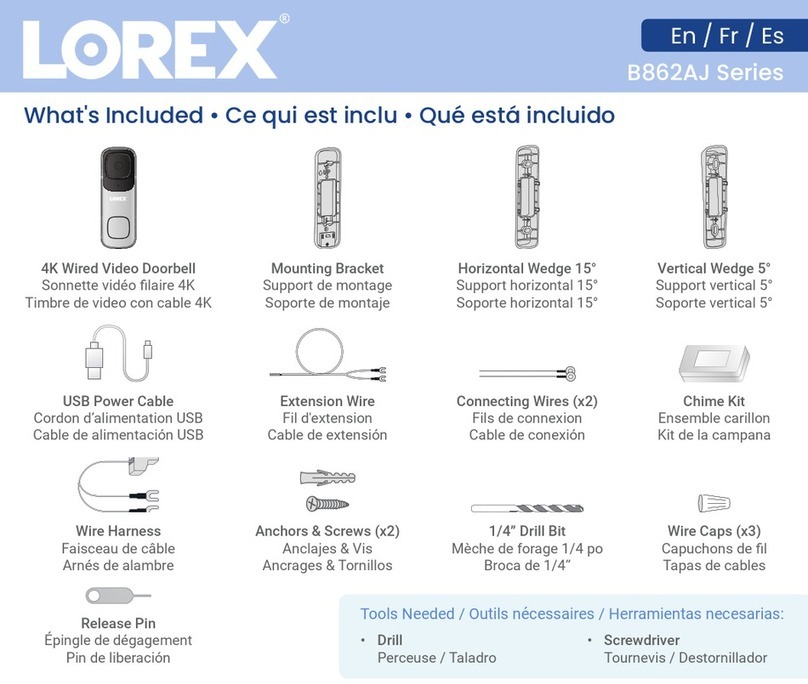
What's Included • Ce qui est inclu • Qué está incluido
B862AJ Series
En / Fr / Es
Tools Needed / Outils nécessaires / Herramientas necesarias:
• Drill
Perceuse / Taladro
• Screwdriver
Tournevis / Destornillador
Release Pin
Épingle de dégagement
Pin de liberación
USB Power Cable
Cordon d’alimentation USB
Cable de alimentación USB
Wire Harness
Faisceau de câble
Arnés de alambre
4K Wired Video Doorbell
Sonnette vidéo laire 4K
Timbre de video con cable 4K
Connecting Wires (x2)
Fils de connexion
Cable de conexión
1/4” Drill Bit
Mèche de forage 1/4 po
Broca de 1/4”
Horizontal Wedge 15°
Support horizontal 15°
Soporte horizontal 15°
Chime Kit
Ensemble carillon
Kit de la campana
Wire Caps (x3)
Capuchons de l
Tapas de cables
Vertical Wedge 5°
Support vertical 5°
Soporte vertical 5°
Extension Wire
Fil d'extension
Cable de extensión
Anchors & Screws (x2)
Anclajes & Vis
Ancrages & Tornillos
Mounting Bracket
Support de montage
Soporte de montaje
1.
1.
QR Code
QR Code
2.
2.
MicroSD Card Slot
MicroSD Card Slot
Fente pour carte MicroSD
Ranura para tarjeta MicroSD
3.
3.
Reset Button
Reset Button
Bouton de réinitialisation
Botón de reinicio
Botón de reinicio
4.
4.
USB Power Port
USB Power Port
Port USB d'alimentation
Puerto de alimentación USB
5.
5.
Power Terminals
Power Terminals
Ports d’alimentation
Puertos de alimentación
6.
6.
Speaker
Speaker
Haut-parleur
Haut-parleur
Altavoz
Altavoz
7.
7.
Camera Lens
Camera Lens
Lentille de la caméra
Lente de la cámara
Lente de la cámara
8.
8.
Microphone
Microphone
Microphone
Microphone
Micrófono
Micrófono
9.
9.
IR Light
IR Light
Voyant IR
Voyant IR
Luz IR
Luz IR
10.
10.
Smart Security (SS) LED
DEL de sécurité intelligente (SS)
Led de seguridad inteligente (SS)
Overview • Aperçu • Descripción general
11.
11.
Smart Security (SS) Call Button
Bouton d’appel de sécurité intelligente (SS)
Botón de llamada de seguridad inteligente (SS)
12.
12.
Night Light
Night Light
Veilleuse
Veilleuse
Luz de noche
Luz de noche
Insert the Release Pin and hold until you hear the audio prompt.
Insérez l'épingle de dégagement et maintenir enfoncé jusqu'à ce que vous entendiez l'invite audio.
Inserte el pin de liberación y mantenga presionado hasta que escuche el mensaje de audio.
*
Device ID: LNWZ83569CCH
1
3
2
4
5
612
7
9
8
10
11
1. QR Code
2. MicroSD Card Slot
Fente pour carte MicroSD
Ranura para tarjeta MicroSD
3. Reset Button
Bouton de réinitialisation
Botón de reinicio
4. USB Power Port
Port USB d'alimentation
Puerto de alimentación USB
5. Power Terminals
Ports d’alimentation
Puertos de alimentación
6. Speaker
Haut-parleur
Altavoz
7. Camera Lens
Lentille de la caméra
Lente de la cámara
8. Microphone
Microphone
Micrófono
9. IR Light
Voyant IR
Luz IR
10. Smart Security (SS) LED
DEL de sécurité intelligente (SS)
Led de seguridad inteligente (SS)
Smart Security LED Indicator • Indicateur DEL de sécurité intelligent
• Indicador led de seguridad inteligente
11. Smart Security (SS) Call Button
Bouton d’appel de sécurité intelligente (SS)
Botón de llamada de seguridad inteligente (SS)
12. Night Light
Veilleuse
Luz de noche
Insert the Release Pin and hold until you hear the audio prompt.
Insérez l'épingle de dégagement et maintenir enfoncé jusqu'à ce que vous entendiez l'invite audio.
Inserte el pin de liberación
y mantenga presionado hasta que escuche el mensaje de audio.
*
*
Ready for network connection
Prêt pour la connexion réseau / Lista para conectarse a la red
Pairing to your Lorex Home account
Jumelage au compte Lorex Home
Emparejamiento con la cuenta de Lorex Home
Device ready / Event detected
Appareil prêt / Événement détecté
Dispositivo listo / Evento detectado
2 Way Talk
Conversation à 2 voies / Conversación de 2
Call ongoing
Appel en cours / Llamada en curso
Factory reset*
Réinitialisation des réglages d’usine* / Restablecimiento de fábrica*
Network connection failed*
La connexion au réseau a échoué* / La conexión de red falló*
Firmware update in progress
Mise à niveau du micrologiciel en cours
%GXYEPM^EGMʬRHIƼVQ[EVIIRGYVWS
TURN OFF THE POWER RUNNING TO YOUR EXISTING DOORBELL AT THE BREAKER.
COUPEZ L’ALIMENTATION ÉLECTRIQUE DE VOTRE SONNETTE AU NIVEAU DU DISJONCTEUR.
DESCONECTE LA ALIMENTACIÓN DEL TIMBRE QUE TIENE INSTALADO ACTUALMENTE DESDE EL
DISYUNTOR.
8IWXXLEXTS[IVLEWFIIRHMWGSRRIGXIHF]TVIWWMRKXLIFYXXSRSR]SYV
existing doorbell. There should be no sound.
:%'MWVIUYMVIH-J]SYHSRSXLEZIXLMWZSPXEKI]SY[MPPRIIHE
:%'HSSVFIPPXVERWJSVQIV
%P[E]WFIGEVIJYP[LIRLERHPMRKIPIGXVMGEP[MVMRK-J]SYEVIRSX
GSQJSVXEFPIHSMRKMX]SYVWIPJGSRWYPXEPMGIRWIHIPIGXVMGMER
EN - Installation
:ʣVMƼI^UYIPƅEPMQIRXEXMSREʣXʣGSYTʣIIRETTY]ERXWYVPIFSYXSRHIZSXVIWSRRIXXI%YGYRWSRRI
devrait être émis.
ɸ:'%VIUYMW7MZSYWEZI^YRIXIRWMSRHMJJʣVIRXIZSYWHIZVI^YXMPMWIVYRXVERWJSVQEXIYVTSYV
WSRRIXXIHIʚɸ:'%
Faites toujours attention lorsque vous manipulez des câbles électriques. Si vous n’êtes pas sûr de
TSYZSMVPIJEMVIZSYWQʤQIGSRWYPXI^YRʣPIGXVMGMIREKVʣʣ
FR - Installation
EN - Chime Kit Setup
Determine the type of doorbell chime you have in your home.
• 1IGLERMGEP=SY[MPPLIEVEGPEWWMGHMRKHSRKWSYRH
%QIGLERMGEPHSSVFIPPMWWTVMRKPSEHIH[MXLPIZIVWERHTL]WMGEPQIXEPGLMQIW
• Electronic: If your doorbell sounds more like a melody then you have an electric chime box.
8LIWIXYTTVSGIWWMWXLIWEQIFYX[LIR[MVMRKJSVEQIGLERMGEPGLMQIWXE]GPIEVSJXLIQIXEP
chimes or any of the moving components inside.
1. Remove the cover panel of your existing doorbell chime
box.
2. 0SSWIRXLIWGVI[WPEFIPIHFRONT and TRANS. Do
RSXVIQSZIXLIWGVI[WERHFIWYVIXSHIXEGLER]
GSRRIGXIH[MVMRK
3. Connect the green terminal on the end of the included
;MVI,EVRIWWXSXLI'LMQI/MX
 'SRRIGXXLI[MVMRKJVSQXLI'LMQI/MXXSXLIFRONT
and TRANS connectors in the Chime Box. Ensure that
XLII\MWXMRK[MVMRKWXE]WGSRRIGXIHEW[IPP
5. 1SYRXXLI'LMQI/MXXSXLIMRWMHISJ]SYV'LMQI&S\SV
along the cover plate using the included double-sided
tape.
)RWYVIXLI'LMQI/MXERH[MVIWEVIRSXXSYGLMRKXLI
chimes or any of the moving components inside
XLIGLMQIFS\SVXLIHSSVFIPPGLMQI[MPPRSXWSYRH
correctly.
Align and place either one of the Horizontal or Vertical Wedges behind the
1SYRXMRK&VEGOIXERHMRXLIHMVIGXMSR]SY[ERXXLIHSSVFIPPXSJEGI
8SGLERKIXLIHMVIGXMSRSJXLIERKPIƽMTXLI,SVM^SRXEPSV:IVXMGEP;IHKI
YTWMHIHS[R
5° down / vers le bas / hacia abajo 5° up / vers le haut / hacia arriba
Vertical Wedge
Support vertical • Soporte vertical
OR
Horizontal Wedge
Support horizontal • Soporte horizontal
15° left / à gauche / a la izquierda
15° right / à droite / a la derecha
EN - Optional Wedge Installation
1. 6IQSZI]SYVI\MWXMRKHSSVFIPPERHHMWGSRRIGXXLI[MVMRK
Tip: &IRHXLITS[IVGEFPIWWSXLI]HSRSXJEPPXLVSYKLXLI[EPP
2. (Optional) Install the Wedges. Make sure the Wedge and Mounting
Bracket align.
3. 4PEGIXLI1SYRXMRK&VEGOIXSRXLIHIWMVIHPSGEXMSR[MXLXLI
EVVS[TSMRXMRKYT
 1EVOXLILSPIWJSVWGVI[W
5. 9WMRKE4LMPPMTWLIEHWGVI[HVMZIVERHXLITVSZMHIHWGVI[WWIGYVI
the Mounting Bracket to the surface.
Optional: -J]SYEVIQSYRXMRK]SYVGEQIVEMRXSHV][EPPYWIXLI
TVSZMHIHHVMPPƉQQXSHVMPPLSPIW[LIVIQEVOIH8LIRYWI
XLITVSZMHIHERGLSVWERHWGVI[W
6. 'SQTPIXIP]VIQSZIXLITS[IVTSVXXIVQMREPWGVI[W[MXLE4LMPMTW
LIEHWGVI[HVMZIV
7. 8LVIEHXLIWGVI[WXLVSYKLXLIQIXEPPSSTWSJXLI'SRRIGXMRK
;MVIWERHXLIRXMKLXIRXLIWGVI[WGPSGO[MWI
EN - Doorbell Setup
Screw Hole
Screw Hole
Screw Hole
Screw Hole
8. %PMKRXLIIRHWSJ]SYVI\MWXMRK[MVMRKERH'SRRIGXMRK
;MVIWTPEGIXLI;MVI'ETWSZIVXLII\TSWIH[MVMRKERH
XLIRX[MWXXLI'ETGPSGO[MWIXSXMKLXIR
9. 4YWLXLI[MVMRKFEGOMRXSXLI[EPP1EOIWYVIXLIVIMW
IRSYKLWTEGIXSƼXXLIGEFPIGSRRIGXSVWERH[MVIGETW
MRXSXLILSPIMRXLI[EPP
10. 4VIWWXLIHSSVFIPPMRXSXLI1SYRXMRK&VEGOIX=SY[MPPLIEV
EGPMGO[LIRMXWIGYVIWMRXSTPEGI
11. 6IGSRRIGXTS[IVEXXLIFVIEOIV
-J]SYVI\MWXMRKHSSVFIPP[MVMRKMWXSSWLSVXVITPEGIXLI'SRRIGXMRK;MVIW[MXLXLITVSZMHIH)\XIRWMSR
Wire.
Device ID: LNWZ83569CCH
Screw Hole
Screw Hole
Sound Settings > Doorbell Ringtone
App Setup • Assemblage à l’aide de l’application • Configuración
de la aplicación
1. (S[RPSEH8ʣPʣGLEVKI^(IWGEVKYILorex app.
2. Tap / Touchez sur / Pulse
+
.
EN - FAQs
Why is the Video Doorbell not turning on?
• Make sure the breaker is turned on.
•1EOIWYVIXLITS[IVWSYVGIXLEXWYTTPMIWXLIZMHISHSSVFIPPMW:%'
•'SRRIGXXLIZMHISHSSVFIPPYWMRKXLITVSZMHIH97&TS[IVGEFPI1EOIWYVIXLI97&GEFPIMW
GSRRIGXIHXSE:%97&TS[IVEHETXIVRSXMRGPYHIHXLEXMWEPWSGSRRIGXIHXSETS[IV
outlet.
•7IPIGXXLIGSVVIGXSTXMSR[LIRGSRRIGXMRKE;M*M'LMQIFS\(YVMRKWIXYTWIPIGXNot Now. Do
RSXWIPIGX1IGLERMGEP'LMQISV]SYVHSSVFIPP[MPPRSXTS[IVSR
How do I change the Video Doorbell's ringtone?
1. Open the Lorex app and tap above the camera’s thumbnail.
2. Tap
Sound Settings > Doorbell Ringtone
Sound Settings > Doorbell RingtoneERHXLIRWIPIGXXLIVMRKXSRI]SY[ERXXSYWI
How do I activate the Deterrence Light and/or Smart Security LED when motion is detected?
1. Open the Lorex app and tap above the camera’s thumbnail.
2. Tap Light SettingsERHXLIR to enable Activate Deterrence Light on Detection. Tap
Deterrence Light ModeXSWIPIGXEWSPMHSVƽEWLMRKPMKLXERHXLIR0MKLX&VMKLXRIWWXSEHNYWX
the brightness level.
3. Tap to enable Activate Status LED on DetectionERHXLIRLED Color to set a custom
Smart Security LED color.
How do I enable the Night Light Mode?
1. Open the Lorex app and tap above the camera’s thumbnail.
2. Tap Light SettingsERHXLIR to enable Night Light Mode. Tap Edit Schedule to set custom
times for the night light to turn on and off.
7GERXLIFIPS[56GSHIJSVXLI5YMGO7XEVX+YMHIERHEHHMXMSREPWYTTSVXQEXIVMEP
7GERRI^PIGSHI56GMHIWWSYWTSYVEGGʣHIVEYKYMHIHIHʣQEVVEKIVETMHIIXʚHIWWYTTSVXW
supplémentaires.
)WGERIIIPWMKYMIRXIGʬHMKS56TEVESFXIRIVPE+YʧEHIMRMGMSVʛTMHS]QEXIVMEPHIETS]SEHMGMSREP
Need help? • Besoin d’aide? • ¿Necesita ayuda?
help.lorex.com/B862AJSeries
4PIEWIWIISYVJYPP8IVQWSJ7IVZMGIERH0MQMXIH,EVH[EVI;EVVERX]4SPMG]EX
:IYMPPI^PMVIRSW8IVQIWHI7IVZMGIIXRSXVI4SPMXMUYIHI+EVERXMI1EXʣVMIPPI0MQMXʣIWYVPIWMXI
4SVJEZSVGSRWYPXIXSHSWPSW8ʣVQMRSWHIRYIWXVSW7IVZMGMSW]PE4SPʧXMGEHI+EVERXʧE0MQMXEHEHI
,EVH[EVIIR
Register your product • Enregistrez votre produit • Registre su
producto
lorex.com/warranty
PRODUCT SPECIFICATIONS
Lorex Corporation
10440 Little Patuxent Parkway, Ste, 300,
Columbia, MD 21044, United States
© 2023 Lorex Corporation
As our product is subject to continuous improvement, Lorex Technology & subsidiaries reserve the right to
modify product design, specifications & prices without notice and without incurring any obligation. E&OE.
08182023-1
lorex.com
B862AJ Series
4K Wired
Video Doorbell
MODEL INFORMATION
B862AJD-E 4K Wired Video Doorbell
(White) 6-95529-05364-6
B862AJDB-E 4K Wired Video Doorbell
(Black) 6-95529-05365-3
Max Video Resolution 8MP (2160 × 3840)
Aspect Ratio 9:16
Video Modes 4K, 2K, 1080p, 720p
Video Features WDR
Max Lens Field of View 150º diagonal
Night Light/Warning Light Yes
Quick Responses Yes
Night Vision Color and IR Night Vision with
IR Cut Filter
Indoor/Outdoor Outdoor, IP65 rated
Digital Zoom 8×
Microphone Microphone with noise
cancellation
Speaker/Siren Yes
Audio Full Duplex 2-Way audio
Network Connectivity 2.4/5GHz 802.11b/g/n/ac
Power Input 16-24VAC, USB 5V-2A
Operating Temperature -4 °F ~ 122 °F / -20 °C ~ 50 °C
Product Dimensions
(W × D × H) 5.12 × 1.77 × 0.91” /
130 × 44 × 23 mm
Product Weight 0.26 lb / 0.11 kg
PRODUCT SPECIFICATIONS
Disclaimers:
1. Audio and video recordings without consent is illegal in certain jurisdictions. Lorex Technology does not assume liability for any use of its product that fails to conform with
local laws.
2. Requires a high-speed internet connection and a Wi-Fi router (not included) for remote access. A minimum upload speed of 10 Mbps is required for the best video
performance.
3. Requires 16-24VAC. If the install location does not have this, a transformer will be required to operate properly. Consult a licensed electrician if in doubt.
4. Person Detection accuracy is compromised when the face and/or body is partially covered.
5. Not intended for submersion in water. Installation in a sheltered area recommended.
6. When MicroSD card storage is full the older previously recorded video will automatically be overwritten with the latest recordings. Note, there is a limited number of write/re-
write cycles rated by the MicroSD card, before performance is reduced.
Lorex products are designed for consumer and business use only and not for US federal governments, federally-funded projects or contractors subject to NDAA.
For smart home compatibility, features and instructions visit www.lorex.com/smarthome.
All trademarks belong to their respective owners. No claim is made to the exclusive right to use the trademarks listed, other than the trademarks owned by Lorex Corporation.
We reserve the right to change models, configurations or specifications without notice or liability. Product may not be exactly as shown.
Apple and the Apple logo are trademarks of Apple Inc., registered in the U.S. and other countries. App Store is a service mark of Apple Inc.
Google, Google Home, Google Play, Google Play logo, Google Assistant logo and Chromecast are trademarks of Google Inc.
Amazon, Alexa and all related logos are trademarks of Amazon.com, Inc. or its affiliates. 2-Way communication is not available via Alexa.
Images may be simulated for illustrative purposes only, and may not have been taken by the camera series depicted.
PACKAGE CONTENTS
• 4K Wired Video Doorbell
• Mounting Bracket
• Horizontal Wedge 15º
• Vertical Wedge 5°
• USB Power Cable
• Extension Wire
• Connecting Wires
• Chime Kit
• 2 × Anchors & Screws
• 1/4” Drill Bit
• 3 × Wire Caps
• Release Pin
PACKAGE DIMENSIONS
Package Blue Giftbox
Package Weight 1.04 lb / 0.47 kg
Package Dimensions
(W × D × H)
6.46 × 7.36 × 2.28” /
164 × 186 × 57 mm
Package Cube 0.062 ft³ / 0.001 m³
Lorex Home app
B862AJ_QSG_EN-FR-ES_R1
Copyright © 2023 Lorex Technology Inc
As our products are subject to continuous improvement, Lorex reserves the right to modify product design, specications
and prices, without notice and without incurring any obligation. E&OE. All rights reserved.
Nos produits étant sans cesse améliorés, Lorex se réserve le droit de modier la conception du produit, ses
caractéristiques et son prix sans préavis et sans aucune obligation. E&OE. Tous droits réservés.
Debido a que nuestros productos están sujetos a mejoras continuas, Lorex se reserva el derecho de modicar el diseño,
las especicaciones y los precios de los productos sin previo aviso y sin contraer ninguna obligación. Excepto errores y
omisiones. Todos los derechos reservados.
This device complies with part 15 of the FCC Rules. Operation is subject to the following two conditions: (1)
This device may not cause harmful interference, and (2) This device must accept any interference received,
including interference that may cause undesired operation.
Cet appareil est conforme à la partie 15 des règlements de la FCC. Son fonctionnement est soumis aux deux conditions
suivantes: (1) cet appareil ne doit pas provoquer d’interférences nuisibles, et (2) cet appareil doit accepter toute
interférence reçue, incluant toute interférence pouvant causer un fonctionnement indésirable.
Este dispositivo cumple con la parte15 de las normas de la FCC. El funcionamiento está sujeto a las siguientes dos
condiciones: (1)Este dispositivo no puede causar interferencia dañina, y (2)este dispositivo debe aceptar cualquier
interferencia recibida, lo que incluye interferencias que puedan causar un funcionamiento no deseado.

Other manuals for B862AJ Series

2

Other Lorex Intercom System manuals

Lorex ACCHM1 Series User manual

Lorex

Lorex ACCHM1 Series User manual

Lorex B451AJ Series User manual

Lorex

Lorex B451AJ Series User manual

Lorex B862AJ-Z1 User manual

Lorex

Lorex B862AJ-Z1 User manual

Lorex ACCHM2 Series User manual

Lorex

Lorex ACCHM2 Series User manual

Lorex B862AJ Series User manual

Lorex

Lorex B862AJ Series User manual

Lorex B463AJ Series User manual

Lorex

Lorex B463AJ Series User manual

Lorex ACCHM2A-E Series User manual

Lorex

Lorex ACCHM2A-E Series User manual

Lorex ACCHM1 Series User manual

Lorex

Lorex ACCHM1 Series User manual

Lorex ACCHM2 Series User manual

Lorex

Lorex ACCHM2 Series User manual

Lorex B451AJ-Z2 User manual

Lorex

Lorex B451AJ-Z2 User manual

Popular Intercom System manuals by other brands

Dnake E211 user manual

Dnake

Dnake E211 user manual

Fermax MEET 1W Installer manual

Fermax

Fermax MEET 1W Installer manual

Jupiter Avionics JAC-T Series operating manual

Jupiter Avionics

Jupiter Avionics JAC-T Series operating manual

Comelit Switch Series Technical manual

Comelit

Comelit Switch Series Technical manual

Commax CMV-70M user manual

Commax

Commax CMV-70M user manual

CyberData 11304 Installation quick reference

CyberData

CyberData 11304 Installation quick reference

Brinno PeepHole Viewer PHV 132512 user manual

Brinno

Brinno PeepHole Viewer PHV 132512 user manual

Elvox 6901 manual

Elvox

Elvox 6901 manual

Commax CDV-352HD user manual

Commax

Commax CDV-352HD user manual

Fermax DUOX plus 970050b Installer manual

Fermax

Fermax DUOX plus 970050b Installer manual

Gigaset Pro 2N Helios Uni Configuration notes

Gigaset

Gigaset Pro 2N Helios Uni Configuration notes

Telex Audiocom WM1000 User instructions

Telex

Telex Audiocom WM1000 User instructions

2T Technology Voyager Voice Sleek Installation & user manual

2T Technology

2T Technology Voyager Voice Sleek Installation & user manual

Jupiter Avionics wiJAC-001 operating manual

Jupiter Avionics

Jupiter Avionics wiJAC-001 operating manual

Orno OR-DOM-AT-930/W Installation and operation manual

Orno

Orno OR-DOM-AT-930/W Installation and operation manual

Wind Crest SERIAL BUS quick start guide

Wind Crest

Wind Crest SERIAL BUS quick start guide

Comelit KAE0061 Technical manual

Comelit

Comelit KAE0061 Technical manual

Cannon Security Products Digital Door Viewer user manual

Cannon Security Products

Cannon Security Products Digital Door Viewer user manual

manuals.online logo
manuals.online logoBrands
  • About & Mission
  • Contact us
  • Privacy Policy
  • Terms and Conditions

Copyright 2025 Manuals.Online. All Rights Reserved.