Lorex ACCWIFI1 User manual

www.lorextechnology.com
ENGLISH
WIFI REMOTE
CONNECTION CRADLE
ACCWIFI1
Version 1.0
USER’S GUIDE

Safety Precautions
•Adult assembly is required. Keep small
parts away from children when assembling.
•This product is not a toy. Do not allow
children or infants to play with it.
•Keep the cords out of reach from children
and infants.
•Only use the chargers and power adapters
provided. Do not use other chargers or
power adapters as this may damage the
device and battery pack.
•Do not cover the product with a towel or
blanket.
•Do not use the product near water.
•Do not install the product near a heat
source.
•Do not touch the plug contacts with sharp or
metal objects.
•Keep this user’s guide for future reference.
To Avoid Injury to
Children & Infants:
•MAKE SURE to keep the product and all
cables at least 3ft / 1m away from cribs
and out of reach of your child.
3ft / 1m

ENGLISH
1
Table of Contents:
Product Includes..............................2
Cradle Overview.............................2
Supported Mobile Devices ...............3
When the Handheld Monitor is
Docked in the Cradle.......................3
Getting Started ...............................4
iPhone®/iPad® Ethernet Setup ........5
iPhone®/iPad® WiFi Setup..............6
Using the iPhone®/iPad® App ........8
Live View ...............................................8
Zooming in Live View ..............................8
Viewing and Sharing Snapshots................9
Changing the Cradle Password...............10
Changing the Video Quality...................11
Android Ethernet Setup .................12
Android Wi-Fi Setup......................14
Using the Android App..................17
Live View .............................................17
Zooming in Live View ............................17
Viewing and Sharing Snapshots..............18
Changing the Cradle Password...............19
Changing the Video Quality...................20
Technical Specifications .................22
Cradle .................................................22
Troubleshooting ............................23
Need Help?...................................24

2
Product Includes
x1
WiFi Charging Cradle Ethernet Cable
x1
Cradle Overview
Charging/network connector
Stand-up guides
Handheld monitor and camera(s) may be
sold separately, depending on product
configuration.
Antenna
Ethernet Port
Service Only Power Port
Power Adapter
x1
Reset button
QR Code
UID Code

ENGLISH
3
Supported Mobile Devices
• iPhone®/iPad®: iOS v.5.1 and above.
• Android™: Android™ v.2.2 and above.
When the Handheld Monitor is
Docked in the Cradle
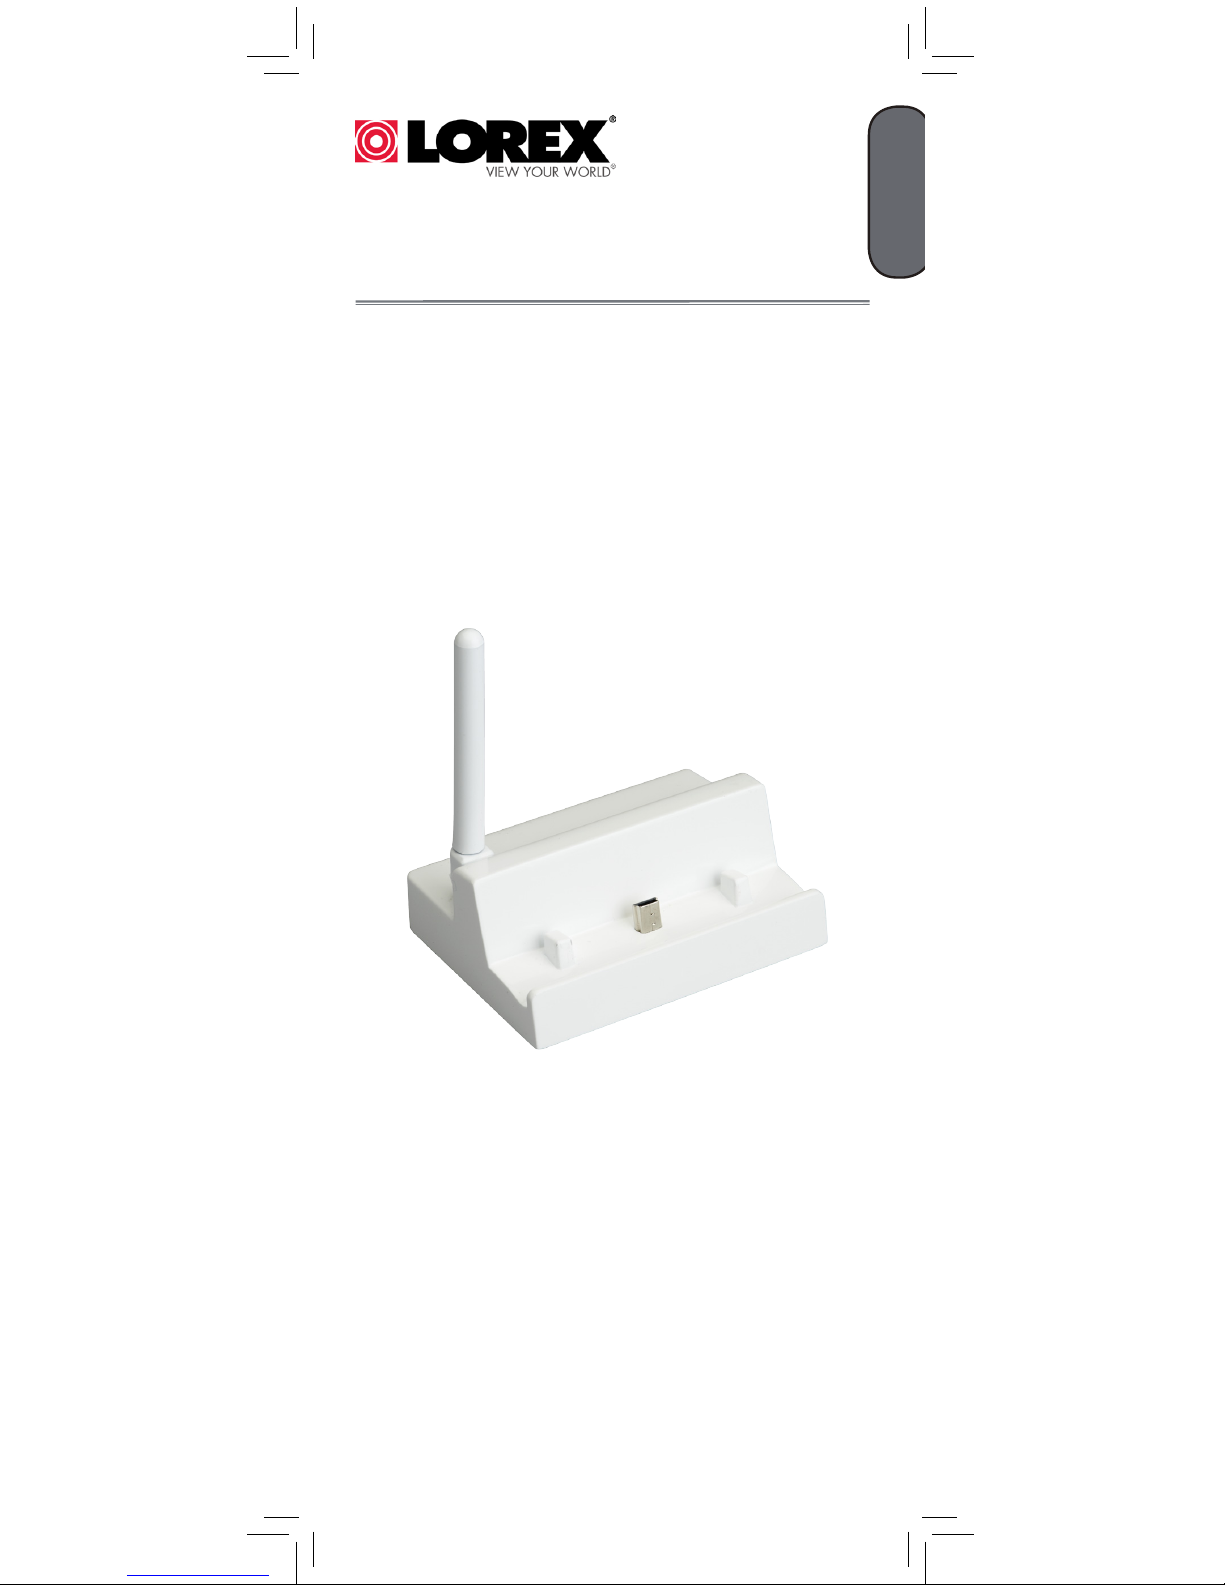
When the handheld monitor is docked in the cradle,
the battery charges. After completing setup, you may
connect to it using a smartphone or tablet at any time.
When no one is connected remotely using
a smartphone or tablet, you may use all
monitor functions except:
• The handheld monitor cannot be turned off.
• AV output to a TV is disabled.
When someone is connected to the cameras
using a smartphone or tablet, you will not
be able to use the buttons or menus on the
handheld monitor. An icon appears on the
handheld monitor when someone is connected using
the apps.
If Manual Recording is in progress when someone
connects remotely, the recording will be stopped and it
does not resume when they disconnect.
If Auto Recording (LW3400 Series only) is in
progress, recording is stopped when someone
connects remotely. When that person disconnects,
recording will resume the next time motion is detected.
If Schedule Recording (LW3400 Series only) is
in progress, recording is stopped when someone
connects remotely. When that person disconnects,
recording will resume for the remainder of the
schedule.
While viewing on a smartphone or tablet, you may
press to take a snapshot of the camera if you wish
to record an event.
For the latest compatibility list, visit
www.lorextechnology.com.
NOTE: A minimum upload speed of 512Kbps is
required. An upload speed of 1Mbps or higher is
recommended for best performance.
NOTE: Up to 3 users can be connected to the cradle
at the same time.
The Lorex Care app supports:

4
Getting Started
4On your smartphone or tablet, download
Lorex Care for free from the App StoreSM
(iPhone®/iPad®) or the Google Play Store
(Android™).
1Connect the cradle power adapter to the
cradle. Connect the other end to a power
outlet.
2Place the monitor onto the power/network
connector on the cradle. Use the stand-up
guides to help place the monitor.
Power/network
connector
The next steps in the setup depend if you are
connecting to the cradle using an iPhone®/
iPad® or Android™ device.
3Connect the cradle to your router using an
Ethernet cable (included).
NOTE: Ensure the switch on the back is set to
INTERNET mode. DIRECT mode is for service
use only. Disconnect and reconnect the power
adapter after changing to INTERNET mode.
INTERNET
For iPhone®/iPad®:
go to page 5 For Android™:
go to page 12
The monitor will charge when connected
to the cradle. It takes 5 hours to fully charge
the monitor.

ENGLISH
5
1Touch the Lorex Care icon to
launch the app.
iPhone®/iPad® Ethernet Setup
2Enter the ID code for the cradle in
one of the following ways:
Option B. Tap Add and manually enter the UID
printed below the QR code on the side of the cradle.
You may need to do this if your device does not have a
camera (for example, 1st generation iPads).
Option A. Tap QRCode and scan the QR code on
the side of the cradle using your device’s camera.
Option C. If your device is on the same network as
the cradle, it will detect the cradle UID. Tap the UID to
enter.
3
BA
C
Enter a name for
your system
Enter the default
password 000000
4Tap Save
••••••

6
5The system will show up in your Device
List with an Online status.
Select your system
to connect
The app will connect to your monitor and stream
live video from your cameras.
To connect the cradle to your Wi-Fi
network, see below.
iPhone®/iPad® WiFi Setup
1Open the Device List screen in Lorex
Care. Press Back if you are currently
connected to a camera.
2
Tap next to
the Wi-Fi cradle
3
Tap Advanced
Setting
4
Tap WiFi
NOTE: For best performance, it is recommended
to place the cradle somewhere with good signal
strength from your router.
NOTE: If your network name (SSID) contains a
space, you must change it to omit any spaces.
Check your router’s user guide for details on how
to change the network name.

ENGLISH
7
6
Enter the
password for your
Wi-Fi network
••••••
Tap Join
7Press 3 times to return to the
Device List.
9
Tap the monitor
to connect
8Remove the Ethernet cable from the
cradle.
Congratulations! You have successfully connected
the cradle to your Wi-Fi network. You can now
place the cradle in any location with good signal
to your Wi-Fi network.
NOTE: The Wi-Fi cradle must be connected to
power and the monitor must be on the cradle to
connect to the system on your phone or tablet.
Select your Wi-Fi
network
5The cradle will scan for available Wi-Fi
networks.

8
Using the iPhone®/iPad® App
Live View
You can view your camera in either portrait or
landscape mode.
View/share snapshots
Take snapshot
Mute audio
Listen to camera
Return to
Device List Select
channel
Pinch open to zoom in
Zooming in Live View
NOTE: The controls above are only shown in
portrait mode.
When zoomed in, press
and drag to move the
zoom area
P/T camera only:
When zoomed all the
way out, press and drag
to control the camera.
You can zoom in on the video in landscape or
portrait mode.
Pinch close to zoom out
Touch Gesture icons are attributed to the Wikimedia Foundation according
to the Creative Commons Licence
NOTE: There may be a delay of a few seconds when
controlling the P/T camera.

ENGLISH
9
2
Tap to open snapshot
1
To share snapshots:
Then tap Share
Viewing and Sharing Snapshots
You can take snapshots of live video from your
cameras by pressing . You can view or share
snapshots using the app.
To view snapshots:
1
Tap
In live view, tap to
view snapshots
2
Tap to save snapshot
to Photos
Tap to email snapshot
OR
NOTE: Your email settings must be configured to
share the snapshot using email. See the User Guide
for your iPhone®/iPad® for details.

10
Changing the Cradle Password
The default password is 000000. It is
recommended to create your own password to
ensure that no one may access your video.
To change the password:
1Open the Device List screen in Lorex
Care. Press if you are currently
connected to a camera.
2
Tap next to
the cradle
3
4
Tap Change
Password
Enter old password
Enter new password
5
Confirm new
password
Tap OK. Press two times to return
to the Device List.
6
7
Tap the monitor
to connect
Record your password:_______________________
TIP: If you forget your password, press and hold the
Reset button on the cradle for 5 seconds, it will reset
using the default 000000 password.
Tap Advanced
Setting

ENGLISH
11
Changing the Video Quality
The video quality can be increased for fast
Internet connections or decreased to improve the
video performance.
If the video is choppy or slow, it is recommended
to reduce the video quality setting.
To change the video quality:
1Open the Device List screen in Lorex
Care. Press if you are currently
connected to a camera.
2
Tap next to
the cradle
3
4
Tap Video
Quality
Select the desired
video quality
5
6Tap three times to return to Device
List.
Tap Advanced
Setting

12
3
NOTE: You may be prompted to select the app that
will be used to scan the QR code. Select Google and
press Always to continue.
Select Google
Press Always
1Touch the Lorex Care icon to
launch the app.
2
Tap Click here
to add device
Android Ethernet Setup
Option C. Tap UID and manually enter the UID
printed on the side of the cradle. You may need to do
this if your device does not have a camera.
Option A. Tap Scan and scan the QR code on the
side of the cradle using your device’s camera.
Option B. If your device is on the same network as
the cradle, tap Search. The app will detect the cradle
UID. Tap the UID to enter.
Enter the ID code for the cradle in
one of the following ways:
B
A
C

ENGLISH
13
Enter the default
password 000000
Enter a name for your
monitor
4
Tap OK
5
Select your device
to connect
The cradle will show up in your Device List
with an Online status.
The app will connect to your system and stream
live video from your cameras.
To connect the cradle to your Wi-Fi
network, see the next page.

14
Android Wi-Fi Setup
1You must connect the cradle to the Internet
using an Ethernet cable before you can
connect it to your Wi-Fi network. Complete
the Ethernet setup as described in “Android
Ethernet Setup” on page 12.
2Open the Device List screen in Lorex
Care. Press if you are currently
connected to a camera.
3Tap next to the
Wi-Fi cradle
4Tap Edit Device
5
NOTE: For best performance, it is recommended
to place the cradle somewhere with good signal
strength from your router.
Tap Advanced
NOTE: If your network name (SSID) contains a
space, you must change it to omit any spaces.
Check your router’s user guide for details on how
to change the network name.

ENGLISH
15
The cradle scans for available Wi-Fi
networks.
7
Tap
Then, select your
Wi-Fi network
6
Tap Manage
Wi-Fi networks

16
8
Enter your Wi-Fi
network’s password
Tap OK
The cradle will connect to your Wi-Fi network. Once
connected, it will say Connected below the network
name.
Connected
9Tap OK twice to return to the Device List.
10 Remove the Ethernet cable from the
cradle.
11
Congratulations! You have successfully connected
the cradle to your Wi-Fi network. You can now
place the cradle in any location with good signal
to your Wi-Fi network.
NOTE: The Wi-Fi cradle must be connected to
power and the monitor must be on the cradle to
connect to the camera on your phone or tablet.
Tap to connect
to the cradle

ENGLISH
17
Using the Android App
Live View
You can view your camera in either portrait or
landscape mode.
Pinch open to zoom in
Zooming in Live View
When zoomed in, press
and drag to move the
zoom area
P/T camera only:
When zoomed all the
way out, press and drag
to control the camera.
You can zoom in on the video in landscape or
portrait mode.
Pinch close to zoom out
Touch Gesture icons are attributed to the Wikimedia Foundation according
to the Creative Commons Licence
Take
snapshot
View/share
snapshots
Mute
audio
Exit live view Listen to camera
Change
channel
NOTE: There may be a delay of a few seconds when
controlling the P/T camera.

18
2
Tap to open snapshot
1
To share snapshots:
Then tap Share
Viewing and Sharing Snapshots
You can take snapshots of live video from your
cameras by pressing . You can view or
share snapshots using the app.
Snapshots are saved in .jpg format. They are
saved to the /DCIM/LorexCare folder on your
device’s memory.
To view snapshots:
1
Tap
In live view, tap to view
snapshots
Other manuals for ACCWIFI1
3
Table of contents
Languages:
Popular Network Accessories manuals by other brands

Tyco Electronics
Tyco Electronics FIST-GPS2-J installation instructions

Secomea
Secomea SiteManager 29 Series Resetting guide

Avaya
Avaya VSP 4850 GTS DC Quick install guide

Paradyne
Paradyne AIM24000 installation instructions

Contronics
Contronics Remote-i Net Operation manual

D-Link
D-Link SharePort user manual