Loring Merlin A15 User manual

Merlin 15K Batch Roasters
3200DuttonAve.#413,SantaRosa,CA95407Phone(707)526‐7215www.smartroaster.com

Version 4-26
OPERATION MANUAL
MERLIN A-15 KILO ROASTER
By LORING SMART ROAST
3200 Dutton Ave. #413, Santa Rosa, CA 95407 Phone 707 526-7215, Fax 707 526-3815
TABLE OF CONTENTS
DAILY OPERATING INSTRUCTIONS FOR MERLIN A-15
IMPORTANT SAFETY INSTRUCTIONS 1
•Read all instructions before proceeding
START UP: FIRST THINGS FIRST 3
•The first things to check and turning on the power
WARM-UP: BRINGING THE ROASTER UP TO ROASTING TEMP. 3
•Fire up the burner and load up some coffee
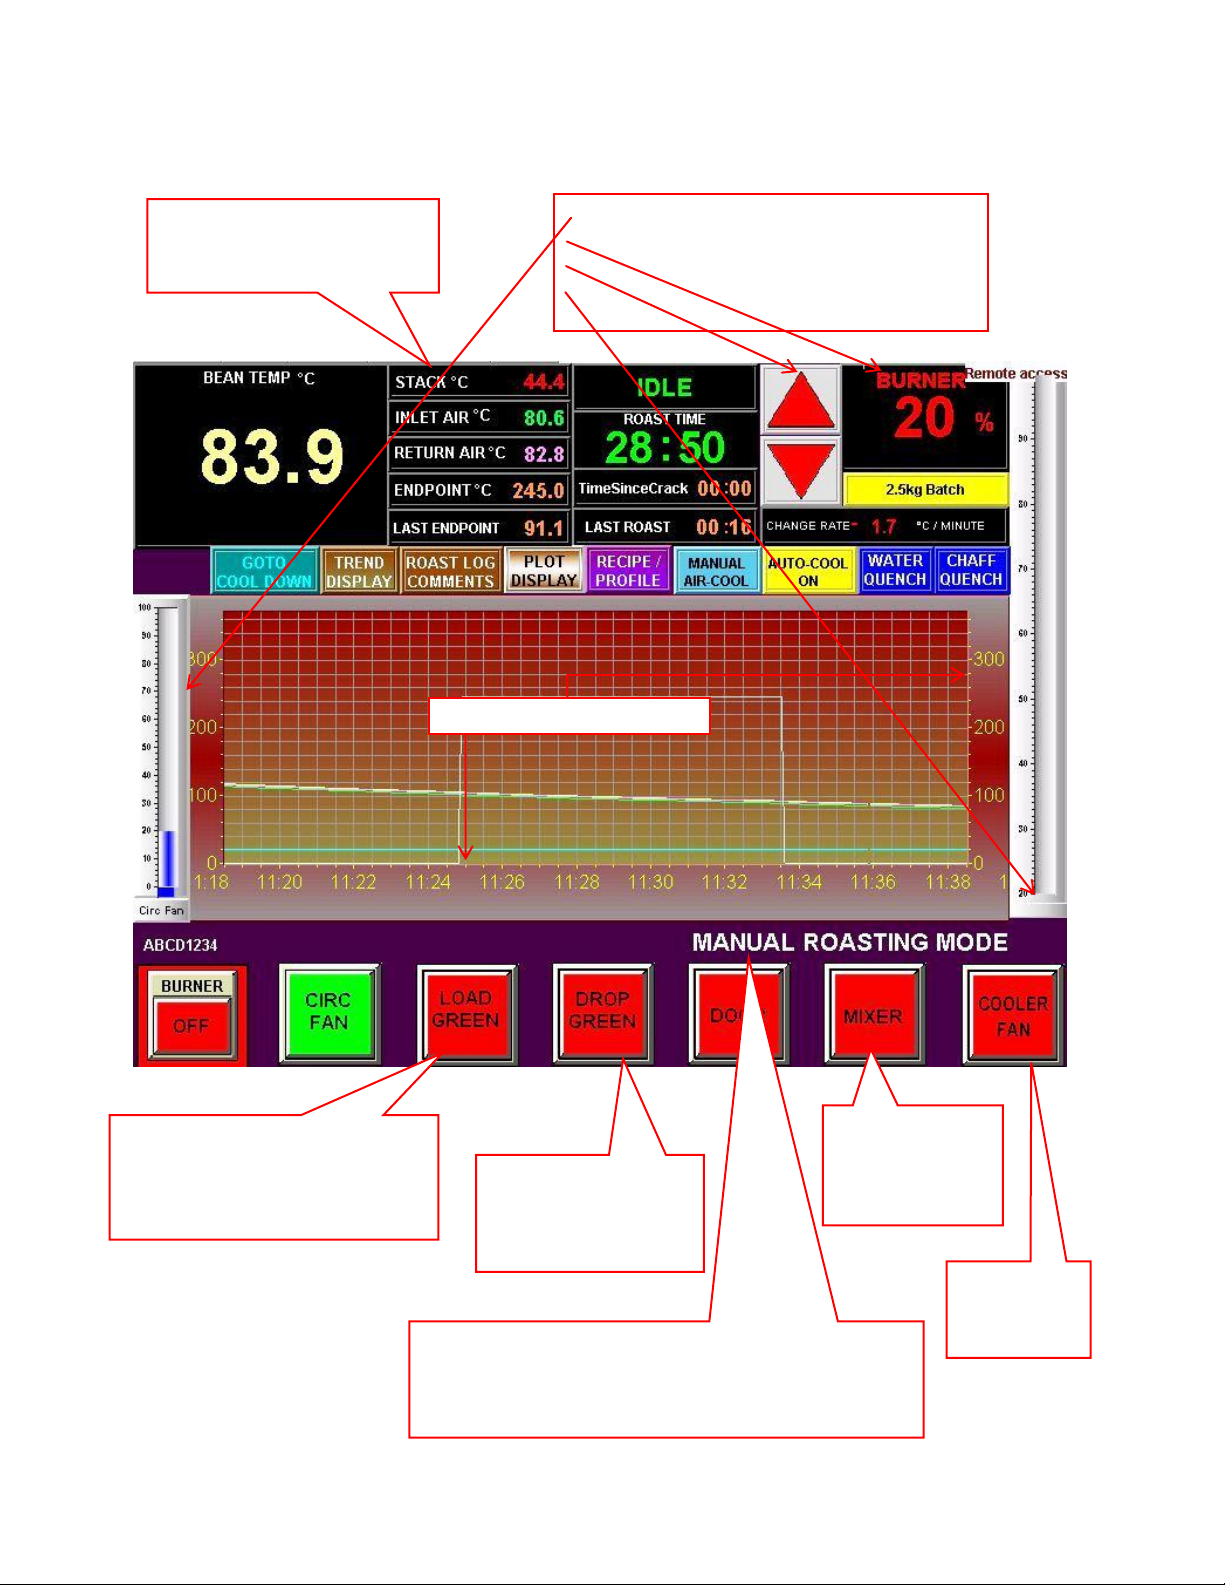
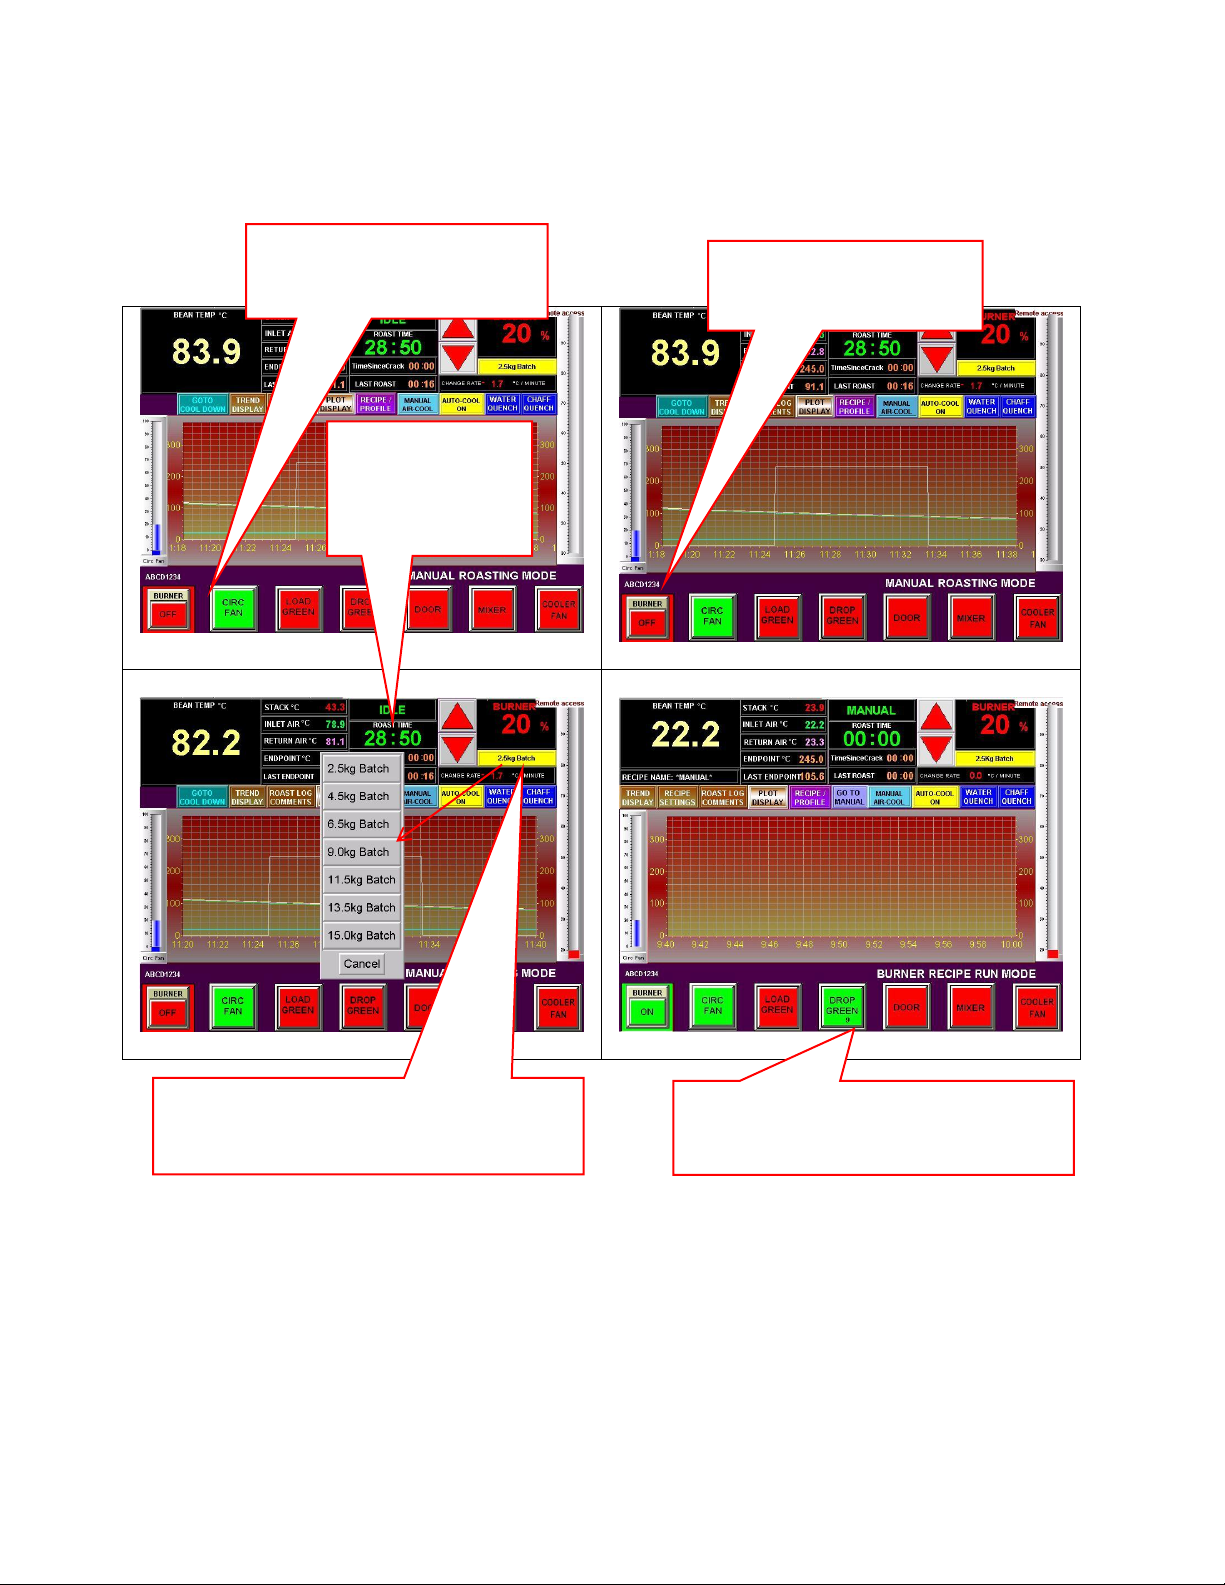
MANUAL MODE: STARTING A ROAST 4
•Select a base line profile, product name, and start roasting
MANUAL MODE: DURING THE ROAST 7
•Navigating the manual roast screens and making some choices
MANUAL MODE: ENDING THE ROAST 8
•Dropping the coffee to the cooler
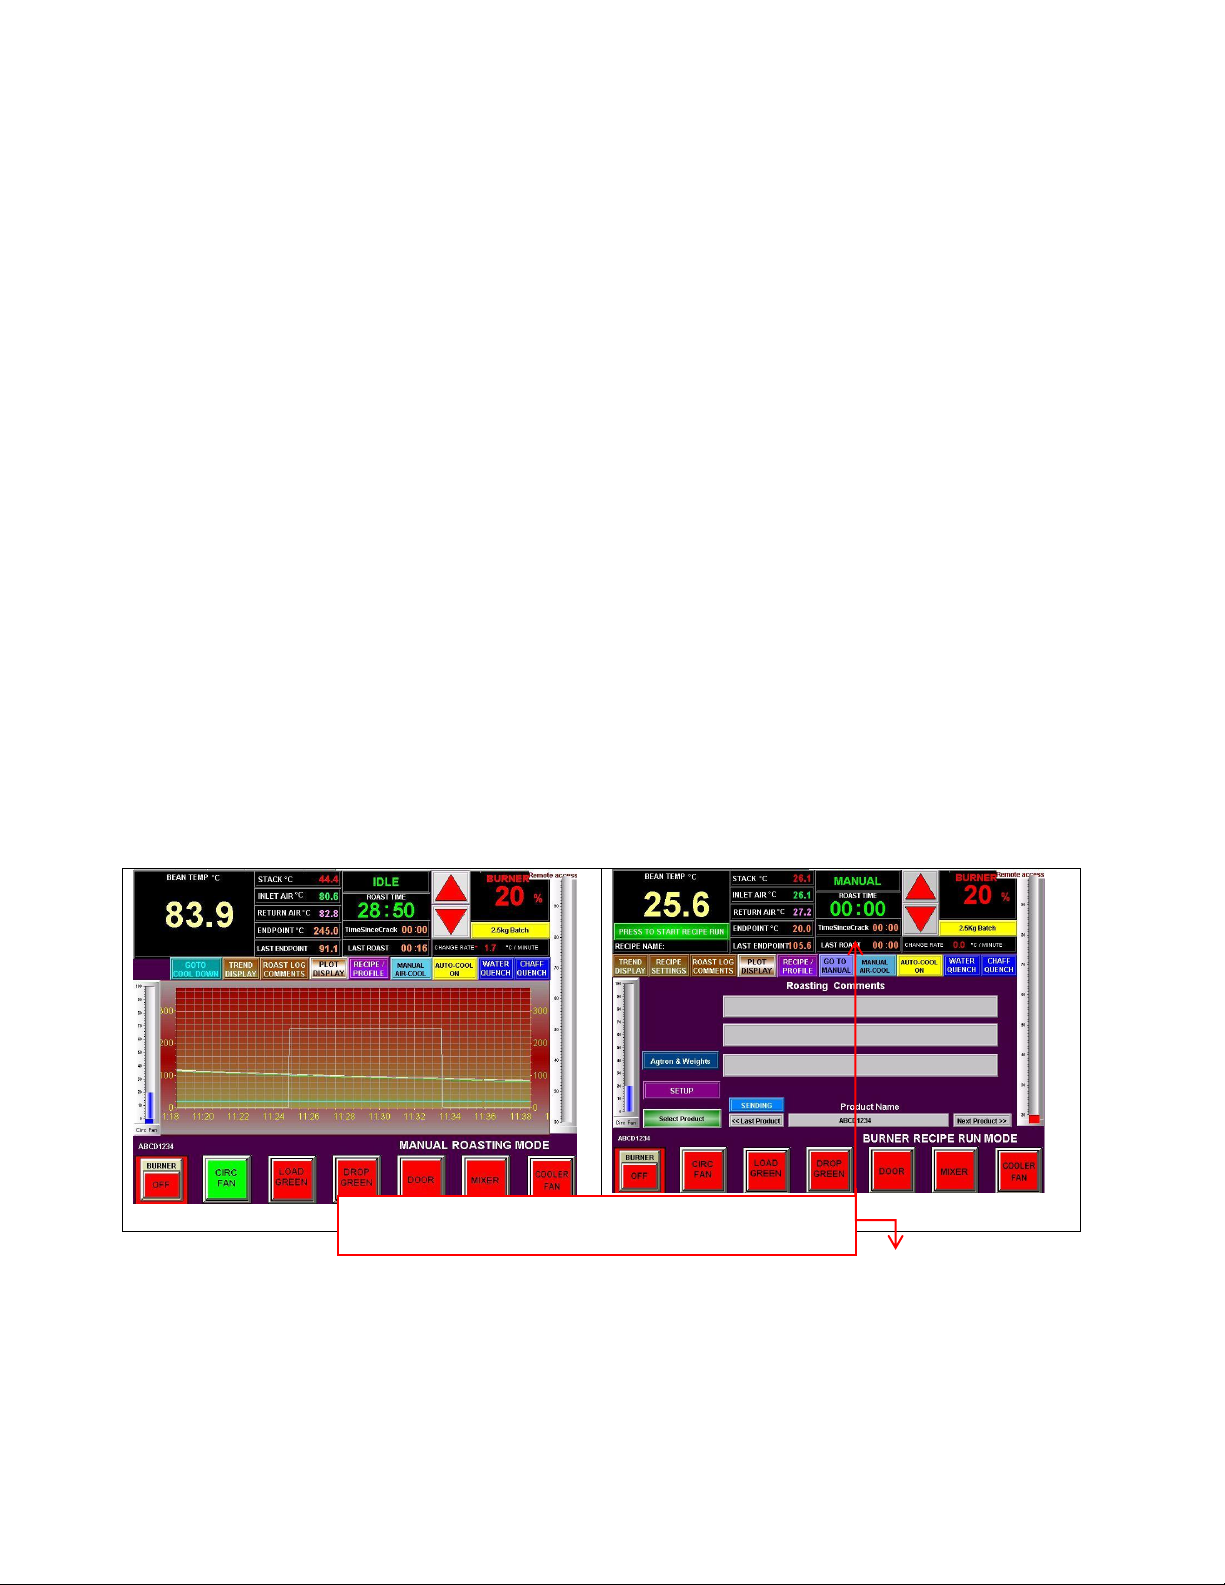
MANUAL MODE: POST ROAST & IDLE MODE 8
•Much data can be saved to the screen for future use
MANUAL MODE: COOL DOWN 10
•Cools the roaster down and turns most everything off automatically
RECIPE MODE: SOME FACTS ABOUT RECIPES 11
•How to create, name and save recipes
RECIPE MODE: STARTING A ROAST 13
Choose burner recipe, product name, drop temp and endpoint temp
RECIPE MODE: DURING THE ROAST 15
•Navigating the Burner Recipe screens and making some choices
RECIPE MODE: ENDING THE ROAST 17
•Dropping the coffee to the cooler may be manual or automatic
RECIPE MODE: POST ROAST & IDLE MODE 18
•Keep roasting with same recipe or change to different
RECIPE MODE: COOL DOWN 20
•Cools the roaster down and turns most everything off automatically
ROAST PROFILE MODE: SOME FACTS ABOUT PROFILES 22
•How to make, name and save profiles
ROAST PROFILE MODE: STARTING A ROAST 23
•Choose Roast Profiles, product name, drop temp and end-point temp
ROAST PROFILE MODE: DURING THE ROAST 26
•Navigating the Roast Profile screens and making some choices
ROAST PROFILE MODE: ENDING THE ROAST 28
•Dropping the coffee to the cooler may be manual or automatic
ROAST PROFILE MODE: POST ROAST & IDLE MODE 29
•Keep roasting with same Roast Profile or change to a different one
ROAST PROFILE MODE: COOL DOWN 31
•Cools the roaster down and turns most everything off automatically

Version 4-26
SETUP SCREEN OPTIONS 32
•Configure many roaster variables
RECOMMENDED MAINTENANCE
MAINTENANCE: DAILY 35
•Some basic chores
MAINTENANCE: WEEKLY 35
•Cleaning the cooler tray
•Vacuum particulate mater from the cooler ducting under the roaster
•Clean vacuum elevator filter
•Bearing squeak
MAINTENANCE: MONTHLY 39
•Inspect cooler ducting
MAINTENANCE: ANNUALLY OR AS NEEDED BASED ON YOUR PRODUCTION 40
•Things to keep an eye on long term
AGENCY APPROVALS
•CE Certificate and Declaration
•Component approvals by type
CUSTOMER DRAWINGS & INSTRUCTION SHEETS
•Installation Notes and Plan View Dimensions
•Installation Elevations
•Burner Gas Piping Schematic
•Power Wiring
•PLC Sinking Inputs
•PLC Relay Outputs
•PLC Analog Outputs
•Front of roaster component identification
•Rear of roaster component identification
•Adjusting the A15 Gas Mixer
•Adjusting the A15 Gas Regulator
•Burner Electrode Assembly BCU
•DNLoader Flow Chart.pdf
www.smartroaster.com 3200 Dutton Ave. #413, Santa Rosa, CA 95407 Phone 707 526-7215, Fax 707 526-3815

Rev 10-15-12
1
MERLIN A15
15KG BATCH ROASTER
IMPORTANT SAFETY INSTRUCTIONS
The roaster MUST be placed on a flat level surface capable of supporting its weight.
Keep area around roaster clean and dry and clear of obstructions as required by local
safety regulations.
Do not REMOVE safety covers or DEFEAT safety interlocks at any time.
There are many HOT surfaces when the roaster is in operation, use caution around the
roaster at all times.
NEVER reach inside the roaster’s main hopper while it is hot, excessive heat could cause
severe injury.
NEVER reach inside cooler tray when mixer is running or injury may result. NEVER
reach inside the mixer when the power is on as the mixer can start automatically at any time.
All cooler ducting and the cooler fan can be EXTREMLY HOT. Allow to cool before
disassembly for cleaning.
The sample tryer has sharp edges and may be quite hot, hold by wooden handle only.
Be very careful when wearing loose clothing or having long, unbound (loose) hair around
the roaster. Hair and clothes can become caught in moving equipment and cause severe
injury.
Turn off power and close all utility valves when the roaster is not in use.

Rev 10-15-12
2
General Information
Picture
001
Time and Temperature Graph.
Mode line indicates in which mode you are operating:
MANUAL ROASTING MODE
BURNER RECIPE RUN MODE
TEMPERATURE PROFILE RUN MODE
Thermal Coupler Temperatures
are indicated on the Graph by
their given color.
Circulation Fan Adjustment Slide
Burner Percentage
Burner Adjustment Up and Down Buttons
Burner Adjustment Slide
LOAD GREEN button indicates to
the computer that the Green has been
loaded for the Automatic Modes of
Recipe and Profile.
Manual Button for
dropping Green Beans
into the Roasting
Hopper
ON and OFF
button for the
Cooler Paddle
Drive
ON and OFF
button for the
Cooler Fan

Rev 10-15-12
3
START-UP
Empty the chaff collector drum. Reinstall the chaff drum and be sure that the locking
clamps are securely latched.
Be sure all cooler ducting is installed with gaskets and clamps are latched tight.
Check to see that the cooling hopper is empty and close the cooler discharge gate.
Close the roaster door.
Open the utility valves for air, water and gas.
Turn roaster “POWER-ON/OFF” switch to the ON position, momentarily. The power
will come on and the switch will spring back to center. The display screen will boot.
Make the necessary adjustments required to satisfy any fault conditions that may be
indicated on the startup screen once it boots.
WARM-UP
Push the “BURNER” button in the lower left hand corner of the display screen. The
frame of the button will switch to green (see Picture 002).The roaster will automatically purge the
system and then the burner will ignite. When ignition starts, the center of the burner button
will turn green and the green “burner on” light will light on the front of the control console
(see Picture 003).
The roaster will begin to warm-up.
The roaster will warm up to the preset “Idle Mode” (see Picture 004) high temp value, usually
around 450 degrees F., and the burner will be turned off by the system. At this time, the
roaster will indicate that it is in Idle Mode. By turning the burner on and off between two
preset temperatures, the roaster temp can be maintained within a narrow band. If the burner
is left on at low fire when the roaster is empty, the temp would continue to climb and the
roaster would get too hot. By cycling the burner, the temp is maintained at an appropriate
level. The burner will reignite at the Idle Mode low temp setting (based on return air temp).
The process takes from 20 to 30 minutes depending on the temp in the room and the target
values chosen by the operator on the setup page for Idle Mode High and Low Set point
values. See section on the “Setup” page screen.
A roast may be started at any time but many roast masters wait for the Idle Mode to
“porpoise” a couple of times to fully preheat the roaster so the first roast won't be too much
longer than subsequent roasts. This porpoise cycle takes about 10 minutes.
“LOAD GREEN” button is needed to activate the automatic modes, Recipe Mode and
Profile Mode. Once the beans are loaded, push this button to send the signal that the beans
are ready to automatically drop when the roaster reaches “Drop Temperature”. This button is
not used in Manual Mode.
Select the batch size that you wish to roast. To select the batch size, touch the yellow
button located under the burner percentage reading at the top right of the screen (see Picture 004).

Rev 10-15-12
4
Picture 002
Picture 003
Picture 004
Picture 005
MANUAL MODE: STARTING A ROAST
A roast may be started at any time after the door is closed from the previous roast. It can
be started during “POST-ROAST” or you can wait and start it once the machine has entered
“IDLE”.
Background turns green and the
“CIRC FAN” turns on when
“Burner On” is requested.
Button turns green and says
“ON” when burner is lit.
Touch Yellow “Batch” size button will open the
batch size dialog box. The size will determine fan
speeds necessary for the size of batch.
Drop Green shows the seconds that the Green
Bean Hopper door will be open when
dropping green according to batch size.
Mode Indicator
IDLE Mode
ROASTING
POST ROAST
COOL DOWN

Rev 10-15-12
5
Select the name of the product you are about to roast from the list of product names you
entered under the “SELECT PRODUCT” button of the “ROAST LOG COMMENTS” tab. It
will now appear on the main “MANUAL ROAST” screen (see Picture 006, 007, 008).
At this time, you may also select a “BASELINE” if you want to monitor the roast
progress relative to one from memory. You will be able to view the actual (current) bean
temp. as it progresses, on top of the graph of the historical baseline on the “PLOT SCREEN”
(see Picture 010) accessed by a tab on the main screen. You can roast by manually adjusting the
burner from this screen to keep the roast on track. The red line on the plot represents the
actual process value (bean temperature) and the white LINE is the historical graph of a roast
from memory. While in this screen you may use the “TREND” tab to view a larger version
of the normal trend display with most buttons minimized and some missing to make room.
Use “PREVIOUS” to return to the normal trend screen.
To select a baseline from memory touch the purple “RECIPE / PROFILE” button on the
main “MANUAL ROAST” screen. Touch the red “BASELINE PLOT” button top center on
the screen and it will turn green. Use the “LOAD PROGRAM FROM MEMORY” to select
the baseline you want to use and confirm with a “YES”. The baseline will now be available
from the “PLOT” tab on the main “MANUAL ROAST” screen (see Picture 009).
The endpoint temperature must be set or changed each time a new value is desired.
Touch the “ENDPOINT” digital indicator (see Picture 006) grouped with the other digital
temperature indicators at the top of the screen to set the desired endpoint for the new batch.
The endpoint you set here will be used to signal the end of roast approach both visually and
audibly.
If in “IDLE” mode, and the burner is off, it’s usually best to start the burner, so the
temperature will be rising in the roaster, then drop the beans at the desired drop temperature
by pushing the “DROP GREEN” button which will turn from red to green while the beans
are dropping. If the roaster is already above your desired drop temperature, open the roaster
door till the temperature falls 10 degrees or so below the desired drop temperature, then close
it and drop the beans at the desired temperature while it is rising.
You may adjust the burner as soon as the drop green gate is closed, as evidenced by the
green “DROP GREEN” button turning back to red. A timer will show on the button (see Picture
011), counting down the seconds that Green Hopper will be open which varies according to
batch size.
You may adjust the Circulation Fan speed, using “Slide” (see Picture 011) adjuster on the left
side of the touch screen, as soon as the drop green gate is closed. This function allows you to
control the movement of the beans.

Rev 10-15-12
6
Picture 006
Picture 007
Picture 008
Picture 009
Picture 010
Picture 011
Roast Log
Comments
(Picture 007)
Select Products brings up
your Product List (Picture 008)
You can scroll through your product list by
touching “<<Last Product” or “Next Product>>”
Click here to go back
to the Main Screen
White line is a profile
from history. The red line
is your New Roast Profile
Touch to Adjust
ENDPOINT
You can adjust the Circulation Fan Speed
once the Drop Green Door closes.
Drop Green Timer
count down.

Rev 10-15-12
7
MANUAL MODE: DURING THE ROAST
During the roast, you may jump between the “TREND DISPLAY”, “ROAST LOG
COMMENTS”, and the “PLOT” tabs (see Picture 012, 013, 014 and 015). You may also enter
“SETUP” and make changes to some of the basic values and parameters of the roaster.
On the “ROAST LOG COMMENTS” screen, you may attach notes from the on screen
keyboard that pops up when you touch the comment bar (see Picture 013). You may also type
them in from a physical keyboard on any PC on your LAN after you create a clone of your
roaster screen. Open a browser on your networked PC and type in “HTTP://” then your
roasters I.P. address, then “:5800” and hit enter. Your roasters I.P. Is most likely
192.168.1.200 but you can check on the information tab of the “SETUP” screen if that
doesn't work. You may also try another browser. They don't all support this but IE and
Firefox usually work. A Tight VNC password dialog box will open and you then enter one
of your two passwords. One is for viewing only and one is for interacting. You will need to
interact to enter your notes but be very careful, the screen is live and if you click on
something, it is just like touching it while standing at the roaster. Be careful with this!! (but
don't be afraid of it)
You may start the “TIME SINCE CRACK” timer manually (see Picture 013 and 015), and its
value will be recorded with the other roast data e-mailed at the end of the roast. Touch the
digital display of the timer to activate it.
20 degrees F (9 deg C) before the endpoint is reached the amber flasher on the front of
the consolet will start flashing. As the endpoint approaches the flasher will flash faster. At
10 degrees F (4 deg C) prior to the endpoint, the horn will sound off one time for about a
second. The volume of the horn can be adjusted by rotating the bezel of the horn. At 5
degrees F (~2 deg C) below endpoint, the horn will sound off several times.
Picture 012
Picture 013
“Time Since Crack” is a timer you start when you detect 1st
or 2nd crack. This is only a timer; it does not detect “Crack”.

Rev 10-15-12
8
Picture 014
Picture 015
MANUAL MODE: ENDING THE ROAST
At the end of the roast the screen will flash “END OF ROAST” and the horn will sound till
the door is opened. The horn may be silenced with the “SILENCE HORN” button on the
screen. You may also disable the end of roast horn signal in setup.
MANUAL MODE: POST ROAST & IDLE MODE
“POST-ROAST” exists because there is residual smoke in the roaster after the coffee is
out of the roaster hopper. The burner remains on for 3 minutes after the end of the roast to
eliminate this smoke and this time is called “POST-ROAST”. After the 3 minutes, if you
don't start a roast, the roaster switches to “IDLE MODE”, and the burner is turned off and
then back on between the two temps set for “IDLE HI LIMIT TEMP” and “IDLE LOW
LIMIT TEMP” as established on the setup screen (see Picture 018 and 019). The roaster will remain
in “IDLE-MODE” till a roast is started, and the burner will cycle on and off between these
two temps which takes about 10 minutes per cycle depending on settings. This is often
referred to as “porpoising”.
The e-mail of the roast data is sent about 30 seconds after the end of the roast cycle, so be
sure all roast log notes are typed in prior to that time. The "ROAST LOG COMMENTS" tab
of the main screen accesses the roast log screen during the roast.
Agtron data collected after the roast may be sent in a separate e-mail after the roast data
e-mail has already been sent. The batch number is incremented automatically so it should
correspond to the batch it came from if it is done in the same order. However, you may not
keep Agtron data on every batch or for other reasons the batch number may get out of sync,
so it is adjustable on the Agtron screen (see Picture 020 and 021). The screen is accessible from the
“AGTRON & WEIGHTS” button of the “ROAST LOG COMMENTS” tab of the Main Run
Recipe screen.
Capturing data from a manual roast can create a recipe. To save the data from a manual
roast, click the purple “ROAST / PROFILE” button above the trend graph on the main screen
(see Picture 016). A new screen will appear allowing you to choose between “BURNER
Trend
View
Plot View
Toggle back and forth

Rev 10-15-12
9
RECIPE”, “BASELINE”, and “ROAST PROFILE MODES” (see Picture 017). Click the
“BURNER / RECIPE” button and it will turn green. Press the “CAPTURE LAST
MANUAL RUN FOR BASELINE PLOT” to capture the baseline, then “CAPTURE LAST
MANUAL RUN FOR BURNER RECIPE” button to capture the recipe. You must now
name the recipe and save it under the new name. To do this select “EDIT BURNER
RECIPE”. Create a name and save the recipe (see Picture 022 and 23).If you save it with the same
name as a previously saved recipe, you can overwrite the recipe in memory, thus modifying
it. A roast profile is created in much the same way but by activating the “ROAST
PROFILE” button instead of the “BURNER RECIPE” button.
A baseline can be created by capturing data from the last roast in much the same way a
recipe is saved; by activating the “BASELINE PLOT” button turning it green (see Picture 024) and
then touch “CAPTURE LAST MANUAL ROAST FOR BASELINE PLOT”. Now “EDIT
BASELINE PLOT”, give it a name, and then save it. In this way, a baseline is captured
independent of recipe functionality. If used in manual mode it is simply displayed (graphed)
in the plot screen and can be used as a template for controlling a manual roast using the
manual burner controls (see Picture 025). Need an accurate picture here and I need a BASELINE
PLOT picture.e
Picture 016
Picture 017
Picture 018
Picture 019
Touch “RECIPE/PROFILE” button
“SETUP” button
Login with 3333 to
change settings.
Once you login you can touch the
black buttons and change settings.

Rev 10-15-12
10
Picture 020
Picture 021
Picture 022
Picture 023
Picture 024
Picture 025
MANUAL MODE: COOL DOWN
At the end of the day, or even on long breaks from roasting, when the roaster is in
“IDLE” or “POST ROAST” you can switch the roaster to “COOL DOWN” (see Picture 026). In
cool down, the burner is shut off along with all other motors except the circulating fan. The
First touch BURNER
RECIPE and it will turn
green.
Second touch “Capture Last
Manual Run for Base Line Plot”
Third touch “Capture Last
Manual Run for Burner Recipe”
Fourth touch
“Edit Burner Recipe”
You will need to establish
your Drop Temp.
Touch here to name your recipe. Then
touch “Save Recipe” button.
Select BASELINE PLOT,
then do the same 2nd, 3rd
&4th steps in picture 22nd.

Rev 10-15-12
11
circulating fan actually speeds up a little. Air is circulated and after a short time the purge
gate is opened so all the air is replaced with cool room air constantly.
If you touch “GO TO COOL DOWN” while in “POST ROAST”, you will see “COOL
DOWN REQUESTED”. We must let the “POST ROAST” cycle end before going to
“COOL DOWN” or we run the risk of allowing some smoke from the end of the last roast to
escape.
At the end of “POST ROAST”, the roaster will automatically switch to “COOL DOWN”
instead of “IDLE”.
The roaster takes 20 to 30 minutes to cool down. It is important so the heat does not
“seep” through to the bearings of the Circulation Fan Motor.
At the end of “COOL DOWN”, the roaster will turn off the circulation fan and return the
roaster to the initial startup screen. This happens when the return air temperature gets down
to 150 deg. F or 66 deg. C. At this point, you only need to turn off the power to the roaster
and close the utility valves for air, water and gas.
Picture 026
RECIPE MODE: SOME FACTS ABOUT RECIPES
To create or change a recipe (or profile) you must first Login. By default, the password is
3333. This may be changed at startup or later via the Internet or, by a field service engineer
from LORING SMART ROAST.
A recipe can only be “captured” from a batch that you roast in “MANUAL MODE”, but
can be created in other ways like creating from scratch using the “EDIT BURNER RECIPE”
screen, loading and editing an existing one, or importing one saved by someone else, or one
created in Excel and FTP'd into the screen via Ethernet.
A recipe is a record of the bean temperatures at which burner adjustments were made
during a roast, the new burner setting at each temperature, and the record (at 6 second
intervals) of the bean temperature graph generated during that roast. When the recipe is
“captured from last manual run”, the baseline from that roast is captured with it.
If a recipe is created by going to the “EDIT BURNER RECIPE” button from the
“RECIPE / PROFILE” (see Picture 027) tab and creating one from scratch, there will be no
Cool Down before
turning off the roaster.

Rev 10-15-12
12
baseline associated with it until the program is run and the baseline thus generated is saved
with the recipe using the same name.
You must have just run (or you must load) the recipe to which you want to add the
baseline before changing the name or saving the recipe.
Do not turn the "BASELINE PLOT" button green. Leave "BURNER RECIPE" green.
Touch "Capture last run for Baseline Plot"(see Picture 028), then touch "Edit Burner Recipe" and
on that screen make any changes you want to the recipe, including the name (or leave the
name) and hit enter (see Picture 029 and 30).
This will add the current baseline (from the last roast) to the recipe. Then you must save
it, with the same name, or a new name.
Touch "Save Recipe" and wait to see the name change (if any) indicated (see Picture 031).
A recipe may be created spontaneously by loading an existing one, modifying it, then
renaming it. It will retain the baseline of the recipe you modified until you run the recipe
(creating new current baseline data) and then saving that baseline to the recipe as described
above.
or going to the “EDIT BURNER RECIPE” button from the “RECIPE / PROFILE” tab
and creating a recipe from scratch. A burner recipe may contain up to 99 burner adjustments
based on bean temperature, or it may contain as few as 4.
Picture 027
Picture 028
Picture 029
Picture 030
Touch “RECIPE/PROFILE”
To add last Profile to Recipe, leave the
“BURNER RECIPE” green then Touch
“Capture Last Manual Run for BaseLine Plot”
Then Touch “Edit Burner Recipe”
Now Touch “Save Recipe Name” and name
your recipe, then Touch “SaveRecipe”.

Rev 10-15-12
13
Picture 031
RECIPE MODE: STARTING A ROAST
Click the purple “ROAST / PROFILE” button above the trend screen on the main screen
(see Picture 032). A new screen will appear allowing you to choose between Burner Recipe,
Baseline, and Roast Profile modes.
To select a previously saved recipe, select the red “BURNER RECIPE” button which
turns it green. Once the central “LOAD FILE FROM MEMORY” button appears touch it
and select your chosen recipe from the drop down list, then confirm it with “YES” (see Picture
033, 034 and 035).
While you are here, you can select the name of the product you will be running with this
recipe. Do so and then push the green “RECIPE / PROFILE RUN” button (see Picture 036 and 037).
You will be switched to the “MAIN RECIPE RUN SCREEN” where the name of the
current recipe and the current product are listed (see Picture 038).
If your last roast was in recipe mode and you haven't changed modes, you will still be in
recipe mode. The same recipe will continue to run, batch after batch, till you load a different
one.
The endpoint temperature is best chosen right after returning to the “MAIN RECIPE
RUN SCREEN” after choosing the recipe and the product name. But it can be changed at
any time during the roast. Touch the “ENDPOINT” digital indicator grouped with the other
digital temperature indicators at the top of the screen to set the desired endpoint for the new
batch or change it on the recipe settings screen (see Picture 038).
A roast may be started at any time after the door is closed from the previous roast. It can
be started during “POST-ROAST” or you can wait and start it once the machine has entered
“IDLE MODE”.
To start a roast cycle press the green “PRESS TO START RECIPE RUN” button under
the digital Bean Temperature indicator.
The roaster will compare the recipes drop temperature to the current roaster temperature.
If the roaster is above it, a yellow flashing text block will ask you to open the roaster door till
the temperature drops below the required drop temperature. When it does, you can shut the
door and then a “WAITING TO DROP GREEN” message will appear. When the roaster
temperature reaches the (recipe specified) drop temperature, the green will drop
Once saved the new name of
the recipe will appear here.

Rev 10-15-12
14
automatically. The roast timer will start at this time and the drum drive will start
automatically if it is not already on.
Once the green bean drop valve closes, the burner will go to the first burner set point of
the recipe. The length of the drop time can be fine-tuned in the setup screen, usually about 15
seconds.
Picture 032
Picture 033
Picture 034
Picture 035
Picture 036
Picture 037
Touch “RECIPE/PROFILE”
After selecting your recipe, choose your product.
Choose Recipe
After touching “BURNER RECIPE”
there is a delay before “Load Recipe
From Memory” appears
Touch “YES”.
Touch “Load Recipe
From Memory”.
Then touch “Recipe/Profile Run”
Select product name.
Touch here to create your product list.
Touch “BURNER RECIPE”
turning it green.

Rev 10-15-12
15
Picture 038
RECIPE MODE: DURING THE ROAST
The recipe software is now in control of the roast. Manual burner adjustments can be
made and will remain in affect till the recipe reaches the next control point. At that
temperature, it will make the scheduled burner adjustment.
During the roast, you may jump between the “TREND DISPLAY”, “RECIPE
SETTINGS”, “ROAST LOG COMMENTS” and the “PLOT” tabs (see Picture 039-046). You may
also enter “SETUP” and make changes to some of the basic values and parameters of the
roaster (see Picture 047).
The Magnehelic gage is mounted behind the control screen. It is a direct and physical
measure of the burner firing rate (see picture 048).
On the “ROAST LOG COMMENTS” screen, you may attach notes from the on screen
keyboard that pops up when you touch the comment bar. You may also type them in from a
physical keyboard on any PC on your LAN after you create a clone of your roaster screen.
Open a browser on your networked PC and type in “HTTP:/ ” then your roasters I.P.
address, then “ :5800 ” and hit enter. Your roasters I.P. Is most likely 192.168.1.200 but you
can check on the information tab of the “SETUP” screen if that doesn't work. You may also
try another browser. They don't all support this but IE and Firefox usually work. A Tight
VNC password dialog box will open and you then enter one of your two passwords. One is
for viewing only and one is for interacting. You will need to interact to enter your notes but
be very careful, the screen is live and if you click on something, it is just like touching it
while standing at the roaster. Be careful with this!! (but don't be afraid of it)
You may start the “TIME SINCE CRACK” timer manually, and its value will be
recorded with the other roast data e-mailed at the end of the roast. Touch the digital display
of the timer to activate it. Many roast masters use this timer to keep track of how long the
roast proceeds after the start of the first crack.
You may switch to “MANUAL CONTROL” of the roast at any time but may not reenter
“BURNER RECIPE MODE” during that batch. You will have to complete the batch in
“MANUAL MODE”, the plot screen will not assist you, and the roast timer will stop.
Now in “BURNER RECIPE RUN MODE”
Touch here to “GO TO MANUAL” mode.
Touch here to change “END POINT” temperature.

Rev 10-15-12
16
Picture 039
Picture 040
Picture 041
Picture 042
Picture 043
Picture 044
Touch “TREND DISPLAY”
Touch “RECIPE SETTINGS”
Touch “ROAST LOG COMMMENTS”
Enter your comments on these 3 lines.
You may enter SETUP changes to some of the
basic values and parameters. See Picture 47.

Rev 10-15-12
17
Picture 045
Picture 046
Picture 047
Picture 048
RECIPE MODE: ENDING THE ROAST
The endpoint temperature is part of the recipe (see Picture 049). The Amber light on the front
of the consolet will flash @ 20 degrees F (9 deg C) before it has reached the endpoint
temperature (Picture 050). As the endpoint approaches the Amber flasher will flash faster. At 10
degrees F (4 deg C) prior to the endpoint, the horn will sound one time for about a second.
At 5 degrees F (~2 deg C) below endpoint, the horn will sound several times.
At the end of the roast, the screen will flash “END OF ROAST” and the horn will sound
until the door is opened (Picture 051). The horn may be silenced with the “SILENCE HORN”
button on the main screen (Picture 052). The volume of the horn can be adjusted by rotating the
bezel of the horn (Picture 053). You may also disable the end of roast horn signal in setup (see
Picture 054).
The e-mail of the roast data is sent about 30 seconds after the end of the roast cycle, so be
sure all roast log notes are typed in prior to that time. The "ROAST LOG COMMENTS" tab
of the Main Run Recipe screen accesses the roast log screen during the roast (Picture 043).
Touch “PLOT DISPLAY”
Table of contents
Other Loring Kitchen Appliance manuals