Lotus cooker F45-78ET User manual

1
563015401.doc
LIBR.ISTR.F45-78E
Istruzioni
per l'installazione e l'uso
Aufstellungs
und Bedienungsanleitung
Instructions
Pour l’installation et l’emploi
Instructions
for installation and use
Instrucciones para la instalación
y el uso
FRIGGITRICI ELETTRICHE
ELEKTRISCH BETRIEBENE
FRITEUSE
FRITEUSES ELECTRIQUES
ELECTRICAL FRYER
FREIDORAS ELÉCTRICAS
Mod.
F45-78ET
IT
CH
FR
BE
DE
AT
CH
GB
IE
ES

2
FIG. A
562014801 M00_00
A B
Targhetta caratteristiche
Typenschild
Plaque des caractéristiques
Data Plate
Chapa de características
Allacciamento elettrico
Elektroanschluß
Raccordement electrique
Electrical connection
Conexión eléctrica
A
B
C

3
FIG. B
549022400 M00_02
400V~3N 50/60 Hz
1
Commutatore Umschalter Commutateur Commutator Commutador
2
Microinterruttore Mikroschalter Micro-interrupteur Microswitch Microinterruptor
3
Morsettiera arrivo linea
Klemmleiste linie Plaque à borne arr. Ligne
Electrical connection Conexión eléctrica
4
Morsettiera
commutazione
Switching
Klemmenblock Bornier de commutation Switching terminal
block
Tablero de bornes de
conmutación
5
Resistenza Heizelement Résistence Resistance Resistencia
6
Spia bianca Kontrolleuchte weiß Lampe témoin blanche White pilot light Piloto blanco
7
Spia verde Kontrolleuchte grün Lampe témoin verte Green pilot light Piloto verde
8
Teleruttore Fernschalter Téléruptor Remote control switch Telerruptor
9
Termostato Thermostat Thermostat Thermostat Termostato
10
Termostato sicurezza Sicherheits-thermostat Thermostat de sécurité Safety Thermostat Termostato seguridad

4
ESEMPIO DI FISSAGGIO PER APPARECCHI
BEISPIEL DER FESTSETZUNG FUER GERAETE
EXEMPLE DE MONTAGE POUR EQUIPEMENTS
EXAMPLE OF FIXING FOR EQUIPMENT
EJEMPLO FIJACIÓN DE APARATO
562026000 M00_00

5
Pag. 6
Seite 10
Page 14
Page 18
Pàg. 22
IT CH
FR
BE
DE AT CH
GB IE
ES

6
IT
CH
INDICE
DICHIARAZIONE DI CONFORMITA’.......................................................................................................................7
TABELLA DATI TECNICI ............................................................................................................................................7
ISTRUZIONI PER L'INSTALLAZIONE .....................................................................................................................7
INSTALLAZIONE...........................................................................................................................................................7
DISPOSIZIONI DI LEGGE, REGOLE TECNICHE E DIRETTIVE........................................................................7
ALLACCIAMENTO ELETTRICO ...............................................................................................................................7
EQUIPOTENZIALE........................................................................................................................................................8
MESSA IN FUNZIONE................................................................................................................................................... 8
ISTRUZIONI PER L'USO ..............................................................................................................................................8
ACCENSIONE.................................................................................................................................................................. 8
SVUOTAMENTO DELLA VASCA ...............................................................................................................................8
PULIZIA E MANUTENZIONE...................................................................................................................................... 8
COMPORTAMENTO IN CASO DI PROLUNGATA INTERRUZIONE DI FUNZIONAMENTO....................... 9
COMPORTAMENTO IN CASO DI GUASTO.............................................................................................................9
MANUTENZIONE (SOLO PER PERSONALE QUALIFICATO) ............................................................................9
ACCESSIBILITÀ.............................................................................................................................................................9

7
IT
CH
DICHIARAZIONE DI CONFORMITA’
Il costruttore dichiara che gli apparecchi sono conformi alle prescrizioni della direttiva CEE 90/396. L’installazione
dovrà essere effettuata in osservanza delle norme vigenti soprattutto in merito all’aerazione dei locali e al sistema di
evacuazione dei gas di scarico.
N.B.: Il costruttore declina ogni responsabilità in caso di danni diretti o indiretti dovuti ad un’errata installazione,
alterazioni, cattiva manutenzione, uso non corretto, e a tutti gli altri casi previsti negli articoli riportati dalle nostre
condizioni di vendita.
TABELLA DATI TECNICI
MODELLI DIMENSIONI cm ALIMENTAZIONE ASSORBIMENTO
MASSIMO A
POTENZA
MASSIMA kW
CAVO
ALIMENTAZIONE
(Al silicone)
F45-78ET 80x90x70h 400Vac/3N 50/60Hz 57,97 40 5x10 mm
2
ISTRUZIONI PER L'INSTALLAZIONE
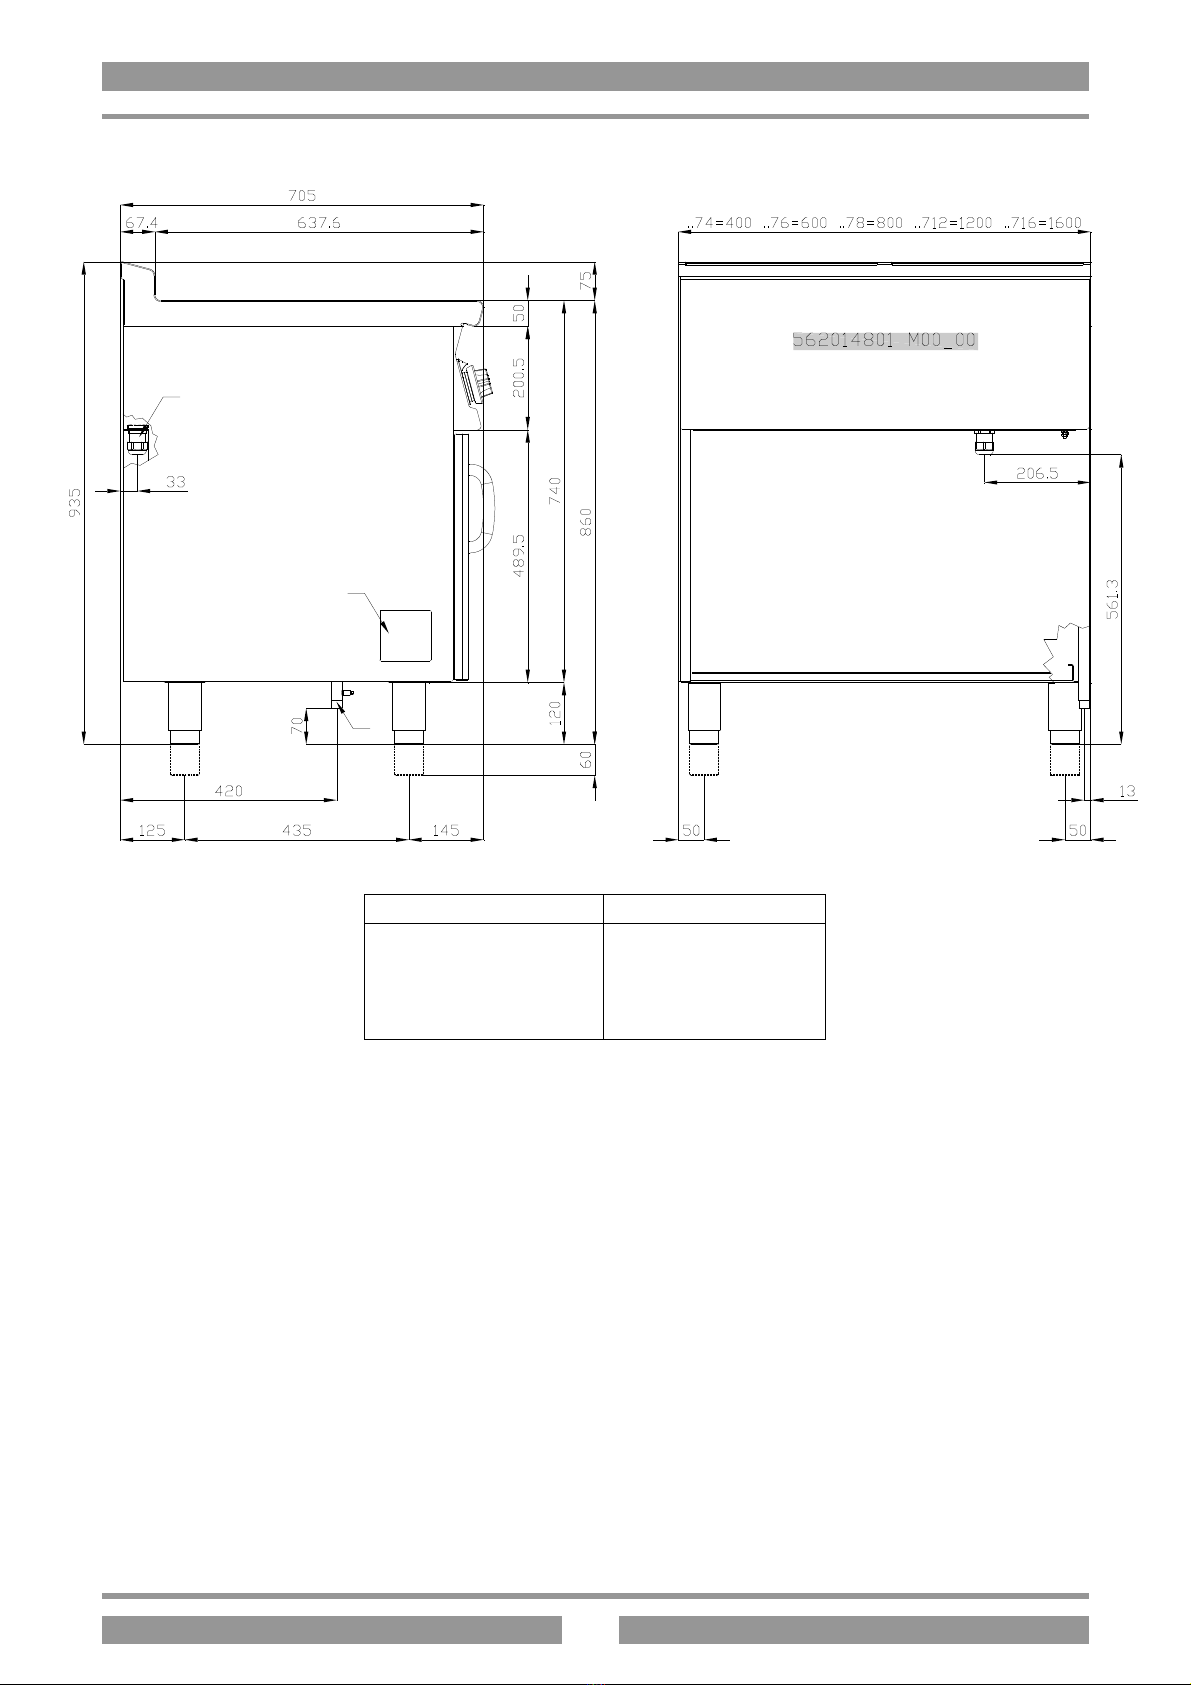
La targhetta caratteristiche tecniche si trova sul fianco laterale (vedi disegno al punto allacciamento elettrico) e contiene
tutti i dati necessari all'allacciamento.
INSTALLAZIONE
Durante il posizionamento l'apparecchio deve essere messo a bolla, piccoli dislivelli possono essere aggiustati mediante
i piedini regolabili (avvitare o svitare). L'interruttore generale o la presa devono essere nelle vicinanze dell'apparecchio
e facilmente accessibili.
Si consiglia di porre l'apparecchio sotto una cappa aspirante, in modo che l'evacuazione dei vapori avvenga in modo
rapido. Qualora l'apparecchio venisse posizionato vicino a pareti, pareti divisorie, mobili da cucina, rivestimenti
decorativi ecc. si consiglia che questi siano di materiale non infiammabile, altrimenti provvedere a rivestire tali pareti
con del materiale non infiammabile.
Si deve anzitutto assicurare che le prescrizioni antincendio vengano rispettate.
L'installazione, messa in funzione e manutenzione dell'apparecchio devono essere eseguite da personale qualificato.
Tutti i lavori necessari all'installazione devono essere eseguiti in osservanza alle norme vigenti.
Il costruttore declina qualsiasi responsabilità in caso di cattivo funzionamento, che risulti dovuto ad una installazione
errata o non conforme.
Attenzione: come da disposizioni internazionali, durante l'allacciamento dell'apparecchio è da prevedere a monte dello
stesso un dispositivo che permetta di staccare in modo omnipolare l'apparecchio dalla rete.
DISPOSIZIONI DI LEGGE, REGOLE TECNICHE E DIRETTIVE
L'installazione deve essere eseguita in osservanza delle seguenti norme:
- Prescrizione antinfortunistica vigente.
- Prescrizione di installazione, norme CEI.
ALLACCIAMENTO ELETTRICO
L'apparecchio viene consegnato privo del cavo di allacciamento.
Per l’installazione del cavo si proceda nel seguente modo:
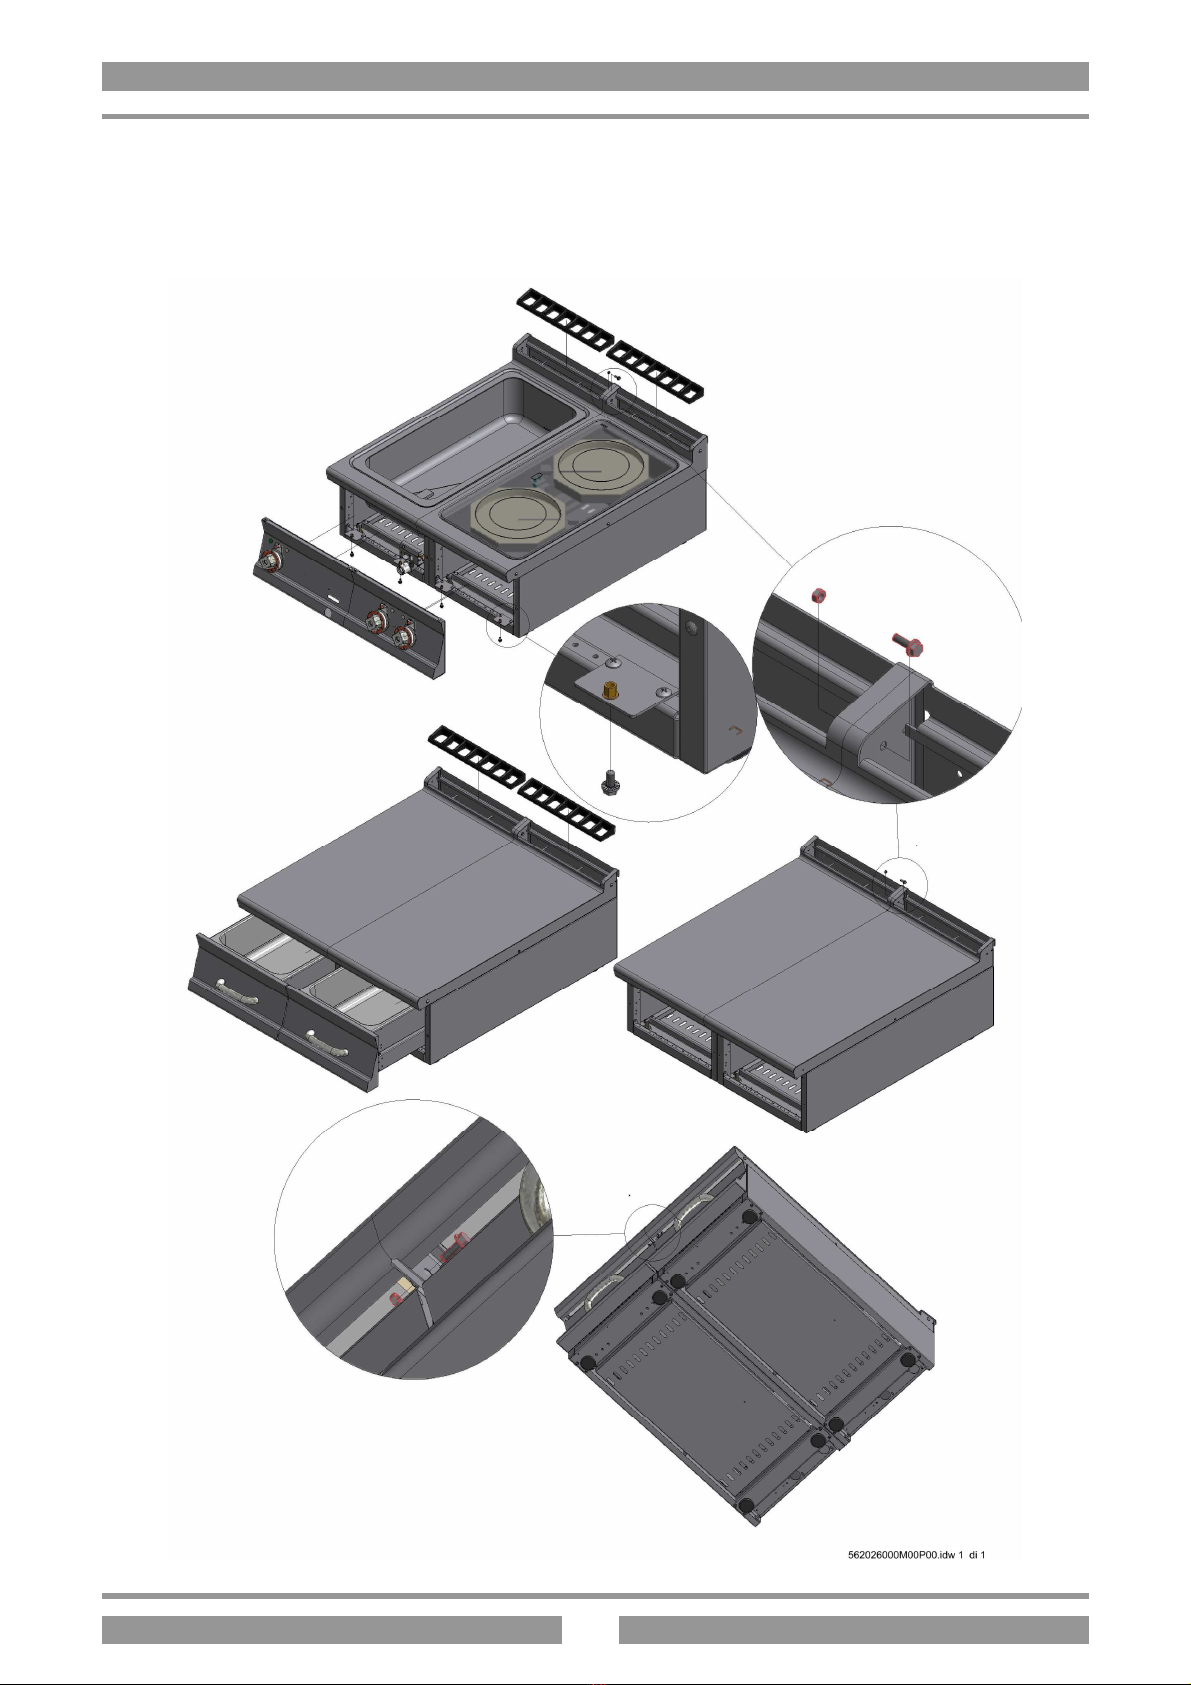
•Togliere il pannello posteriore.
•Passare il cavo di allacciamento attraverso il pressacavo, collegare i conduttori nel corrispondente morsetto della
morsettiera e fissarli.
•Bloccare il cavo con il pressacavo e rimontare il pannello posteriore. Il conduttore di terra deve essere più lungo
degli altri, in modo che in caso di rottura del pressacavo, questo si stacchi dopo i cavi della tensione.
N.B. il cavo di allacciamento deve avere le seguenti caratteristiche: deve essere almeno del tipo H05 RN-F (resistenza a
temperature di almeno 150°C) ed avere una sezione adeguata alla potenza dell'apparecchio (vedi tabella dati tecnici).

8
IT
CH
EQUIPOTENZIALE
L'apparecchio deve essere collegato ad un sistema equipotenziale. La vite di collegamento è posizionata sulla parte
posteriore dell'apparecchio ed è contraddistinta dal simbolo .
Attenzione: il costruttore non è responsabile, e non risarcisce in garanzia danni provocati e che sono dovuti ad
installazioni inadeguate e non conformi alle istruzioni.
MESSA IN FUNZIONE
Prima di utilizzare l'apparecchio per la prima frittura, è necessario pulirlo con cura, soprattutto la vasca (vedi paragrafo
"pulizia e cura").
Controllare l'allacciamento dell'apparecchio e metterlo in funzione secondo le istruzioni.
ISTRUZIONI PER L'USO
Attenzione:- Usare l'apparecchio solo sotto sorveglianza!
- Olio e grasso per friggere sfruttati rappresentano un pericolo d’incendio maggiore , perciò usare solo olio
o grasso per friggere freschi
- Il fritto deve essere asciutto , infatti fritto umido o bagnato provocano schiuma , pericolo di tracimazione.
- Anche grandi quantità di fritto provocano schiuma. Si consiglia di friggere 1 Kg di fritto alla volta.
- Quando il livello dell’olio scende sotto il livello minimo c’è un maggiore pericolo d’incendio.
- Mai mettere in funzione l’apparecchio senza olio.
Le friggitrici sono apparecchi che permettono la frittura di patate , pesce , verdure ecc.
ACCENSIONE
Controllare che il rubinetto di scarico dell’olio sia chiuso.
Riempire la vasca con olio fino al livello indicato dall’indice presente nella vasca stessa (tra min e max)
Inserire l’interruttore posto a monte dell’apparecchio.
Ruotare la manopola da “O” fino alla posizione desiderata fra i 100° e i 180°C , si accendono le spie bianca e verde.
La lampada spia verde indica che l’apparecchio è sotto tensione.
L’accensione della lampada spia bianca segnala il funzionamento dell’elemento riscaldante , il suo spegnimento indica
il raggiungimento della temperatura .
Per spegnere l’apparecchio , girare la manopola in posizione “O”.
Per l’utilizzo della friggitrice con prodotti diversi dall’olio (ad esempio strutto) e comunque aventi notevole inerzia
termica, risulta necessario che al primo ciclo (cioè con partenza da freddo) il termostato sia impostato ad un valore
basso (es. 110°C).
Solamente dopo lo scioglimento di tutta la massa, il termostato potrà essere impostato al massimo
SVUOTAMENTO DELLA VASCA
L'utilizzatore è tenuto a munirsi di un contenitore adatto allo svuotamento dell'olio. Questo contenitore
deve essere di materiale resistente al calore e deve essere costruito in modo che, durante lo svuotamento, l'olio non
tracimi e non rappresenti un pericolo.
Consigliamo di filtrare quotidianamente l'olio alla fine del lavoro e di cambiarlo quando è necessario.
Ruotare il rubinetto scarico olio e portarlo in posizione orizzontale.
Fare particolare attenzione qualora l’olio fosse caldo
Importante: prestare attenzione alla distanza tra l'apparecchio e gli spigoli del supporto.
PULIZIA E MANUTENZIONE
Attenzione: durante la pulizia non lavare esternamente l'apparecchio con getti d'acqua diretti o ad alta
pressione.
Ogni sera a fine lavoro pulire accuratamente l'apparecchio. La pulizia quotidiana dell'apparecchio garantisce un
funzionamento perfetto e una lunga durata dello stesso.

9
IT
CH
Prima di iniziare la pulizia togliere la tensione dall'apparecchio. Le parti in acciaio sono da lavare con acqua calda e
detersivo neutro, sono poi da sciacquare abbondantemente in modo da eliminare ogni traccia di detersivo poi asciugare
con un panno asciutto. Non usare detergenti abrasivi o corrosivi.
Per facilitare la pulizia si possono ruotare le resistenze di 90°in senso antiorario .
Riposizionare le resistenze in maniera corretta alla fine della pulizia. C’è un microinterruttore che rileva il corretto
contatto
COMPORTAMENTO IN CASO DI PROLUNGATA INTERRUZIONE DI
FUNZIONAMENTO
Pulire ed asciugare accuratamente l'apparecchio come da istruzioni. Togliere la tensione.
COMPORTAMENTO IN CASO DI GUASTO
In caso di guasto spegnere l'apparecchio, togliere la tensione mediante il dispositivo posto a monte dell'apparecchio e
avvisare il servizio assistenza.
MANUTENZIONE (SOLO PER PERSONALE QUALIFICATO)
Qualsiasi lavoro di manutenzione e da far eseguire esclusivamente a personale qualificato. Prima di iniziare una
manutenzione, togliere la spina o disinserire l'interruttore posto a monte.
ACCESSIBILITÀ
Per accedere alla morsettiera, togliere la schiena dell'apparecchio. Gli elementi di comando si raggiungono dal cruscotto
anteriore, svitare le viti che fissano il cruscotto e togliere quest'ultimo.

10
DE AT CH
INHALTSANGABE
KONFORMITÄTSERKLÄRUNG ............................................................................................................................... 11
TABELLE DER TECHNISCHEN DATEN................................................................................................................. 11
AUFSTELLUNGSANLEITUNGEN............................................................................................................................. 11
AUFSTELLUNG ............................................................................................................................................................ 11
GESETZLICHE BESTIMMUNGEN, TECHNISCHE VORGABEN UND VORSCHRIFTEN............................ 11
ELEKTROANSCHLUSS................................................................................................................................................. 11
ÄQUIPOTENZIAL.......................................................................................................................................................... 12
INBETRIEBNAHME ...................................................................................................................................................... 12
BEDIENUNGSANLEITUNGEN..................................................................................................................................... 12
EINSCHALTEN .............................................................................................................................................................. 12
ENTLEERUNG DES BECKENS.................................................................................................................................. 12
REINIGUNG UND WARTUNG................................................................................................................................... 13
VORGEHEN BEI LÄNGEREM BETRIEBSSTILLSTAND..................................................................................... 13
VORGANGSWEISE IM SCHADENSFALL............................................................................................................... 13
WARTUNG (NUR DURCH FACHPERSONAL) ....................................................................................................... 13
ZUGÄNGLICHKEIT..................................................................................................................................................... 13

11
DE AT CH
KONFORMITÄTSERKLÄRUNG
Der Hersteller erklärt hiermit, dass die Geräte den Vorschriften der CEE-Richtlinie 90/396 entsprechen. Die
Aufstellung hat unter Einhaltung der geltenden Vorschriften zu erfolgen, dies gilt insbesondere für die Raumbelüftung
und das Ableitungssystem der Abgase.
N.B.: Die Herstellerfirma lehnt im Falle von direkten oder indirekten Schäden, die auf eine fehlerhafte Installation,
Veränderungen, mangelhafte Wartung, nicht sachgemäßen Gebrauch sowie auf sonstige, in den Verkaufsbedingungen
angeführte Fälle zurückzuführen sind, jede Verantwortung ab.
TABELLE DER TECHNISCHEN DATEN
MODELLE ABMESSUNGEN
cm STROMZUFUHR
MAXIMALE
STROMAUF
NAHME A
HÖCHST
LEISTUNG kW
VERSORGUNGS
LEITUNG
(Al aus Silikon)
F45-78ET 80x90x70h 400Vac/3N 50/60Hz 57,97 40 5x10 mm
2
AUFSTELLUNGSANLEITUNGEN
Das technische Typenschild befindet sich auf der Seitenwand des Geräts (siehe Zeichnung unter Punkt “Elektrischer
Anschluss”) und enthält alle für den Anschluss notwendigen Daten.
AUFSTELLUNG
Während der Aufstellung ist das Gerät zu nivellieren, geringe Höhenunterschiede können mit den Stellfüßen
ausgeglichen werden (aufschrauben oder festziehen). Der Hauptschalter oder die Steckdose müssen sich in der Nähe
des Geräts befinden und leicht erreichbar sein.
Es wird empfohlen, das Gerät unter einer Abzugshaube aufzustellen, damit entstehende Dämpfe rasch abgeleitet
werden können. Falls das Gerät in der Nähe von Wänden, Trennpaneelen, Küchenmöbeln, Dekorverkleidungen etc.
aufgestellt wird, sollten diese aus nicht entflammbaren Material bestehen. Im gegenteiligen Fall sind diese Wände mit
feuerfesten Materialien zu verkleiden.
Darüber hinaus ist sicherzustellen, dass die geltenden Brandschutzbestimmungen eingehalten werden.
Die Aufstellung, Inbetriebsetzung und Wartung muss von qualifiziertem Fachpersonal durchgeführt werden. Alle
notwendigen Aufstellungsarbeiten müssen unter Einhaltung der geltenden Bestimmungen erfolgen.
Der Hersteller übernimmt keinerlei Haftung für eine mangelhafte Betriebsleistung, wenn diese auf eine fehlerhafte und
nicht gesetzmäßige Installation zurückzuführen ist.
Achtung!: Gemäß den internationalen Bestimmungen muss während des Anschließens des Geräts oberhalb desselben
eine automatische Vorrichtung mit einer Kontaktöffnungsweite von mindestens 3 m installiert werden, durch welche
das Gerät auf allpolige Weise vom Stromnetz getrennt werden kann.
GESETZLICHE BESTIMMUNGEN, TECHNISCHE VORGABEN UND VORSCHRIFTEN
Die Aufstellung muss unter Einhaltung der folgenden Vorschriften durchgeführt werden:
- Geltende unfallverhütende Bestimmungen .
- Aufstellungsanweisungen, Vorschriften der VDE.
ELEKTROANSCHLUSS
Das Gerät wird ohne Anschlusskabel geliefert.
Zur Installation des Anschlusskabels wie folgt vorgehen:
•Das rückwärtige Paneel entfernen
•Das Anschlusskabel durch den Kabeldurchgang ziehen, die Leiter mit den entsprechenden Klemmen der Klemmleiste
verbinden und daran befestigen.
•Das Kabel mit der Kabelklemme blockieren und das Paneel wieder befestigen. Die Erdungsleitung muss länger als die
anderen sein, damit es sich bei einer eventuellen Beschädigung der Kabelklemme erst nach den Spannungskabeln löst.

12
DE AT CH
ZUR BEACHTUNG: Das Anschlusskabel muss die folgenden Merkmale aufweisen: es muss mindestens dem Typ H05 RN-F
entsprechen (um Temperaturen von mindestens 150°C standzuhalten) und einen der Gerätespannung entsprechenden Querschnitt
haben (siehe Tabelle Technische Daten).
ÄQUIPOTENZIAL
Das Gerät muss mit einem Äquipotenzial-System verbunden werden. Die Verbindungsschraube ist auf der Rückseite des Geräts
angebracht und mit dem Symbol gekennzeichnet.
Achtung!: Der Hersteller übernimmt für Schäden, die durch eine unsachgemäße, nicht den Anleitungen entsprechende
Installation verursacht wurden, keinerlei Haftung und leistet auch innerhalb der Garantie keinen Schadenersatz.
INBETRIEBNAHME
Vor der Benutzung ist es notwendig, das Gerät und insbesondere das Becken sorgfältig zu reinigen. (siehe Abschnitt „Reinigung
und Pflege“).
Den Anschluss des Geräts überprüfen und gemäß den Bedienungsanleitungen in Betrieb nehmen.
BEDIENUNGSANLEITUNGEN
Das Gerät darf nur unter Aufsicht benutzt werden.
- Bereits benutzte Frittieröle und -fette stellen eine höher Entzündungsgefahr dar, es ist daher immer frisches
Frittieröl zu verwenden.
- Das Frittiergut muss trocken sein, durch feuchtes oder sogar nasses Frittiergut bildet sich Schaum, es besteht die
Gefahr des Überfließens.
- Auch durch zu große Mengen an Frittiergut kann Schaumbildung verursacht werden. Es empfiehlt sich daher,
nicht mehr als 1 Kg auf einmal zu frittieren.
- Wenn die Ölmenge unter den Mindeststand absinkt, erhöht sich die Entzündungsgefahr.
- Das Gerät niemals ohne Öl in Betrieb nehmen.
Mit den Fritteusen können Kartoffel, Fisch, Gemüse etc. frittiert werden.
EINSCHALTEN
Überprüfen, ob der im vorhandene Ölabflusshahn geschlossen ist. Das Becken bis zu der im Inneren der Wanne befindlichen
Marke mit Öl füllen (zwischen min und max).
Den oberhalb des Geräts befindlichen Schalter betätigen. Den Drehknopf von “O” bis auf die gewünschte Position zwischen
100° und 180°C stellen, die weiße und die grüne Kontroll-Lampe schalten sich ein. Die grüne Kontroll-Lampe zeigt die
Stromversorgung des Geräts an.
Das Aufleuchten der weißen Kontroll-Lampe zeigt den Betrieb des Heizelements an, ihr Erlöschen bedeutet, dass das Öl die
gewünschte Temperatur erreicht hat. Zum Ausschalten des Geräts ist der Drehknopf wieder auf die Position “O” zu drehen.
Um die Fritteuse mit anderen Produkten als Öl (zum Beispiel Schweineschmalz) zu benutzen, die immer eine hohe
Wärmeträgkeit besitzen müssen, muss beim ersten Zyklus der Thermostat auf einen niedrigen Wert eingestellt werden
(Beisp. 110°C).
Erst nach dem Schmelzen der gesamten Masse kann der Thermostat auf die Höchsttemperatur eingestellt werden.
ENTLEERUNG DES BECKENS
Der Gerätebediener wird dazu aufgefordert, sich einen zum Entleeren des Öls geeigneten Behälter zu beschaffen. Dieser
Behälter muß aus hitzebeständigem Material bestehen und so gebaut sein, daß das Öl während des Entleerens
nichtausfließen und somit keine Gefahr bilden kann.
Es wird empfohlen, das Öl täglich nach Betriebsende zu filtrieren und es bei Bedarf auszuwechseln.
Den im Inneren der Wanne vorhandenen Ölabflusshahn auf senkrechte Position stellen.
Bei heißem Öl ist mit besonderer Vorsicht vorzugehen.
Wichtig! Immer auf den Abstand zwischen dem Gerät und den Kanten der Halterung achten.

13
DE AT CH
REINIGUNG UND WARTUNG
Achtung!: Zur Reinigung darf das Gerät von außen auf keinem Fall mit einem direkten Wasserstrahl oder
einem Hochdruckreiniger abgespritzt werden.
Das Gerät muss jeden Abend nach Betriebsende sorgfältig gereinigt werden. Die tägliche Reinigung nach dem
Abschalten des Geräts garantiert den einwandfreien Betrieb und eine lange Lebensdauer der Anlage.
Vor dem Reinigungsbeginn ist die Stromzufuhr zum Gerät zu unterbrechen. Die Stahlteile sind mit heißem Wasser und
einem neutralen Reinigungsmittel zu säubern. Anschließend mit sauberem Wasser gründlich nachspülen, damit alle
Reinigungsmittelreste entfernt werden und mit einem weichen Tuch trockenreiben. Keine Scheuermittel oder ätzende
Reinigungsmittel verwenden.
Um die Reinigung zu erleichtern, können die Widerstände gegen den Uhrzeigersinn um 90° gedreht werden.
Am Ende der Reinigung sind die Widerstände wieder in ihre richtige Lage zu bringen. Durch einen Mikroschalter wird
der richtige Kontakt angezeigt.
VORGEHEN BEI LÄNGEREM BETRIEBSSTILLSTAND
Das Gerät laut den Anweisungen gründlich reinigen und trockenreiben. Die Stromzufuhr unterbrechen.
VORGANGSWEISE IM SCHADENSFALL
Im Falle eines Schadens ist das Gerät abzuschalten, die Stromzufuhr mittels der oberhalb des Geräts angebrachten
Vorrichtung zu unterbrechen und den Kundendienst zu verständigen.
WARTUNG (NUR DURCH FACHPERSONAL)
Sämtliche Wartungsarbeiten sind von qualifiziertem Fachpersonal durchzuführen. Vor Beginn der Wartung ist der
Stecker herauszuziehen oder die Stromzufuhr durch den oberhalb des Geräts angebrachte Schalter zu unterbrechen.
ZUGÄNGLICHKEIT
Um zur Klemmleiste zu gelangen, ist die Rückwand des Geräts zu entfernen. Die Betriebselemente sind durch die
vordere Bedienblende zugänglich, dazu die Schrauben der Bedienblende lösen und diese entfernen.

14
FR BE
TABLE DES MATIÈRES
DÉCLARATION DE CONFORMITÉ ......................................................................................................................... 15
TABLEAU DES DONNÉES TECHNIQUES .............................................................................................................. 15
INSTRUCTIONS D'INSTALLATION ........................................................................................................................ 15
INSTALLATION............................................................................................................................................................ 15
DISPOSITIONS LÉGALES, RÈGLES TECHNIQUES ET DIRECTIVES............................................................. 15
BRANCHEMENT ÉLECTRIQUE............................................................................................................................... 15
CIRCUIT ÉQUIPOTENTIEL....................................................................................................................................... 16
MISE EN SERVICE....................................................................................................................................................... 16
INSTRUCTIONS D'UTILISATION ............................................................................................................................ 16
ALLUMAGE................................................................................................................................................................... 16
VIDAGE DU BAC .......................................................................................................................................................... 16
NETTOYAGE ET ENTRETIEN .................................................................................................................................. 16
INSTRUCTIONS EN CAS DE NON-UTILISATION PROLONGÉE...................................................................... 17
EN CAS D'ANOMALIE OU DE PANNE .................................................................................................................... 17
ENTRETIEN (A CONFIER AU SEUL PERSONNEL QUALIFIE)......................................................................... 17
ACCÈS BORNIER/ÉLÉMENTS DE COMMANDE.................................................................................................. 17

15
FR BE
DÉCLARATION DE CONFORMITÉ
Le constructeur certifie que les appareils objets du présent manuel sont conformes aux dispositions prévues par la
directive CEE 90/396. L'installation doit être réalisée dans le respect des normes en vigueur, en particulier pour ce qui
touche à l'aération du local d'installation et au système d'évacuation des produits de combustion.
N.B.: Le constructeur décline toute responsabilité en cas de dommages directs et/ou indirects provoqués par une
installation non conforme, par la modification des appareils, par un mauvais entretien et une utilisation inappropriée, et
dans tous les autres cas mentionnés dans les conditions de vente.
TABLEAU DES DONNÉES TECHNIQUES
MODÈLES DIMENSIONS cm
ALIMENTATION ABSORPTION
MAXIMUM A
PUISSANCE
MAXIMUM kW
CÂBLE
D'ALIMENTATION
(au silicone)
F45-78ET 80x90x70h 400Vac/3N 50/60Hz 57,97 40 5x10 mm
2
INSTRUCTIONS D'INSTALLATION
La plaque des caractéristiques techniques se trouve sur la paroi latérale (voir schéma au chapitre "Branchement
électrique") et contient toutes les données nécessaires au branchement.
INSTALLATION
Durant son positionnement l'appareil doit être placé parfaitement à l'horizontale; pour cela il est possible d'intervenir sur
les pieds réglables (à visser ou à dévisser). L'interrupteur général ou la prise doit se trouver à proximité de l'appareil et
être facile d'accès.
Il est recommandé de placer l'appareil sous une hotte aspirante de façon à ce que l'évacuation des vapeurs puissent
s'effectuer plus rapidement. Dans le cas où l'appareil serait installé à proximité de murs, de parois, de meubles de
cuisine ou autres revêtements décoratifs, il est important de veiller à ce que ceux-ci soient constitués de matériaux non-
inflammables, différemment les revêtir d'un matériau non-inflammable.
Il est impératif de respecter les normes anti-incendie.
L'installation, la mise en service et l'entretien de l'appareil doivent être confiés à un personnel qualifié à cet effet. Toutes
les interventions nécessaires à l'installation doivent être effectuées dans le respect des normes en vigueur.
Le fabricant décline toute responsabilité en cas de mauvais fonctionnement dû à une mauvaise installation ou à une
installation non conforme.
Attention!: conformément aux dispositions internationales applicables, durant le branchement de l'appareil, il est
nécessaire de prévoir en amont de celui-ci un dispositif automatique assurant la coupure omnipolaire de l'alimentation
de secteur
DISPOSITIONS LÉGALES, RÈGLES TECHNIQUES ET DIRECTIVES
L'installation doit être effectuée dans le respect des normes suivantes:
- normes de sécurité en vigueur.
- règles d'installation, normes en vigueur.
BRANCHEMENT ÉLECTRIQUE
L'appareil est livré sans câble d'alimentation.
Pour l'installation du câble d'alimentation procéder comme suit:
•Retirer le panneau postérieur,
•Faire passer le câble d'alimentation à travers le passe-fil, raccorder les conducteurs aux bornes correspondantes du
bornier et les fixer.
•Bloquer le câble à l'aide du serre-fil et remettre en place le panneau. La longueur du conducteur de terre doit être
supérieure à celle des autres conducteurs de telle sorte qu'en cas de rupture du presse-fil le conducteur de terre se
décroche après les conducteurs de tension.

16
FR BE
N.B. Le câble d'alimentation doit avoir les caractéristiques suivantes: de type H05 RN-F résistant au minimum à une
température de 150°C et d'une section adaptée à la puissance de l'appareil (voir tableau des données techniques).
CIRCUIT ÉQUIPOTENTIEL
L'appareil doit être raccordé à un circuit équipotentiel. La vis de raccordement est positionnée sur la partie postérieure
de l'appareil et est marquée du symbole .
Attention!: le fabricant décline toute responsabilité en cas de dommages causés par une installation non conforme aux
instructions prévues à cet effet.
MISE EN SERVICE
Avant d'utiliser l'appareil pour la première friture, il est nécessaire de procéder à son nettoyage, en particulier au
nettoyage du bac (voir chapitre "Nettoyage et entretien").
Contrôler le branchement de l'appareil et le mettre en marche en suivant les Instructions d'utilisation.
INSTRUCTIONS D'UTILISATION
Attention: - Veiller à ce que l'appareil soit constamment contrôlé durant son utilisation.
- Huiles et graisses de friture usées exposent à de plus grands risques d'incendie, aussi est-il important
d'utiliser des huiles et des graisses neuves.
- Les aliments à frire doivent être secs, humides ou mouillés ils provoquent la formation de mousse
risquant de déborder de la friteuse.
- Les grandes quantités d'aliment à frire provoquent également la formation de mousse, aussi est-il
recommandé de ne pas frire de quantités supérieures à 1 kg.
- Lorsque le niveau d'huile devient inférieur au minimum, le risque d'incendie est supérieur.
- Ne jamais mettre en marche l'appareil sans huile.
Les friteuses objets du présents manuel sont prévues pour frire pommes de terre, poisson, légumes, etc.
ALLUMAGE
S'assurer que le robinet d'évacuation d'huile est fermé.
Remplir d'huile le bac jusqu'à hauteur du repère présent à l'intérieur du bac (entre les niveaux min. et max.).
Placer l'interrupteur présent en amont de l'appareil sur la position On. Amener la commande de la position "0" à la
position voulue entre 100 et 180°C, les témoins blanc et vert doivent s'allumer. Allumé, le témoin vert indique que
l'appareil est sous tension. Allumé, le témoin blanc indique le fonctionnement de l'élément chauffant, une fois éteint il
indique que la température sélectionnée est atteinte. Pour éteindre l'appareil, ramener la commande sur la position "0".
Pour utiliser la friteuse avec des produits différents de l'huile (par exemple du saindoux) et dans tous les cas avec une
importante inertie thermique, il faut lors du premier cycle (c'est à dire lors de la mise en marche à froid) configurer le
thermostat sur une valeur basse (ex. 110°C).
Uniquement après la fonte de la masse, le thermostat pourra être configuré au maximum.
VIDAGE DU BAC
L’usager doit se munir d’un récipient permettant d’évacuer l’huile. Ce récipient doit pouvoir résister à la chaleur et doit
être fait de manière à ce que l’huile ne déborde pas pendant la vidange, ce qui provoquerait une situation dangereuse.
Il est recommandé de filtrer l'huile en fin de journée et de la changer sans attendre lorsque cette opération devient
nécessaire.
Ouvrir le robinet d'évacuation en le plaçant en position horizontal.
Faire particulièrement attention dans le cas où l'huile serait encore chaude.
Important!: veiller à la distance séparant l'appareil et les angles du support.
NETTOYAGE ET ENTRETIEN
Attention!: ne pas nettoyer l'appareil à l'aide de jets d'eau directs ou à haute pression.

17
FR BE
Une fois l'utilisation terminée veiller à nettoyer soigneusement l'appareil. Un nettoyage quotidien de l'appareil une fois
celui-ci éteint est gage de bon fonctionnement et de longue durée.
Avant de procéder au nettoyage, couper l'alimentation électrique. Les parties en acier doivent être nettoyées à l'aide
d'eau chaude et d'un détergent neutre; rincer ensuite abondamment afin d'éliminer toute trace de détergent puis essuyer à
l'aide d'un chiffon sec. Ne pas utiliser de détergents abrasifs ou corrosifs.
Pour faciliter le nettoyage, il est possible de faire pivoter les résistances de 90° dans le sens contraire des aiguilles d'une
montre.
Veiller à replacer les résistances dans la bonne position une fois le nettoyage terminé (un micro-interrupteur assure le
contrôle du contact).
INSTRUCTIONS EN CAS DE NON-UTILISATION PROLONGÉE
Nettoyer et essuyer soigneusement l'appareil comme indiqué ci-dessus et l'isoler de l'alimentation électrique.
EN CAS D'ANOMALIE OU DE PANNE
Couper la tension à l'aide du dispositif situé en amont de l'appareil et prendre contact avec le service d'assistance.
ENTRETIEN (A CONFIER AU SEUL PERSONNEL QUALIFIE)
Toute intervention d'entretien doit être exclusivement confiée à un personnel qualifié. Avant de procéder à toute
opération d'entretien, débrancher la prise ou placer l'interrupteur situé en amont sur la position Off.
ACCÈS BORNIER/ÉLÉMENTS DE COMMANDE
Pour accéder au bornier de branchement, retirer le panneau postérieur de l'appareil. Les éléments de commande sont
accessibles depuis le panneau frontal: dévisser les vis de fixation du panneau frontal et retirer ce dernier.

18
GB IE
INDEX
DECLARATION OF COMPLIANCE ......................................................................................................................... 19
TECHNICAL DATA TABLE ....................................................................................................................................... 19
INSTRUCTIONS FOR INSTALLATION ................................................................................................................... 19
INSTALLATION............................................................................................................................................................ 19
LAWS, TECHNICAL RULES AND NORMS............................................................................................................. 19
ELECTRIC CONNECTION......................................................................................................................................... 19
EQUIPOTENTIAL......................................................................................................................................................... 20
STARTING UP ............................................................................................................................................................... 20
INSTRUCTIONS FOR USE.......................................................................................................................................... 20
TURNING ON ................................................................................................................................................................ 20
EMPTYING THE TUB.................................................................................................................................................. 20
CLEANING AND MAINTENANCE............................................................................................................................ 20
PROCEDURE TO FOLLOW IF THE APPLIANCE IS NOT GOING TO BE USED FOR SOME TIME.......... 21
WHAT TO DO IN THE EVENT OF A BREAKDOWN ............................................................................................ 21
MAINTENANCE (ONLY FOR QUALIFIED PERSONNEL) ..................................................................................21
ACCESSIBILITY........................................................................................................................................................... 21

19
GB IE
DECLARATION OF COMPLIANCE
The manufacturer declares that the appliances are compliant with the prescriptions of the EEC norm 90/396. The
installation must be done observing the norms in force particularly concerning room ventilation and discharging gas
emissions.
N.B.: The manufacturer declines any responsibility for direct or indirect damage caused by improper or incorrect
installation, alterations, maintenance or use of the appliance, as in all the other cases considered in the items of our sales
conditions.
TECHNICAL DATA TABLE
MODELS DIMENSIONS cm
POWER SUPPLY MAXIMUM
ABSORBTION A
MAXIMUM
POWER kW
POWER SUPPLY
CABLE
(Silicone)
F45-78ET 80x90x70h 400Vac/3N 50/60Hz 57,97 40 5x10 mm
2
INSTRUCTIONS FOR INSTALLATION
The data plate is on the side (see diagram in electric connection item) and has all the data necessary for the connection.
INSTALLATION
When fitting, the appliance must be levelled using a spirit level; slight differences of level can be adjusted by screwing
or unscrewing the adjustable feet. The main switch or the socket must be near the appliance and easily accessible. It is
advisable to place the appliance under an extractor hood so that steam is extracted rapidly. If the appliance is placed
near walls, dividing panels, kitchen furniture, decorative finishing, etc. , these should be in flameproof material;
otherwise it is necessary to cover them with non-flammable material.
Above all, it is necessary to ensure that the fire prevention norms are observed.
The installation, starting up and maintenance of the appliance must be carried out by qualified personnel. All operations
done when installing must be carried out observing the norms in force.
The manufacturer declines all responsibility in the event of incorrect functioning due to wrong installation or
installation which does not comply with the norms.
Attention! In accordance with international rules, when connecting the appliance, an automatic device enabling the
disconnection of all contacts from the mains, must be installed above it.
LAWS, TECHNICAL RULES AND NORMS
Installation must be carried out observing the following norms:
- Safety prescription in force
- Installation prescription, in force.
ELECTRIC CONNECTION
The appliance is supplied without the connection cable.
To install the power supply cable, proceed as follows:
•Remove the back panel
•Push the connection cable through the cable blocked, connect the conductor wires to the corresponding terminals in
the junction box and fix them into place.
•Block the cable with the cable blocked, and reassemble the back panel. The earth wire must be longer than the
others so that if the cable blocked should break, it will disconnect after the tension wires.
N.B. The connection cable must have the following characteristics: it must be at least type H05 RN-F (resistant to a
temperature of at least 150°), and must have an adequate section for the power of the appliance (see technical data
table).

20
GB IE
EQUIPOTENTIAL
The appliance must be connected to an equipotential system. The connection screw is positioned at the back of the
appliance and is identified by the symbol .
Attention! The manufacturer will neither be held responsible for, nor will give any compensation during the guarantee
period for any damage caused, and which is due to inadequate installations not compliant with the instructions.
STARTING UP
Before using the appliance for the first frying, it is necessary to clean it carefully, especially the water tub (see
paragraph “cleaning and care”).
Check the connection of the appliance and start it up following the instructions.
INSTRUCTIONS FOR USE
Use the appliance only under surveillance.
- Oil or fat already used are more at risk of catching fire; therefore only use fresh oil or fat for frying.
- The food to be fried must be dry; damp or wet fry cause froth and danger of overflowing.
- Also large quantities of fry cause froth. It is advisable to fry 1 Kg of food at a time.
- When the oil goes below the minimum level, fire risk is higher.
- Never start up the appliance without oil.
These frying appliances allow to fry potatoes, fish vegetables, etc.
TURNING ON
Check that the oil drainage tap inside the opening is closed.
Fill the tub with oil up to the level indicated inside the tub(between min and max).
Switch on the switch situated above the appliance. Turn the knob from ”O” into the desired position between
100° and 180°; The white and green lights come on. The green light indicates the presence of electrical tension.
The white light shows that the heating element is working; when the temperature is reached, it goes out. To turn
off the appliance, turn the knob into position “O”.
To use the deep fryer with products other than oil (lard, for example) and in any case featuring high thermal inertia, the
thermostat needs to be set at a low value (e.g. 110°C) at the first cycle (starting from cold).
Only after the entire mass has dissolved can the thermostat be set at the maximum level
EMPTYING THE TUB
The user is to have a suitable container for the emptying of the oil.
This container must be made of heat resistant material and must be constructed so that during the emptying the oil does
not overflow and is not dangerous.
It is advisable to filter the oil daily when frying is finished and to change it whenever necessary.
Turn the oil drainage tap inside the opening into a vertical position.
Pay particular attention if the oil is hot.
Important! Pay attention to the distance between the appliance and the corners of the support.
CLEANING AND MAINTENANCE
Attention! During cleaning, do not wash the external parts of the appliance with direct sprays of water or with
high pressure.
After every use, clean the appliance thoroughly. Daily cleaning after switching off the appliance ensures the perfect
functioning and long life of the appliance.
Before starting to clean the appliance, disconnect the power supply. The parts in steel must be washed with hot water
and neutral detergent, then rinsed thoroughly in order to eliminate all traces of detergent; after which, dried with a dry
cloth. Do not use abrasive or corrosive detergents.
To make cleaning easier, the elements may be turned by 90° in an anticlockwise direction.
After cleaning, turn the elements back correctly. There is a micro switch which shows the correct contact.
Table of contents
Languages:
Other Lotus cooker Fryer manuals