manuals.online logo
Brands
  1. Home
  2. •
  3. Brands
  4. •
  5. Lucasey
  6. •
  7. TV Mount
  8. •
  9. Lucasey CKLC100CRT71 User manual

Lucasey CKLC100CRT71 User manual

7100 or 9000 Series
Knuckle Assembly
6.0" Min.
Cut Steel Tubing
2Pl. Holes for CKLC100CRT71 Mount
2Pcs. #10-24 x 2"
Socket Cap Screws
2Pcs. #10-24 Nylock Nuts
Make sure the mounting plate is
level when marking both sides
of the tubing to be drilled.
CKLC100CRT71 INSTALLATION INSTRUCTIONS
CKLC100CRT71_Ins - 3/30/09 - M.R.B. ©2009 Lucasey Manufacturing Corporation, Oakland, California www.lucasey.com
Protected under one or more of these U.S. Patent numbers: 3,291,432 3,559,942 3,724,798 DES.270,689 4,613,109 4,878,645 4,852,842 DES.309,5624,973,023 5,169,114 5,255,884 5,310,152 5,522,576 5,621,614 Re.35,677 DES.398,834 5,826,384 5,941,492 5,964,068 6,060,661 6,102,398 6,158,704 6,454,116B1 6,761,276B2 6,806,425B1
CKLC100CRT71
12 ...
12 ...
12 ...
36 ...
18 ...
4mm Hex Nuts
5mm Hex Nuts
6mm Hex Nuts
5mm Flat Washers
1/4" Flat Washers
2 ...
2 ...
6 ...
6 ...
6 ...
6 ...
6 ...
6 ...
1 ...
1 ...
1 ...
1 ...
2 ...
1/4" Belleville Washer
5/16" Belleville Washer
5/16" Flat Washer
5/16-18 Nylock Nut
4 ...
5 ...
2 ...
2 ...
5/16-18 x 2-1/4" Hex Bolt
5/16-18 x 1-1/2" Button Head Screw
1/4-20 x 1-1/2" Button Head Screw
1/4-20 Nylock Nut
1/4" Flat Washer
Assembly Hardware
Hardware Kit
#10-24 x 2" Socket Cap Head Screws
#10-24 Nylock Nuts
4mm x 25mm Set Screws
5mm x 30mm Set Screws
6mm x 30mm Set Screws
4mm x 12mm Phillips Screws
5mm x 12mm Phillips Screws
6mm x 12mm Phillips Screws
1. Remove the CRT TV from the 7100 or 9000 series mount by unlocking the
TV mounting plate and lifting the TV and mounting plate off of the mount.
2. Remove the knuckle from the tubing using a tubing cutter to cut the tubing
behind the knuckle. The minimum distance from the wall arm, or the bend in
the 9000 series ceiling mount tubing, to the end of the cut tubing should be 6".
3. If the tubing is to be left intact, the knuckle will need to be removed by
taking off a 3/8" Hex Bolt and a hardened Roll Pin. The Roll Pin can only be
removed by grinding in an enironment where the metal grindings won't
cause a hazard. Cutting the tubing behind the knuckle is the prefered
method for installation.
4. Use the CKLC100CRT71 with a level to mark the two holes needed in the
cut tubing. Mark the holes on both sides of the tubing with the mount
held level.
5. Drill 1/4" holes through the tubing in all four marked locations. The holes
on the right side can be made a little larger to adjust the mount level.
Page 1 of 2
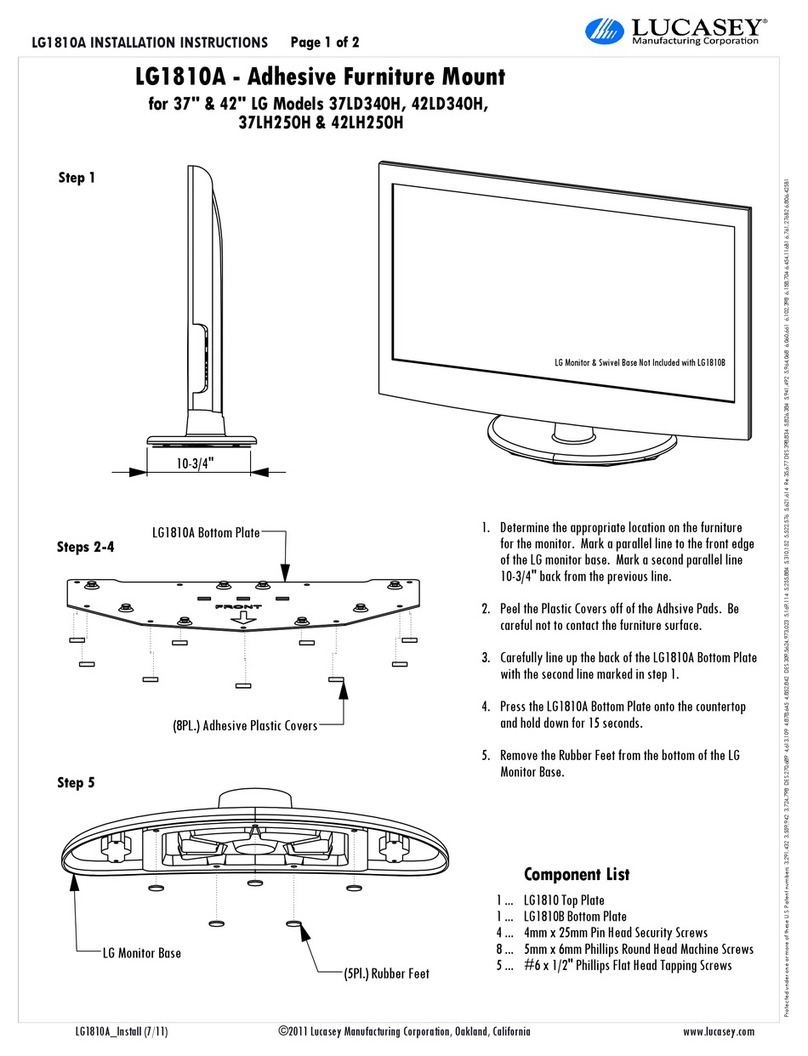
5/16" Hex Bolt
(monitor pivot tension adjustment)
CKLC100CRT71 Tubing Assembly
Socket Button Head Screw
(monitor tilt adjustment screw)
LC100 Pivot Assembly
LC100 Mounting Plate
Monitor Attaching Screws & Washers
Protected under one or more of these U.S. Patent numbers: 3,291,432 3,559,942 3,724,798 DES.270,689 4,613,109 4,878,645 4,852,842 DES.309,5624,973,023 5,169,114 5,255,884 5,310,152 5,522,576 5,621,614 Re.35,677 DES.398,834 5,826,384 5,941,492 5,964,068 6,060,661 6,102,398 6,158,704 6,454,116B1 6,761,276B2 6,806,425B1
CKLC100CRT71
Page 2 of 2
CKLC100CRT71 INSTALLATION INSTRUCTIONS
6. Attach the monitor to the VESA Plate using hardware appropriate for the
threaded inserts on the monitor as specified by the manufacturer. Several
sizes of monitor attaching hardware have been provided for convienience.
7. Tighten the Tilt Plate Socket Button Head Screws to prevent the monitor
from tilting initially.
8. Align the hole on the Swivel Plate with hole on the Wall Arm.
CAUTION! For larger monitors, installation requires at least two people to
align the monitor and insert the 5/16" Hex Bolt. Attempting this installation
without assistance may result in accidental damage to the monitor.
9. Replace the 5/16" Hex Bolt, washers, nylock nut and cap used in Step 1.
10. Tighten the 5/16" Hex Bolt and Button Head Screws to provide the desired
tilting viewing angle and monitor position.
CAUTION! Do not leave the 5/16" Hex Bolt and Button Head Screws loose.
Leaving these screws loose may result in accidental damaged to the
monitor due to unrestricted movement.
CKLC100CRT71_Ins - 3/30/09 - M.R.B. ©2009 Lucasey Manufacturing Corporation, Oakland, California www.lucasey.com

Other Lucasey TV Mount manuals

Lucasey LG1558B User manual

Lucasey

Lucasey LG1558B User manual

Lucasey LG1810A User manual

Lucasey

Lucasey LG1810A User manual

Lucasey SM1909B User manual

Lucasey

Lucasey SM1909B User manual

Lucasey LG1507A User manual

Lucasey

Lucasey LG1507A User manual

Lucasey LG1558A User manual

Lucasey

Lucasey LG1558A User manual

Lucasey LC200DS2 User manual

Lucasey

Lucasey LC200DS2 User manual

Lucasey LG2309A User manual

Lucasey

Lucasey LG2309A User manual

Lucasey SM1909A User manual

Lucasey

Lucasey SM1909A User manual

Lucasey LC6X4WTM User manual

Lucasey

Lucasey LC6X4WTM User manual

Lucasey LG2510B User manual

Lucasey

Lucasey LG2510B User manual

Lucasey FSWA2220 User manual

Lucasey

Lucasey FSWA2220 User manual

Popular TV Mount manuals by other brands

Digitus DA-90423 Quick installation guide

Digitus

Digitus DA-90423 Quick installation guide

Hama 00 220869 Quick installation guide

Hama

Hama 00 220869 Quick installation guide

Edbak SWB1 installation manual

Edbak

Edbak SWB1 installation manual

Gateway GTW-WMM103 Assembling instructions

Gateway

Gateway GTW-WMM103 Assembling instructions

Panduit NET-ACCESS SN7TCDW instructions

Panduit

Panduit NET-ACCESS SN7TCDW instructions

KSL Simpler 12ET installation instructions

KSL

KSL Simpler 12ET installation instructions

CHIEF KRA212 installation instructions

CHIEF

CHIEF KRA212 installation instructions

Pioneer 12.301321-06 installation manual

Pioneer

Pioneer 12.301321-06 installation manual

Displays2go HVAWM3260S instructions

Displays2go

Displays2go HVAWM3260S instructions

Artiss TV-MOUN-003-BK quick start guide

Artiss

Artiss TV-MOUN-003-BK quick start guide

PEERLESS PARAMOUNT PRTLU installation guide

PEERLESS

PEERLESS PARAMOUNT PRTLU installation guide

AmazonBasics B07QH7K9N2 manual

AmazonBasics

AmazonBasics B07QH7K9N2 manual

3idee hp-32s Assembly instructions

3idee

3idee hp-32s Assembly instructions

Vivo MOUNT-E-FD55W instruction manual

Vivo

Vivo MOUNT-E-FD55W instruction manual

Choice Select 5256 Assembly and installation instruction

Choice Select

Choice Select 5256 Assembly and installation instruction

ricoo LH039 quick start guide

ricoo

ricoo LH039 quick start guide

Metra Electronics TL64 Assembly instructions

Metra Electronics

Metra Electronics TL64 Assembly instructions

Sony KDL-46HX750 manual

Sony

Sony KDL-46HX750 manual

manuals.online logo
manuals.online logoBrands
  • About & Mission
  • Contact us
  • Privacy Policy
  • Terms and Conditions

Copyright 2025 Manuals.Online. All Rights Reserved.