Lucci fini 2100249 User manual

Installation Instructions
1 | P a g e
AIRFUSION CLIMATE LIGHT KIT
SKU# 2100249, 2100250,2100251,2100252, 2100253
GB
Installation Instruction Manual .............................................................................................2
D
Installationsanleitung ...........................................................................................................4
F
Guide d’installation................................................................................................................6
E
Manual de instrucciones de instalación.................................................................................8
I
Manuale delle istruzioni di installazione................................................................................10
NL
Installatiehandleiding.............................................................................................................12
Contact:
Beacon International Ltd
Hong Kong Head Office: Suite 1, 66/FL, The Center, 99 Queens Road, Central, Hong Kong
TEL +852 3965 3045 Fax +852 3965 3222
China showroom / Office: 11/Fl, Guzhen Lighting Building B, Mid Zhongxing Road, Guzhen, Zhongshan, GuangDong,
China.
Tel: +86 760 8986 6388 Fax: +86 760 8986 6380
www.beaconinternational.com
Beacon Lighting Europe GmbH
Campus Fichtenhain 42, 47807 Krefeld, Germany
TEL +49 (2151) 325 82 39 FAX +49 (2151) 325 70 65
www.beaconlighting.eu

Installation Instructions
2 | P a g e
Thank you for purchasing this quality Lucci product. To ensure correct function and safety, please read and follow all
instructions carefully before using the product. Please keep instructions for future reference.
Warranty
Warranty will be void if there is any damage due to improper usage or modification to the fitting.
IN EUROPE –If you are a European customer please contact the retail outlet where the light kit was purchased for
warranty service.
Installation requirements
Must be installed by a licensed electrician.
All wiring and installation of the light fitting must adhere to local and national wiring rules.
Do not exceed the maximum wattage rating.
Select a suitable location for installation;
- This product is suitable for indoor use only.
- Ensure the fitting is not installed next to any air vents and is not in any moist or damp areas.
- The mounting point must support 2 times the weight of the fitting.
Take care not to pull any electrical wires during unpacking as this may damage the connection.
Lay out all the components on a smooth surface and make sure there are no components missing before
assembling.
Check whether the fitting has been damaged during transport. Do not operate/install any product which appears
damaged in any way. Return the complete product to the place of purchase for inspection, repair or replacement.
Ensure power to the circuit you are working on has been switched OFF.
Installation directions
1. Remove all packaging material from the product.
2. Remove the cover from the shaft of the fan.
3. Remove the shrinkable sleeve from light wires connector (B).
4. Remove the light shade (E) from the light base (C) by pulling it to release from spring clips.
5. Connect the light wire connectors (B) together.
6. Lift and align the base of the light (C) to the light base bracket (A), let the bolt go through the big keyholes of the slot
and turn the light base anticlockwise. Align the screw holes between the light base and the light base bracket and
use the 3 mounting screws (F) to secure.
7. Install a globe (included) into the lamp holder. Do not exceed the maximum wattage rating.
8. Reposition the lamp shade using the 3 spring clips (D).

Installation Instructions
3 | P a g e
Safety tips
Always ensure the power is OFF and the fitting has cooled down before performing any maintenance, cleaning,
changing the globe or adjustment to the fitting.
Do not touch the globe with bare hands. Use a clean cloth, gloves or a tissue.
To avoid injury or damage to the fitting, ensure that power leads and screws are secure before connecting the
power.
Select a suitable location away from liquids and hazards.
Ensure that the fitting does not come in contact with corrosive chemicals, etc.
To clean, wipe with a damp clean cloth. Never soak the fitting with water.
Specifications
SKU #
2100249
2100250
2100251
2100252
2100253
Model #
BI-LIGHTKIT-ST-
WH
BI-LIGHTKIT-ST-
BC
BI-LIGHTKIT-ST-
AB
BI-LIGHTKIT-ST-
CC
BI-LIGHTKIT-ST-
ORB
Rated
Voltage
220-240V~ 50Hz
Rated
Wattage
Max.11W LED globe
Lamp Holder
GX53
Weight
0.45kg
Dimensions
H:70mm Dia:153mm
Globe
LED globe included (5W)

Installation Instructions
4 | P a g e
Vielen Dank, dass Sie sich für diese Qualitätsprodukt von Lucci entschieden haben. Um eine ordnungsgemäße
Funktion und Sicherheit zu gewährleisten, lesen und befolgen Sie bitte die Anleitung bevor Sie das Produkt verwenden.
Bewahren Sie die Anleitung zum späteren Nachschlagen auf.
Gewährleistung
Für Schäden, die durch unsachgemäßen Gebrauch oder Änderungen an der Aufhängung entstehen, wird keine
Gewährleistung übernommen.
IN EUROPA - Kontaktieren Sie für Gewährleistungsansprüche bitte den Händler, bei dem Sie das Licht-Set
erworben haben.
Voraussetzungen für den Einbau
Der Einbau hat durch einen konzessionierten Elektriker zu erfolgen.
Die Verkabelung der Aufhängung hat den lokalen und nationalen Vorschriften zu entsprechen.
Der maximale Leistungsbereich darf nicht überschritten werden.
Wählen Sie einen passenden Standort.
- Dieses Produkt ist nur zum Gebrauch im Innenbereich geeignet.
- Stellen Sie sicher, dass die Aufhängung nicht neben einer Entlüftungsöffnung und nassen oder feuchten Stellen
montiert wird.
- Die Tragfähigkeit des Montageorts (Decke) muss das doppelte Gewicht der Aufhängung betragen.
Achten Sie darauf, beimAuspacken nicht an der Verkabelung zu ziehen, da dadurch Schäden entstehen können.
Bereiten Sie vor der Montage alle Komponenten vor, um sicherzustellen, dass alle Teile vorhanden sind.
Überprüfen Sie die Aufhängung auf Transportschäden. Montieren/ verwenden Sie das Produkt nicht, wenn es
schadhaft erscheint. Bringen Sie das Produkt in diesem Fall zur Überprüfung, Reparatur oder zum Austausch zum
Händler zurück.
Stellen Sie sicher, dass die Netzspannung der Leitung, an der Sie arbeiten, UNTERBROCHEN wurde.
Montageanleitung
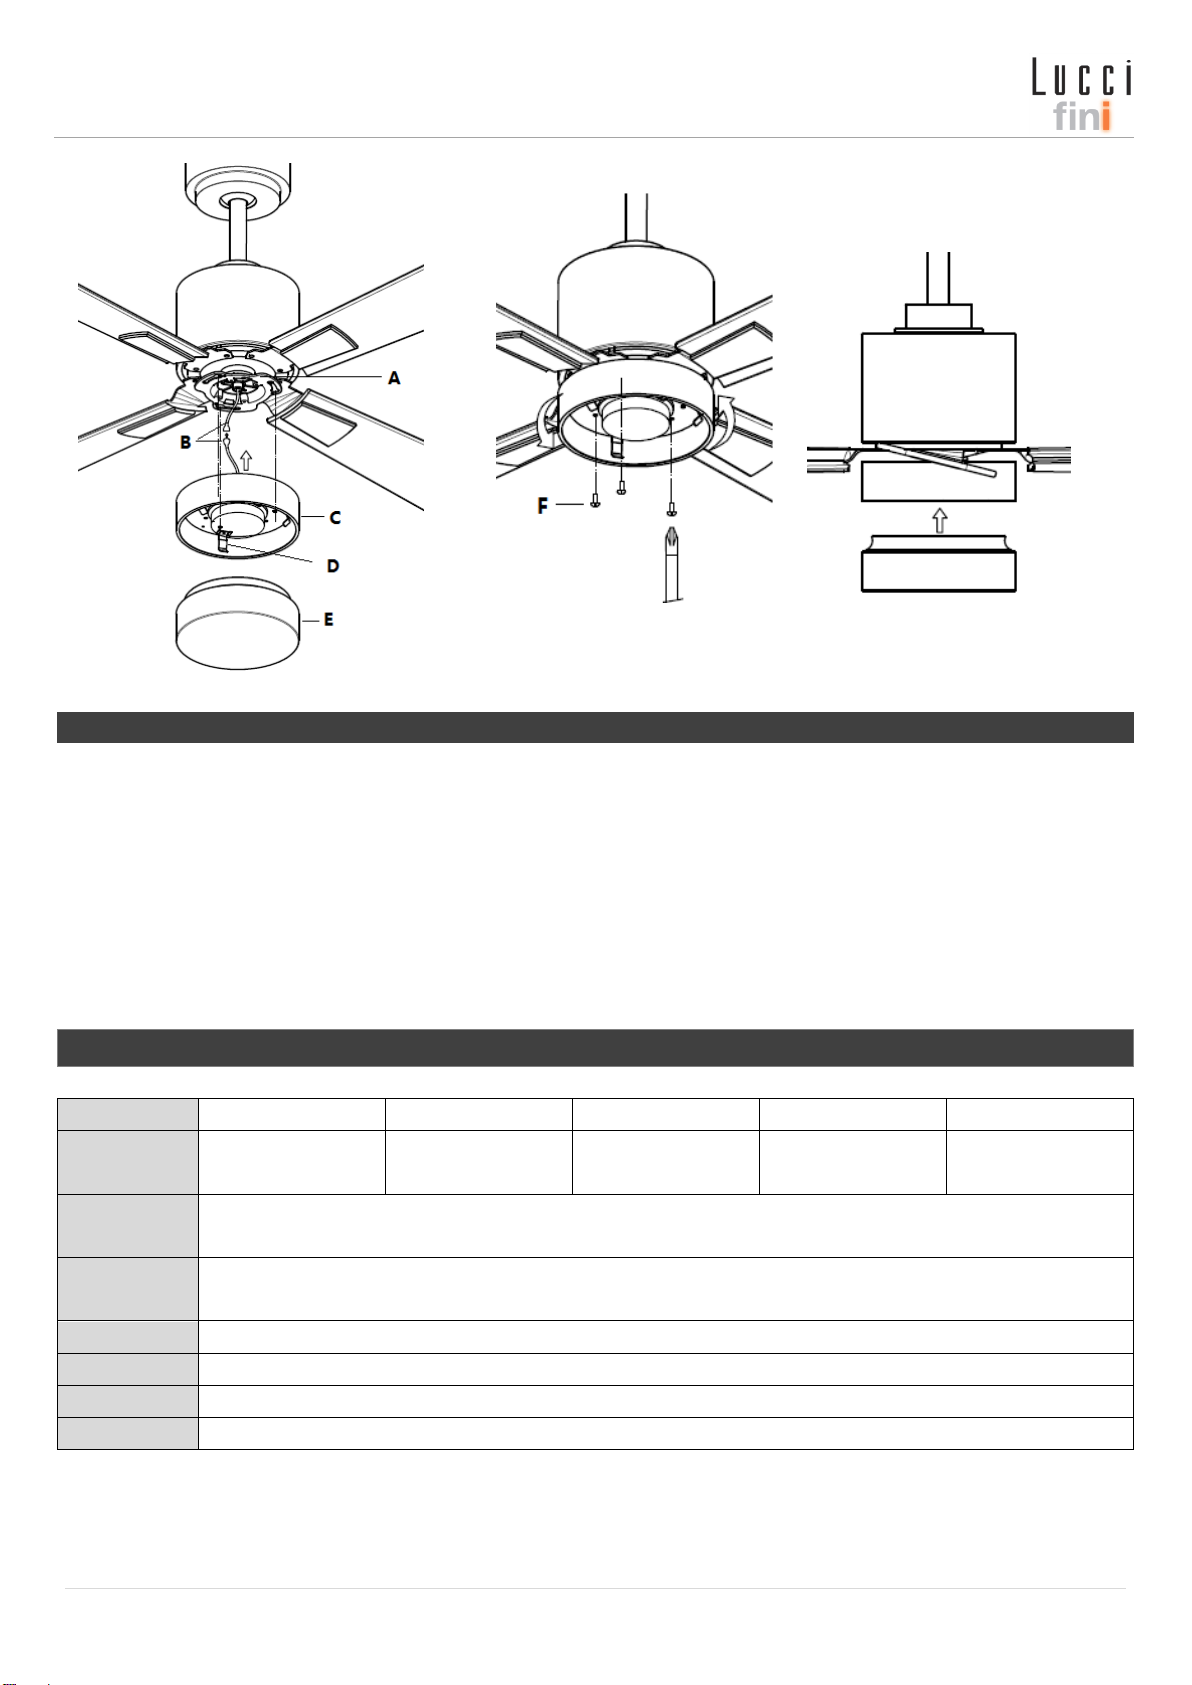
1. Nehmen Sie das Produkt aus der Verpackung.
2. Entfernen Sie dieAbdeckung von der Ventilatorwelle.
3. Entfernen Sie den Schrumpfschlauch vom Kabelverbinder (B) für die Beleuchtung.
4. Ziehen Sie den Lampenschirm (E) aus der Lampenhalterung (C) mit den Federklemmen.
5. Verbinden Sie die Kabelverbindungen (B) für die Beleuchtung.
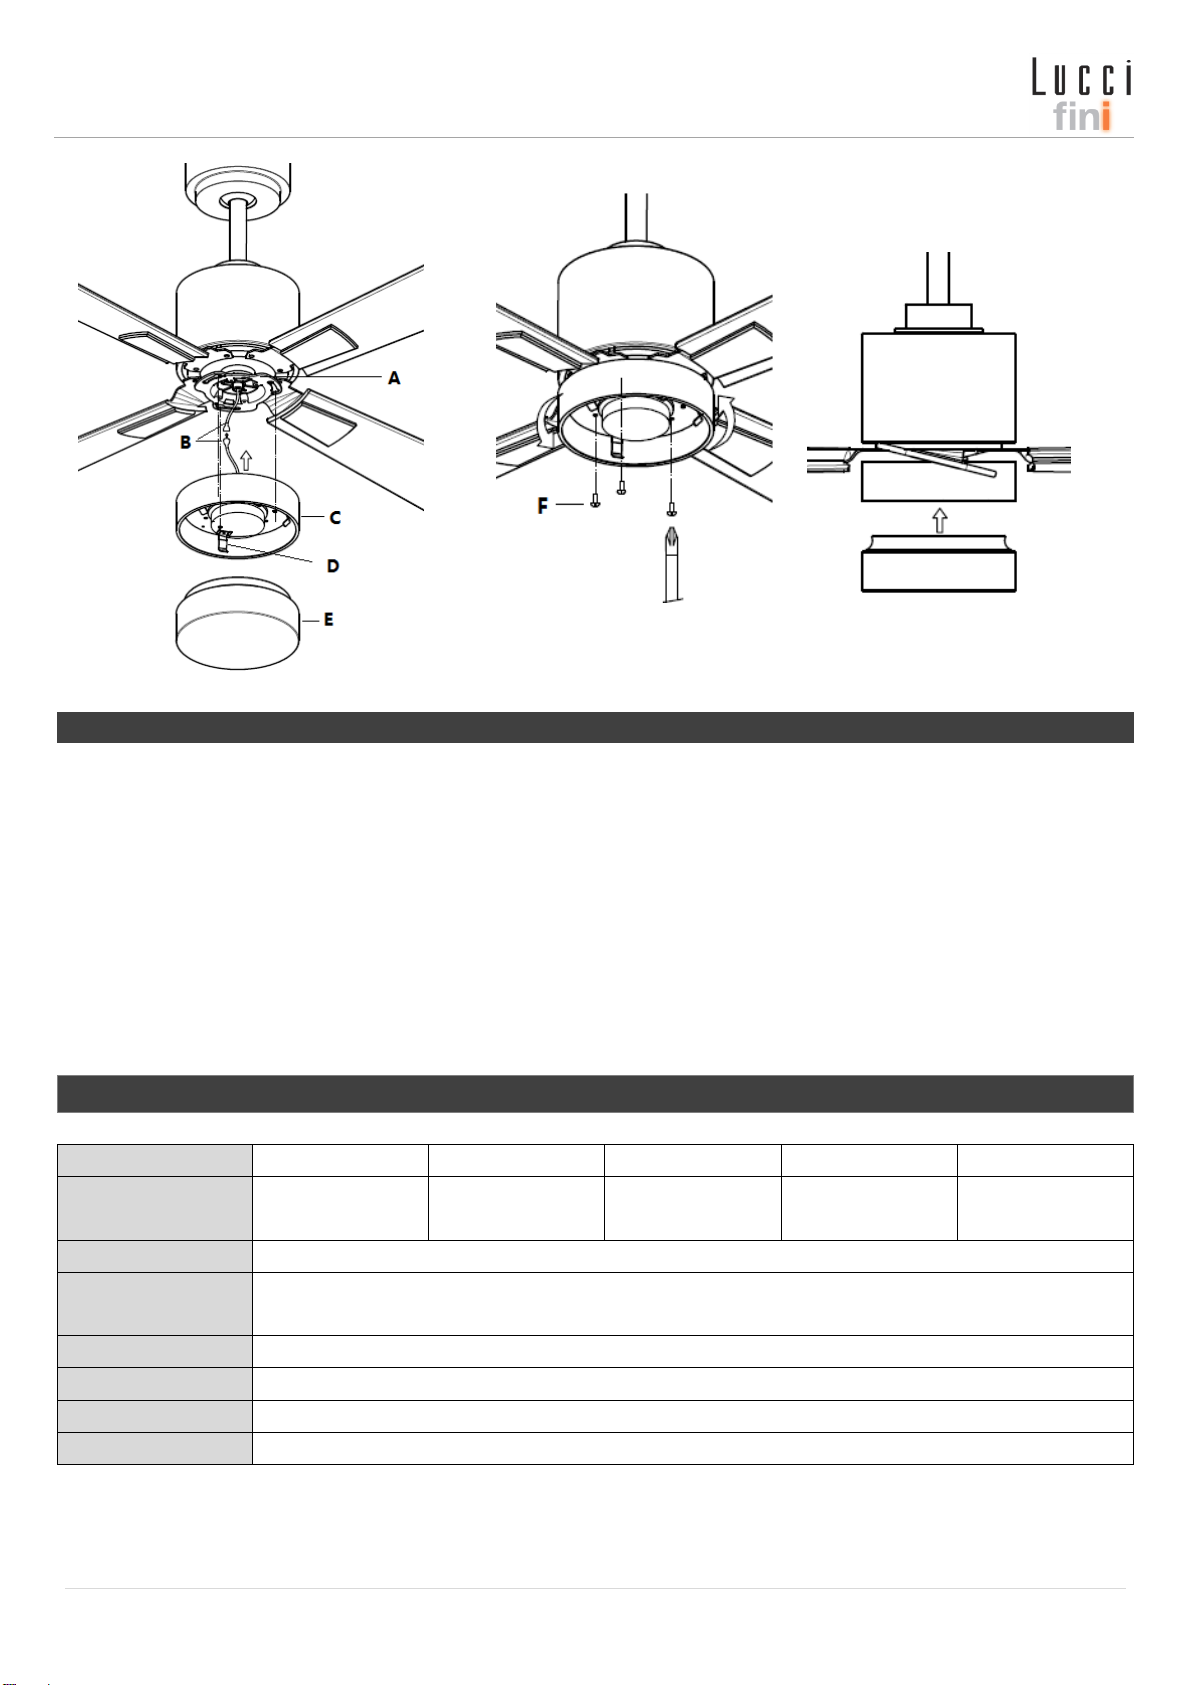
6. Heben Sie die Lampenhalterung (C) hoch und richten Sie sie an der Basisaufhängung aus (A), führen Sie die
Schraube durch die Öffnungen und drehen Sie die Halterung gegen den Uhrzeigersinn. Richten Sie die
Schraubenlöcher der Lampenhalterung an den Schraubenlöchern der Basisaufhängung aus und befestigen Sie sie
mit 3 Befestigungsschrauben (F).
7. Schrauben Sie ein Leuchtmittel (im Lieferumfang enthalten) in die Fassung. Der maximale Leistungsbereich darf
nicht überschritten werden.
8. Befestigen Sie den Lampenschirm wieder mit den 3 Federklemmen (D).

Installation Instructions
5 | P a g e
Sicherheitshinweise
Stellen Sie sicher, dass die Stromzufuhr UNTERBROCHEN ist bevor eine Wartung, Reinigung, das Wechseln eines
Leuchtmittels oder Anpassungen an der Aufhängung vorgenommen werden.
Berühren Sie das Leuchtmittel nicht mit bloßen Händen. Verwenden Sie ein sauberes Tuch, Handschuhe oder ein
Taschentuch.
Stellen Sie sicher, dass die Verkabelung und Schrauben ordnungsgemäß befestigt wurden, bevor Sie die
Stromzufuhr einschalten, um Schäden an der Aufhängung zu vermeiden,
Wählen Sie einen passenden, trockenen und risikofreien Standort aus.
Achten Sie darauf, dass dieAufhängung nicht mit aggressiven Chemikalien,etc. in Berührung kommt.
Verwenden Sie für die Reinigung ein feuchtes, sauberes Tuch. Weichen Sie die Aufhängung niemals in Wasser ein.
Technische Daten
SKU Nr.
2100249
2100250
2100251
2100252
2100253
Modell Nr.
BI-LIGHTKIT-ST-
WH
BI-LIGHTKIT-ST-
BC
BI-LIGHTKIT-ST-
AB
BI-LIGHTKIT-ST-
CC
BI-LIGHTKIT-ST-
ORB
Nennspannung
220-240V~ 50Hz
Elektrische
Leistung
Max.11W LED globe
Lampenhalterun
g
GX53
Gewicht
0.45kg
Abmessungen:
H:70mm Dia:153mm
Leuchtmittel
LED globe included (5W)

Installation Instructions
6 | P a g e
Merci d'avoir achetéce produit de qualitéLucci. Afin de s'assurer du bon fonctionnement et de la sécurité, veuillez
attentivement lire et respecter soigneusement toutes les instructions avant d'utiliser ce produit. Veuillez conserver ce
manuel pour toute référence ultérieure.
Garantie
La garantie sera annulée si le produit présente des dommages provoqués par la mauvaise utilisation ou la
modification de l'installation.
EUROPE - Si vous êtes un client européen, veuillez contacter le point de vente oùle kit d'éclairage a étéacheté
pour obtenir la garantie.
Conditions d'installation
Le produit doit être installépar un électricien agréé.
Tout câblage et installation du luminaire d'éclairage doit respecter les règles de câblage locales et nationales.
Ne dépasser pas la puissance nominale maximale.
Choisir un emplacement adaptépour l'installation;
- Ce produit est destinéuniquement àun usage intérieur.
- S'assurer que le luminaire n'est pas installéàproximitédes évents d'air et n'est pas située dans des lieux
humides ou mouillés.
- Le point de montage doit pouvoir soutenir 2 fois le poids du luminaire.
Attention àne pas tirer des fils électriques pendant le déballage car cela pourrait endommager le raccord.
Poser tous les composants sur une surface plate et assurez-vous qu'il n'ait pas de composants manquants avant
l'assemblage.
Vérifier que le luminaire n'a pas étéendommagépendant le transport. Ne pas utiliser/installer tout produit qui vous
paraît endommager. Renvoyer le produit complet au lieu d'achat pour inspection, réparation ou remplacement.
S'assurer que l'alimentation électrique du circuit sur lequel vous travaillez a étéarrêtée.
Directives d'installation
1. Retirer tous les matériaux d'emballage sur le produit.
2. Retirer le couvercle de l'arbre du ventilateur.
3. Retirer la manche rétractable du connecteur des câbles d'éclairage (B).
4. Retirer l'ombre d'éclairage (E) de la base d'éclairage (C) en le tirant pour le dégager des brides àressort.
5. Brancher ensemble les connecteurs du câble d'éclairage (B).
6. Soulever et aligner la base d'éclairage (C) pour éclairer le support de la base (A), laisser passer le boulon àtravers
les grands trous de la fente et tourner la base d'éclairage dans le sens contraire aux aiguilles d'une montre. Aligner
les trous de vis entre la base d'éclairage et le support de la base d'éclairage et utiliser les 3 vis de montage (F) pour
sécuriser.
7. Installer une ampoule (fournie) dans le porte ampoule. Ne dépasser pas la puissance nominale maximale.
8. Repositionner l'ombre de la lampe àl'aide des 3 brides àressort (D).

Installation Instructions
7 | P a g e
Conseils de sécurité
S'assurer toujours que l'alimentation est en ARRET et que le luminaire s'est refroidi avant d'effectuer tout entretien,
nettoyage, changement d'ampoule ou réglage sur le luminaire.
Ne pas toucher l'ampoule avec des mains nues. Utiliser un linge propre, des gants ou un mouchoir.
Pour éviter des blessures ou des dommages sur le luminaire, veuillez vous assurez que les fils d'alimentation et les
vis sont sécurisés avant de brancher l'alimentation électrique.
Choisir un emplacement adaptéloin des liquides et des risques potentiels.
S'assurer que le luminaire n'entre pas en contact avec des produits chimiques corrosifs, etc.
Nettoyer, essuyer àl'aide d'un linge propre et humide. Ne jamais tremper le luminaire dans de l'eau.
Spécifications
SKU #
2100249
2100250
2100251
2100252
2100253
Modèle #
BI-LIGHTKIT-ST-
WH
BI-LIGHTKIT-ST-
BC
BI-LIGHTKIT-ST-
AB
BI-LIGHTKIT-ST-
CC
BI-LIGHTKIT-ST-
ORB
Tension nominale
220-240V~ 50Hz
Puissance
nominale
Max.11W LED globe
Porte ampoule
GX53
Poids
0.45kg
Dimensions
H:70mm Dia:153mm
Ampoule
LED globe included (5W)

Installation Instructions
8 | P a g e
Gracias por comprar este producto Lucci de primera de calidad. Para garantizar un funcionamiento correcto y la
seguridad, lea y siga cuidadosamente todas las instrucciones antes de usar el producto. por favor guarde las
instrucciones para referencia futura.
Garantía
La garantía seránula si hubiera algún daño debido a un uso indebido o modificación del artefacto.
EN EUROPA - Si usted es un cliente europeo, por favor póngase en contacto con el negocio donde el conjunto de
aclimatación con luz fue comprado para el servicio de garantía.
Prescripciones relativas a la instalación
Debe ser instalado por un electricista autorizado.
Todo el cableado y la instalación del artefacto deben cumplir con las normas de cableado locales y nacionales.
No exceda la máxima potencia nominal.
Seleccione una ubicación adecuada para la instalación;
- Este producto es adecuado solamente para uso en interiores.
- Asegúrese de que el artefacto no se haya instalado junto a alguna salida de aire y que no estéen áreas
húmedas o mojadas.
- El punto de anclaje debe ser capaz de soportar 2 veces el peso del artefacto.
Tenga cuidado de no tirar de los cables eléctricos durante el desembalaje, ya que podría dañar la conexión.
Antes del montaje, coloque todos los componentes sobre una superficie lisa y asegúrese de que no haya
componentes que falten.
Compruebe si el artefacto ha sufrido daños durante el transporte. No utilice ni instale ningún producto que muestre
algún tipo de daño. Envíe el producto completo al lugar de compra para su inspección, reparación o reemplazo.
Verifique que el circuito en el que usted estátrabajando haya sido desconectado.
Instrucciones de instalación:
1. Retire todo el material de embalaje del producto.
2. Retire el recubrimiento del eje del ventilador.
3. Extraiga el manguito retráctil del conector de los cables de luz (B).
4. Quite la tulipa de luz (E) de la base de la luz (C) tirando para soltarla de los ganchos elásticos.
5. Enchufe los conectores (B) de los cables de luz.
6. Levante y alinee la base de la luz (C) en el soporte de base de la luz (A), dejando que el perno pase a través los
agujeros de entrada de la ranura y gire la base de la luz hacia la izquierda.Alinee los orificios de los tornillos entre
la base de la luz y el soporte de base de la luz y use los 3 tornillos de montaje (F).
7. Instale un globo (que se incluye) en el portalámparas. No exceda la máxima potencia.
8. Vuelva a colocar la tulipa de la lámpara en los 3 ganchos elásticos (D).

Installation Instructions
9 | P a g e
Cuidados para la seguridad
Asegúrese siempre de que la alimentación estédesconectada y que el artefacto se haya enfriado antes de realizar
cualquier tarea de mantenimiento, limpieza, cambio de globo o ajuste del artefacto.
No tocar el globo con las manos. Utilice un paño limpio, guantes o un pañuelo de papel.
Para evitar lesiones o daños durante la instalación, asegúrese de que los cables de alimentación y los tornillos
estén bien ajustados antes de reconectar la alimentación.
Busque una ubicación adecuada lejos de líquidos y evite cualquier peligro.
Asegúrese de que la conexión no entre en contacto con productos químicos corrosivos, etc.
Para limpiar, repase con un paño limpio. Nunca moje el artefacto con agua.
Especificaciones
SKU #
2100249
2100250
2100251
2100252
2100253
Modelo
BI-LIGHTKIT-ST-
WH
BI-LIGHTKIT-ST-
BC
BI-LIGHTKIT-ST-
AB
BI-LIGHTKIT-ST-
CC
BI-LIGHTKIT-ST-
ORB
Tensión nominal:
220-240V~ 50Hz
Potencia nominal
Max.11W LED globe
Portalámparas
GX53
Peso
0.45kg
Dimensiones
H:70mm Dia:153mm
Globo
LED globe included (5W)

Installation Instructions
10 | P a g e
Grazie per aver acquistato questo prodotto di qualitàLucci. Per assicurare un corretto e sicuro funzionamento, vogliate
leggere e seguire tutte le istruzioni con cura prima di usare il prodotto. Vogliate conservare le istruzioni per riferimento
futuro.
Garanzia commerciale
La garanzia sarànulla se vi sono dei danni dovuti ad un uso improprio o modifiche alla lampada.
IN EUROPA –Se siete un cliente europeo vogliate contattare il dettagliante dove èstata comprata la lampada per la
manutenzione in garanzia.
Requisiti di installazione
Deve essere installata da un elettricista qualificato.
Tutti i collegamenti elettrici e l'installazione della lampada devono rispettare le regole nazionali e locali di cablaggio.
Non superate la potenza massima in watt.
Scegliete una posizione adeguata per l’installazione;
- Questo prodotto èadeguato solo per uso interno.
- Assicuratevi che la lampada non sia installata vicino a delle bocchette d’aria né in zone umide o bagnate.
- Il punto di montaggio deve sostenere il doppio del peso della lampada.
State attenti a non tirare dei fili elettrici durante il disimballaggio in quanto questo potrebbe danneggiare la
connessione.
Disponete tutti i componenti su una superficie piana e assicuratevi che non manchino dei componenti prima
dell’assemblaggio.
Controllate se la lampada èstata danneggiata durante il trasporto. Non utilizzate/installate alcun prodotto che
appare danneggiato in alcun modo. Restituite il prodotto completo al punto di acquisto per ispezione, riparazione o
sostituzione.
Assicuratevi che la corrente al circuito su cui state lavorate sia stata interrotta.
Istruzioni di installazione
1. Rimuovete tutto il materiale di imballaggio dal prodotto.
2. Rimuovete il coperchio dall'albero del ventilatore.
3. Rimuovete il manicotto restringibile dal connettore dei fili elettrici (B).
4. Rimuovete il paralume (E) dalla base della lampada (C) tirandolo per liberarlo dai fermagli a molla.
5. Collegate i connettori dei fili elettrici (B).
6. Sollevate e allineate la base della lampada (C) alla staffa alla base della lampada (A), lasciate passare il bullone
attraverso i fori della fessura e girate la base della lampada in senso anti-orario.Allineate i fori delle viti tra la base
della lampada e la staffa della base della lampada ed usate le 3 viti di montaggio (F) per assicurarla.
7. Installate una lampadina (inclusa) nel portalampade. Non superate la potenza massima nominale in watt.
8. Riposizionate il paralume usando i 3 fermagli a molla (D).

Installation Instructions
11 | P a g e
Consigli di sicurezza
Assicuratevi sempre che la corrente sia scollegata e che la lampada si sia raffreddata prima di eseguire qualsiasi
manutenzione, pulizia, sostituzione lampadina o regolazione della lampada.
Non toccate la lampadina a mani nude. Usate un panno pulito, guanti o un fazzoletto di carta.
Per evitare ferite o danni alla lampada assicuratevi che i cavi di alimentazione e le viti siano ben assicurati prima di
collegare la corrente.
Trovate una posizione adatta lontana da liquidi e pericoli.
Assicuratevi che la lampada non venga in contatto con prodotti chimici corrosivi, ecc.
Per pulire strofinate con un panno pulito umido. Non immergete mai la lampada nell’acqua.
Specifiche
Codice #
2100249
2100250
2100251
2100252
2100253
Modello °
BI-LIGHTKIT-ST-
WH
BI-LIGHTKIT-ST-
BC
BI-LIGHTKIT-ST-
AB
BI-LIGHTKIT-ST-
CC
BI-LIGHTKIT-ST-
ORB
Tensione
nominale
220-240V~ 50Hz
Wattaggio
nominale
Max.11W LED globe
Portalampade
GX53
Peso
0.45kg
Dimensioni
H:70mm Dia:153mm
Lampadina
LED globe included (5W)

Installation Instructions
12 | P a g e
Wij danken u voor de aankoop van een Lucci kwaliteitsproduct. Om een juist en veilig functioneren te garanderen, lees
en volg de onderstaande instructies op voordat u het product gaat gebruiken. Bewaar de instructies voor toekomstige
raadpleging.
Garantie
De garantie vervalt als het product beschadigd is door onjuist gebruik of wijziging van het armatuur.
IN EUROPA–Europese klanten worden verzocht contact op te nemen met het verkooppunt over de
garantieservice.
Installatievereisten
Moet door een gekwalificeerde elektricien geïnstalleerd worden.
Alle bedrading en installatie van het licht moet voldoen aan lokale en nationale bedradingsvereisten.
Het maximale wattverbruik niet overschrijden.
Kies een geschikte installatieplek;
- Dit product is enkel goedgekeurd voor gebruik binnenshuis.
- Zorg ervoor dat het armatuur niet naast luchtgaten of in een vochtige omgeving geïnstalleerd wordt.
- Het bevestigingspunt moet 2 keer het gewicht van het armatuur kunnen dragen.
Trek aan geen enkele elektrische draad bij het uitpakken aangezien dit de aansluiting kan beschadigen.
Leg alle elementen op een gladde ondergrond en controleer dat geen enkel element ontbreekt voordat u met de
montage begint.
Controleer of het armatuur tijdens het vervoer beschadigd is. Installeer / gebruik geen enkel product dat op één of
andere manier beschadigd blijkt. Breng het complete product terug naar het verkooppunt voor inspectie, reparatie of
vervanging.
Zorg ervoor dat het stroomcircuit waar u aan gaat werken UIT staat.
Installatie-aanwijzingen
1. Verwijder al het verpakkingsmateriaal van het product.
2. Verwijder de behuizing van de ventilatorschacht.
3. Verwijder de krimpbare buis van de bedradingsaansluiting (B).
4. Verwijder de lampenkap (E) van de basis (C) door voorzichtig aan de kap te trekken zodat de veren losspringen.
5. Sluit de bedradingsaansluitingen (B) op elkaar aan.
6. Til de basis van het licht (C) op en aligneer dit met de houder (A), laat de bout door de grote gaten in de gleuf gaan
en draai de basis tegen de klok in. Aligneer de schroefgaten tussen de lichtbasis en de houder en gebruik de 3
montageschroeven (F) om de basis te bevestigen.
7. Bevestig de lamp (inbegrepen) in de houder. Het maximale wattverbruik niet overschrijden.
8. Zet de lampenkap op de lamp met behulp van de 3 klemringen (D).

Installation Instructions
13 | P a g e
Veiligheidstips
Zorg ervoor dat de stroom UITgeschakeld is en het armatuur afgekoeld is voordat u onderhoud uitvoert,
schoonmaakt, de lamp verwisselt of het armatuur verhangt.
Raak de lamp niet met blote handen aan. Gebruik een schone doek, handschoenen of een zakdoek.
Om blessures of beschadiging aan het armatuur te voorkomen, zorg ervoor dat de bedrading en schroeven goed
vast zitten voordat u de stroom weer aanzet.
Installeer het product in een omgeving zonder vloeistoffen en gevaren.
Zorg ervoor dat het armatuur niet in aanraking komt met agressieve chemische producten, etc.
Gebruik een schone, vochtige doek om het product te reinigen. Het product nooit onderdompelen in water.
Specificaties
SKU #
2100249
2100250
2100251
2100252
2100253
Model #
BI-LIGHTKIT-ST-
WH
BI-LIGHTKIT-ST-
BC
BI-LIGHTKIT-ST-
AB
BI-LIGHTKIT-ST-
CC
BI-LIGHTKIT-ST-
ORB
Nominale spanning
220-240V~ 50Hz
Nominaal
wattverbruik
Max.11W LED globe
Lamphouder
GX53
Gewicht
0.45kg
Afmetingen
H:70mm Dia:153mm
Lamp
LED globe included (5W)
This manual suits for next models
4
Table of contents
Languages:
Other Lucci fini Lighting Equipment manuals