INCAS 45 - 90 - 45MICRO - 90MICRO
MOD 54
INCAS 90/45
IN 45 1X50W 12V GU5,3 QR CBC 51
IN45G9 1XMAX40W 230V G9
IN45A/B/BN/R/V 1X1W 350mA LED
IN45.3A/B/BN/R/V 1X3W 700mA LED
INCAS 90/45 MICRO
IN 93 1X35W 12V Gu4 QR CBC 35
IN93A/B/BN/R/V 1X1W 350mA LED
IN93.3A/B/BN/R/V 1X3W 700mA LED
100
100
78
100 100
80
6262
62 62
53
64
Attenzione:
-L’installazione deve essere effettuata da personale qualificato.
-Prima di effettuare i collegamenti elettrici assicurarsi di avere tolto tensione all’
impianto operando sugli interruttori del quadro elettrico generale.
-Il seguente apparecchio è costruito con parti non commestibili.
-Tenere lontano dalla portata dei bambini: parti che lo costituiscono sono di
piccole dimensioni e possono essere da essi ingerite.
-Dopo l'accensione in alcune parti l'apparecchio potrebbe raggiungere alte
temperature pertanto non toccare.
-Non versare acqua o altri liquidi sull'apparecchio.
-Qualora l'apparecchio presentasse difetti di fabbricazione che ne pregiudicassero
il funzionamento, restituirlo al rivenditore;
-Se si interviene sull'apparecchio manomettendolo, l'azienda non risponderà in
alcun caso di danni provocati a cose o persone.
Warning:
- The installation must be effected by competent staff only
- Before making the electrical connections make sure that the tension
line is off by pushing the switches on the general switchboard
- The article is manufactured with non-eatable parts
- Keep away from children, small components could be easily
swallowed
- When on, the item can reach hot temperature, do not touch
- Do not pour water or other liquids on it
- In case of faulty article, not allowing its proper working, just send it
back to the reseller
- If you dismantle the product, the supplier will not be liable for
damages
GB This product confirms to EU Directive 2002/96/EC
the symbol of the crossed waste paper basket on the appliance indicates that at the
end of its working life the product should be disposed of separately from normal
domestic household rubbish, it must be disposed of at a waste disposal centre with
dedicated facilities for elettric and elettronic appliances or returned to the retailer
when a new replacement product is purchased.
The user is responsible for the disposal of the product at the end of its life at an
appropriate waste disposal centre.The waste disposal centre ( using special treatment
and recycling processes effectively dismantles and disposes of the appliance) helps to
protect the environment by recycling the material from which the product is made. For
further information about waste disposal system visit your local waste disposal centre or
the retailer from which the product was purchased.
.
IT Questo prodotto è conforme alla Direttiva EU 2002/96/EC
il simbolo del cestino barrato riportato sull’apparecchio indica che il prodotto,
alla fine della propria vita utile, dovendo essere trattato separatamente dai rifiuti
domestici, deve essere conferito in un centro di raccolta differenziata per
apparecchiature elettriche ed elettroniche oppure riconsegnato al rivenditore
al momento dell’acquisto di una nuova apparecchiatura equivalente.
L’utente è responsabile del conferimento dell’apparecchio a fine vita alle
appropriate strutture di raccolta. L’adeguata raccolta differenziata per l’avvio
successivo dell’apparecchio dismesso la riciclaggio, al trattamento e allo
smaltimento ambientale compatibile, contribuisce ad evitare possibili effetti
negativi sull’ambiente e sulla salute e favorisce il riciclo dei materiali di cui è
composto il prodotto. Per informazioni più dettagliate inerenti i sistemi di raccolta
disponibili, rivolgersi al servizio locale di smaltimento rifiuti, o al negozio in cui è stato
effettuato l’acquisto.
vetro opzionale
Cablaggio/
- Effettuare i collegamenti elettrici come di seguito riportato/
ARTT. IN90-IN45-IN92-IN93 (12V):
devono essere cablati utilizzando trasformatori 230V/12V AC (non in dotazione)con una potenza supportata a seconda della
potenza delle lampadine montate/
ARTT. IN90GU e IN45 G9 (230V):
devono essere cablati direttamente ai cavi della tensione di rete/
ARTT. IN90A -IN90B -IN90BN -IN90R -IN90V-IN45A - IN45B - IN45BN - IN45R - IN45V - IN92A - IN92B - IN92BN - IN92R - IN92V -
IN93A - IN93B - IN93BN - IN93R - IN93V(LED 1W):
devono essere cablati utilizzando alimentatori per LED di potenza a corrente costante da 350mA (non in dotazione)/
ARTT. IN90.3A -IN90.3B -IN90.3BN -IN90.3R -IN90.3V-IN45.3A - IN45.3B - IN45.3BN - IN45.3R - IN45.3V - IN92.3A - IN92.3B -
IN92.3BN - IN92.3R - IN92.3V - IN93.3A - IN93.3B - IN93.3BN - IN93.3R - IN93.3V(LED 3W):
devono essere cablati utilizzando alimentatori per LED di potenza a corrente costante da 700mA (non in dotazione)/
Attenzione:
I faretti in versione led devono essere collegati in serie rispettando le polarità.
Warning:
Spotlights LED version must be connected in series according to polarity.
Wiring:
Make electrical connections as described below:
the spotlights must be wired using transformer 230V/12V AC (not supplied) with a power
supported according to the power of light bulbs mounted.
the spotlights must be wired directly to the mains voltage.
the
spotlights must be wired using power LED in constant current of 350mA (not supplied).
the
spotlights must be wired using power LED constant current of 700mA (not supplied).
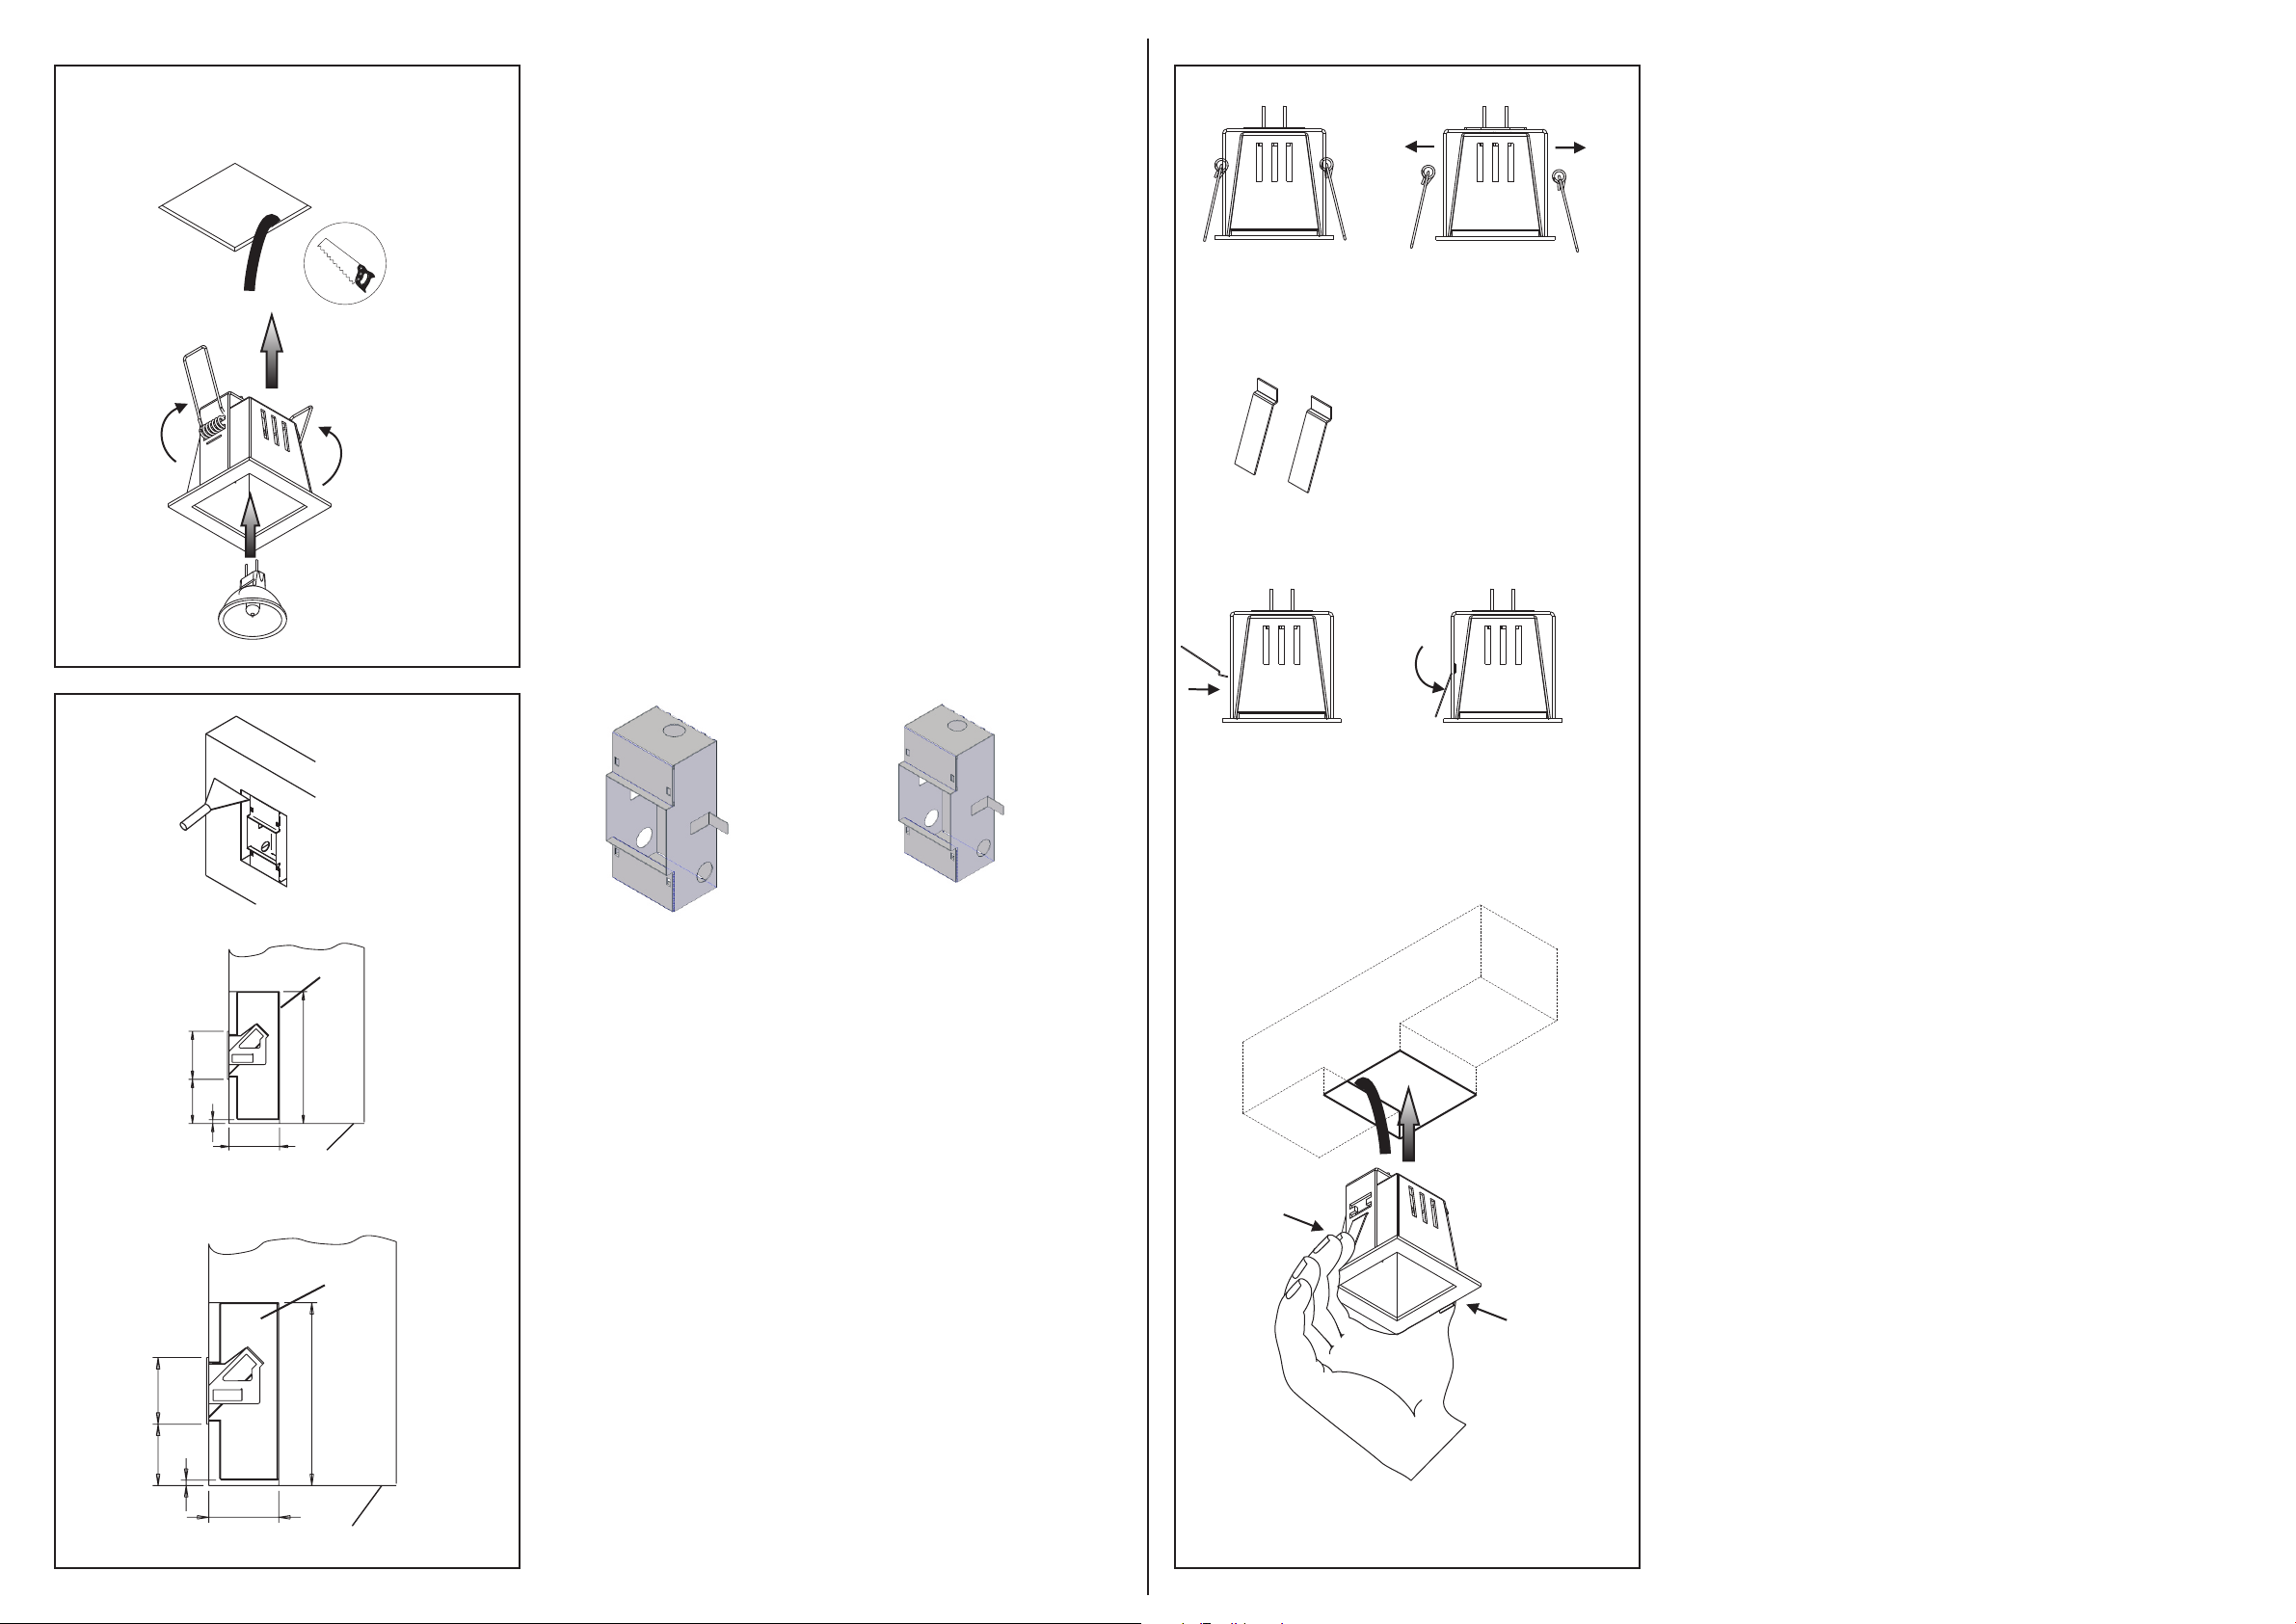
Montaggio vetro (opzionale)/
- Inserire il vetro opzionale attraverso la fessura laterale,
prima di posizionare il faretto/
Mounting glass (optional):
Enter the optional glass through the
slot side before placing the spotlight.
IP 20
- Classe di protezione. Nelle versioni Gu10 e G9 classe I.
- IEC protection class; class I in the Gu10 and G9 versions.
0.5m - Distanza minima che deve essere mantenuta tra lampada e oggetto illuminato.
- Minimum distance between the light bulb and the objects to be illuminated.
F- I n s t a l l a b i l e s u s u p e r f i c i
normalmente infiammabili.
- Luminaries suitable for direct
mounting on flammable surfaces.
- Grado di protezione alla penetrazione di corpi. In caso di montaggio del vetro IP 40.
- Ingress Protection. In the version with glass IP 40
- Prodotto secondo le vigenti Normative Europee
- This lamp is in conformity with the European Directives.
14
H min 160mm
min 300x300 mm