manuals.online logo
Brands
  1. Home
  2. •
  3. Brands
  4. •
  5. LUCIS
  6. •
  7. Lighting Equipment
  8. •
  9. LUCIS OMNIA ZT4 User manual

LUCIS OMNIA ZT4 User manual

OMNIA ZT4, ZT2
Montážní návod
pro svítidla
Mounting Instructions
for Light Fixtures
Montageanleitung
für Beleuchtungskörper
Nedotýkejte se LED diod, hrozí jejich poškození, které se může projevit i po
dlouhé době!
Do not touch the LED diods as there is a risk of damage to the LEDs, which
can occur even after a long time!
Berühren Sie die LED-Dioden nicht, da die Gefahr einer Beschädigung der
LEDs besteht, die auch nach langer Zeit auftreten kann!
MN215
Rev.Date 14.12.2021
Rev.0 2
OMNIA ZT4, ZT2.6, ZT2.12
Typ: závěsné svítidlo / suspension lamp / Pendelleuchte
Stínidlo: akrylátové sklo PMMA opal / acrylic glass PMMA opal / Acrylglas PMMA opal
Těleso svítidla: ocelové lakované / painted steel / lackiertes Stahl
Typ svítidla
Light fixture type
Typ des Beleuchtungskörpers
LED Modul
LED Module
LED Modul
Energetická třída
Energy Class
Die Energieklasse
ZT4.K1.O2
103/73-930 G5
E
ZT4.K2.O2
103/73-940 G5
E
ZT2.6.K1.O2
103/73-930 G5
E
ZT2.6.K2.O2
103/73-940 G5
E
ZT2.12.K1.O2
103/73-930 G5
E
ZT2.12.K2.O2
103/73-940 G5
E
Tab. 1
Před montáží si důkladně
prostudujte celý návod.
Before installation carefully read
whole manual.
Vor der Installation sorgfältig gesamte
Handbuch.
Montáž [CZ]
1. Opatrně vyjměte svítidlo z krabice.
2. Odstraňte fólii z misky svítidla
(1, Obr. 1).
3. Pootočením proti směru
hodinových ručiček a zvednutím
sejměte misku (1, Obr. 1).
4. Pootočte delší ramena (2) do
polohy dle Obr. 1. Utáhněte matice
(4, Obr. 3).
(Neplatí pro svítidlo OMNIA
ZT2.6.)
5. Misku (1, Obr. 3) upevněte pomocí
upevňovacích vrutů a hmoždinek
(nejsou součástí balení). Rozteč
kotvících otvorů je na Obr. 2.
Polohy nýtů ukazují směry ramen
(3, Obr. 2).
6. Připojte zemnící vodič a následně
napájecí vodiče do svorkovnice
(5, Obr. 3).
7. Spojte konektor zemnícího vodiče
(7, Obr. 3). Svítidlo zvedněte na
doraz do misky (1, Obr. 3).
Pootočením na doraz po směru
hodinových ručiček a následným
poklesnutím jej háčky (6, Obr. 3)
upevněte do misky (1, Obr. 3).
8. Při demontáži postupujte
obráceným způsobem.
Installation [EN]
1. Take the luminaire out of the box
carefully.
2. Remove the plastic wrap from the
base of the luminaire (1, Fig. 1).
3. Remove the base of the luminaire
(1., Fig. 1) by turning it
counterclockwise and lifting it.
4. Swivel the longer arms (2) to position
in accordance to Fig. 1. Tighten the
nuts (4, Fig. 3). (Does not apply to
OMNIA ZT2.6 luminaire.)
5. Fix the base of the luminaire (1, Fig.
3) with screws and dowels (not
included). Spacing of the anchoring
holes is shown in Fig. 2. The
positions of the rivets show the
directions of the arms of the
luminaire (3, Fig. 2).
6. Connect the ground and sequentially
power supply cord to the terminal
plate (5., Fig. 3).
7. Connect the ground connector
(7, Fig. 3).Lift up the luminaire as far
as it will go into the base of the
luminaire (1., Fig. 3). Attach the
hooks (6, Fig. 3) to the base (1, Fig.
3) by turning it clockwise and then
lowering it.
8. Disassembly –is the converse of
assembly.
Montage [DE]
1. Nehmen Sie die Leuchte vorsichtig
aus der Verpackung.
2. Entfernen Sie die Plastikfolie vom Leuchten
Basis (1, Abb. 1).
3. Entfernen Sie die Basis (1., Abb. 1), indem
Sie ihn gegen den Uhrzeigersinn drehen und
anheben.
4. Schwenken Sie den kürzeren Arm (2) in die
geeignete Position (Abb. 1) und neigen Sie
auch die Leuchtenköpfe (2, Abb. 1) in die
gewünschte Position, die Muttern festziehen
(4, Abb. 3).
(Gilt nicht für OMNIA ZT2.6 Leuchte.)
5. Befestigen Sie die Basis (1, Abb. 3) mit der
Hilfe von Schrauben (nicht im Lieferumfang
enthalten) an die Decke. Abstand
entsprechend der Abb. 2. Die Positionen der
Nieten (3, Abb. 2) zeigen die Richtungen der
Arme der Leuchte.
6. Schließen Sie zuerst Erdung Kabel und dann
die Anschlusskabeln in die Klemmen (5, Abb.
3).
7. Stecken Sie den Stecker ein (7, Abb. 3).
Heben Sie die Leuchte bis zum Anschlag in
der Basis (1., Abb. 3). Befestigen Sie die
Haken (6, Abb. 3) an der Basis (1, Abb. 3),
indem Sie ihn im Uhrzeigersinn drehen und
dann absenken.
8. Demontierung –umgekehrte Folge wie bei der
Montage.
MN215
Rev.Date 14.12.2021
Rev.0 3
Obr. 1 / Fig. 1 / Abb. 1
Obr. 2 / Fig. 2 / Abb. 2
Obr. 3 / Fig. 3 / Abb. 3
MN215
Rev.Date 14.12.2021
Rev.0 4
Bezpečnostní instrukce [CZ]
Ruční zpracování a postup tavení
skloviny mohou způsobit lehké
nepřesnosti a změny barev, tvarů a síly
skla. Jedná se však spíše o přednosti
nežli o chyby, protože svědčí o
řemeslném ručním zpracování skla.
Při nevhodné manipulaci se sklem
hrozí jeho poškození a nebezpečí
úrazu!!! Je nutné dbát na to, aby
stínidlo bylo uchopeno vždy za dno.
Při nevhodné manipulaci s akrylátovým
stínidlem hrozí neopravitelné
poškození lepených spojů!!! Je nutné
dbát na to, aby stínidlo bylo uchopeno
vždy za 2 boční stěny nebo za dno.
Pokud okolní teplota při přepravě
klesne pod 12°C, ponechejte stínidlo
před další manipulací alespoň 3 hodiny
při pokojové teplotě.
Znečištěné stínidlo omyjte vlažnou
vodou s přídavkem saponátu (bez
abrazivních částic). Nečistit lihem a
organickými rozpouštědly.
Svítidlo je možné připojit pouze do
elektrické sítě, jejíž instalace a jištění
odpovídá normám dle platné vyhlášky.
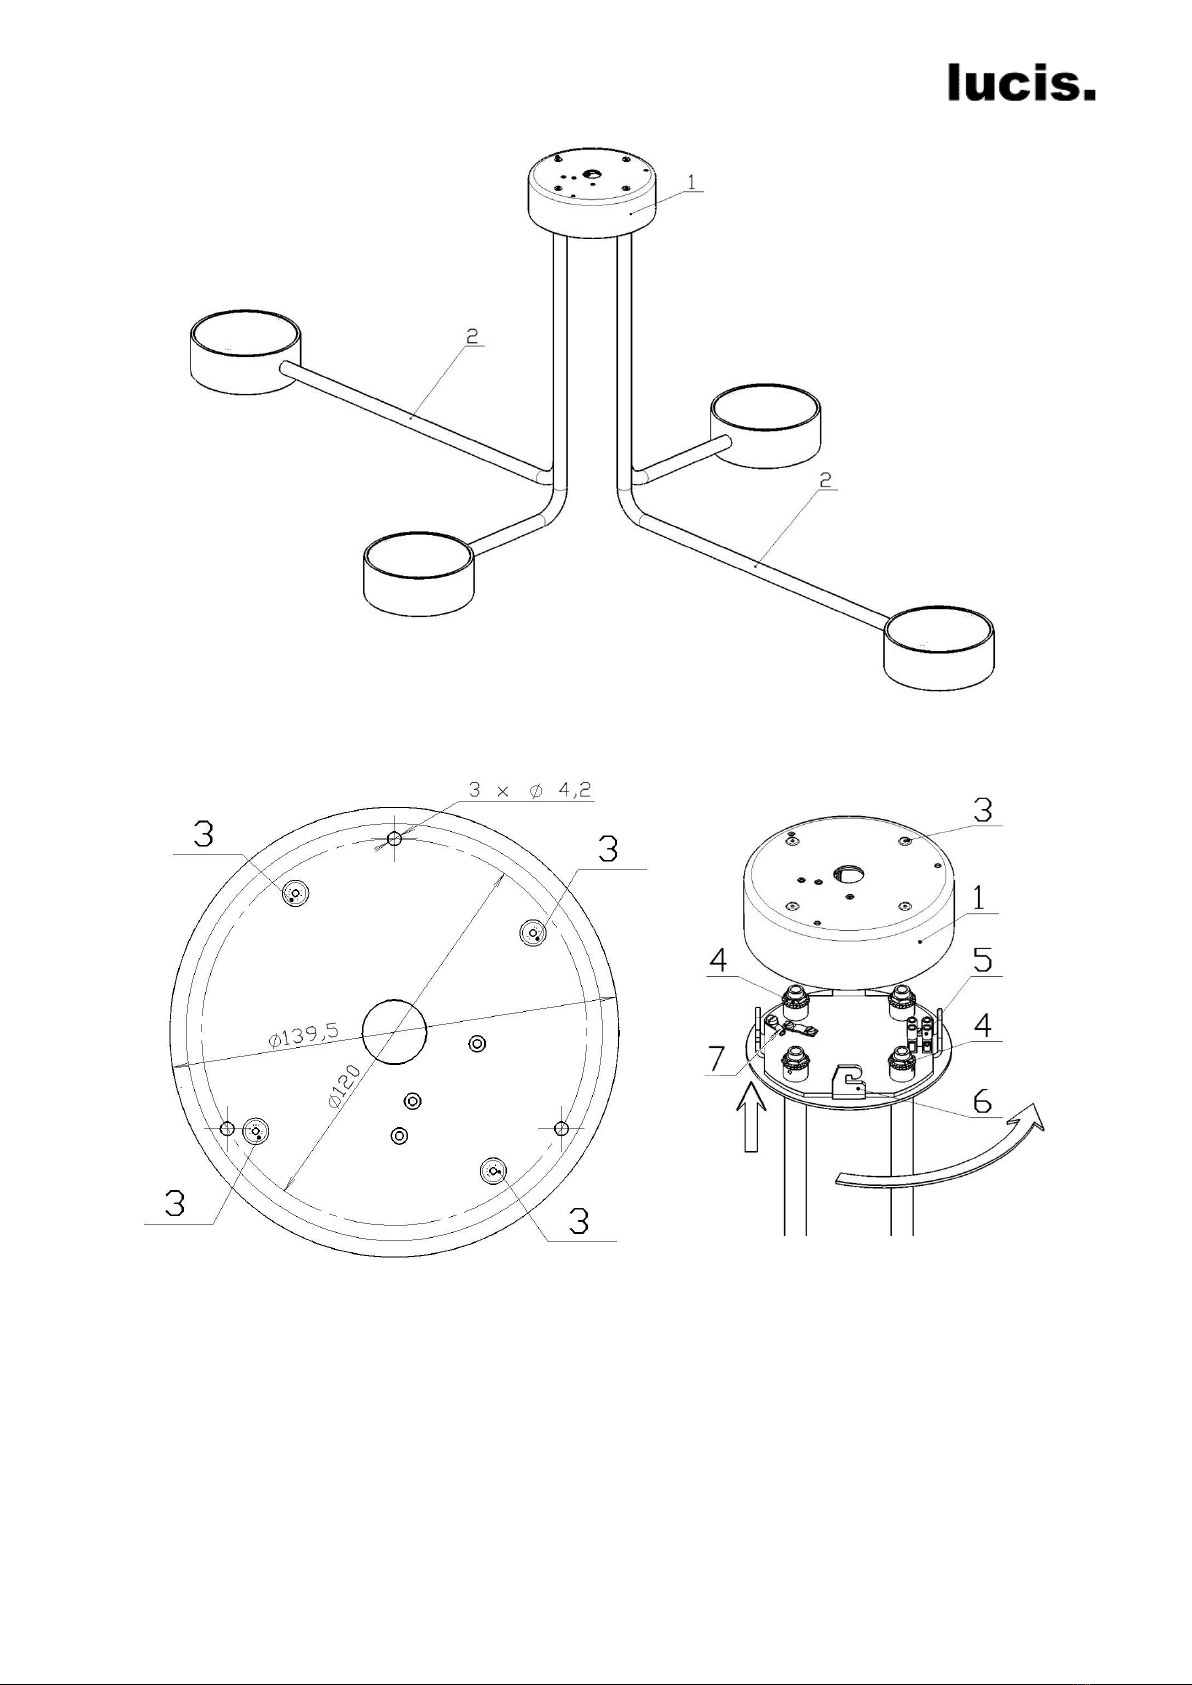
Zapojte napájecí kabel do svorkovnice
následovně:
L –fázový vodič (Černá)
N –nulový vodič (Světle modrá)
–ochranný vodič (Zeleno-žlutá)
Pro variantu s ovládáním DALI:
L –fázový vodič (Šedý)
N –nulový vodič (Světle modrá)
ochranný vodič (Zeleno-žlutá)
DALI –vodiče (Hnědý a Černý)
Montáž, demontáž a údržbu smí
provádět pouze osoba s odpovídající
kvalifikací dle platné vyhlášky o
odborné způsobilosti v elektrotechnice.
Při nedodržení montážního návodu
výrobce neručí za případné vzniklé
škody.
V případě dotyku LED hrozí jejich
neopravitelné poškození.
Svítidlo obsahuje světelný zdroj
zařazený do energetické třídy dle
tabulky uvedené níže.
Výměna LED zdroje může být
provedena pouze kvalifikovanou
osobou (elektrikářem). Postup pro
výměnu naleznete v brožuře na
stránkách fy LUCIS: www.lucis.eu
Safety instruction [EN]
Manual processing and the procedure of
meeting glass may cause slight
imperfections and changes in colors,
shapes and strength of the glass.
However, this concerns priorities rather
than errors, evidence of the craft involved
in manual processing of glass.
Incorrect handling of the glass shade
could lead to damage it and the risk of
injury!!! It is necessary to make sure that
the shade is always grasped at the
bottom.
Incorrect handling of the acrylic shade
could cause irreparable damage of glued
joints!!! It is necessary to make sure that
the shade is always grasped at 2 side
walls or the bottom.
If the ambient temperature during
transport drops below 12°C, leave the
shade at room temperature for at least 3
hours before further handling.
If the shade is dirty, wash it with tepid
water with detergent (without abrasives).
Do not clean with alcohol and organic
solvents.
The light fixture may only be connected to
mains the installation and protection of
which complies with the standards
according to a valid regulation.
Connect the supply cable to the terminal
board as follows:
L –live conductor (Black)
N –neutral conductor (Light blue)
–protective conductor (Green-yellow)
For modification with DALI control:
L –live conductor (Grey)
N –neutral conductor (Light blue)
protective conductor (Green-yellow)
DALI –communication conductors
(Brown and Black)
Assembly, disassembly and maintenance
may only be performed by persons with
appropriate qualification according to a
valid regulation on professional
qualification in electrical engineering.
If the mounting instructions are not
followed, the manufacturer does not
guarantee possible caused damage.
In the case of touching LED threatens
their irreparable damage.
The luminaire contains a light source
classified in the energy class
according to table, see below.
The LED light source can be replaced
only by qualified person (electrician).
The procedure for replacing LED light
source can be found in the brochure
on the LUCIS website: www.lucis.eu
Sicherheitsanweisungen [DE]
Handarbeit und Methode des schmelzen
Glasmasse können leichte Ungenauigkeiten und
Änderungen Farben, Formen und Glasstärke
verursachen. Es handelt sich eher um Vorteile als
um Fehler, weil es an handwerkliche Verarbeitung
des Glases zeigt.
Bei ungeeigneter Manipulation mit dem Glass-
Lichtschirm kann zu Beschädigung kommen und
die Verletzungsgefahr!!! Es ist notwendig darauf zu
achten, dass der Beleuchtungskörper immer auf
den Boden zugegriffen wird.
Bei ungeeigneter Manipulation mit dem Acrylat-
Lichtschirm unreparierbare Beschädigung der
Klebverbindungen droht!!! Es ist notwendig darauf
zu achten, dass der Beleuchtungskörper immer an
2 Seitenwänden oder auf den Boden zugegriffen
wird.
Falls die Umgebungstemperatur beim Transport
unter 12°C abfällt, lassen Sie den Lichtschirm vor
weiterer Manipulation mindestens 3 Stunden bei
Raumtemperatur.
Verschmutztes Lichtschirm spülen Sie mit
lauwarmen Wassern mit Zugabe des
Haushaltsreinigers (ohne abrasion Teilen) ab. Nicht
mit Alkohol und organischen Lösungsmitteln
reinigen.
Der Beleuchtungskörper darf nur in das Stromnetz
angeschlossen werden, dessen Installation und
Sicherung den Normen gemäß der gültigen
Verordnung entspricht.
Schließen Sie den Anschlusskabel in den
Klemmenbrett wie folgt an:
L –Phasenleiter (Schwarz)
N –Nullleiter (Hellblau)
–Schutzleiter (Grün-Gelb)
Bei Variante mit DALI-Steuerung:
L –Phasenleiter (Grau)
N –Nullleiter (Hellblau)
–Schutzleiter (Grün-Gelb)
Kommunikationskalbel (Braun und Schwarz)
Montage, Demontage und Wartung darf nur Person
mit entsprechender Qualifikation gemäß gültiger
Verordnung über fachliche Befähigung in
Elektrotechnik durchführen.
Bei Nichteinhaltung der Montageanleitung der
Hersteller nicht für eventuell entstandene Schäden
verantwortlich ist.
Im Fall der Berührung der LED, es droht ihre
irreparable Schäden.
Die Leuchte enthält ein Leuchtmittel, das in die
Energieklasse gemäß Tabelle eingeordnet ist,
siehe unten.
Die LED Module darf nur von einer qualifizierten
Person (Elektriker) ausgetauscht werden. Das
Verfahren zum Austausch der LED Module
finden Sie in der Broschüre auf der LUCIS-
Website: www.lucis.eu
www.lucis.eu

This manual suits for next models

1

Popular Lighting Equipment manuals by other brands

EuroLite LED BAR-252 RGB 10mm user manual

EuroLite

EuroLite LED BAR-252 RGB 10mm user manual

Rosco DMX IRIS Operation manual

Rosco

Rosco DMX IRIS Operation manual

Lumenpulse DMXrdm reference guide

Lumenpulse

Lumenpulse DMXrdm reference guide

American DJ Laser Widow owner's manual

American DJ

American DJ Laser Widow owner's manual

LiteGear Auroris X System user guide

LiteGear

LiteGear Auroris X System user guide

Philips Hue Runner user manual

Philips

Philips Hue Runner user manual

ONFORU CTB48RGB product manual

ONFORU

ONFORU CTB48RGB product manual

Ledj 18HEX10 PRO user manual

Ledj

Ledj 18HEX10 PRO user manual

Federal Signal Corporation HighLighter Elite Installation, operation and maintenance instructions

Federal Signal Corporation

Federal Signal Corporation HighLighter Elite Installation, operation and maintenance instructions

VanGaa VG-FL470A user manual

VanGaa

VanGaa VG-FL470A user manual

thomann Stairville PAR 64 user manual

thomann

thomann Stairville PAR 64 user manual

TRACE-LITE TLED-XPF installation instructions

TRACE-LITE

TRACE-LITE TLED-XPF installation instructions

olympia electronics OLY-1004/LT/WP installation instructions

olympia electronics

olympia electronics OLY-1004/LT/WP installation instructions

HEPER TILA S AFX 2 Module Installation & maintenance instructions

HEPER

HEPER TILA S AFX 2 Module Installation & maintenance instructions

IN HOUSE LED SICROBCF/EVO user manual

IN HOUSE LED

IN HOUSE LED SICROBCF/EVO user manual

RSA Lighting COMBOLIGHT LV2003IS Specification sheet

RSA Lighting

RSA Lighting COMBOLIGHT LV2003IS Specification sheet

PLG JOY 3 user manual

PLG

PLG JOY 3 user manual

Storz TECHNO LED nova 100 instruction manual

Storz

Storz TECHNO LED nova 100 instruction manual

manuals.online logo
manuals.online logoBrands
  • About & Mission
  • Contact us
  • Privacy Policy
  • Terms and Conditions

Copyright 2025 Manuals.Online. All Rights Reserved.