LUNA OPTICS LN-G2-B50 User manual

LN-G2-B50
GEN-2 HD DIGITAL TECHNOLOGY
DAY & NIGHT BINOCULAR 6-30x50
INSTRUCTION MANUAL
IMPORTANT: Please read this manual in its entirety
prior to using this device!

DIGITAL DAY/NIGHT VISION:
1. Your new binocular operates with batteries. Unlike a
daylight binocular, where you see the image due to light
traveling through the glass and the prisms, the digital night
vision device works by processing the image with the internal
CMOS sensor and projecting the image onto an LCD screen.
While the CMOS sensor and the LCD display are both crucial
components of your viewer, the optical parts of the unit are also
very important, as they gather the light into the CMOS sensor
and then bring the projected image from LCD screen to your
eye. Since the image is projected on the screen, just like any TV,
it has certain limited resolution, so your digital night viewer
cannot provide the same crystal clear image, as you see through
your daylight binoculars.
2. Another important point –your digital night vision viewer
has full color image during the day and option of color / night
vision green / black & white images when operating with IR
illuminator –why? Because full color image sometimes washes
out the details in the dark and will not be as effective as
monochrome image during nighttime conditions. The night
vision green color was chosen because green color shows more
details than any other color in the palette and black & white
image is especially useful when reading text or building signs or
car plates.
3. Your digital viewer is intended for operation during daylight
and nighttime hours. Please note that during daylight you will
have to reduce the brightness level of the unit to prevent the
image from becoming totally washed out. You should also
utilize Color Enhancing Filter, supplied with the unit for daylight
operation in order to view more vibrant colors.
4. For more details on how to operate your viewer, please read
this manual completely to ensure proper operation.

YOUR PACKAGE INCLUDES THE FOLLOWING:
1. LN-G2-B50 Digital Binocular
2. 8GB Micro SD-card (installed into the SD-card slot)
3. Color Enhancing Filter (Daylight use only for vivid colors)
4. Carry case with shoulder strap
5. Padded neck strap
6. DC adapter with US plug (EU plug adapter included for
International customers) (110V/240V compatible)
7. RCA-type Video Cable
8. USB cable and / or USB Flash adapter for micro-SD card
9. 2xCR123 batteries (optional –may not be included with
every unit –if included they are NON-RECHARGEABLE)
10. CR123 Battery charger (optional –may not be included
with every unit)
11. Lens cleaning cloth
WARNING! NEVER ATTEMPT THE FOLLOWING:
1. Try to disassemble the unit by yourself or by anyone who
is not our authorized technician. Doing so may result in
injury and will void any warranty claims
2. Charge batteries included with the unit –they are not
rechargeable!
3. Charge ANY batteries inside the unit –it can only be done
in the correct battery charger!
4. Leave the batteries inside the unit while operating it from
the AC/DC source! You must remove the batteries prior
to connecting the cord!
5. Submerse the unit into water or use it during heavy rain.
OPERATION:
Now that we’ve covered some of the basics of the technology
behind the night vision, let’s learn how to operate your new device.
Please look at the next page to identify all the parts of the unit.

LN-G2-B50 DIGITAL DAY/NIGHT VISION
BINOCULAR
Glossary:
1 –Objective Lens Focusing Wheel 9 –IR Beam Brightness Wheel
2 –Video Record Button 10 –Accessory Mount
3 –Still Image (PIC) Button 11 –USB / Micro-SD Card Ports
4 –Image / Zoom Button 12 –DC Input
5 –Power ON/OFF Button 13 –IR Beam Focusing Wheel
6 –Infrared / Menu Button 14 –Video Output
7 –Ocular Focusing Wheels 15 –Battery Compartment
8 –Brightness Toggle Wheel
1
12
8
4
11
12
10
2
5
6
9
3
2
1
14
15
13
8
11
7

INSTALLING THE BATTERIES:
Your digital day/night vision unit operates on 2xCR123 batteries commonly
available in retail shops and online. NOTE: it is possible to use rechargeable
RCR123 batteries, but their peak voltage cannot exceed 4.5V each battery!
WARNING: if 2xCR123 batteries are supplied with the unit –they
are not rechargeable –do not charge or recharge these
batteries!
WARNING: it is prohibited to charge any battery inside the unit
or have battery inside the unit while operating it from wall or car
outlet!
To install the batteries, unscrew the battery compartment cover (15), located
on the front of the unit between the objective lens and the IR illuminator and
install the batteries into the compartment inserting the positive (+) end first.
Once the batteries are inside, replace the cover.
TURNING THE UNIT ON AND OFF:
Your digital day/night vision unit has one-touch push-buttons. To turn the unit
ON, first remove the objective lens cover and momentarily press the power
button (5). The green light indicator located on the back of the unit should light
up. Look through the ocular –you should see the Welcome screen for a few
seconds, followed by image. Even if the image is not yet sharp, the unit is
operating. To turn the unit OFF, press and hold the power button for 2
seconds. The image will disappear if you turn the unit off correctly. Always
replace the objective lens cover after the unit is turned off and no longer is in
use to protect the lens from scratching or dust.
IMPORTANT: When turning the unit ON or OFF it is normal to see some
momentary image flickering. This is normal and does not affect the unit.
OPERATING FROM EXTERNAL POWER SOURCE:
DC ADAPTER: Your digital binocular can also operate from a common wall
outlet with the use of the plug adapter (included). Insert the adapter cord into
the DC Input (12) and connect adapter to the wall outlet. IMPORTANT: Always
remove the batteries prior to operating the unit from wall/car outlet!
5V/2A POWER BANK: Your digital binocular can also operate from a common
cellphone charging 5V Power Bank. Please make sure each output on the
Power Bank is rated at a minimum of 2A. Connect the Power Bank to Micro-
USB input (11).

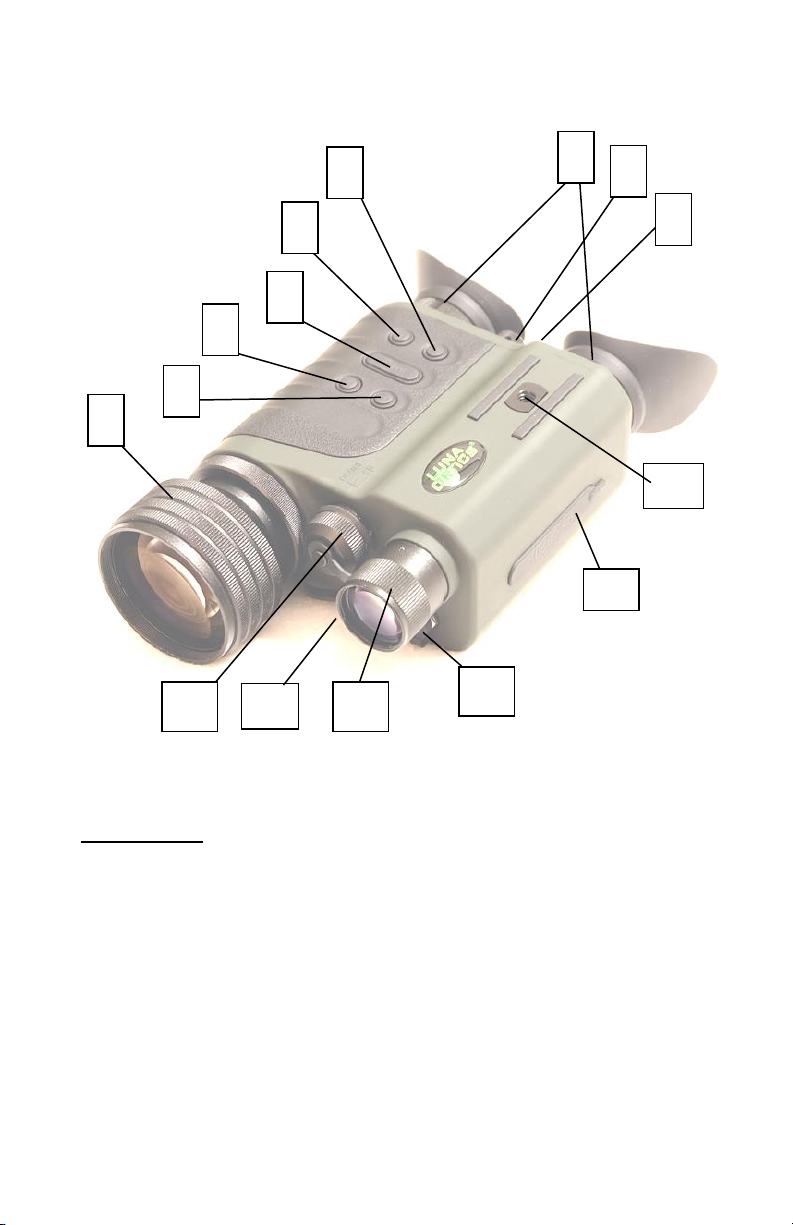
SETTING UP DATE AND TIME:
Turn the unit ON. After image appears, press and hold for 2 seconds the
IR/Menu Button (6). Menu will appear on the image screen. Select date/Time
option with Image button (4) and activate it with IR/Menu button (6). Default
date format is MM/DD/YYYY. To adjust the numbers, press Image Button (11)
either in + or –direction. To switch between date/month/year, press IR button
momentarily. After Date is set, adjust the time. Time is in 24hr format, so
13:00 is 1pm; 17:30 is 5:30pm and so on. As with the date, changing hours and
minutes is done with Image button (4) either + or –and moving between hours
and minutes is done via IR button (6). Once the time is adjusted you may
choose to change the date format from the factory setting MM/DD/YYYY to
DD/MM/YYYY or YYYY/MM/DD according to your preference. Once you are
finished setting date and time, you must confirm your setting by pressing REC
button (2).
IMPORTANT: in order to preserve the set date/time do not remove the dead
batteries from the unit until you are ready to replace them with the new set,
then replace the old batteries with new set as quickly as possible and the
date/time will be preserved.
FOCUSING THE UNIT:
To obtain the sharp image, you must first rotate the objective lens (1) in either
direction, until you notice in which position the image is at its best. After that,
rotate the oculars (7) also until the image is at its best. You may have to repeat
the process again, until the image is sharp and clear. Once the clear image is
obtained, you no longer need to adjust the oculars, just rotate the front
objective lens to adjust the distance to the object you are viewing.
BRIGHTNESS ADJUSTMENT:
Your digital binocular is equipped with dual brightness control. An automatic
brightness control sensor adjusts the image brightness according to the
available ambient light. In addition a toggle brightness adjustment wheel (8)
allows you to fine-tune the image brightness depending on the ambient light
conditions. Please note that during daylight you will need to tone the
brightness down to avoid image flickering and to preserve the battery life.
During nighttime you could increase the brightness all the way up, however
when utilizing built-in or external IR illuminator, you may need to tone the
brightness down a bit.
ELECTRONIC IMAGE MAGNIFICATION ZOOM:
Your unit is also equipped with electronic zoom function, which allows you to
change image magnification from 6x to 30x.To increase the image
magnification press the IMAGE button (4) on the + side and look into the ocular
–you will see the image magnification increase. At the minimum level (1.00)
the image magnification is 6x; at the maximum level (5.00) the image

magnification is 30x. You can see the zoom level in the left lower corner of the
image screen once you start pressing the IMAGE button on the + side. To
decrease the image magnification, press the IMAGE button on the –side.
USING INFRARED ILLUMINATOR:
Your digital viewer is equipped with a built-in powerful Infrared illuminator
light. This light operates in a spectrum, which is normally invisible to a human
eye, however with the help of the internal image sensor you will see a beam of
light when looking though the ocular. Since the image sensor does not actively
amplify the available light, you will need to utilize the IR illuminator often in the
nighttime conditions.
To turn the Infrared illuminator ON, press the IR illuminator button (6)
momentarily –image will remain full color. To switch image to night vision
green (Sephia option) –press IR button again. To switch image to Black &
White press the IR button again. To turn the IR illuminator OFF press the same
IR button again once. A red light indicator located in the back of the unit will
light up indicating the IR Illuminator is on and will disappear when the IR
illuminator is off.
Your binocular has a fully adjustable IR beam, meaning you can adjust the IR
power via special IR brightness wheel (9) located just below the image
brightness toggle wheel (8). You can also adjust the width of the IR beam by
rotating the IR beam focusing wheel (13) in order to either spread the IR light
beam, or narrow it for longer distances.
It is also possible to utilize different color image options without the use of IR
illuminator by selecting either Black & White or Sephia (NV green) option in the
main menu. Selection is done with the long IMAGE button and confirmation is
done by short-pressing the IR button. Please note –after selecting either B&W
or Sephia option this way, once you activate the IR illuminator, this option will
be disconnected automatically.
When using the infrared illuminator it is important to remove the red daylight
color enhancing filter and also remember that like a flashlight, the IR
illuminator is brightest when used in short distances. As the distance increases,
the intensity of the infrared light fades away.
Extended range IR illuminators are available (model LN-EIR-2, or LN-ELIR-2),
which can be mounted into the top accessory mount socket (10). The thread is
a standard ¼” type and will accept any accessory with mounting screw of that
size. Please note there is another mounting socket at the bottom of the
binocular, which is reserved for mounting the unit onto a tripod with standard
¼” thread.

TAKING PICTURES AND RECORDING HD VIDEOS:
WE STRONGLY RECOMMEND MOUNTING YOUR DEVICE ONTO A
STEADY TRIPOD WHEN RECORDING VIDEO OR TAKING STILL IMAGES –
PARTICULARLY WHEN WATCHING DISTANT OBJECTS AND/OR
UTILIZING ZOOM FUNCTION
Your digital binocular has the ability to take pictures and record HD videos onto
the external Micro-SD card. 8GB card is included with your unit and it is
already installed into the SD-card slot. The Micro-SD card can be upgraded up
to 128GB, which is especially useful if you plan to record a lot of videos. To
change the SD-card, open the SD-card/USB compartment (11) and remove the
included 8GB card by carefully pressing onto its end. It will pop out of its slot.
Gently remove the card and replace it with the new one by pressing it straight
forward until it is securely locked in the slot. Close tightly the rubber
compartment cover to protect the card from water and/or dust.
To take a picture, focus the unit onto the object you are viewing and with a
steady hand firmly press the PIC button (3) once. The display will give a
countdown (2-1) and then image is taken and is automatically stored onto the
SD card.
To record a video, focus the unit onto the object and press REC button (2) once.
The system will start recording. Please note that the video is being recorded in
Full-High Definition (1080p) and in the Widescreen format (16x9). To stop
video recording press REC button again. During video recording it is possible to
take a still picture by pressing PIC button (3) momentarily. Please note during
video recording it is still necessary to re-adjust the focus if you wish to record
different objects, located at different distances. Please be aware that actual
video recording quality is significantly higher than what you will see through
the viewfinders –to see recording in High Definition widescreen format please
remove the micro-SD card and play it on your Blu-Ray player or computer.
NOTE: during daylight video-recording is 60fps, during nighttime it is 30fps.
CHOOSING CORRECT ISO (SENSITIVITY) SETTING:
Your digital binocular comes with 5 user-selectable ISO (sensitivity) settings,
plus an AUTO mode. All units come with AUTO mode as a default setting and in
most conditions this mode is the best choice for viewing and recording. In
certain conditions where extra sensitivity is desired (such as Sky Watching
where small light objects need to be constantly seen) it is better to select one
of the highest ISO settings (between 1600 and 6400) for constant sensitivity,
which prevents any sudden bright light source to lower the overall system
sensitivity. To choose the ISO setting, access the menu by long pressing the
IR/Menu button (6) and selecting desired mode with IMAGE/Zoom button (4)
and confirming with IR button (6)

DATA VIEWING AND DATA TRANSFER OPTIONS:
It is possible to view the images and videos directly on the unit’s micro-display.
To do so, while the unit is operating press the Power button (5) momentarily
just once. You will be able to switch between images and videos by pressing
IMAGE button (4) in either + or –direction. To play the recorded video, press
PIC button (3) once. To stop playing video press PIC button again. To exit
picture/video viewing mode and to come back to the active image mode, press
Power button (5) briefly just once. Please note –if you press and hold Power
button, your unit will shut down and would need to be reactivated again by
pressing Power button once.
You can connect the unit directly to the computer via USB connection by
utilizing the micro-USB connector (11). To do so, first connect the micro-USB
part to the unit, then connect the standard USB part to the computer. Look
through the eyepiece –choose MASS STORAGE option via the IMAGE button
and confirm your selection with either PIC or REC button (depending on the
software version). Once connected to the computer, the software will
download automatically and you will be able to open and transfer all of your
SD-card files onto your computer.
Alternatively, you can remove the micro-SD card from the binocular and use it
in the included USB flash drive adapter to transfer data to your computer. If
your computer has a direct micro-SD slot, you can insert the card directly to the
slot bypassing the above options. It is also possible to utilize the full-size SD
card adapter (not included with binocular).
CONNECTING TO EXTERNAL VIDEO SOURCE:
You can connect your device to the TV/VCR/DVR via the RCA-type video cord
(included with your device) in order to view the video stream directly on the
monitor/TV. Connect the small end of the Video cable to the Video Output (14)
and then connect the yellow plug to the TV/Recorder video input. NOTE –if
you live outside of USA, you may need to switch the Video Output from NTSC
to PAL by accessing the menu (Press IR Button for 2 seconds and when Menu
appears select the Video format option. Switch between NTSC and PAL formats
by pressing the Image Button and confirm your setting by pressing IR button).
WI-FI LINK INSTRUCTIONS:
1. Download “ROADCAM” App on your Android
phone/tablet or on iPhone/iPad. For Android
users if you have a problem finding the app in
Google Play Store, please scan the QR code on
the right
2. Press PIC button for 3 seconds to activate your
monocular WI-FI setup. Look through the

eyepiece and observe the WI-FI link
name and Password. The Wi-Fi link
is the first line of the screen and
the password is on the second line.
3. Find the device Wi-Fi signal on your
phone (same as shown on the
unit’s display) and select it.
4. Enter password (second line of the
unit’s OLED display) –NOTE: only numbers after “:” are needed to be
entered –typical default password is 12345678.
5. IMPORTANT: make sure your smartphone or tablet does not
automatically disconnect from this signal due to no internet
availability –most smart devices do that by default –they
automatically switch to the better/saved signal which has internet. Go
to your smart device settings and allow it to keep connected to this
signal.
6. Now open the app and it will display the device name below the
orange cam symbol –simply touch the cam symbol and app will
connect to the device.
7. Follow on screen menu on your smart device to utilize the available
features of the app. NOTE: during Wi-Fi streaming the ZOOM function
is disabled and cannot be utilized!
RE-FORMATTING 64GB & 128GB MICRO-SD CARDS TO FAT32
FORMAT:
Any micro-SD card above 32GB needs to be re-formatted from EXFAT format to
FAT32 format, which is the format of the night vision monocular (and many
other consumer electronics). Please note that FAT32 is the most widely used
format and is also considered the most reliable format.
In order to re-format the card you must run it through a 3rd party provider. We
suggest using Disk Partition. While nearly all of the providers would want you
to buy their upgraded versions, you can just download their basic free version
and it would be sufficient to re-format the card. Disc Partition seems to be the
most simple and hassle-free provider we could find:
https://www.disk-partition.com/download.html
Download the “Standard Free” version and follow all the download
instructions.
Once downloaded, open the program and insert the micro-SD card
into the computer.
Highlight the correct disc by single-click and then choose on the
bottom left side of the menu to “Format Partition” (alternatively right-

click on the highlighted disc and choose the same function). A pop-up
window will appear. You can label your partition (such as “Luna Optics
Monocular” or any other name you desire (it’s optional) and then
make sure to select “FAT32” as the File System. Then click “OK”.
Once the format is finished, click on “Apply” located in the most upper
left corner. You must select “Apply” otherwise the formatting is not
finished.
You card is now formatted, but before you can use your 64GB+ card in our digital
night vision product you must also format the card inside the product. To do so,
insert the card into its slot, turn the night vision on and through the menu find
and select “Format”, then select “OK”. Once the card is formatted inside the
night vision device it is now ready to use.
TROUBLESHOOTING:
1. Unit does not turn on and the light indicator is off:
a) please check if the batteries are inserted correctly
b) please make sure the batteries are fresh
2. The light indicator is working, but you cannot see the image:
a) you may be turning the unit on in a dark area with the
lens cover still on the unit
b) You may need to turn on the infrared light and/or remove
the Daytime Color Enhancement Filter
3. Unable to obtain sharp and clear image:
a) you may need to repeat the process of rotating the
oculars and objective lens several times until you get a
good feel of it
b) You may be viewing an object that it too close –the
minimum focusing distance is approximately 80cm or
2.6ft
4. I switch from active image to photo/video review and the unit shuts
off:
a) You are pressing the Power button too long. You must
only press the Power button momentarily.
5. Image freezes during operation or during initial turn on:
a) Open at least one battery compartment and then re-
activate the unit.
6. I’m trying to turn the IR illuminator on and instead I see the
date/time menu:
a) You are holding the IR button for more than 1 sec. In
order to turn the IR illuminator on, you must press the IR
button once and immediately release it.

TECHNICAL SPECIFICATIONS:
Image Sensor Resolution / Sensitivity: ____ 1920x1080 / 0.002lux (night)
Image Display __________________0.26” Micro-flat HR 800x600 (dual)
Still Image resolution ___________________________1440x1080, JPEG
Video resolution (signal) ____________Full-HD 1080p, AVI (NTSC / PAL)
Image Magnification ___________________________________6x-30x
Focusing Distance______________________________ 80cm (2.6ft) - ∞
Viewing Distance (clear skies, full moon) _____________ 600m (656yds)
Viewing Distance (1/4 Moon) ______________________ 400m (437yds)
Viewing Distance (IR complete darkness) _____________ 250m (273yds)
Field Of View_____________________________________________ 7°
Memory ___________________________ Micro SD card (up to 128GB)
Wi-Fi streaming ___________________________________ iOS/Android
Power_______________2 x 3V Lithium (CR123A) / or 5V/2A Power Bank
Operating Time _______________________________2.5-3hrs (CR123A)
Dimensions______________180mm x 120mm x 60mm (7.2”x4.7”x2.3”)
Weight__________________________________________ 725g (1.6lbs)
Warranty_______________________________________________1yr
---------------------------------------------------------------------------------------------------------
LUNA OPTICS, INC. 300 Hawthorn Dr., Fate, TX 75087 (USA)
E-mail: info@lunaoptics.com Web: www.lunaoptics.com © 2020
This manual suits for next models
1
Table of contents
Other LUNA OPTICS Binoculars manuals

LUNA OPTICS
LUNA OPTICS LN-PBG1-PRO User manual

LUNA OPTICS
LUNA OPTICS LN-G3-B50-PRO User manual

LUNA OPTICS
LUNA OPTICS LN-G3-B50 User manual

LUNA OPTICS
LUNA OPTICS LN-G3-MS50 User manual

LUNA OPTICS
LUNA OPTICS LN-ELIR User manual

LUNA OPTICS
LUNA OPTICS LN-EBG1 User manual

LUNA OPTICS
LUNA OPTICS LN-NVB2 User manual

LUNA OPTICS
LUNA OPTICS LN-DB60-HD User manual

LUNA OPTICS
LUNA OPTICS LN-EIR850 User manual

LUNA OPTICS
LUNA OPTICS LN-EB5-LRF User manual