LUNA OPTICS LN-G3-B50-PRO User manual

1
LN-G3-B50-PRO
GEN-3 HD DIGITAL TECHNOLOGY
DAY & NIGHT BINOCULAR 6.5-39x50
VERSION M7 V1.16
INSTRUCTION MANUAL
IMPORTANT: Please read this manual in its entirety prior
to using this device!

2
DIGITAL NIGHT VISION TECHNOLOGY:
1. Your digital binocular operates with batteries. Unlike a daylight
binocular, where you see the image due to light traveling through the
glass and the prisms, the digital night vision device works by projecting
the image onto an OLED display screen. While the Image Sensor and the
OLED display are the crucial components of your viewer, the optical parts
of the unit are also very important, as they gather the light into the
Image Sensor and then bring the projected image from the OLED screen
to your eye. Since the image is projected on the display screen, just like
any TV, it has certain limited resolution, so your digital night viewer
cannot provide the same crystal-clear image, as you see through your
daylight binoculars.
2. Your binocular has options of full-color, black and white, night vision
green and amber color image –why? Because, while full-color image is
an excellent choice during daylight, it is not as effective as monochrome
image during nighttime conditions.
3. Your digital viewer is safe to operate during daylight and nighttime
hours. IT IS NOT SAFE FOR YOUR EYES TO LOOK DIRECTLY AT THE SUN
THROUGH THIS PRODUCT! Please note that during daylight you will have
to reduce the brightness level of the unit to prevent the image from
becoming totally washed out. You should also utilize Color Enhancing
Filter, supplied with the unit for daylight operation in order to view more
vibrant colors. (Filter is embedded into the front lens cover)
4. For more details on how to operate your viewer, please read this
manual completely to ensure proper operation.
YOUR PACKAGE INCLUDES THE FOLLOWING:
1. LN-G3-B50-PRO Binocular
2. 16GB Micro SD-card (installed into the SD-card slot)
3. Color Enhancing Filter (installed into the front lens cover –daylight
use only –remove the lens cover in the dark!)
4. Deluxe Carry Case
5. USB Cable, Micro-SD Card USB Flash Drive Adapter
6. RCA Video Cable
7. 4xCR123A batteries (Optional –NON-RECHARGEABLE!)
WARNING: it is prohibited to use ANY rechargeable batteries
with peak Voltage above 4.2V in this device. Please only use
reputable rechargeable batteries brands and battery chargers.

3
Please identify all the parts of the device PRIOR to operation!
(Actual binocular housing (body) may differ from pictures below, however all
parts and controls are identical)
1
6
5
7
11-a
3
4
2
9
10
8
11-b

4
GLOSSARY:
1 –Objective Lens Focusing Ring 8 –Menu / Super Controller
2 –IR Illuminator Focusing Wheel 9 –Power Indicator Light
3 –IMAGE Button 10 –Folding Eyecups
4 –CAMERA / LRF Button 11 –Lens Covers:
5 –POWER / IR Button 11-a) Objective Lens Cover with
6 –Ocular Focusing Rings built-in Daytime Color Filter
7 –Rangefinder Lens 11-b) Laser Rangefinder Lens Cover
INSTALLING THE BATTERIES:
Your device operates on four 3V Lithium type batteries, known as CR123A type
commonly available online and in Electronics/Camera/Convenience stores. NOTE:
it is possible to use rechargeable batteries (CR123R) but please make sure each
battery peak voltage is equal to or less than 4.2V. Furthermore, rechargeable
batteries are not recommended due to significantly shorter operating time!
WARNING: if batteries supplied with the unit - they are not
rechargeable –do not charge or recharge these batteries!
To install the batteries, remove the battery cover, located on the bottom of the
binocular by gently pressing onto the cover and at the same time sliding it in the
direction shown by arrow on the cover. Please
note the battery cover has an attached ribbon,
which has two functions: one is to prevent the
battery cover from being lost in the field and
second, to allow for easier batteries removal
by placing the ribbon under the batteries
during installation. Since there are 4 batteries
that need to be installed, place the ribbon
under the bottom 2 batteries, then place it
again between the bottom and top batteries.
Always follow polarity when installing the
batteries, placing negative (-) end onto the
metal springs. Replace the cover by sliding it
back until you hear a clicking sound indicating the cover has locked into place.
Always make sure the cover is locked securely prior to using the binocular in the
field.
OPERATING FROM A USB POWER BANK: BEST POWER OPTION
Your digital viewer can also operate from the commonly available 5V USB Power
Bank chargers. Please make sure the output of the Power Bank is BETWEEN 2.0A

5
and 2.4A, as less powerful output may fail to power the unit especially when the IR
illuminator or Video/Wi-Fi functions are activated, and more powerful output is
not necessary and may make power supply area hot to the touch. To connect the
Power Bank, open the Connection Area rubber cover by gently pulling it outward
and then swing it counter-clockwise to the right
and locate the Micro-USB-C connector. Connect
the small end of the USB cable (included) to the
connector and then connect the large end of the
cable into Power Bank output. You may need to
activate the power bank first, prior to turning
the viewer on. We strongly recommend operating this binocular from a power
bank when long time observation is required and when binocular is utilized on a
tripod in a fixed position.
DAYLIGHT COLOR ENHANCING FILTER:
Your binocular is equipped with a unique daytime color enhancing filter, which
provides vibrant and accurate colors rendition (digital image sensors are known to
distort colors and provide an unnatural color image during daytime). The filter is
embedded into the objective lens cover (11-a) and we strongly recommend
keeping it on during daytime use in order to enjoy vibrant daytime color images.
During nighttime you will need to remove the lens cover, because the color filter
will block most of the built-in IR illuminator’s light.
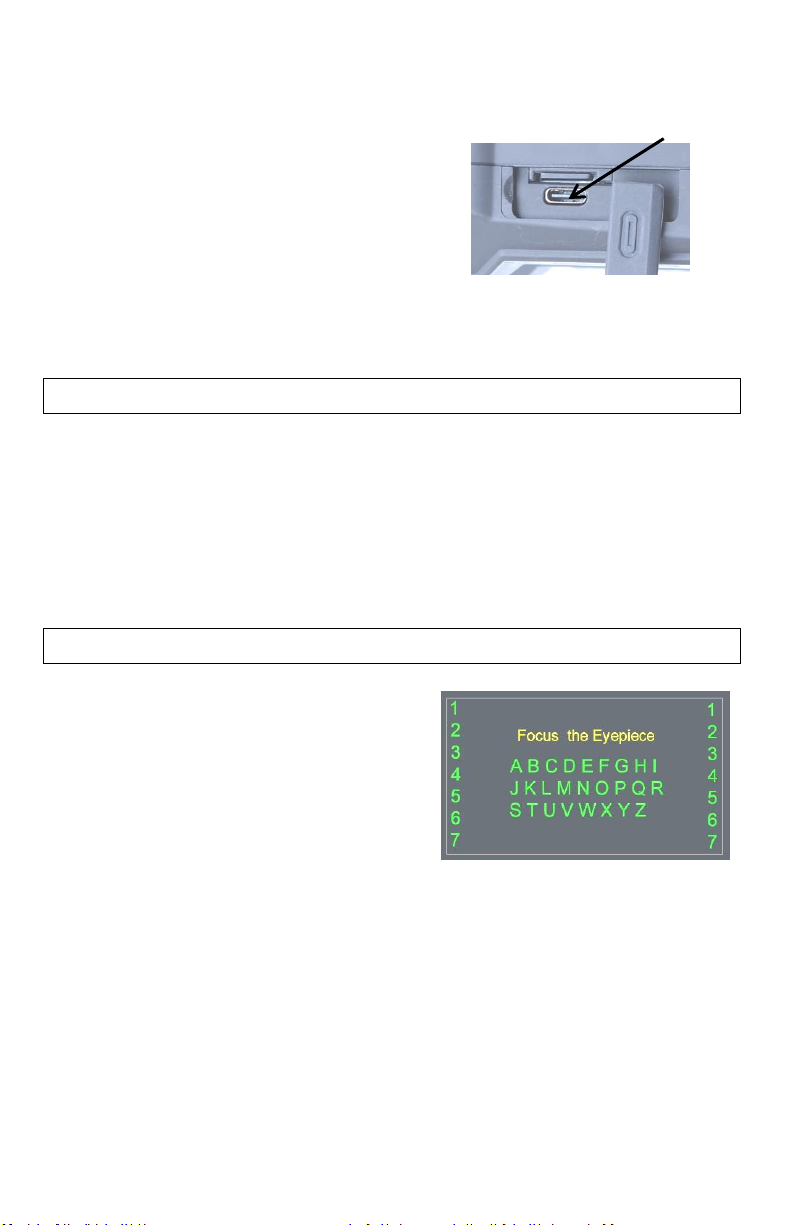
TURNING THE UNIT ON / FOCUSING THE UNIT / TURNING IT OFF:
To turn the unit ON, press the POWER
Button (5) momentarily. The LED Power
Indicator (10) located on the back of the unit
should light up in green color. Look through
the eyecups (6) –you should see the
Welcome screen for a few seconds, followed
by the initial image showing alphabet and
numbers. Once you see this image you can
begin the eyepiece focusing process. With right eye closed, focus the left eyepiece
until you can clearly see letters and numbers. Then close the left eye and focus the
right eyepiece. Open both eyes and the image should be mostly clear. If the image
is still not 100% clear, fine-tune each eyepiece until you can uniformly see all
letters and numbers with both eyes open. You may also need to adjust the
physical distance between the eyepieces (inter-pupillary distance) by grasping
both eyepiece assemblies and either pulling them apart or pushing them closer to
each other. Once the uniformed and sharp image is obtained, you no longer need
to adjust the two eyepieces. Now press the power button momentarily and the
letters/numbers will disappear from the screen. (NOTE: the initial screen will

6
automatically disappear after some time. If you are not done focusing the
eyepieces, you may continue doing so by focusing on the on-screen display icons.)
Now it is time to focus the front objective lens to the distance of the object you
wish to view. Rotate the Objective Lens Focusing Wheel (1) focusing on the object
until the image is at its best. Once the clear image is obtained, you will no longer
need to adjust the eyepieces, just rotate the front objective lens to adjust the
distance to the object you are viewing.
IMPORTANT: Only one front objective lens assembly (on the right side of the
binocular) need to be rotated to distance-focus the binocular. The second front
assembly houses laser rangefinder unit and is not involved in the focusing process.
It cannot be rotated and please do not under any circumstances try to rotate this
lens assembly.
To turn the unit OFF, press and hold the POWER Button for 2 seconds. The image
will disappear if you turn the unit off correctly. Always replace the protective lens
cover after the unit is turned off and no longer in use.
IMPORTANT: When turning the unit ON or when operating the unit with Wi-Fi
stream activated, it is normal to see some image flickering in the display. This is
normal and does not affect the unit. If the flickering does not disappear once the
unit is up and running and Wi-Fi is no longer active, please re-start the unit. If
conditions persist, please contact us at: info@lunaoptics.com for assistance.
ON-SCREEN DISPLAY ICONS:
Laser Rangefinder Reticle Distance Readout and Measuring Unit
Record Mode
IR Power Level Magnification Date & Time Power source

7
Counter Number Remaining Image Space
MENU / SUPER CONTROLLER FUNCTIONS:
Your binocular features a unique and user-friendly
adjustment called Super Controller (8). It incorporates
various operating functions and makes navigating and
adjusting menu functions fast, easy and natural
without having to take your eyes off the eyepieces in
the field. It is especially useful when using in the dark
conditions where button location may be particularly
difficult. Controller activates the Main Menu by
pressing and holding onto it for 2 seconds.
Once activated, all Menu navigation is done the
following way:
-Scrolling through the menu contents: rotate the Super
Controller in either direction (each click scrolls the menu by
one step)
-Selecting and confirming function: short-press onto the
Super Controller
-Return from selected function to Main Menu: Press and
Hold onto Super Controller for 2 seconds.
-Return from subchapter or from 2nd page: highlight “Back”
circle and short-press Controller
-Exiting the Main Menu: Press and Hold onto the Super
Controller for 2 seconds

8
MAIN MENU consists of the following selections:
VIEW MODE:
-DAYTIME COLOR: this setting presents image in natural full color, best
suited for daytime viewing and recording
-B&W MONOCHROME: this setting presents the image in monochrome
black and white color (preferred for nighttime urban settings)
-NV GREEN PHOSPHOR: this setting presents image in traditional night
vision green color (good for nighttime field settings)
-NV WHITE PHOSPHOR: this setting presents image in traditional night
vision turquoise hue color (good for nighttime urban settings)
-AMBER: this setting presents image in soft Amber color (good for highly
detailed image during variety of low-light conditions and for car
headlights glare)
SEE PAGE-12 FOR MORE INFORMATION ON IMAGE COLOR SELECTION
WI-FI:
-OFF: Wi-Fi is turned OFF (default setting)
-ON: Wi-Fi is turned ON (SEE PAGE-16 FOR MORE INFORMATION)
RANGEFINDER:
-RANGING MODE: Opens sub-menu as follows
OFF: Laser Rangefinder is OFF
ON (MANUAL): Laser Rangefinder is in manual mode –user can
measure distance by pressing Camera/LRF button momentarily.
ON (AUTO): Laser Rangefinder is in automatic mode –it will
continuously measure the distance every 2-3 seconds.
-RANGING UNIT: Opens sub-menu as follows
YARD: distance will be measured in Yards
METRE: distance will be measured in Meters
PLAYBACK:
-Selecting this mode will allow you to review and play back the images and
videos directly on your binocular. During playback it is possible to delete
unwanted files by short-pressing the Camera button (4), then rotate the
Super Controller to confirm delete and short-press the Camera button
again. To exit this mode press and hold the Controller for 2 seconds
SETTINGS:
Opens the Settings Chapters as follows below:
ELECTRONIC IMAGE STABILIZER (EIS):
-OFF: Electronic Image Stabilizer is turned off (default setting)
-ON: Electronic Image Stabilizer is turned on (SEE PAGE-14 FOR MORE
INFORMATION)
RESOLUTION:
-QHD @30FPS
-3MHD / 30FPS:
-FHD 1080p / 60FPS:

9
-FHD 1080P / 30FPS:
-HD 720P / 30FPS:
CAPTURE MODE:
-Instant: select if you want no delay in capturing still image. Image will be
captured as soon as the camera button is pressed. (Default mode)
-Delay 3S: device will count down 3-2-1 and then image is captured
-Delay 10S: device will countdown 10 seconds and then image is captured
TV MODE:
-NTSC: select when connecting to TVs in North America (including USA),
Latin America and Caribbean, South America (except Brazil, Uruguay and
Argentina), Japan, South Korea, Taiwan, Philippines and Myanmar.
-PAL: select when connecting to TVs in Western Europe, Northern, Eastern
and Southern Africa, Middle East, India, Southeast Asia, Australia and
New Zealand
TV OUT:
-Select prior to connecting the Video cable to your TV or monitor
(binocular displays will turn off during Video connection)
FACTORY RESET:
-Cancel: Exit to main menu
-OK: Returns binocular to factory settings
FORMAT CARD:
-Cancel: Exit to main menu
-Format Card: Formats micro-SD card (ALL FILES WILL BE ERASED!)
DATE/TIME:
-Select when setting or updating date and time (see PAGE-11 for more
information)
VERSION:
-Displays current software version installed in your device. (In case of any
technical questions or malfunction, our customer service may ask for the
software version)
LANGUAGE:
-Select to change language (up to 10 different languages may be available)
ELECTRONIC IMAGE MAGNIFICATION ZOOM:
Your unit is also equipped with electronic zoom function, which allows you to
change image magnification from 6.5x to 39x. To increase the image
magnification, rotate the Menu / Super Controller (8) to the right (clockwise) and
look into the eyepieces –you will see the image magnification increase with each
rotation click by approximately 3x. See below the magnification chart according to
each rotation:
6.5x –10x –13x –16.3x –19.5x –23x –26x –29.3x –32.5x –36x –39x

10
You can observe the current magnification level on the bottom of the image
display once you start rotating the Super Controller. To decrease the image
magnification, rotate the Super Controller to the left (counterclockwise) and image
magnification will decrease. Factory default setting is 6.5x
NOTE: During any image magnification adjustments, please avoid pressing onto
the Super Controller, as this may activate the device main menu.
POWER & IR BUTTON (5):
a) Initial short-press –turns the power ON
b) When power is ON, single short press activates 1st power
level of IR illuminator. There are 3 IR power levels –each
consecutive short-press increases the power by one
level. 4th short-press turns the IR illuminator OFF
c) When power is ON, long-press shuts the power OFF
CAMERA/LRF BUTTON (4)
a) When LRF is OFF or in Auto Mode: Short press activates
photo capture. Long Press activates video recording.
During video recording, short press activates Photo
capture (default mode is instant capture). Long press
ends video recording, and video is automatically saved
onto micro-SD card
b) When LRF is set to Manual Mode: Short press activates LRF
measurement. Long press activates (second long press ends) video
recording. Photo capture is NOT possible during LRF activated in Manual
mode.
IMAGE BUTTON (3)
a) Adjusts OLED displays brightness. Each short-press
increases the display brightness by one level. There are 7
brightness levels, and the factory default setting is level-3.
See page-13 for more image brightness adjustment
information
SETTING UP DATE AND TIME:
As your viewer has capability to take images and
record video, time and date is automatically stamped
onto each image and video recording. To set the
correct date and time, please follow this procedure:
Turn the unit ON. After image appears, press onto
the Menu/Controller (8) and hold it for
approximately 2 seconds to activate the menu. Select
“Settings”, then “Date/Time”To adjust the numbers,
rotate the Controller in either direction. To switch
between numbers, short-press onto Controller. After
Date is set, adjust the time. Time is in 24hr format, so 13:00 is 1pm; 17:30 is

11
5:30pm and so on. As with the date, changing hours and minutes is done by
rotating the Controller and moving between hours and minutes is done by
pressing onto it. Once the time is adjusted you may choose to change the date
format to MM/DD/YYYY or YYYY/MM/DD according to your preference. Once you
are finished setting date and time, you can exit the menu by pressing Controller
for approximately 2 seconds. Once set, the time will be displayed on the bottom of
the image display.
IMPORTANT: in order to preserve the set date/time do not remove the dead
batteries from the unit until you are ready to replace them with the new set, then
replace the old batteries with new set as quickly as possible and the date/time will
be preserved.
USING INFRARED ILLUMINATOR:
Your digital viewer is equipped with a built-in powerful Infrared illuminator light
(2). This light operates in a spectrum, which is normally invisible to a human eye,
however with the help of the Image Sensor, located inside the binocular, you will
see a beam of light when looking though the ocular lens. Since the Image Sensor
does not actively amplify the available light, you will need to utilize the IR
illuminator often in the nighttime conditions.
WARNING: Your IR illuminator is a
Class-3R laser product. DO NOT LOOK
DIRECTLY INTO THE IR ILLUMINATOR
LENS WHILE THE ILLUMINATOR IS ON!
To turn the Infrared illuminator ON, short press the Power & IR button (5) –the IR
icon on the bottom of the display will light in pink color. The illuminator intensity
can be further increased by short-pressing the IR button (5) second and third time.
The IR icon in the image display will change colors from pink to orange to red,
indicating the three different power levels. After the red level (3rd and most
powerful) the next short press on the IR button will turn the IR off completely.
When using the infrared illuminator, it is important to remember that like a
flashlight, it is brightest when used in short distances. As the distance increases,
the intensity of the infrared light fades away. The illuminator lens can be focused
by rotating its front lens barrel (2). This allows for the IR beam to be widened
(shorter effective distance) or narrowed (longer effective distance).
IMPORTANT: whenever operating IR illuminator please note that batteries
working time will be significantly diminished, especially when IR is on the 2nd and
3rd power levels. This is due to the high power consumption of the IR diode.
Whenever the conditions allow, consider using IR on the 1st (lowest) power level
and only utilize 2nd and 3rd power levels when absolutely necessary.

12
IMAGE COLOR OPTIONS:
The binocular has 5 distinct image colors, which are suitable for a variety of light
and terrain conditions. In order to change the image color, you just need to
momentarily press onto the Menu/Controller. Each press will switch to the next
available color according to this order:
-Daytime Color (default mode) displays images in full-color. This is
preferred mode for daytime use as well as when enough artificial light is
present (inside a well-lit room). If used during nighttime the overall
sensitivity of the image sensor will be significantly reduced and, as you
must remove the daytime color filter during nighttime, the image colors
will no longer have true reproduction.
-B&W Monochrome displays images in monochrome black and white. This
mode is particularly useful when it might be important to read the street
signs or automobile plates or similar situations where highest contrast
between light and dark colors is necessary.
-NV Green Phosphor allows you to experience image as seen with
traditional “intensifier tube” night vision devices. This mode is best
utilized at nighttime in the clear field/rural settings.
-NV White Phosphor allows you to experience image as seen with
traditional white phosphor “intensifier tube” night vision devices. This
turquoise-like hue is best utilized at nighttime in the city/urban settings.
-Amber this unique and state-of-the-art color mode may be used in a
variety of nighttime conditions when highest detail of the object is
required. It provides excellent sharpness and contrast similar to B&W
mode. This color mode is also very useful for dark and rainy days, as well
as for dusk and dawn conditions and for conditions where
direct/projection light is present, for example automobile headlights, as it
helps to mitigate the light glare.
IMPORTANT: PLEASE READ!
Due to the inherited limitations of any digital image sensor, video refresh rate will
be significantly slower during nighttime, resulting in visible image lag/delay when
using your monocular in the dark. It is important to take the following steps to
minimize this effect and ensure the best possible image and video recording
quality:
-During nighttime and in any dark condition activate built-in IR illuminator
–it will provide extra light needed for the image sensor to “speed up” its
refresh rate and image delay will be minimized.
-During nighttime you need to remove the daylight color enhancing filter –
it will block most of the Infrared light from the built-in IR illuminator
resulting in very dark image.
-Always try to utilize a quality tripod for any video recording done at
nighttime. This will ensure steady placement and will minimize image
delay when filming a moving object.

13
BRIGHTNESS ADJUSTMENT:
Your digital viewer is equipped with dual image brightness control. An automatic
picture optimization sensor adjusts the image according to the available ambient
and artificial light. In addition, a manual Image Brightness Button (3) allows you to
fine-tune the image brightness to the most comfortable level. Please note that
during daylight you will need to tone the brightness down to avoid image flickering
and/or washout and to preserve the battery life. During nighttime you could
increase the brightness all the way up, however when utilizing built-in IR
illuminator, you may still need to tone the brightness down. Each short press onto
the IMAGE Button (3) will increase brightness by one level until it reaches
maximum level –then it will reset to the lowest brightness setting.
USING LASER RANGEFINDER:
Your BINOCULAR is equipped with a built-in and fully integrated Laser Rangefinder
(LRF), allowing you to quickly range targets up to 1500m (1635yds). There are two
modes of operating LRF: manual and automatic (continuous). Manual mode gives
you the option of measuring the distance to the object only when you want it
done, while automatic mode allows for continuous distance measurement as you
scan the terrain. Please note that automatic mode will negatively affect the
batteries working time, so unless you specifically require constant distance
reading, we recommend to use manual mode.
To activate rangefinder, go to the main menu by
pressing onto the Menu/Controller and holding it for
more than 1sec. Once Main Menu is accessed, rotate
the controller clockwise until you highlight
“Rangefinder”, then short-press the controller to
activate the Rangefinder Menu. Once there, highlight Ranging Mode and then
choose “Manual” or “Auto”. Once chosen, the system will automatically exit the
Menu and return back to the live image.
NOTE: When Laser Rangefinder is in Manual Mode, Photo Capture function is
disabled. To capture still images and have laser rangefinder work at the same
time, please switch to Auto Mode for the Rangefinder.
The rangefinder reticle and unit of measurement (M=Meters, or Y=Yards) will be
displayed. To switch the Measuring Unit, activate Main Menu, then “Rangefinder”,
then highlight “Ranging Unit” and select the unit of measurement you desire.
Once selected you need to manually exit the menu by pressing onto the
Menu/Controller for 2 seconds.
IMPORTANT: TO UTILIZE LASER RANGEFINDER YOU MUST REMOVE
THE PROTECTIVE RANGEFINDER LENS COVER (11-b).

14
Once the rangefinder is activated, in Manual mode, you will need short-press the
Camera/LRF button (4) (momentary press) and the distance is displayed.
IMPORTANT: Please be aware that if you press and hold the Camera/LRF button,
video recording will start, therefore if you only wish to measure the distance you
must press and release the button immediately.
As with any rangefinder, maximum measuring distance will depend on the size and
reflective capabilities of the target. Smaller objects, objects in dark colors, objects
with non-reflective material/matter will not range to the maximum distance
specified in this manual. Large objects, objects in lighter colors and objects with
highly reflective finishes (such as buildings or structures finished in tile or polished
stone, as well as traffic road-signs or flags will provide more reliable readings at or
close to the maximum specified distance)
In Auto mode, the rangefinder will continuously beam and read distance of any
object aligned with the rangefinder reticle. Please be aware that laser beam, when
active, may be easily seen by anyone using night vision equipment or by wildlife
animals.
IMPORTANT: Laser Rangefinder will not measure distance from behind the glass,
so you must open the window if measuring from inside your house or lower the
window down if measuring from inside the vehicle.
ELECTRONIC IMAGE STABILIZER (EIS)
Your binocular is equipped with an Electronic Image Stabilizer (EIS)”, which helps
compensate some shake during video recording. To activate, enter Main Menu,
then enter Settings –highlight EIS icon and turn it on. Once active, EIS icon will
appear on the bottom of the image display when it is working.
IMPORTANT: when EIS is activated image Zoom will no longer be possible and
system will be fixed on 6.5x optical magnification. If you must utilize Zoom, you
will need to turn EIS off.
TAKING PICTURES AND RECORDING VIDEOS:
WE STRONGLY RECOMMEND MOUNTING YOUR DEVICE ONTO A STEADY
TRIPOD WHEN RECORDING VIDEO OR TAKING STILL IMAGES –
PARTICULARLY WHEN WATCHING DISTANT OBJECTS AND/OR UTILIZING
ZOOM FUNCTION
Your digital viewer can take High-Resolution pictures and record HD videos onto
the external Micro-SD card. 16GB card is included with your unit and it is already

15
installed into the SD-card slot. The Micro-SD card can be upgraded up to 128GB,
which is especially useful if you plan to record a lot of videos See RE-FORMATTING
64 & 128GB CARDS TO FAT32 FORMAT on page 18 for important instructions.
Your binocular features a multi-use CAMERA/LRF button (4). It can be used to
record video, capture still images, or measure the distance with the built-in laser
rangefinder. Please refer to Page-7 for instructions on how to use Super
Controller and Menu options.
VIDEO: To record a video, focus the unit onto the object and momentarily press
CAMERA/LRF button. The system will start recording. To stop recording, press
CAMERA button momentarily once again. During recording it is still necessary to
re-adjust the front objective lens focus (1) if you wish to record different objects,
located at different distances. There are 4 different video recording resolution
options:
1. QHD (Quad-HD resolution) at 30FPS: When highest video resolution and
crystal clear image is necessary both: daytime or nighttime. Provides
brilliant image details, very close to 4K, without sacrificing the nighttime
sensitivity. Best choice for viewing video files on 4K TVs.
2. 3MHD / 30FPS: Very close in quality to QHD but allows for more video
files to be stored on memory card. Excellent choice for those who plan to
watch the video recording on 4K TV or monitors but wish to save more
space on memory card.
3. FULL-HD 1080P / 30FPS: Blue-Ray quality recording. Best for recording in
daylight with color filter on and when mounted on tripod.
4. FHD 1080p / 60FPS: best mode for recording moving objects (animals,
birds, sports etc.) as well as when tripod mounting is not possible. Choose
this resolution for both: nighttime and daytime action recording.
5. HD 720P / 30FPS: best choice for smaller size video recording files. Allows
for more video files to store on a memory card and still provides excellent
image when viewed on 720p or higher resolution HDTV.
PHOTO: To take a still image, access Main Menu, then enter Record Mode
function and select Photo. Then focus the unit onto the object you are viewing and
with a steady hand gently press the CAMERA button momentarily. Depending on
the Capture Mode setting (see page –9 Capture Mode) the image will either be
captured immediately, or the display will give a visual countdown and then image
is taken and is automatically stored onto the SD card. All still images are taken at
5360x3008 resolution (16.1MP).
IMPORTANT: once your micro-SD card reaches its capacity, video recording and
still image taking will no longer be possible and “SD Card” will be displayed,
indicating it is time to either replace the card or empty your current card. This
feature acts as a safeguard to prevent accidental over-writing your existing video
and photo files.

16
IMPORTANT: If you see “Memory Error” message displayed, your micro-SD
card is either bad, or, if you have a 64GB or 128GB card, it is not operating in
FAT32 format. Please refer to page 18 for re-formatting instructions.
SD-CARD REMOVAL, DATA VIEWING AND TRANSFER OPTIONS:
It is possible to view the images and videos directly on the unit’s micro-display. To
do so, while the unit is operating access the Main Menu and choose “Playback”.
Once in the Playback Mode you will be able to switch between photos and videos
by rotating the Menu Controller and short-pressing Controller will activate any
video file. To exit the Playback Mode simply press Menu Controller for 2 seconds.
NOTE: If you need to delete the unwanted files you can do so while in Playback
mode by highlighting the file with the Menu Controller and then briefly pressing
the Camera button.
Alternatively, you can remove the micro-SD card from the monocular and use it
directly via the micro-SD card slot in your laptop, or if you don’t have a direct slot,
use it in the included USB flash drive adapter to transfer data to your computer.
Carefully open the Connection Area rubber cover by
gently pulling it from the left side outward and then
swing it counterclockwise to the right and locate the
Micro-SD Card Slot. Gently push onto the micro-SD
card and it will pop out. It is also possible to utilize
the full-size SD card adapter (not included with
binocular). To replace the micro-SD card gently push it back into the slot until it
clicks and stays in it. Do not use force when removing or replacing the Micro-SD
card from the slot!
CONNECTING TO EXTERNAL VIDEO SOURCE:
You can connect your device to the TV or a video monitor, via the RCA video cable
(included with your device). Video output is located at
the front of the binocular. Please use the included
video cable, which has a special curved plug, in order
to provide easy connection to the binocular. To make
the connection, you must first access the menu and
scroll down to Settings and then find and activate the
TV Out mode. Then connect the cable between the
binocular and the video monitor.
IMPORTANT: Please note that when device is connected to any video monitor
or TV, it may be impossible to connect via Wi-Fi to the App during active video
recording. If you wish to connect to the Wi-Fi App, you will need to first
discontinue video recording and then connect to Wi-Fi.

17
WI-FI LINK AND OPERATION INSTRUCTIONS:
1. Download “ROADCAM” App on your Android phone/tablet
or on iPhone/iPad. For Android users, if you have a problem
finding the app in Google Play Store, please scan the QR
code below
2. Enter Main Menu and scroll to Wi-Fi selection. Turn the Wi-Fi ON. Now
look through the eyepiece and observe the Wi-Fi
signal name (typically M7_followed by a set of
numbers) and Password (typically 12345678).
3. Find the device Wi-Fi signal on your phone (same as
shown on the unit’s display) and select it.
4. Enter password
5. Once connected make sure your phone is allowed
to stay connected to this Wi-Fi signal even though there is no internet
available. This will prevent frequent automatic disconnects by your
phone, as it tries to find a better internet connection.
6. Now open the app and it will display the device name (M7…) below the
orange cam symbol –simply touch the cam symbol and app will connect
to the device. Please note –once app is connected to the device video
recording starts automatically.
7. Follow on screen menu on your smart device to utilize the available
features of the app. We suggest leaving the device in Video mode, since it
is possible to snap a photo via app control at any time during live video
stream.
8. During streaming it is possible to change image colors by short-pressing
onto the Controller.
9. NOTE: during Wi-Fi streaming the ZOOM function is disabled and cannot
be utilized!
10. NOTE: during Wi-Fi streaming long press onto the Controller deactivates
Wi-Fi function altogether.
11. If the App shuts down during normal use, please re-start it, or re-install it
on your mobile device if it happens more than twice.
RE-FORMATTING 64GB & 128GB MICRO-SD CARDS TO FAT32
FORMAT:
Any micro-SD card above 32GB needs to be re-formatted from EXFAT format to
FAT32 format, which is the format of the night vision monocular (and many other
consumer electronics). Please note that FAT32 is the most widely used format and
is also considered the most reliable format.

18
In order to re-format the card you must run it through a 3rd party provider. We
suggest using Disk Partition. While nearly all of the providers would want you to
buy their upgraded versions, you can just download their basic free version and it
would be sufficient to re-format the card. Disk Partition seems to be the most
simple and hassle-free provider we could find:
https://www.disk-partition.com/download.html
•Download the “Standard Free” version and follow all the download
instructions.
•Once downloaded, open the program, and insert the micro-SD card into
the computer.
•Highlight the correct disc by single-click and then choose on the bottom
left side of the menu to “Format Partition” (alternatively right-click on the
highlighted disc and choose the same function). A pop-up window will
appear. You can label your partition (such as “Luna Optics Monocular” or
any other name you desire (it’s optional) and then make sure to select
“FAT32” as the File System.Then click “OK”.
•Once the format is finished, click on “Apply” located in the most upper
left corner. You must select “Apply” otherwise the formatting is not
finished.
•You card is now formatted, but before you can use your 64/128GB card in
our digital night vision product you must also format the card inside the
product. To do so, insert the card into its slot (11-c), turn your monocular
on and through the menu find and select “Format”, then select “OK”.
Once the card is formatted inside the night vision device it is now ready
to use.
TROUBLESHOOTING:
1. Unit does not turn on and the light indicator is off:
a) please check if the batteries are inserted correctly
b) please make sure the batteries are fresh
2. The light indicator is working, but you cannot see the image:
You may be turning the unit on in a dark area without utilizing the
IR illuminator. Please also remove the Daytime Color Filter.
3. Unable to obtain sharp and clear image:
a) you may need to repeat the process of rotating the oculars and
objective lens several times until you get a good feel of it
b) You may be viewing an object that it too close –the minimum
focusing distance is approximately 80cm or 2.6ft
4. During image magnification adjustment color changes or Main Menu
activates:

19
You have accidentally pressed onto the Super Controller. If Menu
appears, press onto it again for approximately 2 seconds and Menu
will disappear.
5. I’m trying to turn the IR illuminator on and instead the unit shuts down:
You are holding the Power/IR button for more than 1 sec. To turn
the IR illuminator on, you must press the button only momentarily.
6. I’m trying to measure the distance, but I trigger video recording:
You are pressing and holding the Camera/LRF button. You must
press it only momentarily to get the distance reading.
7. I’m trying to record (or stop) the video but still image is taken:
You are releasing the Camera/LRF button too soon. You must press
it and hold it for approximately 2 seconds.
8. I’d like to use a 64GB or a 128GB micro-SD card, but it’s not working or is
not recognized:
Your 64GB or 128GB micro-SD card must be re-formatted to FAT32
format. Please refer to page-17 for re-formatting instructions
WARNING! NEVER ATTEMPT THE FOLLOWING:
•NEVER try to disassemble the unit by
yourself or by anyone who is not our
authorized technician! Doing so may result
in injury and will void any warranty claims!
•NEVER charge batteries included with the
unit –they are not rechargeable!
•NEVER submerse the unit into water or use it
during heavy rain!
•NEVER look directly at the sun through this
device!
•NEVER Look directly into the IR Illuminator
lens while IR is ON!

20
TECHNICAL SPECIFICATIONS:
Image Sensor Resolution / Sensitivity: __________ Quad-HD 2560x1440 / 0.002lux
Image Display: _________________________Dual 0.38” HD AMOLED-Q 1280x720
Still Image resolution ____________________________5360x3008 (16.1MP) JPEG
Video resolution (signal) ____________________________________Quad-HD AVI
Video Recording options: ___QHD(30fps); 3MHD(30fps); FHD(60/30fps); HD(30fps)
Image Magnification __________________________________________6.5x-39x
Objective Lens _____________________________________________F1.0/50mm
Ocular Diopter Range _____________________________________________ +/-5
Inter-Pupillary Distance ___________________________________ 59mm - 71mm
Focusing Distance_______________________________________ 80cm (2.6ft) - ∞
Viewing Distance (daylight, 6x) ___________________________ 2000m (2180yds)
Viewing Distance (IR complete darkness) _____________________ 600m (654yds)
IR Illuminator: _____________________________________ Class 3R, 850nm, 1W
Laser Rangefinder Maximum Distance (large reflective targets) _ 1500m (1635yds)
Laser Rangefinder: _______________________________________ Class-I 905nm
Field Of View_____________________________________________________ 10°
Memory ____________________________________ Micro SD card (up to 128GB)
Wi-Fi ____________________________________________________ Android/iOS
Battery Power_____________________________________4 x 3V Lithium (CR123)
External Power ______________________________________ 5V/2A micro-USB-C
Operating Time (4xCR123A batteries, IR off, no video/Wi-Fi) _____________4.5hrs
External outputs ____________________________________ micro-USB-C / RCA-V
Dimensions_______________________190mm x 126mm x 76mm (7.5”x4.9”x2.9”)
Weight__________________________________________________ 980g (2.2lbs)
Warranty________________________________________________________2yrs
----------------------------------------------------------------------------------------------------------
LUNA OPTICS, INC. 300 Hawthorn Dr., Fate, TX 75087 (USA)
E-mail: info@lunaoptics.com Web: www.lunaoptics.com © 2022
Table of contents
Other LUNA OPTICS Binoculars manuals

LUNA OPTICS
LUNA OPTICS LN-EB5-LRF User manual

LUNA OPTICS
LUNA OPTICS LN-EBG1 User manual

LUNA OPTICS
LUNA OPTICS LN-G3-M50 User manual

LUNA OPTICS
LUNA OPTICS LN-PB7 User manual

LUNA OPTICS
LUNA OPTICS LN-G2-M44 User manual

LUNA OPTICS
LUNA OPTICS LN-PBG1-PRO User manual

LUNA OPTICS
LUNA OPTICS LN-NVB2 User manual

LUNA OPTICS
LUNA OPTICS LN-EIR850 User manual

LUNA OPTICS
LUNA OPTICS LN-ELIR User manual

LUNA OPTICS
LUNA OPTICS LN-G3-MS50 User manual