LUNA OPTICS LN-TB35-LRF User manual

1
LN-TB35-LRF
LN-TB50-LRF
THERMAL IMAGING
BINOCULARS WITH BUILT-IN
LASER RANGEFINDER
INSTRUCTION MANUAL
IMPORTANT: Please read this manual in its entirety
prior to using this device!

2
INTRODUCTION
Thank you for purchasing a quality LUNA OPTICS®
product. With proper care and maintenance your
device will provide many hours of operation and
outstanding reliability. Please read this manual –it is your
key to enjoying this exciting and hi-tech product!
THERMAL IMAGING
Without getting too technical and confusing, let’s try to
understand how this device works and what it can and
cannot do:
1. Your thermal device works on the principle of
detecting infrared radiation, also known as energy.
Instead of operating in a visible light spectrum of 400-
700nm (such as regular binoculars or cameras),
thermal imagers detect waves as high as 17,000nm or
17µm, which are beyond our capability to observe
with naked eye. The infrared signal is received by the
thermal device and is then converted into an
electrical signal by the thermal sensor (called
microbolometer), located inside the unit and that
electrical signal is then displayed on the micro display
located near the ocular (eyepiece).
2. Your device operates with batteries. Unlike a
daylight binocular, where you see the image due to
light traveling through the glass and the prisms, the
thermal imaging device works by projecting the
image onto a screen. While the thermal sensor is the
crucial component of any thermal device, the
optical parts of the unit are also very important, as
they gather the light into the sensor and bring the
projected image to your eyes. Since the image is
projected on the screen, it has certain limited
resolution…so please
do not expect your night vision device to provide the
same crystal clear image, as you see through your
daylight binoculars –after all, you are using this
device in the environment, where normally your vision
would be very limited…

3
OPERATION:
Now that we’ve covered some of the basics of the
technology behind the thermal imaging, let’s learn how
to operate your new device:
Please look below to identify all the parts of the unit.
LN-TB35-LRF (shown) & LN-TB50-LRF (same but with
larger 75mm front lens) Lens and unit appearance may
vary slightly.
Glossary:
1 –Germanium Objective Lens
2 –Laser Rangefinder
3 –Distance Focusing Ring
4 –Rangefinder Button
5 –Moisture Control Cartridge
6 –Zoom Button
7 –Accessory Mounting Plate
8 –Ocular Lens Focusing Rings
9 –Invert Button
10 –Image Gain / Display Brightness Control
11 –Power Switch
12 –External Power Supply Connector
13 –Battery Compartment
3
9
2
13
7
4
1
12
10
11
6
5
8

4
INSTALLING THE BATTERIES:
Your night vision unit operates on commonly available 3V
Lithium batteries, CR123-type. You will need 3 batteries to
operate the device.
To install the batteries, unscrew the battery compartment cover
and install the batteries inserting the positive (+) end first. Once
the batteries are inside, replace the cover.
TURNING THE UNIT ON, OFF & STANDBY MODE:
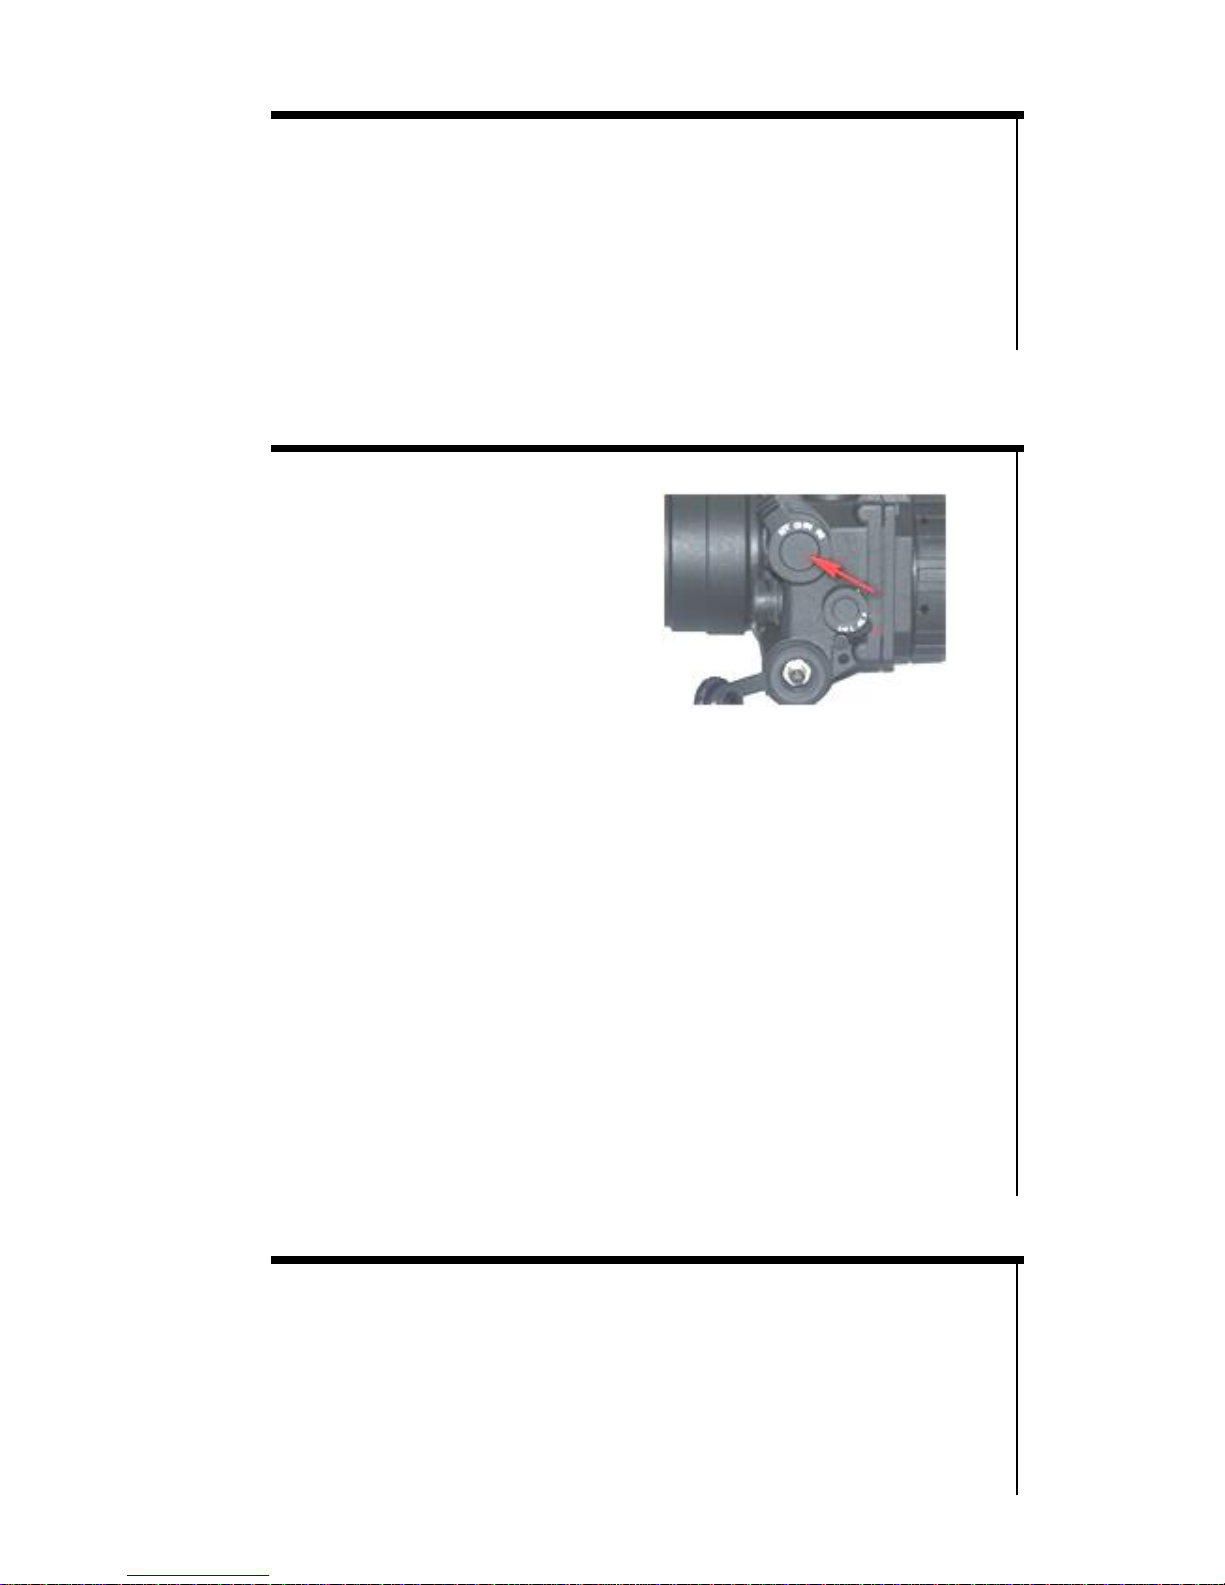
Your night vision unit has a
power switch (11), which
allows you to easily switch
between OFF / ON & Standby
modes, To turn the unit ON,
first remove the objective lens
cover and rotate the switch by
one dial counterclockwise to
ON position. Look through the oculars –you should see
INITIALIZING appear on the display. The unit will become
operational within approximately 5 seconds after that. To turn
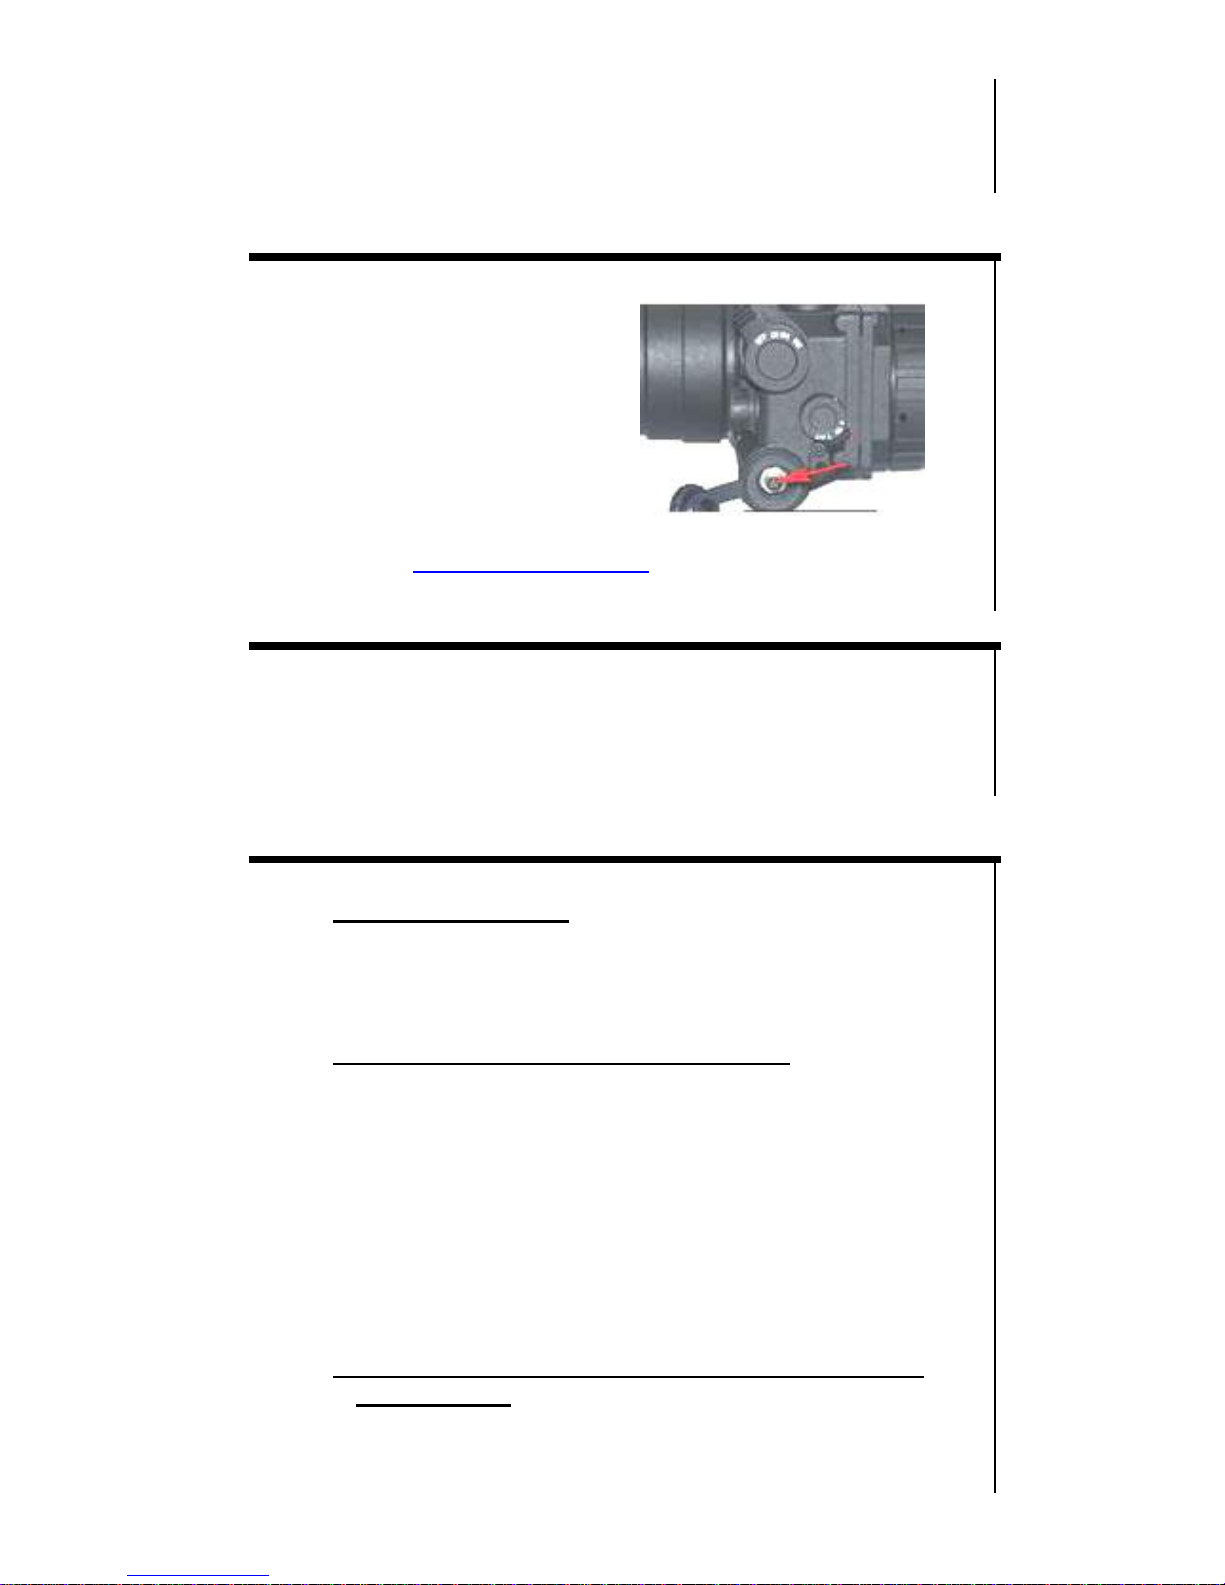
the unit OFF rotate the same switch backwards (clockwise) one
dial to OFF position. You may also have the unit on STANDBY
position by first turning the unit to ON position and then gently
pulling the Power Switch outwards and rotating it one
additional dial counterclockwise. STANDBY mode allows you to
quickly get operational in the field, eliminating the 5 second
delay when turning the switch back to ON position. It is also
used when viewing the image on external video source utilizing
the video output located directly above the battery
compartment cover (Yellow RCA type video plug). It is always
recommended to turn the unit to OFF position if you are not
planning to operate the unit for more than a few minutes in
order to conserve battery power. Always replace the objective
lens cover after the unit is turned off and is no longer is in use.
FOCUSING THE UNIT:
To obtain the sharp image, you must first rotate each Ocular
Focusing Ring (8) one-by-one in either direction, until you notice
in which position the image is at its best. Since you are looking
at a display, it will be easier to adjust them by simply focusing
your attention on the displayed letters and numbers. After that,
rotate the Distance Focusing Ring (3) also until the image is at
its best. You may have to repeat the process again, until the

5
image is sharp and clear. Once the clear image is obtained,
you no longer need to adjust the Oculars Focusing Rings, just
rotate the Distance Focusing Rings to adjust the distance to the
object you are viewing.
ADJUSTING DISTANCE BETWEEN EYEPIECES:
After you turn the power on
and after you adjust the
focusing to the best possible
image, make notice of the
image and see if it appears as
one single complete display. If
it does, then there is no need
to adjust the distance
between the eyepieces. If the
image appears as if parts of the display are covered, then you
need to either pull apart the eyepieces or push them in
together until the image appears as one complete display.
IMAGE GAIN / DISPLAY BRIGHTNESS CONTROL:
Your thermal binoculars come with Manual Gain Control
allowing you to adjust the image to the best possible resolution
even when atmospheric conditions change rapidly, especially
during high humidity and/or rapid temperature changes.
To adjust the Image Gain, rotate the switch (10) either
clockwise or counterclockwise while viewing the image –
you will see word GAIN and either positive or negative
number appear in the upper right corner of the image
display. There are 10 negative and 10 positive image gain
levels and a Zero level. Lowering the Image Gain will allow
for better facial and shape recognition. Increasing the
Image Gain will allow for better recognition of surroundings,
such as houses/buildings, trees and bushes and so on,
allowing you to better see the surroundings and to better
orient in the terrain.
To adjust the Display Brightness level press the switch
momentarily and letters BRGT will appear in the same upper
right corner –you can now rotate the same switch and
Display Brightness will change. There are 31 levels of display
brightness. Please note that switch will return to the default
GAIN mode if no action is taken within 2 seconds after
pressing the switch.

6
ZOOM FUNCTION
The standard (optical) magnification of your thermal binoculars
is either 3.5x or 5x (you will see the objects 3.5x or 5x closer than
if looking with the naked eye). It is possible to increase the
magnification by applying a digital zoom function. There are
two zoom levels (2x and 4x) meaning your combined
magnification will be either 7x or 14x. (10x or 20x on LN-TB50-LRF
model). To utilize zoom function press the Zoom Button (6) once
to achieve 2x zoom (7x/10x magnification) or twice to achieve
4x zoom (14x/20x magnification). To return to standard optical
image press the Zoom Button once more. Please note the
bottom left corner of the image display will show either 1x, 2x or
4x, depending on how many times you press the Zoom Button.
IMAGE INVERTION
It is possible to change the way the heat signatures are
displayed –the default image is “WHITE HOT” meaning the heat
signatures will appear in white color with most of the
background appearing in black or dark color. You may switch
(invert) this setting by pressing the Invert Button (9) once and
then het signatures will appear in dark color on otherwise white
background. In addition to WHITE HOT and BLACK HOT, the unit
also has options of 5 color palettes, which highlight heat
signatures in various colors. Generally, it may be better to have
White Hot setting during daylight observation, especially
outdoors, while having Black Hot setting may be preferable
during nighttime outdoors. You may also try each color setting
to see which one renders images best during various
atmospheric conditions and humidity levels.
USING LASER RANGEFINDER:
Your thermal binoculars come with fully integrated Laser
Rangefinder allowing you to accurately measure the distance
to the viewing object up to approximately 700m (760yds)
To measure the distance you must first activate the feature by
pressing once the Rangefinder Button (3). You will see the
shutter box in the middle and << --- >> appear on the center
bottom of the display. At this point you can aim at the viewing
object and press the Rangefinder Button once more while
aiming –the distance will appear after a brief pause and it will
look like this <<025>>, which is displayed in Meters (1m=1.09yds),
so 25m is approximately 27yds. Should you see <<ERR>>
message it may be because The rangefinder function will be
disabled after several seconds of no activity.
IMPORTANT: just like any laser rangefinder, the ability to

7
accurately read distance will depend on the reflective
characteristics of the object, as well as its size and ability to
view it unobstructed. We suggest to measure distance 3 times
for the same object to determine the most precise reading.
EXTERNAL POWER SUPPLY
It is possible to connect an
optional external power supply
to the binoculars in order to
operate them for a longer
periods of time, or during
extreme cold temperature of
minus 10 degrees C (14F).
Please inquire about the
external power supply availability from your local dealer or
MOISTURE CONTROL CARTRIDGE:
Your thermal binoculars are equipped with a special Moisture
Control Cartridge (5), which allows removal of any moisture
from the unit in the unlikely event of uncontrolled
depressurization.
TROUBLESHOOTING:
1. Unit does not turn on:
a) please check if the batteries are inserted
correctly
b) please make sure the batteries are fresh
2. Unable to obtain sharp and clear image:
a) you may need to repeat the process of rotating
each ocular and distance ring several times until
you get a good feel of it
b) You may be viewing an object that it too close –
the minimum focusing distance is approximately
3m or 9 feet
c) You may be viewing image where no heat
signatures are present and your gain level is too
low to see any surroundings. Dial up the GAIN
level.
3. Unable to see heat signatures behind visible barriers,
such as glass:
PLEASE NOTE: THERMAL DEVICES ARE UNABLE TO SEE HEAT
SIGNATURES IF THE OBJECT IS BEHIND ANY BARRIER THAT
HAS REFLECTIVE NATURE, SUCH AS GLASS, THEREFORE

8
YOU WILL NOT BE ABLE TO SPOT PEOPLE INSIDE A VEHICLE
UNLESS THE WINDOWS ARE LOWERED DOWN, OR A
PERSON STANDING BEHIND THE WINDOW IN A HOUSE OR
IN SIMILAR SITUATIONS. LIKEWISE YOU WILL NOT BE ABLE
TO SEE ANY HEAT SIGNATURES WHILE OBSERVING FROM
BEHIND A WINDOW –YOU MUST HAVE UNOBSTRUCTED
VIEW.
NEVER:
1. Point this device directly at the sun or any heat source
over 500 degrees Celsius (930 degrees Fahrenheit)
2. Try to disassemble the unit by yourself or by anyone
who is not our authorized technician. Doing so may
result in injury and will void any warranty claims.
3. Look at the sun through this unit.
4. Leave the batteries inside the unit for a long period of
time –the batteries may overheat and may render the
unit inoperable and will void the warranty.
5. Submerse the unit into water or use during heavy rain.
TECHNICAL SPECIFICATIONS:
Imaging Sensor__________ ULIS Pico384 (384x288) 17µm
Frame Rate ______________________ 50 Hz (Shutter-free)
Optical Magnification______________________3.5x (5.0x)
Digital Zoom _________________________________ 2x & 4x
Focusing Distance____________________________ 3m - ∞
Objective Lens Aperture_______________ 50mm (75mm)
Field Of View______________________________ 6.2° x 4.6°
Diopter Adjustment____________________________ +/- 4
Eye base adjustment_________________ 58mm –72mm
Detection range (1.8m object)_________1200m (1700m)
Power Supply_______________________ 3 x CR123 Lithium
Working time ________________________________ 4.5-5hrs
Temperature Range:
CR123 Batteries______________-10C / +50C (14F –122F)
Dimensions________________165mm x 139mm x 66mm
Weight_______________________________________ 1400g
LUNA OPTICS, INC.
300 Hawthorn Dr. Fate, TX 75087 (USA)
Tel: +1-972-722-1100; Fax: +1-844-273-3079;
E-mail: info@lunaoptics.com Web: www.lunaoptics.com © 2017
This manual suits for next models
1
Table of contents
Other LUNA OPTICS Binoculars manuals

LUNA OPTICS
LUNA OPTICS LN-G3-MS50 User manual

LUNA OPTICS
LUNA OPTICS LN-PB7 User manual

LUNA OPTICS
LUNA OPTICS LN-G3-M50 User manual

LUNA OPTICS
LUNA OPTICS LN-EIR850 User manual

LUNA OPTICS
LUNA OPTICS LN-NVB2 User manual

LUNA OPTICS
LUNA OPTICS LN-G2-M44 User manual

LUNA OPTICS
LUNA OPTICS LN-G3-B50-PRO User manual

LUNA OPTICS
LUNA OPTICS LN-PBG1-PRO User manual

LUNA OPTICS
LUNA OPTICS LN-G3-B50 User manual

LUNA OPTICS
LUNA OPTICS LN-ELIR User manual