Lund 67810 User manual

67810
INSTRUKCJA ORYGINALNA 1
MIKSER PLANETARNY
PLANETARY MIXER
PL
GB

INSTRUKCJA ORYGINALNA
2
PL GB
TOYA S.A. ul. Sołtysowicka 13-15, 51-168 Wrocław, Polska
I I
II III
IV V
VI VII
6
1
2
8
3
4
5
9
10
14
11 12 13
16
15

INSTRUKCJA ORYGINALNA 3
PL GB
1. podstawa
2. głowica
3. włącznik
4. kabel zasilający z wtyczką
5. dźwignia zatrzasku głowicy
6. pokrywa gniazda blendera
7. gniazdo blendera
8. misa
9. pokrywa misy
10. wrzeciono
11. mieszadło do ciast
12. mieszadło do ubijania
13. mieszadło trzepiące
14. dzbanek blendera
15. pokrywa dzbanka
16. zatyczka pokrywy
PL GB
1. basis
2. head
3. switch
4. power cord with plug
5. lever of the head latch
6.cover of the blender socket
7. blender socket
8. bowl
9. bowl cover
10. spindle
11. stirrer for dough
12. stirrer for tamping
13. shaking stirrer
14. blender juc
15. jug cover
16. cover plug
VIII IX
X X
XII
XIII
XI
7

INSTRUKCJA ORYGINALNA
4
PL GB
Przeczytaćinstrukcję
Read the operating instruction
Druga klasa bezpieczeństwa elektrycznego
Second class of insulation
OCHRONA ŚRODOWISKA
Symbol wskazujący na selektywne zbieranie zużytego sprzętu elektrycznego i elektronicznego. Zużyte urządzenia elektryczne są
surowcami wtórnymi - nie wolno wyrzucaćich do pojemników na odpady domowe, ponieważzawierająsubstancje niebezpieczne
dla zdrowia ludzkiego i środowiska! Prosimy o aktywnąpomoc w oszczędnym gospodarowaniu zasobami naturalnymi i ochronie
środowiska naturalnego przez przekazanie zużytego urządzenia do punktu składowania zużytych urządzeńelektrycznych. Aby
ograniczyćilość usuwanych odpadów konieczne jest ich ponowne użycie, recykling lub odzysk w innej formie.
ENVIRONMENTAL PROTECTION
Correct disposal of this product: This marking shown on the product and its literature indicates this kind of product mustn’t be
disposed with household wastes at the end of its working life in order to prevent possible harm to the environment or human
health. Therefore the customers is invited to supply to the correct disposal, differentiating this product from other types of refusals
and recycle it in responsible way, in order to re - use this components. The customer therefore is invited to contact the local
supplier office for the relative information to the differentiated collection and the recycling of this type of product.
Kontakt produktu z żywnościąjest dozwolony
Contact of the product with food is allowed

INSTRUKCJA ORYGINALNA 5
PL
CHARAKTERYSTYKA URZĄDZENIA
Mikser planetarny służy do przygotowywania potraw. Dzięki bogatemu wyposażeniu możliwe jest przygotowanie wielu, rozmaitych
potraw. Stabilna podstawa z przyssawkami oraz uniwersalność sprawia, że mikser będzie pomocny w każdym gospodarstwie do-
mowym. Produkt zostałzaprojektowany wyłącznie do użytku domowego i zabronione jest korzystanie z niego w zastosowaniach
komercyjnych. Prawidłowa, niezawodna i bezpieczna praca urządzenia zależna jest od właściwej eksploatacji, dlatego:
Przed przystąpieniem do użytkowania urządzenia należy przeczytaćcałą instrukcjęi zachowaćją.
Za szkody, powstałe w wyniku nieprzestrzegania przepisów bezpieczeństwa i zaleceńniniejszej instrukcji dostawca nie ponosi
odpowiedzialności.
WYPOSAŻENIE
Produkt jest dostarczany w stanie kompletnym, ale przed użyciem wymaga montażu. Wraz z mikserem dostarczane sąmisa z
pokrywą, trzy końcówki miksera, dzbanek blendera z pokrywą.
Przed użyciem wymagany jest poprawny montażurządzenia.
INSTRUKCJE BEZPIECZEŃSTWA
UWAGA! Przeczytaćwszystkie poniższe instrukcje. Nieprzestrzeganie ich może prowadzićdo porażenia elektrycznego, pożaru
albo do uszkodzeńciała.
PRZESTRZEGAĆPONIŻSZYCH INSTRUKCJI
Nie należy korzystaćz urządzenia w środowisku o zwiększonym ryzyku wybuchu, zawierającym palne ciecze, gazy lub opary.
Urządzenie należy ustawiaćna płaskich, równych i twardych powierzchniach. Jeżeli urządzenie jest wyposażone w gumowe stop-
ki lub przyssawki należy wybraćtaki rodzaj powierzchni, aby stopki lub podstawki zapobiegały przemieszczaniu sięurządzenia
podczas użytkowania.
Nie stawiaćurządzenia w pobliżu źródełciepła lub ognia.
Urządzenie należy podłączaćtylko do sieci elektrycznej o napięciu i częstotliwości widocznych na tabliczce znamionowej urzą-
dzenia.
Wtyczka kabla zasilającego musi pasowaćdo gniazdka sieciowego. Nie wolno modyfikowaćwtyczki. Nie wolno stosowaćżad-
nych adapterów w celu przystosowania wtyczki do gniazdka. Niemodyfikowana wtyczka pasująca do gniazdka zmniejsza ryzyko
porażenia prądem elektrycznym.
Po każdym wykorzystaniu należy odłączyćwtyczkękabla zasilającego od gniazda sieciowego.
Unikaćkontaktu z uziemionymi powierzchniami takimi jak rury, grzejniki i chłodziarki. Uziemienie ciała zwiększa ryzyko porażenia
prądem elektrycznym.
Urządzenie jest przeznaczone tylko do pracy wewnątrz pomieszczeń. Nie należy narażaćurządzenia na kontakt z opadami
atmosferycznymi lub wilgocią. Woda i wilgoć, która dostanie siędo wnętrza urządzenia zwiększa ryzyko porażenia prądem
elektrycznym. Nie zanurzaćurządzenia w wodzie lub innej cieczy.
Nie zasłaniaćotworów wentylacyjnych i dbaćo ich drożność.
Nie przeciążaćkabla zasilającego. Nie używaćkabla zasilającego do noszenia, podłączania i odłączania wtyczki od gniazdka sie-
ciowego. Unikaćkontaktu kabla zasilającego z ciepłem, olejami, ostrymi krawędziami i ruchomymi elementami. Uszkodzenie ka-
bla zasilającego zwiększa ryzyko porażenia prądem elektrycznym. W przypadku uszkodzenia kabla zasilającego (np. przecięcie,
stopienie izolacji) należy natychmiast odłączyćwtyczkękabla od gniazdka, a następnie przekazaćprodukt do autoryzowanego
zakładu naprawczego. Zabronione jest użytkowanie urządzenia z uszkodzonym kablem zasilającym. Zabroniona jest naprawa
kabla zasilającego, kabel musi zostaćwymieniony na nowy w autoryzowanym punkcie serwisowym. W przypadku stosowania
przedłużaczy, należy stosowaćprzedłużacze o parametrach zasilania takich jak widoczne na tabliczce znamionowej urządzenia.
Przekrój żyłprzedłużacza powinien byćnie mniejszy niżprzekrój żyłkabla zasilającego urządzenie. Należy to sprawdzićna
izolacji kabla zasilającego i przedłużacza lub zwrócićsiędo producenta urządzenia i / lub przedłużacza.
W przypadku zauważenia uszkodzenia jakiejkolwiek części urządzenia zabronione jest jego dalsze użytkowanie. W takim przy-
padku należy urządzenie przekazaćdo autoryzowanego punktu serwisowego lub wymienićtęczęść samodzielnie o ile instrukcja
użytkownika pozwala na takie działania naprawcze.
Przed rozpoczęciem jakichkolwiek czynności związanych z wymianą, czyszczeniem lub regulacjączęści ruchomych należy urzą-
dzenie wyłączyć, a wtyczkękabla zasilającego odłączyćod gniazdka sieciowego.
Urządzenie nie może byćużywane przez dzieci. Urządzenie i jego kabel zasilający należy trzymaćz dala od dzieci.
Urządzenie może byćużytkowane przez osoby o obniżonych możliwościach fizycznych, umysłowych i osoby o braku doświad-
czenia i znajomości urządzenia, jeżeli zapewniony zostanie nadzór lub instruktażodnośnie do użytkowania urządzenia w bez-
pieczny sposób, tak aby związane z tym zagrożenia były zrozumiałe. Dzieci nie powinny bawićsięurządzeniem. Dzieci bez
nadzoru nie powinny wykonywaćczyszczenia i konserwacji urządzenia.
Urządzenie zawiera ostre części (ostrze blendera), należy zachowaćszczególnąostrożność przy montażu, demontażu oraz
czyszczeniu takich części.

INSTRUKCJA ORYGINALNA
6
PL
Urządzenie jest przeznaczone tylko do użytku domowego. Czas ciągłej pracy nie może przekroczyć6 minut, po których należy
siępozostawićurządzenie na ok. 20 minut celem schłodzenia. W tym czasie należy odłączyćwtyczkękabla zasilającego od
gniazdka sieciowego.
OBSŁUGA URZĄDZENIA
UWAGA! Podczas wszystkich czynności związanych z montażem i demontażem wyposażenia należy wyłączyćurządzenie i
odłączyćwtyczkękabla zasilającego od gniazdka sieciowego.
Montażi demontażmiksera
Mikser postawićna równym i stabilnym podłożu. Upewnićsię, że wszystkie przyssawki w podstawie chwyciły podłoże.
Nacisnąć zgodnie z kierunkiem strzałki dźwignię(II), która zwolni zatrzask głowicy roboczej i spowoduje jej uniesienie. Głowica
uniesie sięsamoczynnie za sprawąsprężyny, ale należy unieść jąręcznie do końca i upewnićsię, że zadziałała blokada górnego
położenia głowicy miksera. Nie daje sięobniżyćgłowicy bez ponownego naciśnięcia dźwigni.
W otworze podstawy zainstalowaćmisę. Wypustki w podstawie misy w prowadzićw zagłębienia na obwodzie otworu podstawy
(III), a następnie obrócićmisęzgodnie ze kierunkiem wskazywanym przez strzałkęw podstawie (IV). Spowoduje to zablokowanie
misy w podstawie miksera. Sprawdzićpoprawność montażu, jeżeli misa jest zamocowana równo i nie daje sięjej unieść, oznacza
to poprawny montaż(V).
Wokółuchwytu końcówki miksera, zamontowaćpokrywęmisy. Przyłożyćpokrywępod głowicętak, aby strzałka widoczna na po-
krywie wskazywała symbol otwartej kłódki na głowicy miksera (VI). Upewnićsię, że pokrywa równo przylega do głowicy i obrócić
ją, tak aby strzałka wskazała symbol zamkniętej kłódki (VI).
Na końcówce wrzeciona należy zainstalowaćodpowiedniąkońcówkę. Wypusty wrzeciona musza pokryćsięz wgłębieniami wokół
otworu końcówki (VII). Należy pchnąć końcówkędo góry i obrócićw kierunku symbolu zamkniętej kłódki widocznego na górnej
części kołnierza końcówki (VIII).
Nacisnąć dźwignięi opuścićgłowicęmiksera, urządzenie jest gotowe do pracy (IX).
Demontażu wykonaćw kolejności odwrotnej do procedury montażu.
Montażi demontażblendera
UWAGA! Ponieważpodczas użytkowania blendera urządzenie równieżuruchamia mikser, należy przed rozpoczęciem montażu
blendera zamontowaćmisęmiksera wraz z jej pokrywą. Nie jest konieczny montażkońcówki. Osłoni to wrzeciono miksera pod-
czas używania blendera i zmniejszy ryzyko zranienia sięobracającym sięwrzecionem.
Mikser postawićna równym i stabilnym podłożu. Upewnićsię, że wszystkie przyssawki w podstawie chwyciły podłoże. Upewnić
się, że głowica została zablokowana w dolnym położeniu.
Zdemontowaćpokrywęgniazda blendera, naciskając lekko i przytrzymując w miejscu oznaczonym trójkątem, a następnie pocią-
gnąć pokrywęna zewnątrz obudowy miksera (X). Dzbanek blendera postawićna gnieździe montażowym i po znalezieniu pozycji,
w której podstawa dzbanka będzie równo przylegała do gniazda montażowego. Należy dzbanek obrócićzgodnie z kierunkiem
strzałki opisanej „CLOSE” (XI). Pozwoli to zablokowaćdzbanek w gnieździe montażowym. Aby upewnićsię, że montażprzebiegł
prawidłowo należy sprawdzićczy dzbanek przylega równo do obudowy miksera i nie daje sięgo unieść.
Ponieważmożliwe sącztery pozycje w których można zamontowaćdzbanek blendera, należy kierowaćsiępołożeniem uchwytu
dzbanka. Dobraćje tak, aby nie trzeba było sięgaćza urządzenie przy chwytaniu uchwytu dzbanka.
Dzbanek posiada pokrywęz uszczelkąoraz otworem z osobnązatyczką. Pokrywęnależy wcisnąć i sprawdzićczy równo przylega
do krawędzi dzbanka (XII). Pokrywa posiada zaokrąglonąwypustkę, której kształt zostałdopasowany do zakrycia wylewu dzban-
ka. Zapobiegnie to rozchlapywaniu zawartości blendera podczas pracy.
Zatyczkęnależy włożyćtak aby wypusty na jej obwodzie trafiły w wycięcia w otworze pokrywy, a następnie obrócićzgodnie z
ruchem wskazówek zegara. Demontażzatyczki należy przeprowadzićw odwrotnej kolejności.
Zatyczka pozawala na uzupełnienie zawartości blendera bez przerywania jego pracy, minimalizuje rozchlapywanie zawartości
dzbanka. Zatyczka może teżsłużyćjako mała miarka kuchenna.
UWAGA! Przy zamontowanym blenderze nie należy podnosićgłowicy miksera. Ciężar dzbanka może spowodowaćprzewrócenie
całego urządzenia, wylanie sięzawartości dzbanka, jego stłuczenie oraz podnosi ryzyko zranienia się.
Demontażdzbanka blendera należy przeprowadzićw kolejności odwrotnej do procedury montażu.
Korzystanie z urządzenia
UWAGA! Przed pierwszym skorzystaniem z urządzenia należy dokładnie umyći wysuszyćwszystkie części mające kontakt z
żywnością. Należy uprzednio zapoznaćsięze sposobem konserwacji urządzenia.
UWAGA! Zabronione jest jednoczesne korzystanie z misy miksera oraz dzbanka blendera. Taka sytuacja może doprowadzićdo
przegrzania sięurządzenia i jego nieodwracalnego uszkodzenia.

INSTRUKCJA ORYGINALNA 7
PL
Urządzenie posiada włącznik, który umożliwia ustawienie kilku prędkości obrotowych oraz bieg turbo. Ustawiając włącznik w
wybranej pozycji ustala sięprędkość obrotów mieszadła i blendera. Pozycja turbo umożliwia użycie maksymalnej prędkości obro-
towej. Aby jej użyć, należy obrócićwłącznik urządzenia i przytrzymaćw pozycji opisanej „Turbo”. Po zwolnieniu nacisku włącznik
automatycznie wróci w pozycje „0”, a urządzenie wyłączy obroty silnika. Pozycje opisane 0-6 nie wymagająprzytrzymywania
włącznika.
UWAGA! Przed podłączeniem wtyczki należy sięupewnić, że włącznik urządzenia znajduje sięw pozycji „0” – wyłączony.
Po podłączeniu wtyczki kabla zasilającego do gniazda sieciowego, przy nastawie „0”, lampka kontrolna wokółwłącznika świeci
światłem pulsującym. Jakakolwiek inna nastawa z zakresu 1-6 oraz „Turbo” powoduje, że lampka kontrolna świeci sięświatłem
stałym.
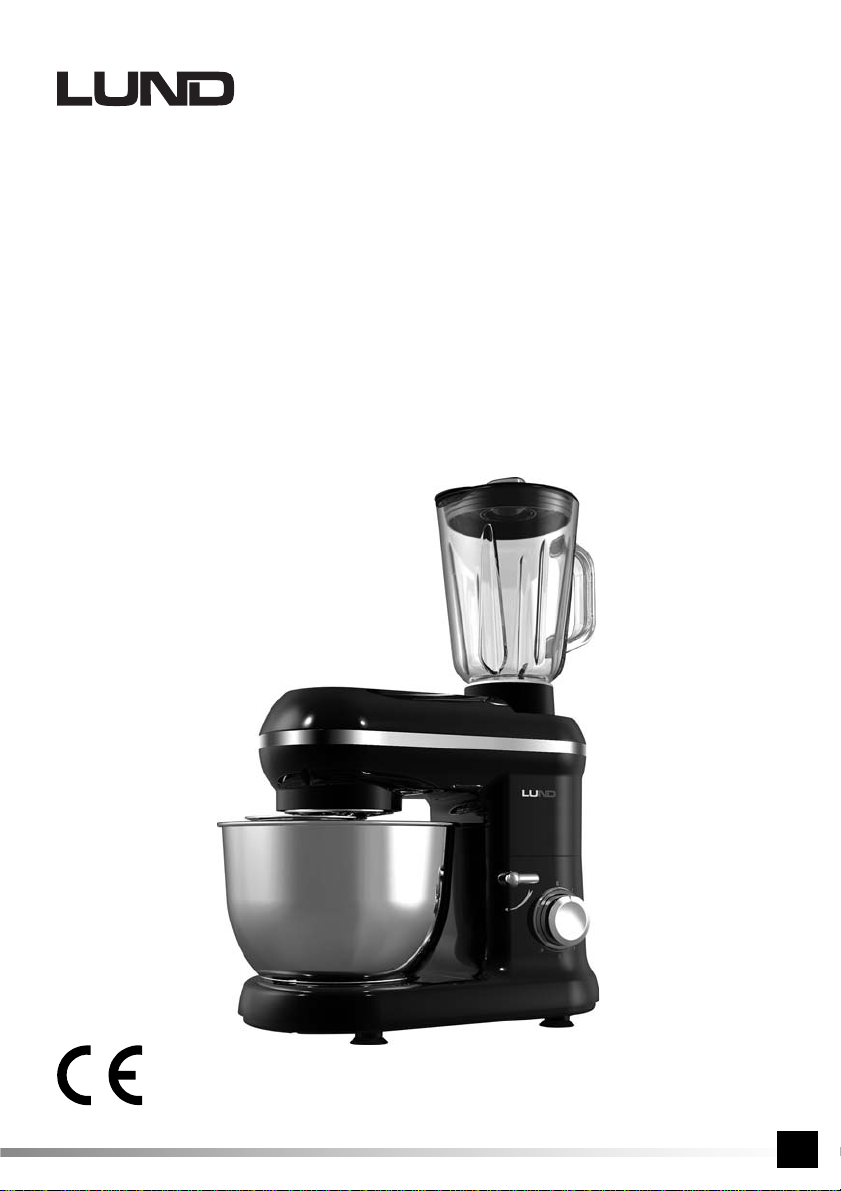
Dzięki wymiennym końcówkom mikser można wykorzystaćdo mieszania różnych produktów spożywczych.
Mieszadło do ciast służy do mieszania składników na masy o średniej gęstości (np. ciasto drożdżowe), zaleca sięstosować
nastawy włącznika z zakresu 1 – 2 podczas pracy tąkońcówką.
Mieszadło do ubijania służy do mieszania składników na masy o niewielkiej gęstości (np. ciasto biszkoptowe, ciasto naleśnikowe),
zaleca sięstosowaćnastawy włącznika z zakresu 1 – 4 podczas pracy tąkońcówką.
Mieszadło do trzepania służy do ubijania piany i bitej śmietany, zaleca sięstosowaćnastawy włącznika z zakresu 5 – 6 podczas
pracy tąkońcówką.
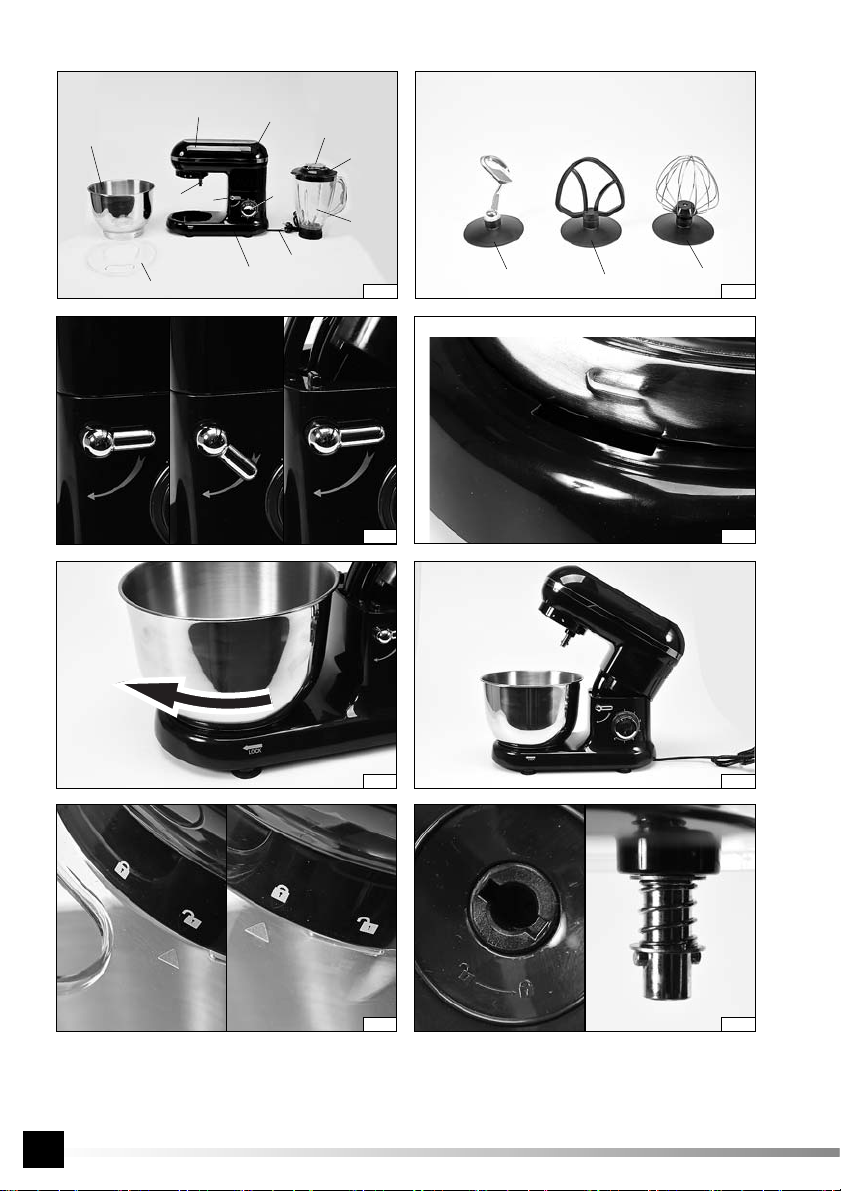
Zaleca sięstopniowo zwiększaćprędkość obrotowąkońcówki, pozwoli to uniknąć nadmiernego rozchlapywania mieszanych
składników. Pokrywa misy posiada otwór dzięki któremu można dorzucaćkolejne składniki bez podnoszenia głowicy miksera.
Nie należy przekraczaćmaksymalnego czasu pracy urządzenia 6 minut. Dłuższy czas pracy może doprowadzićdo przegrzania i
nieodwracalnego uszkodzenia urządzenia.
Urządzenie posiada wyłączniki bezpieczeństwa, które nie pozwalająna uruchomienie urządzenia przy podniesionej głowicy lub
przy niepoprawnie zamontowanym blenderze lub pokrywie gniazda blendera. Pozawala to zminimalizowaćryzyko kontaktu użyt-
kownika z ruchomymi częściami urządzenia. Należy jednak wziąć pod uwagę, że po wyłączeniu silnika części ruchome mogą
wirowaćjeszcze przez jakiśczas.
Nie należy przekraczaćpojemności maksymalnej misy i dzbanka, należy teżwziąć pod uwagę, że składniki podczas mieszania z
powietrzem mogązwiększyćswojąobjętość. Zaleca sięprzygotowywaćkilka mniejszych porcji, zamiast jednej dużej.
UWAGA! Podczas używania blendera należy unikaćkontaktu jakiejkolwiek części ciała z ostrzami. Zabroniony jest teżkontakt
jakichkolwiek przedmiotów z ostrzami. Może to prowadzićdo powstania poważnych obrażeń.
Podczas używania blendera należy składniki wrzucaćdo dzbanka przez otwór w pokrywie, pozwoli to zminimalizowaćrozchla-
pywanie zawartości dzbanka. Zaleca sięnie przekraczaćobjętości 1,2 litra, co pozwoli uniknąć nadmiernego rozchlapywania
zawartości dzbanka.
W przypadku dużych składników należy je podzielićna mniejsze porcje, a jeżeli nie jest to możliwe, należy włożyćje do dzbanka
przed uruchomieniem urządzenia, następnie zamontowaćpokrywęi dopiero uruchomićurządzenie. Nie należy demontować
pokrywy dzbanka podczas pracy blendera.
Blendera nie należy używaćdo kruszenia lodu lub zmrożonej żywności. Nie zaleca sięużywaćblendera dłużej niż3 minuty.
Temperatura składników umieszczanych w dzbanku nie może byćwyższa niż80 st. C
KONSERWACJA I PRZECHOWYWANIE
UWAGA! Nigdy nie zanurzaćobudowy i głowicy w wodzie ani innym płynie. Może to grozićporażeniem elektrycznym.
Części które nadająsiędo zanurzenia to: misa, pokrywa misy, wszystkie mieszadła, pokrywa i zatyczka pokrywy dzbanka. Dzba-
nek nie posiada demontowanej podstawy, z tego względudDo wnętrza dzbanka można wlaćwodę, ale nie należy go w całości
zanurzaćw wodzie.
Po zakończeniu używania należy wyłączyćurządzenie, odczekaćdo całkowitego zatrzymania obrotów części ruchomych, odłą-
czyćwtyczkękabla zasilającego od gniazdka sieciowego, zdemontowaćurządzenie, misęlub dzbanek opróżnićz zawartości, a
następnie przystąpićdo konserwacji.
Części urządzenia które miały kontakt z żywnością, należy oczyścićzaraz po użyciu. Zaschnięte resztki żywności mogązakleić
mieszadła i ostrza, co może doprowadzićdo spadku wydajności urządzenia lub nawet jego uszkodzenia. Jeżeli jednak dojdzie
do takiego przypadku należy zanurzyćte części, które zostały opisane jako możliwe do zanurzenia w ciepłej wodzie z dodatkiem
płynu do mycia naczyńi pozostawićdo odmoczenia, a następnie oczyścićza pomocąmiękkiej gąbki lub szczotki oraz wody z pły-
nem do mycia naczyń. Żadna z części urządzenia nie nadaje siędo mycia w zmywarkach mechanicznych. Może to doprowadzić
do utraty kształtu, koloru, faktury materiałów z których zostały wykonane.
Obudowęurządzenia oraz zewnętrzne powierzchnie dzbanka wyczyścićza pomocąmiękkiej tkaniny zwilżonej roztworem wody i
łagodnego środka czyszczącego. Powycieraćdo sucha. Nie stosowaćściernych środków czyszczących.
UWAGA! Ze względu na ostre krawędzie ostrzy blendera należy unikaćkontaktu dłoni z ostrzami podczas mycia. Ostrza mogą
przeciąć zarówno skóręjak i rękawice kuchenne wykonane z tworzywa sztucznego. Ostrza należy myćza pomocąszczotki lub
gąbki.

INSTRUKCJA ORYGINALNA
8
PL
Przed podłączeniem urządzenia do zasilania należy sięupewnić, że wszystkie części zostały wyczyszczone i osuszone. Produkt
przechowywaćw suchych miejscach i zacienionych. Chronićmiejsce przechowywania przed dostępem osób niepożądanych,
zwłaszcza dzieci. Produkt przechowywaćw opakowaniach jednostkowych dostarczonych wraz z produktem.
PARAMETRY TECHNICZNE
Parametr Jednostka miary Wartość
Numer katalogowy 67810
Napięcie znamionowe [V] ~230
Częstotliwość znamionowa [Hz] 50
Moc znamionowa [W] 1000
Moc maksymalna [W] 1500
Klasa ochronności elektrycznej II
Rodzaj pracy: dorywcza S2 (KB) [min] 6
Pojemność misy [l] 4,5
Pojemność dzbanka [l] 1,5
Wymiary zewnętrzne urządzenia gotowego do pracy jako mikser (szer. x gł. x wys.) [mm] 375 x 225 x 315
Wymiary zewnętrzne urządzenia gotowego do pracy jako blender (szer. x gł. x wys.) [mm] 315 x 175 x 540
Masa [kg] 4

9
GB
ORIGINAL INSTRUCTIONS
DEVICE SPECIFICATION
Planetary mixer is used for food preparation. Due to the extensive range of accessories is possible to prepare many different
dishes. Stable base with suction cups and device versatility makes that the mixer will be helpful in every household. The product
has been designed exclusively for domestic use and is not designed for use in commercial applications. Correct, reliable, and safe
operation of the tool is dependent on its proper use, therefore:
before you start working with the product, you should read all the instruction and keep it around.
For any damage caused by failure to comply with safety regulations and instructions of this manual, the supplier is not respon-
sible.
EQUIPMENT
The product is supplied in a complete state, but it requires assembly before its use. Along with the mixer there are supplied bowl
with the cover, three mixer tips, jug blender with cover.
Assembly is required before use of the product.
SAFETY INSTRUCTIONS
ATTENTION! Read all the instructions below. Failure to comply with them can lead to electrical shock, fire or personal injury.
FOLLOW THE FOLLOWING INSTRUCTIONS
Do not use the device in an environment of increased risk of explosion, which is containing flammable liquids, gases, or vapours.
Set the device on a flat, even and hard surfaces, if the device is equipped with rubber feet or suction cups, select such type of
surface, that these suctions cups or feet would prevent the travelling of the device during its operation.
Do not place the device near sources of heat or fire.
Connect the unit only to the mains of voltage and frequency shown on the rating plate of the device.
Power cord plug must fit into the wall outlet. It is forbidden to modify the plug. Do not use any adapters in order to adapt the plug
to the outlet. The unmodified plug, which fits the outlet, reduces the risk of electric shock.
After each use, you should disconnect the power cord plug from a mains outlet.
Avoid contact with earthed surfaces such as pipes, radiators and refrigerators. The earthing of body increases the risk of electric shock.
The device designed for indoors operation only. Do not expose the device to humidity or precipitation. Water and moisture , which
get inside the device increases the risk of electric shock. Do not immerse the device in water or any other liquid.
Do not cover the ventilation holes and take care of their patency.
Do not overload power cable. It is forbiddent to use the power cord to carry out, connect and disconnect the plug from wall outlet.
Avoid contact of the supply cord with heat, oil, sharp edges and moving parts. Damaged cable increases the risk of an electric
shock. In the event of damage to the power cord (for example, the cutting, melting of insulation), you should immediately discon-
nect the plug from the wall outlet, and then pass the product to the authorized repairing service. It is forbidden to use the device
with a damaged hose. It is prohibited to repair the power cable, the cable must be replaced with a new one at the authorized
service point. In the case of the use of extension cords, extension cords should be used with such power supply parameters as
these shown on the nameplate of the appliance. Cross section of the extension cable wires should be not smaller than the cross
section of the wires of device power cord. It is necessary to check the insulation of power cord and extension cord or ask the
manufacturer of the device and/or of the extension cord.
If you notice damage to any part of the equipment, its further use is forbidden. In this case, the device must be submitted to an
authorized service center, or you should replace that part independently, providing that the user manual allows for such corrective
action.
Before starting any activities, related to exchange, cleaning or adjustment of moving parts, you should set the device off and
disconnect the power plug from the mains outlet.
The appliance must not be used by children. The unit and its power cord should be kept away from children.
The device may be operated by persons with reduced physical and mental capabilities, and by persons who lack of experience
and knowledge of the appliance, if it is provided the supervision or instruction concerning the use of appliance in a safe way, so
that the associated risks would be understood. Children should not play with the device. Children without supervision should not
carry out the cleaning and maintenance of the device.
The device contains sharp parts (blender blade), caution should be exercised when installing, dismantling and cleaning of such parts.
The device designed for domestic operation only. The continuous operation time should not exceed 6 minutes, after which the device
should be left for approx. 20 minutes to cool down. After this time you should disconnect the power cord plug from a mains outlet.
OPERATION OF THE DEVICE
ATTENTION! During all operations related to assembly and disassembly, turn off the device and unplug it from the mains socket.

10
GB
ORIGINAL INSTRUCTIONS
Assembling and dismantling of the mixer
Put the mixer on a level and stable surface. Make sure that all the sucking cups at the base gripped the ground.
Press the lever (II) according to the arrow direction, this lever releases the latch of working head and causes it to lift. The head will
rise automatically by a spring, but it should be raised manually to the end and you should make sure that the lock of upper position
of mixer head worked properly. It is not possible to lower the head without pressing the lever again.
In the base hole you should install the bowl. Enter the bowl base protrusions to the cavities located at the periphery of the base
hole (III), and then rotate the bowl in accordance with the direction indicated by arrow placed in the base (IV). This will block the
bowl at the base of mixer. Check for correctness of assembly, if the bowl is fixed evenly and it is not possible to raise it, this means
proper installation (V).
Around the mixer handle tip you should install the bowl cover. Put the head cover so that the arrow, which is visible on the cover,
points to the open padlock symbol on mixer head (VI). Make sure that the cover evenly adheres to the head and turn it, so that
the arrow points to a closed padlock icon (VI).
At the end of the spindle you should install the appropriate tip. The spindle protrusions must cover the cavities around the tip hole
(VII). Push the tip upwards and turn it toward the closed padlock symbol shown in the upper part of the tip flange (VIII).
Press the lever and lower the mixer head, the device is ready for operation (IX).
Disassembly should be done in reverse order to the assembly procedure.
Assembling and dismantling of the blender
ATTENTION! Because when you use a blender, the device also starts the mixer, before you start assembling the blender, you
should install the mixer bowl with its cover. It is not necessary to mount the tip. This will protect the mixer spindle when using the
blender and reduce the risk of injury by the rotating spindle.
Put the mixer on a level and stable surface. Make sure that all the sucking cups at the base gripped the ground. Make sure that
the head is locked in the lower position.
Remove the cover of blender socket by pressing lightly and holding it at the point marked with a triangle, and then pull the cover
outside the mixer housing (X). Put the blender jug on assembly socket and after finding the position, in which the base of the jug
will be evenly adhered to the mounting socket, then the jug should be turned in the direction of the arrow described by “CLOSE”
(XI). This will allow to lock the jug in the installation slot. To ensure that installation is performed correctly you should check that
the jug is evenly adjacent to the mixer housing and that it is not possible to lift it.
Because there are four possible positions in which you can mount the jar blender, should be guided by the position of the handle
jug. Choose them so that it will be not necessary to reach behind the device when catching the jug handle.
The jug has cover with a seal and hole with a separate plug. The cover should be pressed, then you should verify that it evenly
adheres to the jug edge (XII). The cover has a rounded protrusion which shape has been adjusted for covering of the jug outflow.
This prevents splashing the contents of the blender during its operation.
The plug must be inserted so that the protrusions on its perimeter match the cavities located on the cover hole, and then turn it
clockwise. The plug disassembly should be carried out in reverse order.
The plug allows to supplement the content of the blender without interrupting itswork and minimizes splashing of the jug content.
The plug can also be used as a small kitchen gauge.
ATTENTION! When the blender is mounted, do not lift the mixer head. The weight of the jug can overturn the entire device, can
also cause the pouring out jug contents, jug breakage, and increase the risk of injury.
Removing the jug blender should be carried out in the reverse order of the installation procedure.
Operation of the device
ATTENTION! Before the first using of appliance, you should thoroughly wash and dry all the parts which would contact with food.
You must first learn the method of device maintenance.
ATTENTION! It is forbidden to use simultaneously the mixer bowl and blender jug. Such a situation can lead to overheating of the
device and its irreversible damage.
The device has a switch that allows you to set some several rotational speeds and the turbo run. By setting the switch to the de-
sired position you can determine the rotation speed of mixer and blender. The turbo position allows to use the maximum rotational
speed. To use it, turn the control switch and hold it in position described as “Turbo”. After releasing the pressure, the switch will
automatically return to “0” position, and device will shut down the engine speed. The modes described as 0 - 6 do not require the
switch to be hold.
ATTENTION! Before inserting the plug, make sure that the control switch is in the “0” position - switched off.
After connecting the power cord to a mains outlet, when the device is set to “0”, the indicator lamp, which is placed around the
power switch, lights by pulsed light. Any other setting the range 1-6 and the “Turbo” makes that the indicator lamp lights up by
steady light.

11
GB
ORIGINAL INSTRUCTIONS
Due to the exchangable tips, the mixer can be used to mix different food products.
The stirrer for dough is used for mixing the components for masses of medium density (for example yeast dough), it is recom-
mended to use the switch settings ranged from 1 - 2 while working this tip.
The stirrer for tamping is used for mixing the components for masses of low density (for example biscuit dough, batter) it is recom-
mended to use the switch settings ranged from 1 - 4 while working this tip.
Stirrer to shaking is used to shake the foam and for whipped cream making, it is recommended to use the switch settings ranged
from 5 - 6 while working this tip.
It is recommended to gradually increase the rotational speed of the tip, this will allow to avoid excessive splashing of mixed ingre-
dients. Cover the bowl has a hole through which you can throw further components without raising the mixer head. Do not exceed
the maximum operating time of 6 minutes. Longer operating time can lead to overheating and irreparable damage of the device.
The device has safety switches, which do not allow you to start the device with raised head or when the blender is incorrectly
mounted, or the cover of blender socket is incorrectly mounted. This allows to minimize the risk of the user’s contact with moving
parts of the device. You should, however, take into consideration that when you turn off the engine some elements can swirl yet
for some time.
Do not exceed the maximum capacity of the bowl and jug, it must also be taken into consideration that the ingredients during the
mixing with air may increase in their volume. It is advisable to prepare several smaller portions instead of one large.
ATTENTION! When using the blender you should avoid the contact of any body part with the blades. It is forbidden to touch any
objects with the blades. This can lead to a serious injury.
When using the blender, you should throw the ingredients into jug through the hole in cover, it will minimize splashing the contents
of jug. It is recommended to not exceed a volume of 1.2 liters, this will allow to avoid the excessive splashing of jug contents.
In the case of large components, they should be divided into smaller portions, and this is not possible, you should put them in the
pot before starting the device, then install the cover, and only after that you should start the machine. Do not remove the jug cover
while the blender is working.
Do not use the blender for crushing ice or frozen food. It is not recommended to use the blender for more than 3 minutes.
The temperature of the ingredients, that are placed in a jug, can not be higher than 80 degrees C.
MAINTENANCE AND STORAGE
ATTENTION! Never immerse the housing and head in water or any other liquid. This may cause an electric shock.
Parts which are suitable for immersion include a bowl, bowl cover, all stirrers, the cover and plug of jug cover. The jug does not
have a removable base, because of that you can pour the water to the jug interior, but not completely immerse it in the water.
After you have finish the device operation, turn it off, wait until the complete stop of rotation movable components, disconnect the
power cord from the wall outlet, dismount the device, empty the content of bowl or jug, and then proceed to maintenance.
Parts of the equipment which have been in contact with food must be cleaned immediately after the use of device. Dried food resi-
dues can clod the stirrer and blades, which could lead to a decrease in the performance of the device or even its failure. However,
when it comes to such a case, you must immerse these parts, which have been described as possible to be immersed, in warm
water with dishwashing liquid and leave them till they soak out, then clean them with a soft sponge and water with dishwashing
liquid. None of the device parts is suitable for washing in a dishwasher. This may lead to the loss of shape, color, texture of the
materials from which they are made.
Clean the device housing and jug external surfaces with a soft cloth, moistened with solution of water and mild cleanser. Wipe it
dry. Do not use abrasive cleaning agents.
ATTENTION! Due to the sharp edges of blender blades you should hand avoid hand contact with this blades during washing. The
blade can cut through the skin and the kitchen gloves made out of plastic as well. The blades should be cleaned using a brush
or sponge.
Before connecting the device to the power supply, make sure that all parts have been cleaned and drained. Store the product in
dry and shaded places. Protect the storage from undesirable individuals, especially from the children. Store the product in small
single unit packs supplied with the product.
TECHNICAL PARAMETERS
Parameter Unit Value
Catalog number 67810
Rated voltage [V] 230 AC
Rated frequency [Hz] 50
Rated power [W] 1000
Max. power [W] 1500
Electric protection class II

12
GB
ORIGINAL INSTRUCTIONS
Parameter Unit Value
Mode of operation: occasional S2 (KB) [min] 6
Bowl capacity [l] 4.5
Jug capacity [l] 1.5
External dimensions of the device which is ready for operation as a mixer (width x depth x heigth) [mm] 375 x 225 x 315
External dimensions of the device which is ready for operation as a blender (width x depth x heigth) [mm] 315 x 175 x 540
Weight [kg] 4
Table of contents
Languages:
Other Lund Mixer manuals
Popular Mixer manuals by other brands

Sunbeam
Sunbeam MXM5000 user guide

OSTBA
OSTBA FM101 user manual

Vicko
Vicko KL-223B instruction manual

KitchenAid
KitchenAid 5K45 Series use and care manual

Cuisinart
Cuisinart Precision Master SM-50BCC INSTRUCTION AND RECIPE BOOKLET

Faggiolati Pumps
Faggiolati Pumps GM Series Instructions for installation and use