Lutema HELIGRAM MIT24CSHB User manual

PLEASE READ ALL OPERATING INSTRUCTIONS BEFORE USING

Please keep this instrucon manual for future reference.
1. Specificaons:
・Length: 9.2”
・ Width: 2.25”
・ Height: 4.23”
2. Electrical Specificaons:
・Helicopter: 1 lithium baery 3,7 volts 200 mAh
・ Remote Control: 4 baeries of 1,5 Vcc AA (Not Included)
・Helicopter
・ Remote Control
・ Charger
・ Soware
・ Instrucon Manual
・ Replacement Blades
3. This product has high stability due to advanced gyroscope technology.
・We recommend fully charging the baery before first flight.
1. Introducon
2. Your Package Includes
Addional part sold separately
www.Lutema.com
PLEASE READ ALL OPERATING INSTRUCTIONS BEFORE USING

1. Read the instrucons carefully before operang. Please follow these instrucons when using your
equipment.
2. Keep small parts away from young children to avoid risk of suffocaon.
3. Do not expose baeries to heat or fire.
4. Posion yourself five to ten feet away from the helicopter in flight. Make sure the helicopter does
not come in contact with the face, head or body of any person or animal.
5. Do not modify the product without supervision, damage may be beyond repair.
6. Keep the helicopter in line of sight for beer control.
7. For the safety of your children, adult supervision is recommended.
Attention:
Do not touch any moving
parts (propellers, engine,
gears, etc); this can cause
severe damage.
Do not touch the engine
during or after using the
helicopter since there is
high risk of burn.
This product has Gyroscope technology which is acvated every me you turn on the product. It is
necessary to consider the following:
1. Turn the remote “ON” and make sure that the throle sck is completely down.
2. Move the switch on the helicopter to the “ON” posion and place the unit on a flat surface
for 5 seconds this will allow the gyroscope technology to be calibrated before flying.
3. Safety Precauons
4. Descripon of Remote Control
Remote Control **Requires 4 x AA Baeries (Not included)
Sound volume
(High/medium/low)
DEMO
Funcon
Light
Switch
Le
Trim Right
Trim
High / Low speed
Buon Start
ON / OFF
Sound of shoong and launching missiles
Music Switch
1. Silent mode
2. Simulated flight
3. Flight with music
Direconal
Sck
USB Charging
Port
Throle Sck
(Ascend / Descend)

To charge the baery of the helicopter:
1. Turn the switch on the helicopter “ON”
2. Connect the baery charger.
1. Make sure the charger is connected to the outlet.
2. The baery can be damaged by overheang or over charging, please disconnect if the charger
is overheang.
3. The charger has an advanced and specific funconing system. For safety do not use other
chargers.
4. Recharge the baery of the helicopter aer 30 minutes of last flight. The baery becomes
hot aer flying, charging immediately aer usage may cause damage it.
5. For safety do not place the baery near heat sources that may cause short circuit.
6. for security prevent contact of the baery terminals with metal parts as it could cause
a short circuit
1) Fly under the best weather condions.
1. Never fly under extreme temperatures:
a. Do not fly if over 113 °F/45 °C or under 50 °F/10 °C. Flying under extreme
temperatures can impede performance and damage the product.
2. Do not fly in strong windy condions as wind will impede control of the helicopter. The wind
may cause loss of control, damage the product and may cause injury.
2) Choose an open area to fly the helicopter. Make sure there are no obstrucons, animals or
objects close to the flying area.
5. Charging the Baery (Helicopter)
6. Flight Environment and Locaon
Cauon:
Over 2.5 meters
Over 3 meters
Over 3 meters
Over 3 meters
Over 2 meters
While the helicopter is charging, make sure that the switch is in the ON posion

To learn how to maneuver the helicopter, start with the basics. Difficult maneuvers are the combinaon
of simpler maneuvers.
Push the throle sck forward to li the helicopter off the ground, pull it gently unl it lands.
Do not make sudden movements. Connue to pracce li-off to higher altudes unl you are
comfortable with the controls.
Step 1 - Horizontal Flight:
Raise the flying height of your helicopter around five feet. Maintain height for a few seconds,
then press the direconal sck to the sides; this will cause the helicopter to turn.
if you noce that you start to lose control of the helicopter, move the direconal sck to its
original posion. A fall in this posion is safer and will most likely prevent damage.
Step 2 - Direconal Flight:
Slowly raise the helicopter to five feet, maintain height for a few seconds. Then push the
direconal sck forward to produce forward movement, the helicopter should move forward easily.
Release it to stop forward moon. This procedure is similar for reverse flight.
Step 3 - Forward Flight:
When the helicopter is maintained at a height of approximately 8” it may suffer from a
“VORTEX effect” and lose stability.
Aenon:
Descripon
7. Flight Control
Descripon
Up and
Down
Turn
Forward
MiniUSB charging port
MiniUSB port for
computer connection

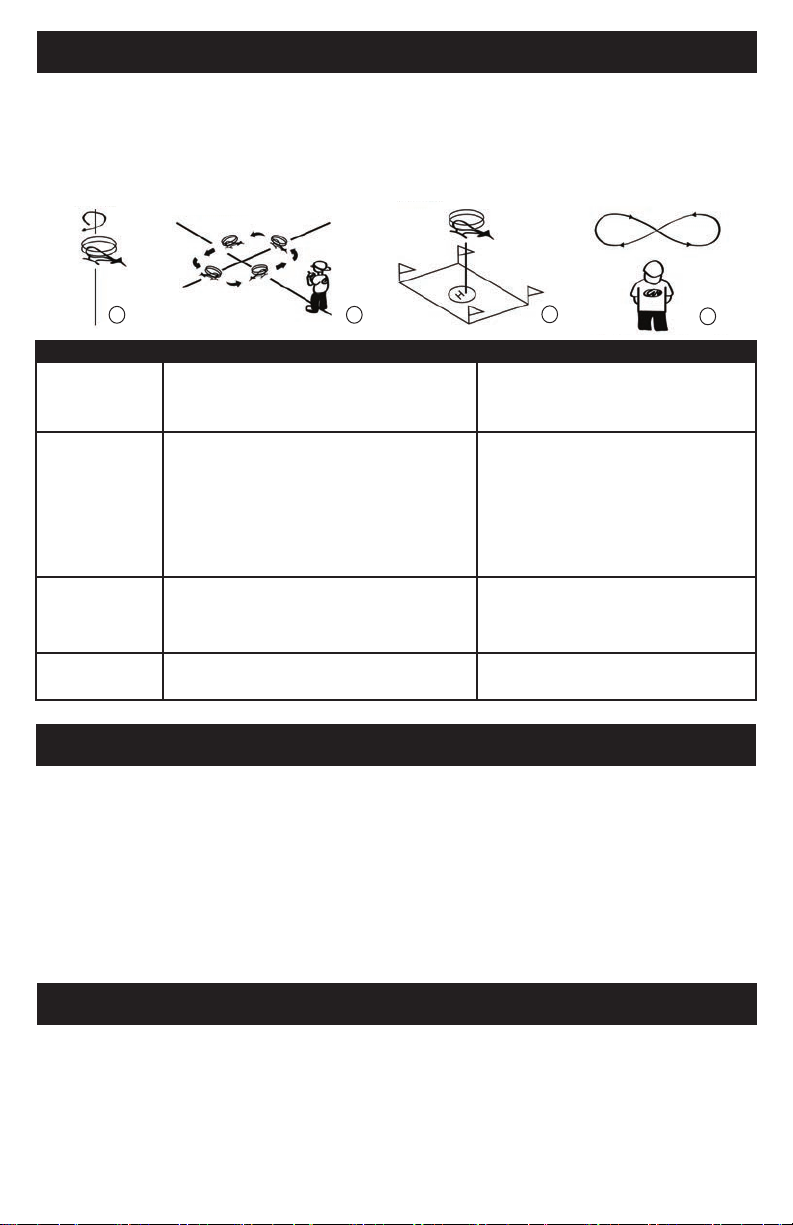
Aer praccing the previous procedures, you can aempt to follow the below flying paerns.
a. Revolve the helicopter around a fixed point.
b. Go forward and turn le unl you complete a rectangle.
c. Landing at a fixed point.
d. Fly in a figure 8 paern.
8. Pracce Flight
1. If the baery of the controller is low, the flying distance will shorten and the helicopter will have
limited elevaon and will maneuver slowly.
2. In case the helicopter will not be used for a long period of me, please remove the baery from the
remote control to prevent damage.
3. In case the helicopter suffers damage or alteraons, go to a local technician. If the propeller shows
signs of wear or damage avoid flying. A damaged propeller may cause accidents.
4. Before flying, always press the “ON” buon on the remote control before turning the helicopter’s
power switch “ON”.
5. Aer flying, turn “OFF” the switch on the remote control, then turn “OFF” the switch on the
helicopter.
9. Precauons
1. Clean the helicopter with a clean and slightly damped cloth.
2. Do not expose to direct sunlight or excessive heat.
3. Do not submerge equipment in water.
4. Turn the power “OFF” on the remote control and helicopter when not un use.
5. Remove the baeries from the remote control if storing the unit for a long period of me.
6. Use brand new alkaline baeries for best results.
7. Check the equipment regularly for damage or loose parts that may cause injury.
10. Maintenance
a b cd
・The power may be in the “OFF”posion .
・Baeries may be installed incorrectly.
・Baeries may be drained.
・Push the power buon to “ON”.
・Check that baeries are correctly installed.
・Recharge or replace baeries.
The remote control
is not responding.
PROBLEM CAUSE SOLUTION
・The power switch may be in the “OFF” posion.
・The antenna is damaged.
・There are strong winds prevenng controllable
movement.
・ The unit is not synced with the remote control.
・Turn the power switch to “ON”.
・Double check that the antenna is visible
and aached.
・Do not fly under strong currents of wind.
・Descend the helicopter and replace
baeries and /or resynchronize the
control with the unit.
The helicopter is
not responding.
・The propeller is turning too slowly.
・The baery on the helicopter has drained.
・Press the Throle sck forward further.
・Recharge the internal baery on the
helicopter unit.
Helicopter will not
elevate or fly
properly.
・The throle sck on the controller descended
suddenly.
・When landing, lower the throle sck
on the controller very gently.
Forced landing.

12. Soware Procedure
Connected Disconnected
11. How to edit the flashing characters and download the Soware
Lutema
1. Plug the MiniUSB cable into the helicopter and computer.
2. Insert the Heligram CD in the computer’s disk drive.
3. Open the CD, double click on
Computer - Helicopter
Connecon Status
2. Choose the opening
and closing mode.
1. Input text.
3. Preview the edited
flashing characters
to be shown on the
helicopter.
4. Upload the edited
characters data to the
helicopter.
While operang the helicopter, the flashing character can be displayed on the rotang blade.
Soware
Lutema
You can Copy the folder from the
CD to the computer.
Double click on so you can edit the
flashing text from your computer without
runing the soware from the CD.

This manual suits for next models
1
Table of contents
Other Lutema Toy manuals
Popular Toy manuals by other brands

TechOne Hobby
TechOne Hobby Slider instructions

Faller
Faller BLACK FOREST MILL quick start guide

USA Trains
USA Trains WOODSIDED CABOOSE instructions

Clancy Aviation
Clancy Aviation speedy bee Instructions for assembly

JK Models
JK Models Thunderbolt Engine Sbach 342 build book

LEGO
LEGO Nexo Nights 70321 Assemble Instruction