LUXBIRD LB-2SC User manual

尺寸:95mm*170mm
类型:骑马订
Temperature
LB-2SC
Manual
Controller
P1
P2
WORK1
WORK2


INTRODUCTION
OPERATING INSTRUCTIONS
Contents
01
02
Features 1
Technical Parameters 1
Product Layout 2
CAUTION 1
Factory Reset 3
Quick Query of The Start Heating Temperature 4
Quick Setup of The ControllingTemperature 5
Temperature Unit Setting 6
Start Heating Temperature of P1 (ST1) 7
Stop Heating Temperature of P1 (SP1) 8
Technical Assistance and Warranty 17
Temperature Display 16
Turn On/Off The Buzzer Sound Manually (ALM) 15
The Setting of The P2 Calibration Value (CA2) 15
Low Temperature Alarm of P2 (AL2) 14
High Temperature Alarm of P2 (AH2) 13
Stop Heating Temperature of P2 (SP2) 12
11
Start Heating Temperature of P2 (ST2)
The Setting of The P1 Calibration Value (CA1) 10
Low Temperature Alarm of P1 (AL1) 9
High Temperature Alarm of P1 (AH1) 9

KEEP CHILDREN AWAY
TO REDUCE THE RISK OF ELECTRIC SHOCK, USE ONLY
INDOORS
DO NOT PLUG INTO ANOTHER RELOCATABLE POWER
TAPS OR AN EXTENSION CORD
USE ONLY IN DRY LOCATION
CAUTION
Features
INTRODUCTION
Technical Parameters
Plug-n-Play, easy to use.
Dual relay control, controls two sets of outputs. Users
can set different target temperatures according to
different environments.
Supports both Celsius and Fahrenheit units.
LCD display, displays the testingtemperature, the
target temperature and the output state.
Supports temperature calibration.
Supports high/low temperature limit alarm.
Supports probe abnormal alarm.
Power
Input: 100~240Vac 50/60Hz
Output: 100~240Vac 50/60Hz 500W Max
Probe Type: R25℃=10KΩ±1% R0℃=26.74~27.83KΩ
B25/85℃=3435K±1%
Temperature Control Range: 0.0℃~45.0℃/32.0℉~113℉
Power
Probe Type: R25℃=10KΩ±1% R0℃=26.74~27.83KΩ
B25/85℃=3435K±1%
Temperature Control Range: 0.0℃~45.0℃/32.0℉~113℉
-1-

Temperature Measurement Range: -5.0℃~50.0℃
/23.0℉~122℉
Temperature Display Accuracy: 0.1℃/℉ (T<100℃/℉),
1℃/℉ (≥100℃/℉)
Temperature Measurement Accuracy: ±1℃/±2℉
Temperature Unit: Celsius ℃ or Fahrenheit ℉
Operating Ambient Temperature: -20℃~60℃/-4℉~140℉
Storage Environment:
-temperature range: 0℃~60℃/32℉~140℉
-humidity range: 20~80%RH (not frozen or condensa-
tion)
Warranty: 2 years for the controller and 1 year for the
probes
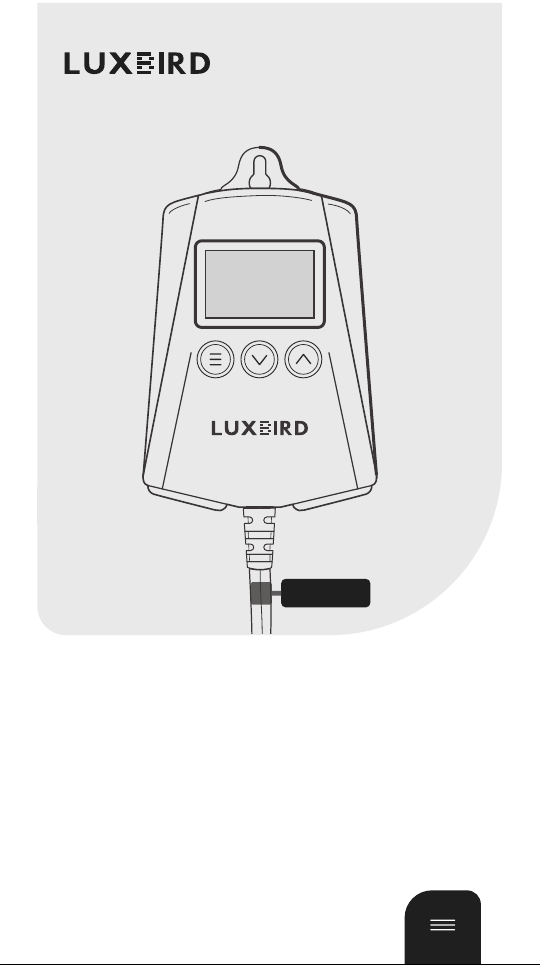
Product Layout
P1
P2
WORK1
WORK2
LCD: Display the Current Temperature, the WORK1 Stop
Heating Temperature, the Heating Indicator of WORK1, the
WORK2 Stop Heating Temperature, and the Heating Indica-
tor ofWORK2.
Probe
Interfaces
Buttons
WORK1/WORK2
Outputs
-2-

Unplug the controller, then holdand plug in the
power cord to reset the controller.
Display after the factory reset
Display before the factory reset
OPERATING INSTRUCTIONS
Factory Reset
Note: The buzzer will beep ashort sound to remind you
that all the parameters have been restored to the
default data.
-3-

Press again,the P2 SET TEMP. area will display
the start heating temperature 80.0℉.
Press ,the P1 SET TEMP. area will display the start
heating temperature 77.0℉.
The controller will return to normal display if there’s no
operation for 3 seconds, or you can press any button to
return to normal display manually.
For example, the start heating temperature of P1 is 77.0°F
and the stop heating temperature is 78.0°F; the start
heating temperature of P2 is 80.0°F, and the stop heating
temperature of P2 is 82.0°F. The device displays the stop
heating temperature of P1 and P2 by default.
Quick Query of The Start
Heating Temperature
-4-

Press once, then the P1 SET TEMP 77.0 (the start
heating temperature value) will flash.
Press or to adjust the stop heating temperature
value.
Press once,then the P2 SET TEMP80.0 (the start
heating temperature value) will flash.
Press or to adjust the start heating temperature
value.
Press once, then the P1 SET TEMP 78.0 (the stop
heating temperature value) will flash.
For example, the start heating temperature of P1 is 77.0°F
and the stop heating temperature is 78.0°F; the start
heating temperature of P2 is 80.0°F, and the stop heating
temperature of P2 is 82.0°F.
Quick Setup of The Controlling
Temperature
-5-
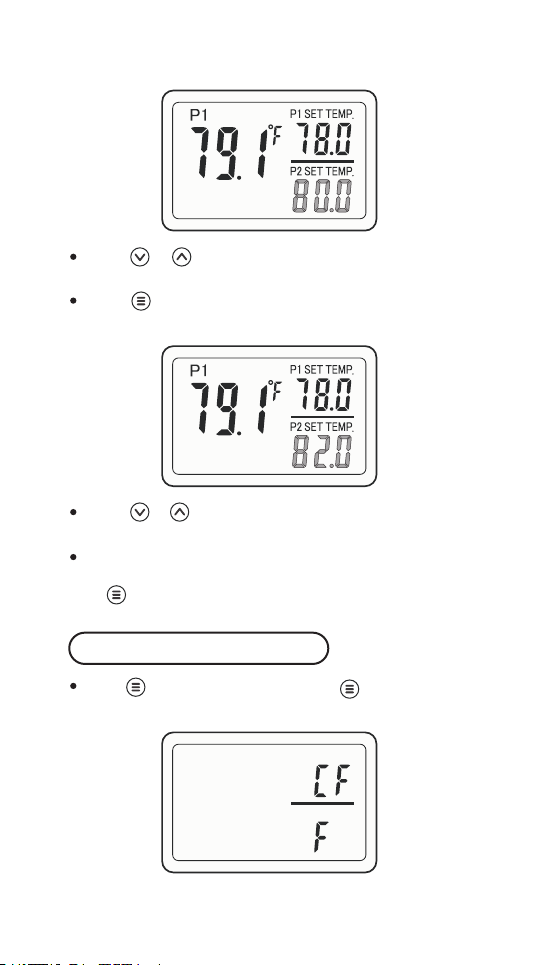
Press orto adjust the start heatingtemperature
value.
Press once,then the P2 SET TEMP 82.0 (the stop
heating temperature value) will flash.
Press or to adjust the stop heating temperature
value.
The controller will save the settings and exit automati-
cally if there’s no operation in 30 seconds, or you can
hold for 2 seconds to exit settings manually.
Holdfor 2 seconds and press once again to
enter the setting menu, then select CF.
Temperature Unit Setting
-6-
Table of contents
Popular Temperature Controllers manuals by other brands


SMC Networks
SMC Networks Thermo-con INR-244-639 Operation manual

eltherm
eltherm Ex-TC It Series operating instructions

Omron
Omron C200H-TV Series Operation manual

industrie technik
industrie technik CA1 instructions

KRAL
KRAL EET 32 operating instructions

dixell
dixell XR420C Installing and operating instructions