manuals.online logo
Brands
  1. Home
  2. •
  3. Brands
  4. •
  5. Luxi Electronics
  6. •
  7. Transmitter
  8. •
  9. Luxi Electronics THB-350 User manual

Luxi Electronics THB-350 User manual

Website: www.luxielectronics.com
Email: xlu@luxielectronics.com
Phone: +1 (949) 654-2047
Address: Irvine, CA, USA
Document name: THB-350 quick start guide Revision: 1.01 Date: 7/19/2017
Specifications are subject to change without notice
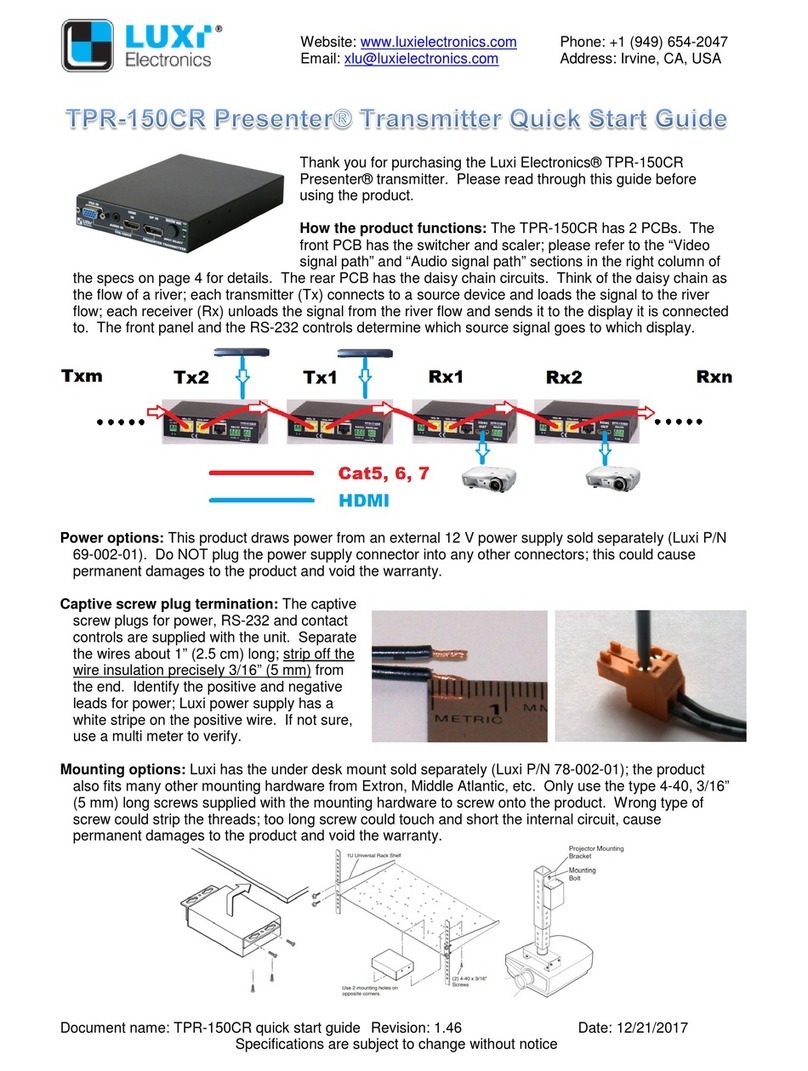
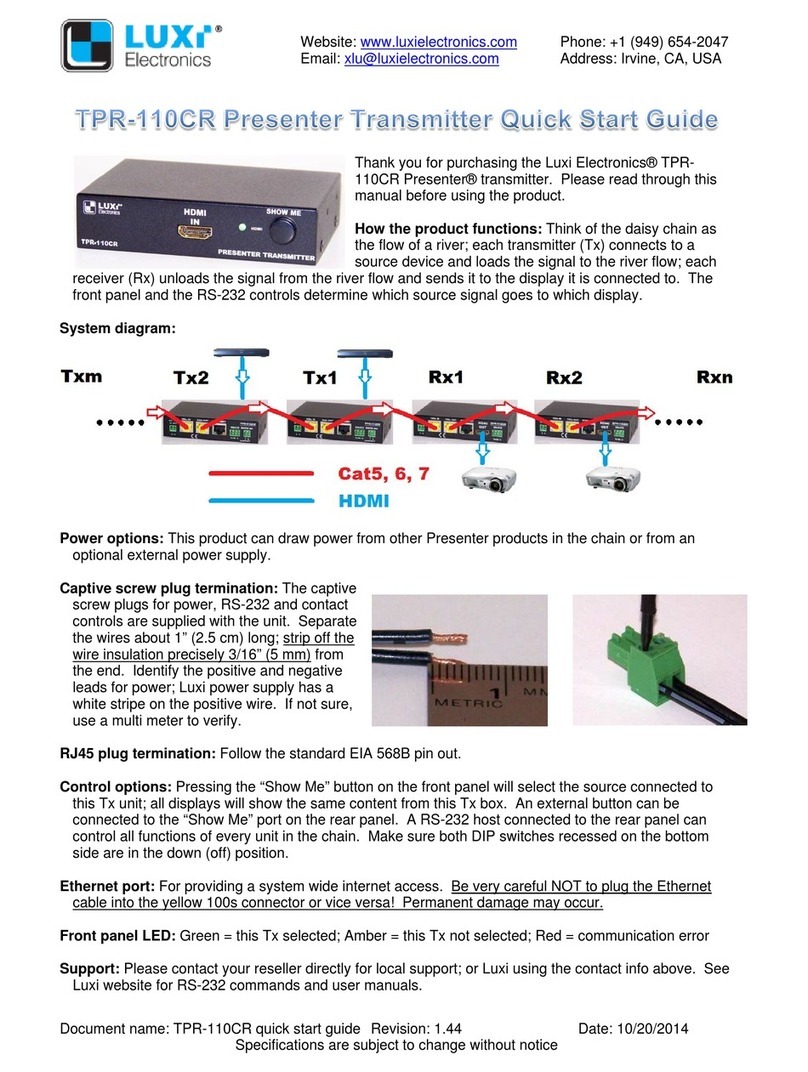
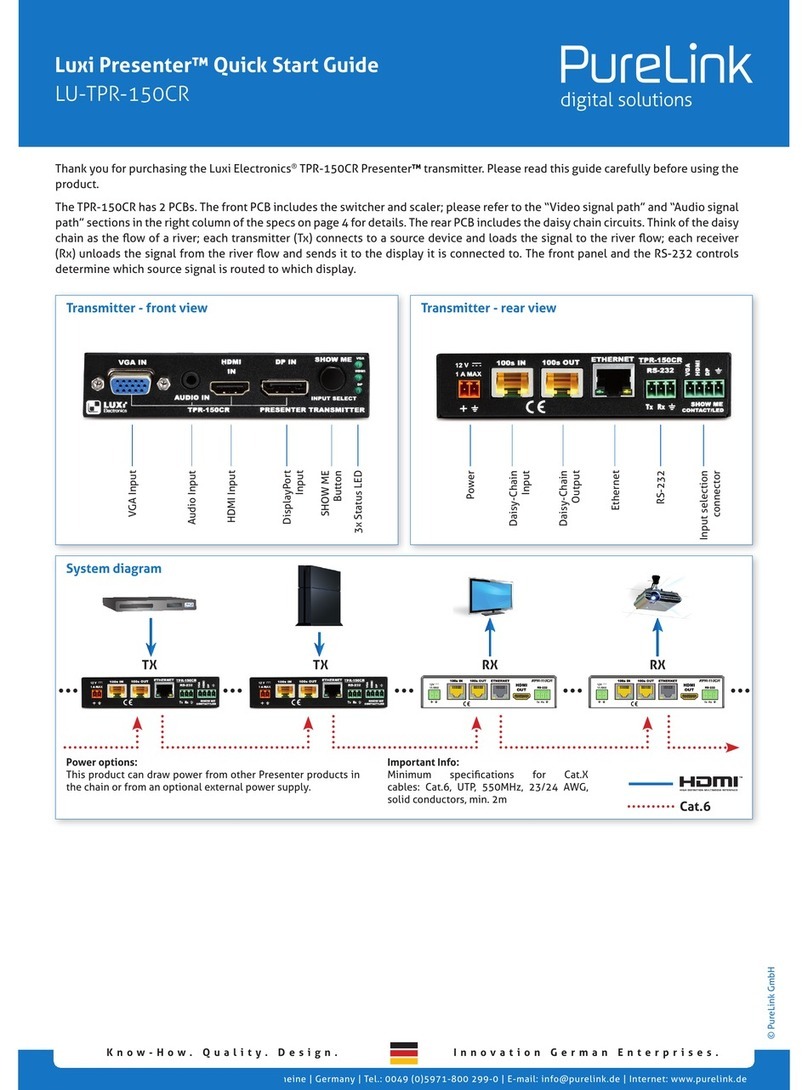
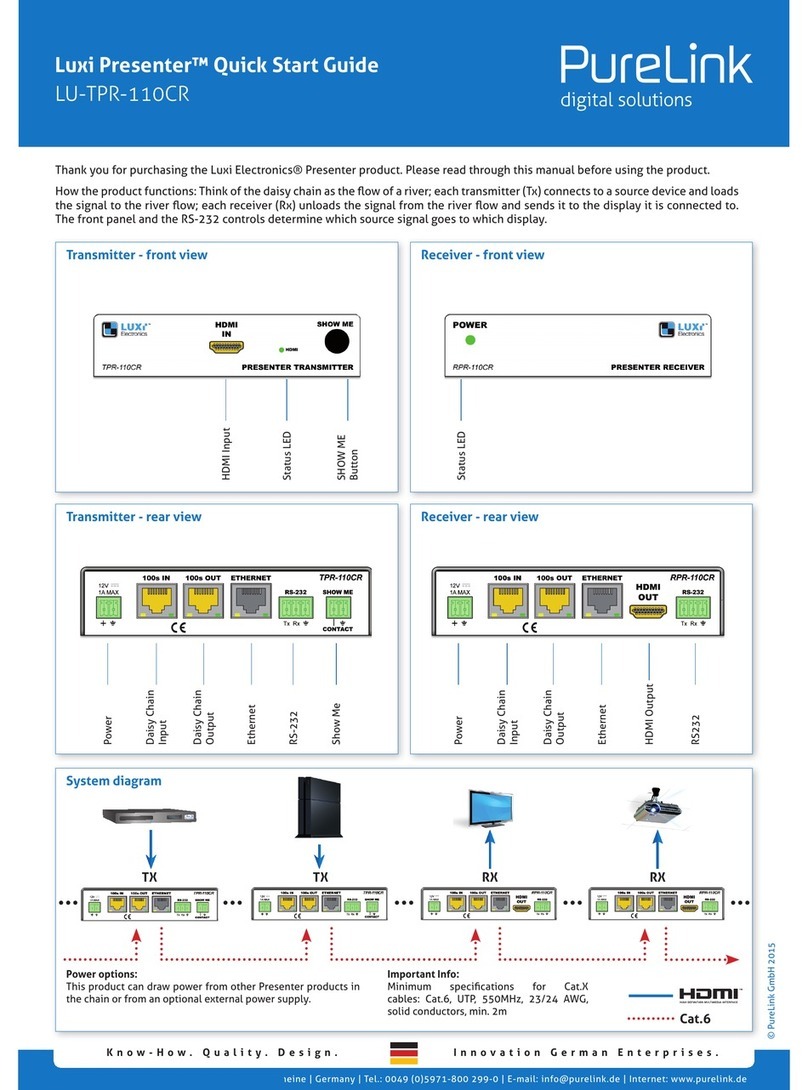
Thank you for purchasing the Luxi Electronics® THB-350 scaler
transmitter. Please read through this manual before using the
product.
How the product functions: To use the 2nd video output for
remote locations, this product needs to be connected to a Luxi
RHB-350 or a compatible HDBT receiver with POC or POE
turned off; failure to turn it off may cause damages and void warranty. Please refer to the “Video signal
path” and “Audio signal path” sections in the right column of the specs on page 5 for details.
Power options: This product draws power from an external 24 V power supply sold separately (Luxi P/N
69-008-01).Do NOT plug the power supply connector into any other connectors; this could cause
permanent damages to the product and void the warranty.
Captive screw plug termination: The captive
screw plugs for power, audio, RS-232 and
contact controls are supplied with the unit.
Separate the wires about 1” (2.5 cm)
long; strip off the wire insulation precisely
3/16” (5 mm) from the end. Identify the
positive and negative leads for power; Luxi
power supply has a white stripe on the
positive wire. If not sure, use a multi meter
to verify.
Mounting options: Luxi has the under desk mount (Luxi P/N 78-002-01) or the MediaHub table tanks
sold separately; the product also fits many other mounting hardware from Extron, Middle Atlantic, etc.
Only use the type 4-40, 3/16” (5 mm) long screws supplied with the mounting hardware to screw onto
the product. Wrong type of screw could strip the threads; too long screw could touch and short the
internal circuit, cause permanent damages to the product and void the warranty.
Control options: When auto switching off, pressing the “Input Sel.” button on
the front panel will toggle thru the 3 video inputs. 3 sets of external contact
closure push buttons and LEDs can select inputs discretely with the LED
indication, see wiring diagram on the right side; when a button is pressed, the
associated LED would blink once, then stay on. A RS-232 host connected to
this or RHB-350 can control all functions, see page 3 for the RS-232
commands.
Website: www.luxielectronics.com
Email: xlu@luxielectronics.com
Phone: +1 (949) 654-2047
Address: Irvine, CA, USA
Document name: THB-350 quick start guide Revision: 1.01 Date: 7/19/2017
Specifications are subject to change without notice
Auto input switching: The default is auto switching on, front panel button defeated. When the button
pressed, the 3 LEDs next to it will blink 3 times. To turn off auto switching, press and hold the button
for about 7 seconds until the LEDs blink twice, or use RS-232 command. When auto switching off, use
the button or contact closure buttons or RS-232 to select input. To engage auto switching again, press
and hold the button for more about 7 seconds until the LEDs blink 3 times, or use RS-232 command.
Audio output connector wiring: refer to the diagrams on the right for
the wiring to the 5-pin captive screw connector. Do NOT connect the
sleeve (audio cable shield) to the “-” pin of the audio output; this could
cause permanent damages to the product and void the warranty.
RS-232 controls: Only the input selections can be controlled by front
panel or external buttons; all other functions can only by controlled by
RS-232. See the RS-232 Setup Guide on Luxi website for more
information: http://luxielectronics.com/attachments/File/Luxi_RS-
232_setup_guide.pdf. Refer to page 3 for RS-232 commands.
Input select commands: Command “s” is to check the current selected input; “0s” is to enable auto
switching; “1s” is to select VGA input, “2s” HDMI input; “3s” DP input. There will be a blank screen for a
brief period of time during input switching. The duration depends on the handshake time of the display
and the source device, and the input and output resolutions, generally around 2 seconds or less.
Front panel and contact closure lockup: Command “A” is to check the current front panel switch status;
“0A” is to turn off auto switching and defeat front panel and contact closure controls; “1A” is to turn off
auto switching and allow front panel and contact closure controls; “2A” (default) is to turn on auto
switching and defeat front panel/contact closure controls.
Auto image settings: Command “a” is to initiate auto image settings.
Scaler output video format settings: Refer to RS-232 “o” series commands on page 3 for more details.
Image size (zoom) adjustments: Many displays made by consumer electronics manufacturers tend to
set the image on the screen in overscan even fed by computer signals, making the menu icons on the
sides cut off or disappear. Use the “z” commands to set (shrink) the proper picture size on screen.
Command “z” is to check the current zoom level; “1z” is to set the zoom level to 1 (default, same size as
the original in a non-overscan display), “2z”, “3z”, … “6z” are to set the zoom levels to 2, 3, … 6,
respectively.
Video output commands: Refer to RS-232 “m” series commands on page 3 for more details. If the
monitors can go to sleep without input signal and can wake up with input signal, use RS-232 command
“1m” to enable this feature. If your projector needs screen saver to prevent burn in, use command “2m”
to turn on OSD (On Screen Display) when no input signal.
Audio commands: Refer to RS-232 “M” series commands on page 3 for more details. Use RS-232
command “0M” to mute all audio outputs; “1M” to set digital audio pass thru for preserving the movie
surround sound; “2M” to mix the 3.5 mm audio to input digital audio; “3M” to pair the 3.5 mm audio with
VGA input only; “4M” to use the 3.5 mm audio all the time (for wireless microphone).
Resetting the product to factory defaults: Use the RS-232 command “r” to reset the product to factory
defaults. See page 3 for the default values.
Display power controls: THB-350 has the configurable display power control feature to enable fully
automated system operations without any operator or 3rd party control devices. THB will send a display
Website: www.luxielectronics.com
Email: xlu@luxielectronics.com
Phone: +1 (949) 654-2047
Address: Irvine, CA, USA
Document name: THB-350 quick start guide Revision: 1.01 Date: 7/19/2017
Specifications are subject to change without notice
power off command via RS-232 ports of both THB-350 and RHB-350 with a set delay time (1 to 60
minutes) after the last input signal disappears; and will send a display power on command as soon as
the first input signal detected, and will automatically select that input. The switcher uses one RS-232
port to connect both external host (optional; only required for setup) and display in parallel with the
display in “listening” mode only (only display’s Rx pin connected). Here’s the wiring diagram:
Ext host THB-350 RHB-350 Display
Rx -------------- Tx Tx -------------- Rx
Tx -------------- Rx Via Cat6 Rx NC NC
Ground -------------- Ground Ground -------------- Ground
NC = Not Connected
Use the “2{xxx}R” and “1{yyy}R” commands listed in next page to setup the display power on and off
commands respectively, then use the “1*zR” command to enable the display power control feature
while setting the power off delay time at “z” minutes. Use “0R” command to disable the display power
control feature. Once setup finished, the external host is not needed for daily operations. The system
reset command “r” will not erase the stored display power on and off commands, but will disable the
display power control feature (factory default).
Support: Please contact your reseller directly for local support; or Luxi using the contact info in the
header.See Luxi website for additional and more updated documents.
Luxi THB-350 scaler Tx RS-232 commands Rev1.01
Function
Command
to THB-350
Response from THB-350 Notes Factory default
Product information commands
Query device part number p74-040-01¶ Numeric and dash only
MCU firmware version 1P x.xx¶ Numeric only
Scaler firmware version 2P x.xx¶ Numeric only
Splitter firmware version 3P x.xx¶ Numeric only
HDBT firmware version 4P x.xx¶ Numeric only
Reset command
Reset to factory defaults rReset
Input selection commands
Select local input x xs Input xlive¶ x has 3 possible values, 1 thru 3 2s (HDMI input)
Set auto switch on 0s Auto sw on¶ Will release by new input selection
Input xlive
Auto sw on (or off)
Input xsignal present
Front panel sw off
Auto sw off
Front panel sw on
Auto sw off
Front panel sw off
Auto sw on
Front panel sw off (or on)
Auto sw on (or off)
Scaler commands
Initiate auto image aAuto image on
Set output format to pixel to pixel 0o Output format pixel to pixel
Only supports 7 preset resolutions: 720p,
1080p, 1280x800, 1920x1200, 1024x768,
1280x1024, 1600x1200
Set output format to 720p 1o Output format 720p
Set output format to 1080p 2o Output format 1080p¶2o (output 1080p)
Set output format to 1280x800 3o Output format 1280x800
Set output format to 1920x1200 4o Output format 1920x1200
Set output format to 1024x768 5o Output format 1024x768
Set output format to 1280x1024 6o Output format 1280x1024
Set output format to 1600x1200 7o Output format 1600x1200
Query output format o
(One of the responses from
cell C30 to C37)
Set zoom level on xzZoom level x¶ x has 6 possible values, 1 thru 6 1z (zoom level 1)
Query zoom level zZoom level x
Press and hold
front panel switch
for about 7
seconds will toggle
the auto sw on or
off; LED fast
blinking 3 or 2
times respectively
Allow auto switching and defeat
front panel input selection
2A
When front panel switch pressed, the LED
fast blinking 3 times
2A (auto sw on,
front panel sw off)
Defeat front panel input selection
0A
When front panel switch pressed, the LED
fast blinking twice
Allow front panel input selection
1A
Query local input status
s
Send all 3 groups of status to "s" command,
only one group of status to the one just
changed
Query front panel switch status
A
See Luxi website for more commands
Website: www.luxielectronics.com
Email: xlu@luxielectronics.com
Phone: +1 (949) 654-2047
Address: Irvine, CA, USA
Document name: THB-350 quick start guide Revision: 1.01 Date: 7/19/2017
Specifications are subject to change without notice
Product Specifications Part Number: 74-040-01
VGA/HDMI/DP/audio 3x2 switcher scaler Tx Model: THB-350 (Tx)
Product Image Product Drawing
Featuresand Benefits Mechanical
> Universal interface, compatible with all source signal formats Enclosure material: steel
> World's smallest high performance all purpose signal Enclosure size: 4.29” x 1.00” x 6.00” (10.9 x 2.5 x 15.2 cm)
converter, scaler, switcher, splitter, mixer, HDCP compliant Electrical
> VGA, HDMI, DP input, auto switch or front panel, RS-232, Video signal path: There are 3 video inputs and 2 video outputs.
contact controllable with discrete input LED indications The analog RGB video from the VGA input goes to the
> Configurable display power controls via RS-232 enables scaler's analog input; the DisplayPort (DP) input signal is
fully auto operation systems without any 3rd party controller first converted to HDMI, then switched with the HDMI input
> Independent analog audio input, can be coupled with any signal, the selected signal goes to the digital input of the
video input, mixed with audio de-embedded from HDMI or DP scaler. The scaler converts all video to LVDS, feeds to a
outputs to bal/unbal analog output, or embedded to HDMI HDMI encoder, then to 1 HDMI and 1 HDBT output
> Dual mirrored outputs, HDBT for big screen/projector and VGA input: 0.7 Vp-p analog RGBHV, 75 ohm impedance
HDMI for local monitor, with or without OSD or screensaver, HDMI input: HDMI 2.0, 4k 30 Hz, max 10.2 Gbps
enable monitor sleep/wake up (energy saving) DP input: DP 1.3, 4k 30 Hz, max 10.2 Gbps
> Unique RS-232 controlled picture zoom (out) adjustments Video processing: 36-bit decoding, sampling, 225 MHz clock
> HDBT output sending signals up to 70 m (235') with POC Video input resolution range: from 800x600 to 1920x1200
> RS-232 selectable video resolutions of common 16:9, 16:10, Scaled video output resolution presets: 720p, 1080p, 1280x800
4:3 or pixel to pixel modes 1920x1200, 1024x768, 1280x960, 1600x1200, pixel to pixel
> High efficiency fanless design for ultimate reliability HDBT output: up to 70 m (235') with Cat6 cable; POC 24 V
> Rack mountable, under-table mountable, above-projector Audio signal path: There are 3 audio inputs and 3 audio
mountable metal enclosures outputs. The digital audio embedded in HDMI and DP inputs
Package are selected by a HDMI switcher, then goes to the scaler.
One piece in one color cardboard box; with captive screw The scaler produces both SPDIF digital audio and de
plugs and quick start guide -embedded analog audio. The latter is mixed with the analog
no power supply audio input and goes to the bal/unbal analog audio outputs,
and a analog to digital converter. The HDMI encoder can
select this mixed audio, or the digital audio from HDMI/DP
and directly pass it thru to HDMI and HBDT outputs.
Box size: 7.4” x 6.1” x 1.1” (18.9 x 15.4 x 2.8 cm) Analog audio input: stereo on 3.5 mm mini jack, nominal
Weight: package, 1.1 lb (0.49kg); product, 0.97 lb (0.44kg) level -10 dBV (316 mV), max +3.5 dBV (1.5 V), 22k ohms
20-pc box size: 12.4" x 11.6" x 9.4" (31.5 x 29.5 x 24.0 cm) Analog audio output: stereo on 5-pin 3.5 mm captive screw
20-pc box weight: 23 lb (10.5 kg) connector, balanced output nominal -4 dBV (632 mV), un-
Connections balanced output nominal -10 dBV (316 mV), 60 ohms
Input connectors: 1 VGA, 1 HDMI, 1 DP, 1 mini jack (audio) Audio gain: 0 dB (x1) to unbal, +6 dB (x2) to bal output
Output connector: 1 HDMI, 1 HDBT, (1) 5-pin CS (audio) Controls: Front panel button toggle thru all 3 inputs
Power connector: 2-pin 3.5 mm captive screw receptacle RS-232 on 3-pin 3.5 mm captive screw, 9600/8-N-1
Control connectors: (1) 3-pin RS-232, (1) 4-pin contact Contact port on 4-pin 3.5 mm captive screw, discrete pin for
Other Related Products each input, dual function (switch to select, LED for indication)
Power supply, 100-240 V in on US plug, Power consumption: 24 V DC, up to 1 A
24 V out, P/N 69-008-01 Optional power supply: Not included. Luxi 69-008-01
Auto switching 100-240 V AC input on US plug, 24 V DC
Under desk mount, P/N 78-002-01 1 A max on bare wires, wall ward type, UL, PSE, CE, FCC
Mounting: Not included. Luxi under desk mount 78-002-01
compatible with several Extron and Middle Atlantic mounts
Regulatory compliance
Safety: CE, cUL, UL (power supply only)
HDBT Rx, P/N 74-037-01, EMI/EMC: CE, FCC Class A
model RHB-350 MTBF: 30,000 hours
Warranty: 3 years parts and labor

This manual suits for next models

1

Other Luxi Electronics Transmitter manuals

Luxi Electronics Presenter TPR-150CR User manual

Luxi Electronics

Luxi Electronics Presenter TPR-150CR User manual

Luxi Electronics LU-TPR-110CR User manual

Luxi Electronics

Luxi Electronics LU-TPR-110CR User manual

Luxi Electronics TPR-110CR User manual

Luxi Electronics

Luxi Electronics TPR-110CR User manual

Luxi Electronics TPR-150CR Presenter User manual

Luxi Electronics

Luxi Electronics TPR-150CR Presenter User manual

Popular Transmitter manuals by other brands

Endress+Hauser HART iTEMP TMT142B operating instructions

Endress+Hauser

Endress+Hauser HART iTEMP TMT142B operating instructions

AOMWAY TX001 quick start guide

AOMWAY

AOMWAY TX001 quick start guide

Airgineers Force V2 quick start guide

Airgineers

Airgineers Force V2 quick start guide

RKI Instruments 65-2330RK Operator's manual

RKI Instruments

RKI Instruments 65-2330RK Operator's manual

Greystone RH200A installation instructions

Greystone

Greystone RH200A installation instructions

WT sensor PCM400 quick start guide

WT sensor

WT sensor PCM400 quick start guide

BWI Eagle AIR-EAGLE SR PLUS 36-HH-9-VBR Product information bulletin

BWI Eagle

BWI Eagle AIR-EAGLE SR PLUS 36-HH-9-VBR Product information bulletin

Kramer TP-580TD user manual

Kramer

Kramer TP-580TD user manual

blukii Smart Key Go 500 manual

blukii

blukii Smart Key Go 500 manual

Jasco GE SmartSecurity 51147 user manual

Jasco

Jasco GE SmartSecurity 51147 user manual

SEA 23110550 manual

SEA

SEA 23110550 manual

OSSIA COTA user manual

OSSIA

OSSIA COTA user manual

Acromag TT351-07 0 Series user manual

Acromag

Acromag TT351-07 0 Series user manual

COP Security S8775 user manual

COP Security

COP Security S8775 user manual

Fox Micron TXR Plus operating instructions

Fox

Fox Micron TXR Plus operating instructions

Honeywell oneWireless XYR 6000 quick start guide

Honeywell

Honeywell oneWireless XYR 6000 quick start guide

Endress+Hauser iTEMP Safety instructions

Endress+Hauser

Endress+Hauser iTEMP Safety instructions

ARTEX C406-2 Series Description, operation, installation and maintenance manual

ARTEX

ARTEX C406-2 Series Description, operation, installation and maintenance manual

manuals.online logo
manuals.online logoBrands
  • About & Mission
  • Contact us
  • Privacy Policy
  • Terms and Conditions

Copyright 2025 Manuals.Online. All Rights Reserved.