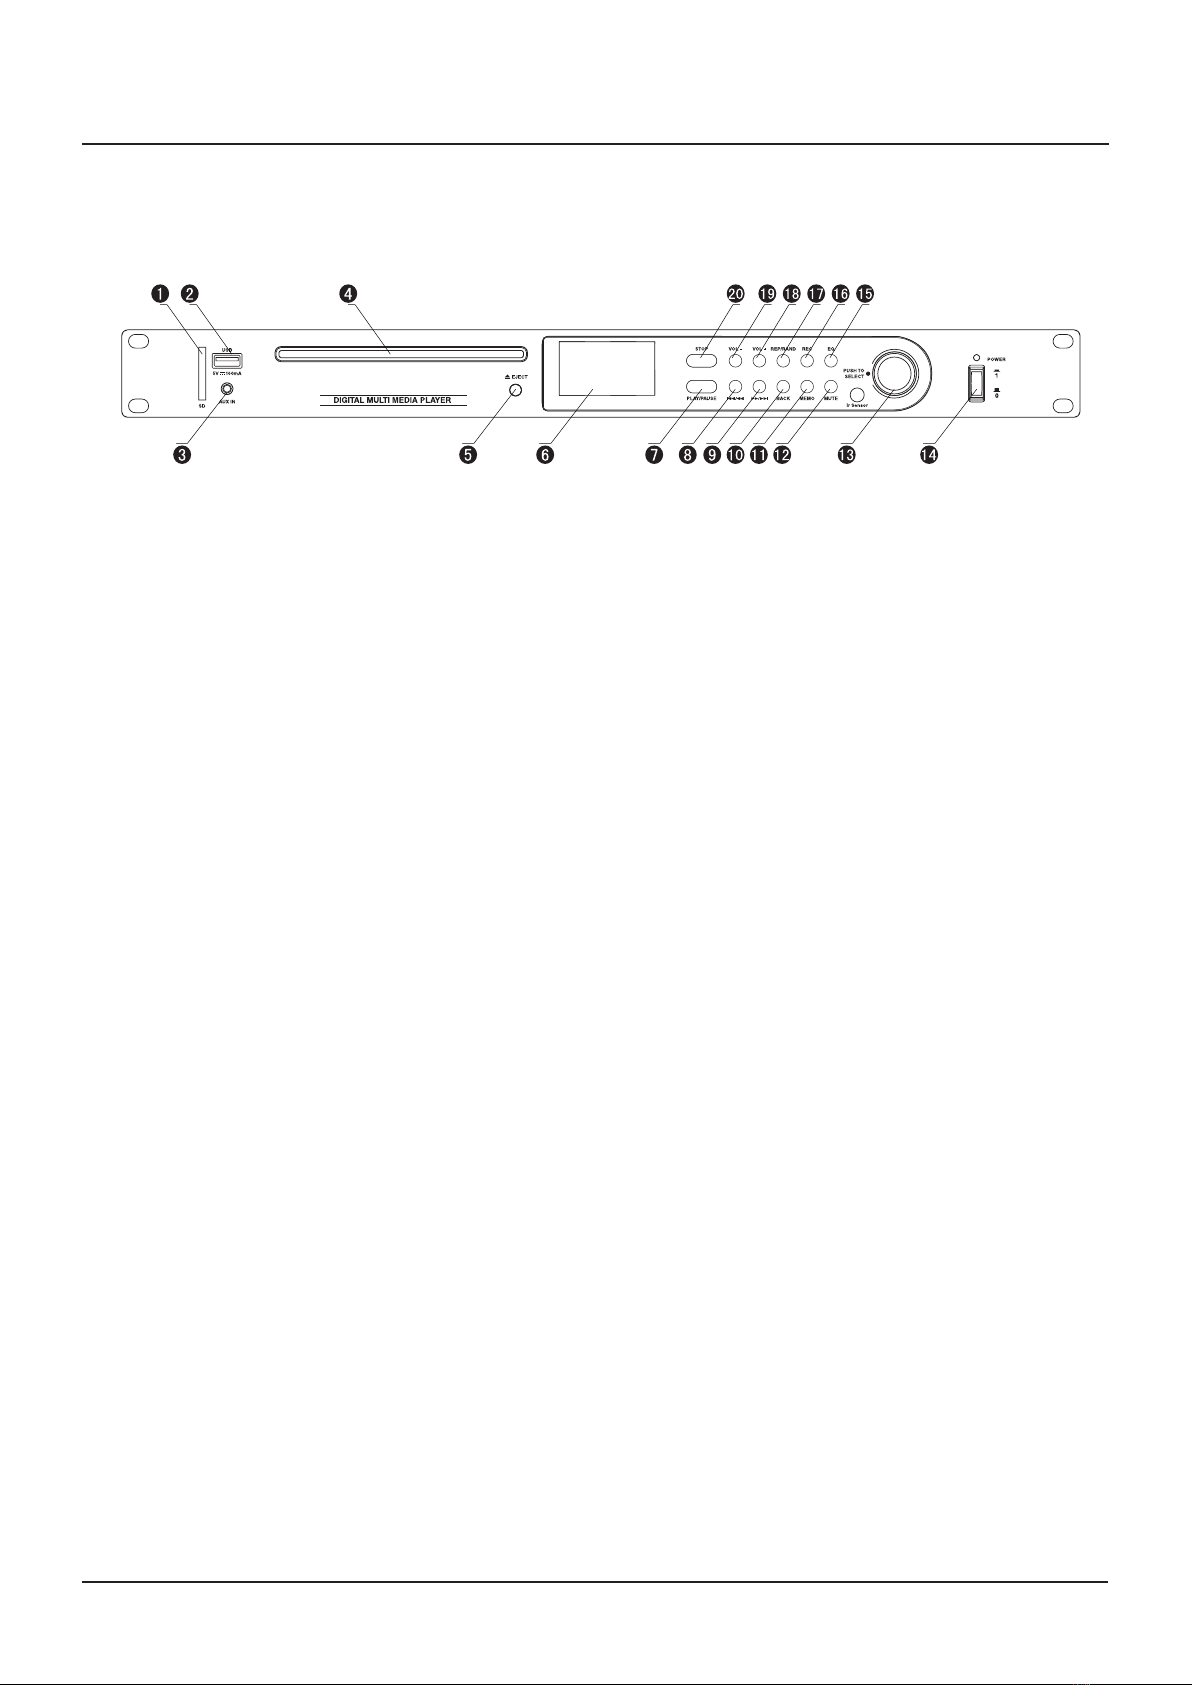
LY International Electronics ER-3 User manual

ER-1
ER-3
ER-4
Warning:Before attempting to connect,operate or adjust this Amplifier,
please read these instructions completely and carefully and save this Manual
Public Address System
DIGITAL MULTI MEDIA PLAYER


1.CAUTION
Danger of explosion if battery is incorrectly replaced.
Replace only with the same or equivalent type.
2.Batteries (battery pack or batteries installed) shall not be exposed to excessive heat such as
sunshine, fire or the like.
3.WARNING
Do not ingest the battery, Chemical Burn Hazard(The remote control supplied with) This product
contains a coin/button cell battery. If the coin/button cell battery is swallowed,it can cause severe
internal burns in just 2 hours and can lead to death. Keep new and used batteries away from
children.
If the battery compartment does not close securely, stop using the product and keep it away from
children.
If you think batteries might have been swallowed or placed inside any part of the body, seek
immediate medical attention.
4.No naked flame sources, such as lighted candles, should be placed on the apparatus.
5.The use of apparatus in tropical climate.

Table of Contents
Introductions ----------------------------------------- 2
Front panel --------------------------------------------3
Rear panel -------------------------------------------- 6
Accessories --------------------------------------------8
Remote Control ---------------------------------------9
Table of Contents
1
Bluetooth -------------------------------------------- 10
Network Setting for Internet Radion ------------11
Internet Radio Menu ------------------------------- 14
Connecting Station -------------------------------15
Specifications --------------------------------------16

The ER-1 is an All-In-One audio source device with intergrated FM RDS tuner,Internet Radio,
UPNP and USB,SD media player,compatible with MP3,WMA,FLAC and WAV audio files.
Introductions
2
Introductions
FM TUNER/CD/USB/SD/BT/DAB+/INTERNET RADIO
It combines a FM tuner, CD-player, Media-player and Internet Radio into one single rack
space 19’’ housing.On the front side,a CD slot, an USB slot provided. This makes it possible
to play regular audio CD’s as well as MP3 files from CD, USB,SD memory sticks.
On the rear side of the device, four stereo outputs is provided. Three of them are dedicated
to the tuner, CD/MEDIA and Internet Radio function.
This feature can be useful for applications such as Multi-Zone systems where multiple audio
sources are required at the same time.
The variable output has a volume control function and carries the signal selected by BACK
button among FM tuner,CD-player,Media-player by USB/SD,DAB/Internet Radio, Bluetooth
and Aux input signal.

Front Panel
Front Panel
3
1.SD connection port:
An USB storage device can be inserted to this slot.Tracks stored on here can be played through the
ER-1 and it will start to play when the media is inserted and selected SD function by BACK button.
2.USB connection port:
An USB storage device can be inserted to this slot.Tracks stored on here can be played through the
ER-1 and it will start to play when the media is inserted and selected USB function by BACK button.
3.AUX IN
Line level Aux input jack.It will start to play when you select AUX function by BACK button.
4.CD Slot
Audio CD shall be inserted into this drive. The drive will load the CD automatically when it is
inserted into this slot. Only use CD with normal round shape and with normal size (12 cm). Always
check if the CD slot is empty before inserting a CD and don’t force the CD into the slot when it
doesn’t accept the CD automatically. When a CD is inserted, the device will automatically start
playing it at CD.
5.CD Eject button (EJECT)
This button shall be pressed to remove the CD from the drive. After this button is pressed,the CD
will be ejected from the drive and can be taken out by user. If the CD is not taken within ~5 minutes,
the CD will be automatically inserted to the drive again.
6.LCD Display
The LCD Display shows the current operation mode of the unit. It shows which radio station is
playing, which audio track is playing, which functions are enabled, …
• Standby mode
Press the button,the device can be turn on.
7.Play / Pause button (PLAY/PAUSE)
• CD, USB,SD mode
Press:The music from the CD,USB or SD can be started and paused with this button. When a track
currently is playing, it will be paused after pressing this button and the current position (Track no and
time) will be shown on the display. It will resume to play after pressing this button again.

4
10.BACK
In function mode,you can scroll menu backward by push this button.In tuner(FM) mode, pressing
this button long term,you can see MCU version for main.
• Bluetooth mode:
Press:The music from the Bluetooth feature is activated on your Bluetooth device and paused with
this button. It will resume to play after pressing this button again.
• Standby mode
Press the button,the device can be turn on.
8.Tuning down / CD-Mp3 Track selection down ( )
• CD, USB,SD mode
In CD,USB or SD mode, the playing track and position in the track can be selected with this button.
Press: Pressing this button for a short term, the previous track will be selected.
• Tuner mode
In tuner mode, the desired radio station can be selected with this button.Press: Pressing this button
one single time, the previous radio station will be searched in manual seek mode, and when used in
manual seek mode the selected frequency will decrease one step.
Press & Hold: Pressing and holding this button, the selection mode for the tuner will be switched to
auto seek mode and the frequency can be decreased by holding / pressing this button.
9.Tuning up / CD-Mp3 Track selection up ( )
• CD, USB,SD mode
In CD,USB or SD mode, the playing track and position in the track can be selected with this button.
Press: Pressing this button for a short term, the next track will be selected
• Tuner mode
In tuner mode, the desired radio station can be selected with this button.Press: Pressing this button
one single time, the next radio station will be searched in manual seek mode, and when used in
manual seek mode the selected frequency will increase one step.
Press & Hold: Pressing and holding this button, the selection mode for the tuner will be switched to
auto seek mode and the frequency can be increased by holding /pressing this button.
• Internet radio mode
In internet radio mode,press this button to confirm the menu.
11.BACK
• Tuner mode:(Memory for the tuner frequency)
When pressing and holding this button, current radio stations dispalyed in LCD will be stored,and
you can adjust preset number among P1~P50 press this buttom again. The radio stations are
stored by pressing this button for a short term, you can see stored stations in order of preset from
P1 to P50 total 50 presets.
• CD,USB,SD mode
In the CD, USB, or SD mode, you can adjust the number of preset preferences P1 ~ P17 through
the selection between press this button again.
Front Panel

5
• Bluetooth mode
In Bluetooth mode, pressing this button long term,you can see MCU version for Bluetooth.
12.Mute (MUTE)
Pressing this button, all variable output and fixed output can be muted/unmuted. When the outputs
are muted, the message ‘MUTE’ will display on the LCD. In CD(USB) mode,by pressing this button
long term,you can see MCU version for CD(USB).
13.Function selection button (PUSH TO SELECT)
Combination menu button,turn to scroll through the items in the display, push to select the high
lighted item or to confirm your selection.
In the function mode,turn the button on the left, reduce the volume, turn the button on the right,
and increase the volume,only control main output.
14.Power switch
Press the power switch, the device can be turn for on,the blue LED above the power button will
illuminate, the message ‘STANDBY’ will display on the LCD.
15.Equalizer select (Bypass/Pop/Rock/Classic/JAZZ ) (EQ)
Press this button to switch between different equalizer presets: Bypass / Classic / Pop / Rock /
Off. They will be selected in this sequence and enhanced sound can be went out only main
output jack.
16.Recoding(REC)
You can record a various sound source to USB or SD.
Menu ==> System Step ==> Recording
==> Main Out to USB *
==> Main Out to SD
==> REC IN to SD
==> REC IN to USB
17.Repeat (REP/RAND)
• CD, USB,SD mode
Pressing this button, the repeat mode can be selected among Repeat One (Repeats currently
playing track), Repeat All (Repeats all tracks on inserted data carrier) and Random play.
18.Volume up(VOL+)
Volume up button for main output jack.
19.Volume down(VOL-)
Volume down button for main output jack.
20.Stop button (STOP)
• CD, USB,SD and Bluetooth mode
The currently playing track will be stopped when pressing this button. After pressing“Play” again,
it will resume to play at the absolute beginning of the inserted data carrier.
Front Panel

Rear Panel
Rear Panel
1.Power inlet
The main power supply (100~240VAC,50/60 Hz) has to be applied to this AC power inlet. The
connection is made by an IEC C14 power connector which is fitted with a fuse.When replacing
the fuse, make sure that the value of the replacement fuse matches the value of the original
fuse. (T0.5AL/250V)
3.Network cable connetor(LAN)
Connect to a normal computer network.For internet radio playback,the network must have an
accessible broadband internet connection.
4.RS232 control port
The RS232 control port can be used for controlling the device through external hardware such as
audiovisual installations, home & industrial automation systems, computers, ...
2.DC+24V Input connection
The back-up power supply (DC+24V) has to be applied to this connector.
5.REC INPUT
This Euroblock connector is to record the input of the external balance signal.
6
6.Selected Variable audio output
The selected variable audio output can be switched between TUNER or CD/USB/SD(MEDIA)
or BLUETOOTH/AUX or DAB+/INTERNET RADIO mode and the output level (volume) can be
adjusted. Volume adjustment should be done using the rotary function dial of 15. In most basic
audio application where only one simultaneous source is required (either TUNER or CD/USB/
SD or BLUETOOTH/AUX or DAB+ /INTERNET RADIO),the variable audio output will be used.
Two types analog signal output from RCA(unbalance) and Euroblock(balance).
7.Internet radio/DAB+ output
The output terminal has output connection for two analog signals. Internet radio and DAB+. Their
output levels are fixed and not controlled.
Two types of analog signal output can be from RCA(unbalance) and Euroblock (balance) at the
same.

Rear Panel
7
12.Wi-Fi antenna
Connect the wi-fi antenna here.
11.FM Antenna connection
Connect the supplied FM antenna to those connectors to ensure a good FM reception. In case
of bad reception, the connection of an external outdoor antenna or cable distribution can
significantly improve the audio reception.
14.Bluetooth antenna
Connect the bluetooth antenna here.
13.DAB+ Antenna
Connect the DAB antenna here.
8.Bluttooth/AUX output
The output terminal has output connection for two analog signals, bluetooth and AUX.
Their output levels are fixed and not controlled.
Two types of analog signal output can be from RCA(unbalance) and Euroblock (balance)
at the same.
9.Media output
The output terminal has output connection for two analog signals, CD,USB and SD.
Their output levels are fixed and not controlled.
Two types of analog signal output can be from RCA(unbalance) and Euroblock (balance)
at the same.
10.Tuner output
This output is a independent output tuner analog signal, and its output level is fixed and
uncontrolled.
Two types of analog signal output can be from RCA(unbalance) and Euroblock (balance)
at the same.

Accessories
8
Accessories
Please check and identify the supplied accessories.
FM Antenna x 1
WiFi Antenna x 2 (M5 MODEL)
WiFi Antenna x 1 (M4/M3 MODEL)
Remote Control x 1
Power Cord x 1
Euroblock Connector
ER-1 MODEL : 2PIN,5.08 x 1
ER-3/ER-4 MODEL : 2PIN,5.08 x 1
6PIN,3.5 x 6
6PIN,3.5 x 5

Remote Control
9
Remote Control
Replacement of battery
Remove the battery cover
on the rear of the Remote-
Control, and insert two
(size AAA) batterieswith
(+) and (-) matched correctly.
(Power):When the device is in standby mode, you can press
this key to turn on the power. Once again, the device switches to
the standby mode.
(Mute):Mutes the sound.
USB REC: USB direct recording.
(Skip/Search) :
*Skips Fast backward or Forward.
*Searches for a section within a track/file.
RANDOM: Listen to your track / file of random.
DELETE: Deletes MP3/WMA files. (USB/SD only).
(Play/Pause) : Starts or pauses playback.
(Stop) : Stops playback or recording.
REPEAT : Listens to your tracks/files repeatedly.
(Open/Close) : Opens and closes the disc tray.
MEMO: *Stores radio stations.
*Creates a programmed list you want to listen to.
only CD/USB/SD model.
CLEAR: *Deletes all the saved stations.
Left/right scroll through items in the display.
Up/down scroll through items in the display.
ENTER: The highlight item is confirmed by this key.
MENU: The function and mode menu of the device.
INFO: The RDS function of the tuner ON/OFF.
VOL +/-: Adjusts VARIABLE OUTPUT volume.
ST/MON: Tuner (FM) mode, stereo and mono switching.
EQ: Switch to a different preset equalizer.
PRESET.FOLDER
*Searches for a folder of MP3/WMA files.When a CD/USB
containing MP3/WMA files in several folders is being played,
press the key to select the folder you want to play.
*Chooses a preset radio station.
0 to 9 numerical buttons : Selects numbered tracks,or files.
(only CD/USB/SD).

Bluetooth
10
Bluetooth
Bluetooth is wireless communication technology for short range connection.
The sound may be interrupted when the connection is interfered by the other electronic wave or
you connect the bluetooth in the other rooms.
Connecting individual devices under Bluetooth wireless technology does not incur any charges.
A mobile phone with Bluetooth wireless technology can be operated via the Cascade if the
connection was made via Bluetooth wireless technology.
Available Devices : Mobile phone, MP3, Laptop, PDA.
Pairing your unit and Bluetooth device
Before you start the pairing procedure, make sure the Bluetooth feature is activated on your
Bluetooth device:
1.Function Select the Bluetooth,“BT READY” appears on the display window.
2.Operate the Bluetooth device and perform the pairing operation. When searching for this unit
with the Bluetooth device, a list of the found devices may appear in the Bluetooth device
display depending on the type of Bluetooth device. Your unit appears as “ER-1”(ER-3,ER-4).
3.When this unit is successfully connected with your Bluetooth device, “BT PAIRED” will be
appear on the display window.
3.Listen to music.
To play a music stored on your Bluetooth device, refer to your Bluetooth device’s user guide.

Network Setting for Internet Radio
11
Network Setting for Internet Radio
If your wireless network is configured to use Wired Equivalent Privacy(WEP)or Wi-Fi Protected
Access(WPA)data encryption,you will need to know the WEP or WPA code so that you can setup
your internet radio to communicate with your wireless network.Consult your network
administrator for your WEP or WPA codes.
Navigation
Please connect the Internet Radio with Wireless Network,according to below steps.
First Step : Power ON,select the function to internet radio.
LCD display Screen will be lighted on and showed same as below:
Second Step : Scan for Network Router
Before you are able to use your internet radio,you will need the following items:
• A broadband internet connection.
• A wired/wireless access point,or router connected to your broadband internet connection.
• Before continuing,make sure that your wired/wireless access point or router is powered on,and
connected to your broadband internet connection.Consult the manufacturer’s guide supplied
with your wired/wireless access point or router if you are unsure how to do this.

Network Setting for Internet Radio
12
When the Internet Radio search out Wireless Network, names of Networks will be showed on
the LCD screen.
Wireless Network List
Menu Wizard
*If your wireless network is not found, check that your wireless access point or router is switched
on and connected to your broadband internet connection.
The Third Step : Connect to Wireless Network
Choose a wireless network that you can use, press the "press Select" button to confirm the
connection and connect successfully.
But,if a password has been set up for the wireless service, then it can be connected after inputting
the password.
Use " "button to show the correct character on the display panel, and select"E"to press the
“PUSH TO SELECT” button to complete the confirmatin.
Use the remote control " "key and the "ENTER" key can also complete the input.The
LCD screen will showed as below:
Remork:
< Delete single number or character.
E Complete the input.
C Clear the input and exit.
After inputting password,Choose the “E” button to confirm the completion of input and the
connection of Internet,The LCD screen will showed as below:

Network Setting for Internet Radio
13
Connecting to a wired network
Use the following procedure to connect the WI-FI radio to a wired router.
1.Connect an ethernet cable (not supplied) between the ethernet port on the rear of the WI-FI
radio and a wired router.
2.Power On the Wi-Fi router.
3.The connection between the WI-FI radio and the router will be setup automatically.

Internet Radio Menu
14
Internet Radio Menu

Connecting Station
15
Connecting Station
1.Turn the “PUSH TO SELECT”control until the following screen is displayed.
Notice: If an error occurred, please press the BACK button to return to last stage of the function
table.
Choose the Internet Radio you want to listen.
Press down “PUSH TO SELECT” button, to confirm into Internet Radio menu.
You can also switch directly on the “INTERNET” button of the remote control.
2.There are five methods to search the station in the Function table of Internet Radio.
<Location>Station can be search by location.
<Genre> Station can be search, according to types, such as 90s,Classical, Dance or Rock.
<Search>Station can be search by inputting Stations’ name directly.
3.Press down “PUSH TO SELECT” button to choose the way you like, such as <Location>, then
choose Nation and Region, rotate “PUSH TO SELECT” button to search.
Notice: Station name will be ranked according to Initials.
4.Press down "PUSH TO SELECT" confirm button then you can listen to the station which you
choosed. When the station is in the process of downloading buffer,the display screen will
showed as <Buffering...>

Specifications
16
Specifications
FM Tuner
Tuning range
Sensitivity (26dB S/N)@ 75Ω unbalanced
Channel selectivity (67.5KHz)
Tuning step size
Audio S/N ratio FM
Audio bandwith
Analog out(MODE:75KHz,1kHz)
THD
Stereo separation
87.5 - 108 MHz
2.0 μV
40 dB
50 kHz (Option,100kHz)
60 dB
30 - 15 kHz
Fixed Output: 0dB
Vriable Output(EQ,Bypass,vr,max): 0dB
< 0.3%
> 40 dB @ 1 kHz
Compatible media
Audio format
S/N ratio
Analog out(1kHz)
THD
Frequency
Supported audio codecs
Memory file system
Memory capacity
S/N ratio
Analog out(1kHz)
THD
Frequency range
Supported audio codecs
Memory file system
Memory capacity
S/N ratio
Analog out(1kHz)
THD
Frequency range
S/N ratio
THD
CD,CDROM,CDROMXA
Audio CD 16 bit PCM, MP3 32-320 kbps and variable
bitrate, WMA. Id3,
>80dB
Fixed Output: 0dB
Vriable Output(EQ,Bypass,vr,max): 0dB
<0.1%
20Hz - 20KHz
MP 3 32-320 kbps and variable bitrate
WMA,FLAC, WAV, ID3 tags support
FAT, FAT32
up to 16GB
>80 dB
Fixed Output: 0dB
Vriable Output(EQ,Bypass,vr,max): 0dB
<0.1%
20 Hz - 20 kHz
MP 3 32-320 kbps and variable bitrate
WMA,FLAC, WAV, ID3 tags support
FAT, FAT32
up to 16GB
>80 dB
Fixed Output: 0dB
Vriable Output(EQ,Bypass,vr,max): 0dB
<0.1%
20 Hz - 20 kHz
>80 dB
<0.3%
CD player
USB/UPnP
SD
Recording Replay
Necessary modifications are carried out without notice.

Specifications
17
Specifications
Necessary modifications are carried out without notice.
AUX(Input 1kHz/-6dBv)
Frequency range
S/N ratio
Analog out
THD
Bluetooth
Internet radio
Wifi
Ethernet
General
Frequency range
S/N ratio
Analog out(1kHz)
THD
Receiving distance
Audio streams
Customizable favourites
2.4 GHz
Authentication
Channels
Connector
Tuning range
Sensitivity
Power supply
Bus Power Supply (USB)
Output impedance
Operating temperature
Relative humidity
Dimensions (L x W x H)
Color
Weight
20 Hz - 20 kHz
>80 dB
Fixed Output: 0dB
Vriable Output(EQ,Bypass,vr,max): 0dB
<0.3%
20 Hz - 20 kHz
>80 dB
Fixed Output: 0dB
Vriable Output(EQ,Bypass,vr,max): 0dB
<0.3%
more than 8 meters
Mp3 / WMA
via web portal
802.11
Open,Pre-shared key (PSK),Wifi protected access
(WPA) or WPA2
selectable per country
standard RJ45 network port
BAND Ⅲ: 174.928MHz - 239.200MHz
≤ -90
100~240VAC,50Hz/60Hz / DC+24V
5V 500mA
less than 1 kΩ at max setting
10-40 °C
10 to 80% non-condensing
482 x 320 x 44 mm
Black
3.82kg
DAB+
L BAND :1452.960 MHz - 1490.624 MHz
Remarks:
*ER-4 model has no Internet radio/DAB+ function.
*ER-3 model has no Internet radio/DAB+ and CD function.
This manual suits for next models
2
Table of contents
Other LY International Electronics Media Player manuals