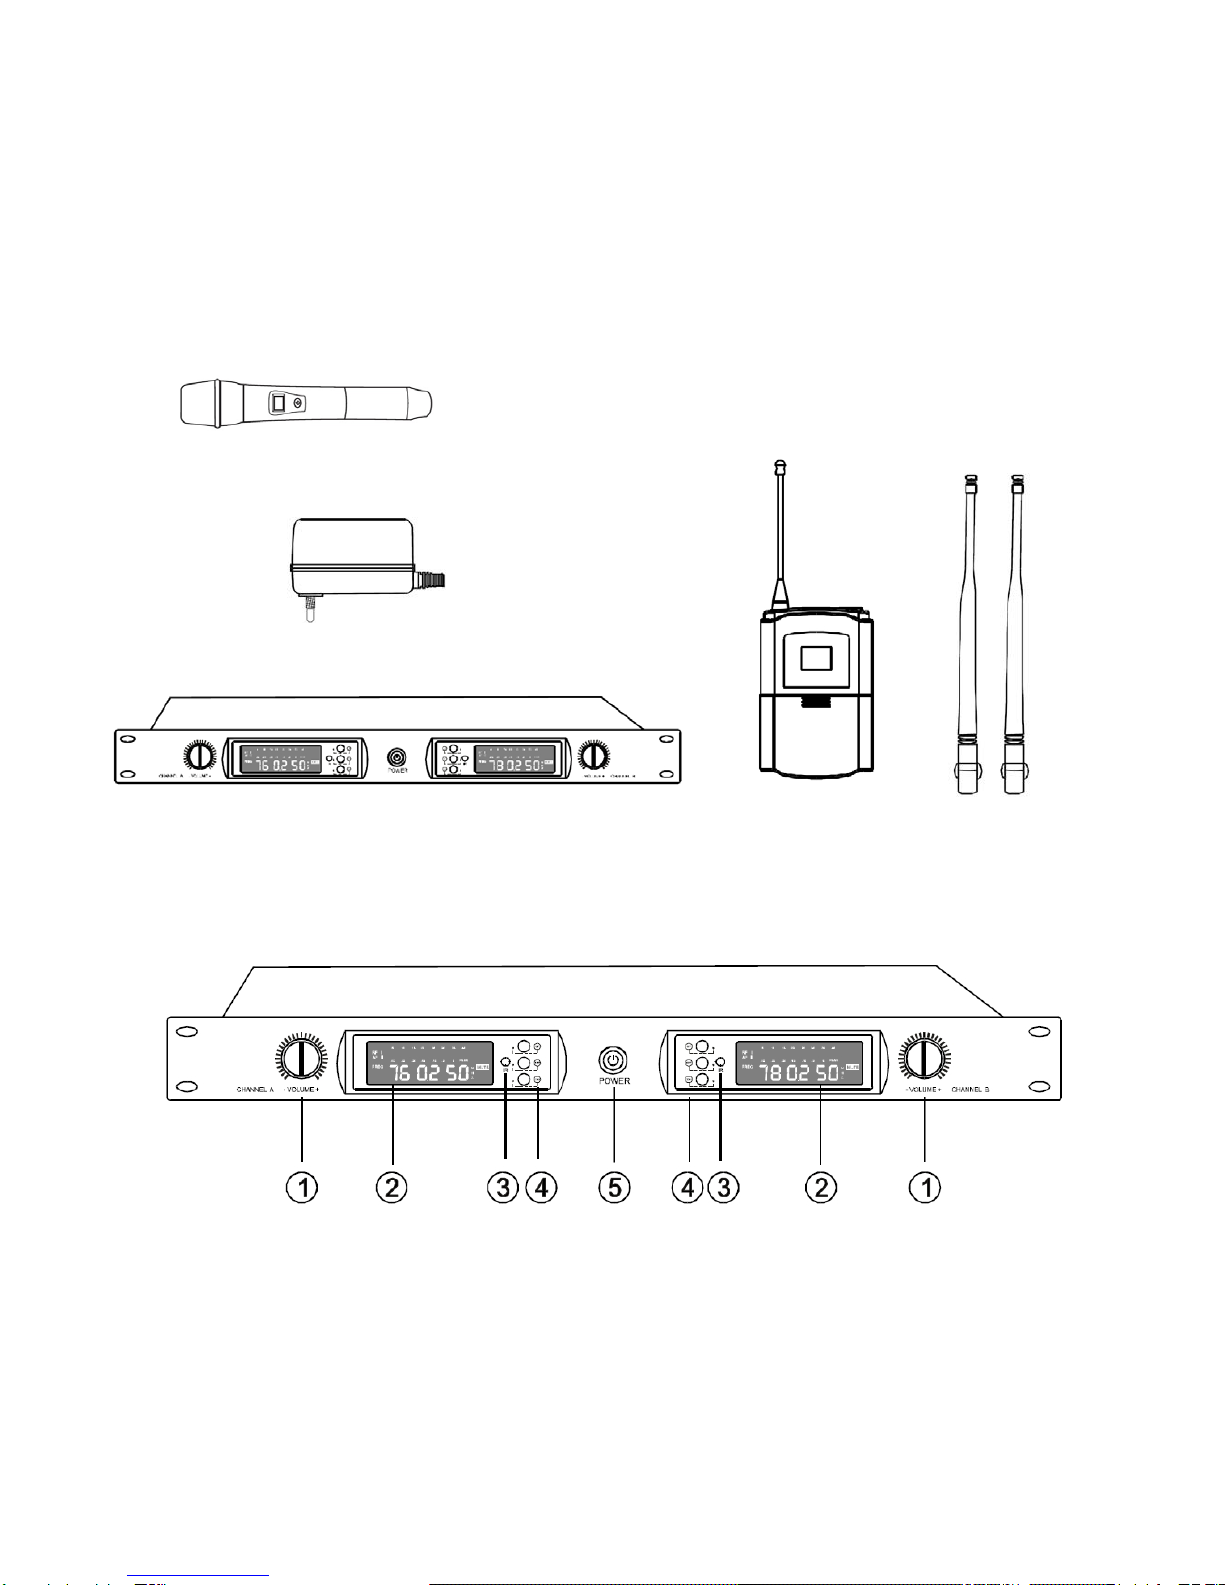
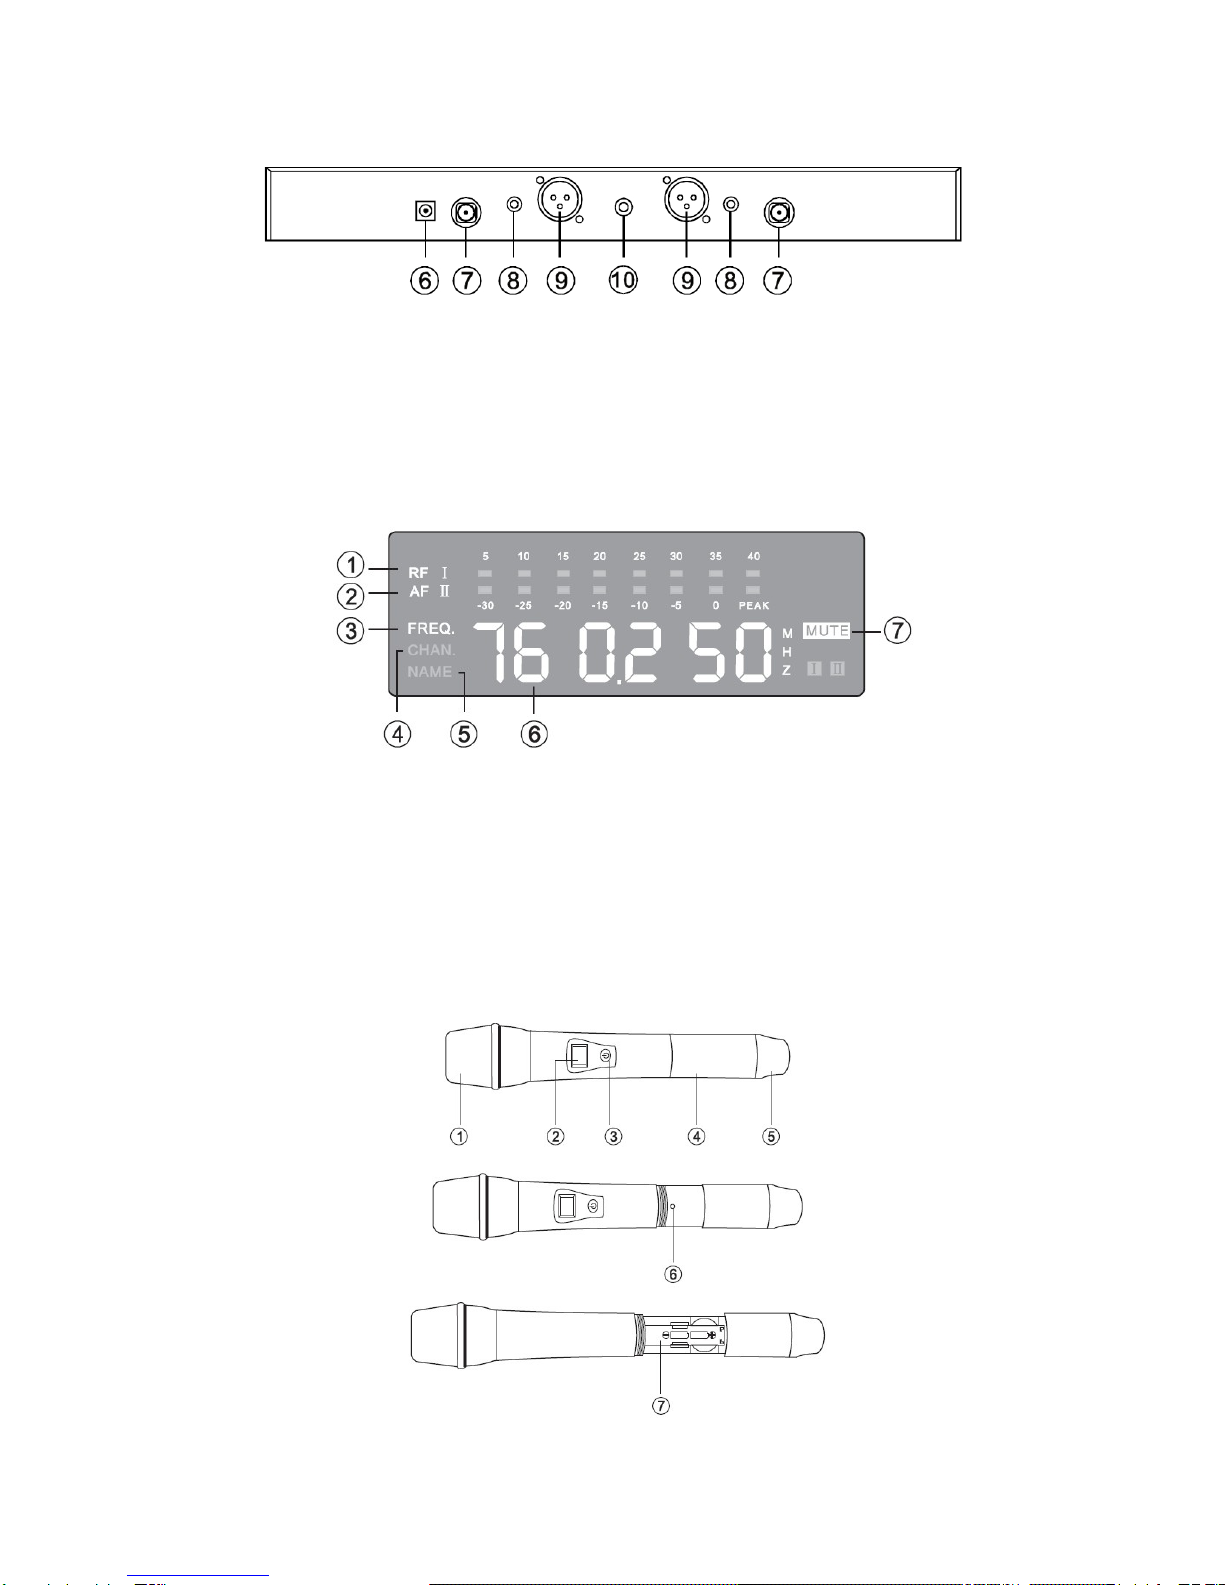
LY International Electronics H-66B User manual

PROFESSIONAL WIRELESS MICROPHONE
SYSTEM MANUAL

1
Thank you for selecting this wireless microphone system!
The newly system uses the latest PLL SYNTHESIZED and IR TECHNOLOGY, they have
excellent and skilled in manufacture technique of wireless,dependable performance, easy
set up and handle. Moreover, they have high fineness AF definition. Whether you are the
singer,guitar or exponential, it will be your best choice.
Warning
Please prevent the equipment dripping by water; do not put the liquid articles such
as vase on the equipment. This machine has no maintain part, for preventing
electric shock from being dangerous, do not turn on the machine cover without
permission. If need to maintain, please contact sale agent.
1. Read the operating instructions-You must read all the safety and operating instructions
carefully before use the equipment.
2. Reserved the operating instructions-Please reserved all the safety and operating instructions,
ready for the future checking.
3. Warning - Please note all the warning of the applications of this machine during operation.
4. Follow the instructions - Please follow the instructions of the machine and all operations.
5. Additional devices-Only allow the additional devices which recommended by the manufacture,
in order to avoid accident.
6. Rainy and humidity-Keep away from the water
7. Ventilation- Use and storage of the machine needs good ventilation environment, each
equipment space at least more than 5cm.
8. Heat-Please keep away from the heat, including: heater, radiator,stove and so on.
9. Power-Please use the standard power volts marked in the machine.
10. Equipment should not place naked flame sources, such as lighted candles.
11. Do not throw waste batteries, please put it into the designated recycling bins.
12. Don’t put all the liquid or heavy objects; prevent water droplets or water splash on the
equipment.
13. Equipment can be used in tropical or temperate zone

2
System include following parts:
●Receiver
●2 AA batteries (4 in combo systems)
●Power supply
●2 antenna
●User guide
●2 handheld microphone transmitters/ Lavalier Mic transmitter
●Lapel clip
Handheld microphone transmitter
Power Supply unit
Receiver Lavalier Mic transmitter Antenna
Front View of Receiver
1. Volume switch
2. LCD panel: display system information
3. Infrared Sensor: Broadcasts IR signal to transmitter to synchronize frequencies with
“DOWN” key
4. SET/UP/DOWN function key: Press “SET” key to select the main menu, then use “UP” and
“DOWN” key to change the selection menu status, press “SET” key again to save the
setting.
5. On/Off switch: Tap to turn on , hold to turn off

3
Rear View of Receiver
6. Power Jack: Connect to DC12V 600mA power adapter
7. Antenna Jack
8. Sensitivity adjustment dial
9. Balance output jack
10. Mixing output jack
Receiver LCD Display
1. RF signal level
2. AF audio level
3. Frequency display: When FREQ lighting, the digit display current working frequency
4. Channel display: When CHAN lighting, the digit display current working channel
5. RF power display
6. Channel display: Display current working channel
7. Mute: LCD will display mute if there is no signal
Function of Handheld Microphone Transmitter

4
1. Interchangeable microphone head
2. LCD screen
3. Power switch: Press and hold to turn on or off.
4. Microphone body: battery, circuit inside.
5. Built-in antenna
6. Infrared sensor: operating with “DOWN” key on the receiver
7. Battery case: Use two AA chargeable batteries. If you don’t use it for a long time, please
take it off.
Transmitter Microphone LCD Display
1. Channel display
2. Battery capacity
3. Please change the new battery if the battery capacity displayed as pic 2.
4. Microphone off
5. Pic 4: Transmitter microphone channel unlock,
6. Pic 5: Transmitter microphone channel lock on.
Battery Install
Please install the battery as following pic:
1. Hold on the upper part of the handheld, open the metal shell, disclosing the battery case.
2. Put two AA 1.5V batteries into the case, but please make sure the battery polar is correct
Note: Please don’t make the battery polar wrong, it would be damaged electronic
component inside the transmitter.
3. Cover the metal shell after batteries are settled.

5
Receiver Setting
(We have setting the default frequency and channel, please do not change the setting if
unnecessary)
1. Automatic frequency selection
Press “UP’ key, receiver will scanning and selecting the frequency automatically within 10
seconds, if press “SET” key during the scanning, receive will cancel this operating and remain
unchanged.
2. IR sync
Turn on transmitter microphone and receiver first, press “Down” key on receiver, and then
use the microphone IR sensor aim at the receiver’s IR port, receiver will save the setting and
exit automatically if the IR sync succeed, and RF indicator will display, MUTE symbol will
disappear, transmitter microphone will switch the channel and frequency same as receiver.
Lock/Unlock function
If you want lock or unlock the function key of receiver, please do as following:
1. Turn on receiver first.
2. Hold on to press ‘SET” key, and press “DOWN” key
3. LCD will display as pic 1 “LOC ON”
4. Release the key press at the same time, receive will lock the function key
5. Hold on to press ‘SET” key, and press “UP” key
6. LCD will display as pic 2 “LOC OFF”
7. Release the key press at the same time, receive will unlock the function key

6
Function of Lavalier Mic transmitter
1. Power On/Off switch
2. Lavalier Mic input jack
3. Antenna
4. LCD display
5. Infrared sensor
6. Lavalier Mic transmitter function key (the usage is same as the handheld Mic transmitter
function key)
7. Battery case
8. Lavalier Mic connector
9. Condenser microphone cartridge
Lavalier Mic transmitter LCD Display
1. Channel display
2. Battery capacity
3. Please change the new battery if the battery capacity displayed as pic 2.
4. Microphone off
5. Pic 4: Transmitter microphone channel unlock,
6. Pic 5: Transmitter microphone channel lock on.

7
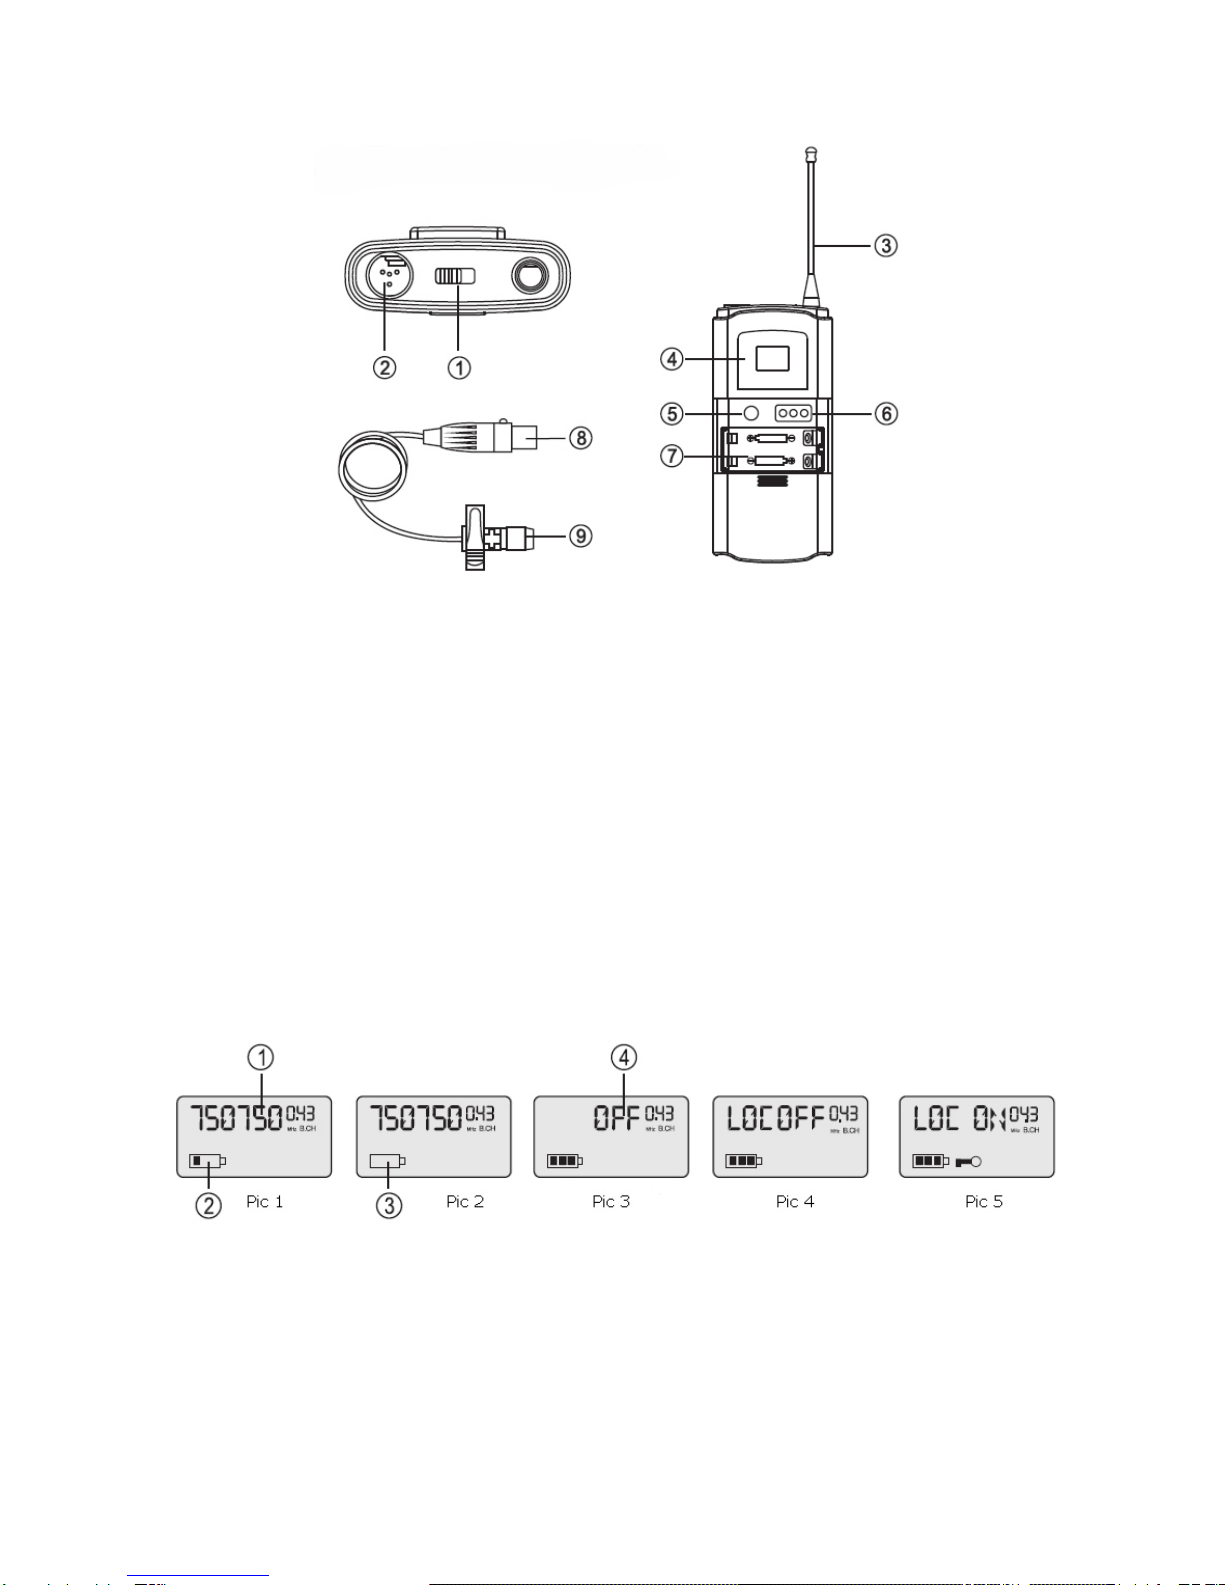
Operation of Lavalier Mic transmitter
1. Channel adjustment
Press “SET” key one time, when LCD top right corner display digit “X.XX” will flash, user
can use “UP’ & “DOWN” key to select the channel, frequency will change automatically,
frequency band is 250kHz, total 100 channel, user can save the setting with “SET” key
press.
2. Frequency band adjustment ( For example current is low band)
Press “SET” key two times, “BAN LO” will flash, user can use “UP’ & “DOWN” key to select
the frequency band, and then press “SET” key to save the setting when LCD “BAN HI”
flashing.
3. RF PWR adjustment (For example current RF is in high status)
Press “SET” key four times, “RF HI” will flash, user can use “UP’ & “DOWN” key to select
the RF PWR. LCD will display “RF LO” if user select low power, and then press “SET” key
to save the setting.
4. Sensitivity adjustment
Press “SET” key four times, LCD will display “VOL -30” or “VOL 0”, the digits will flash,
user can use “UP’ & “DOWN” key to select the sensitivity ( -30, -20, -10, 0, 0 is the
highest), and then press “SET” key to save the setting.
5. IR sync
Press “Down” key on receiver, and then use the transmitter IR sensor aim at the receiver’s
IR port to transmit the parameter to receive, receiver will save the setting and exit
automatically if the IR sync succeed
6. Lock & Unlock
Hold on to press ‘SET” key, and press “UP” key, LCD will display “LOC ON”, this indicate
transmitter’s function key was locked.
Hold on to press ‘SET” key, and press “DOWN” key, LCD will display “LOC OFF”, this
indicate transmitter has release the lock status.
(Transmitter unit will exit the setting if there is no operation after LCD digit flashing
within 6 seconds.)
Operation:
1. Connect the sound system
2. Turn volume of receiver and amplifier (KARAOKE system) to the lowest point.
3. Turn on sound system’s power step by step.
4. Turn on transmitter microphone
5. Adjust receiver’s volume to the middle. Open microphone’s power, and then adjust the
volume of amplifier slowly, make sure the microphone achieve the best effect. You can go
around using place when testing. If there is no hum when you going around, it means you
got perfect sound effect.
6. If there are problems with receiver system, please see the “Troubleshooting”. If you still
cannot find the solution, please contact professionals or local agency.
7. After using, turn off transmitter’s power first, and then turn of sound system step by step.
Note:
1. Since the installation of antenna influences the operating efficiency of the receiver.The
most important rule is to minimized the distance between receiving antenna and

8
microphone as short as possible for better reception and performance
2. To avoid RF signal influence, always keep the receiver away from computer or other
potential sources of interference.
3. Avoid installing the receiver at the lowest floor of equipment cabinet
4. This wireless system can support up to 200 microphones at the same time, no disturb, but
it has to be adjusted by professional before using.
Trouble Shooting
Problem/Status Solution
No sound (Status: No receiver RF signal )
Make sure transmitter and receiver’s
power switch “ON” position
Check the battery polar
Check the antenna of the receiver
Make sure there are no obstruct between
antenna and transmitter
No sound (Status: RF & AF signal active)
Check receiver volume knob
Check the connection of receiver,
amplifier and mixer.
Check the volume knob of amplifier and
mixer
No sound (Status: RF signal active, no AF
signal)
Check transmitter ’s power
Exchange the microphone if necessary
Distortion or unwanted noise bursts
Remove RF interference (CD players,
computers, in-ear monitor system, ect.)
Change receiver and transmitter to a
different frequency
Reduce transmitter gain
Replace transmitter battery
If use multiple systems, increase the
frequency band between systems
Sound level different from cabled guitar or
microphone, or when using different guitars
Adjust transmitter gain and receiver
volume as necessary
Can not turn on/off transmitter Replace the battery

9
Technique Specifications
1. System Parameter:
Working frequency: 740.000MHz-790.000MHz
Modulation: Broad Band FM
Frequency channel: 200
Switching bandwidth: 250 kHz
Frequency stability: ±0.005%
Dynamic range: 100dB
Max deviation: ±45KHz
Audio frequency response: 50Hz-18KHz (±3dB)
Signal noise ratio: > 105dB
THD: ≤0.5%
Operation range: About 80 m (No disturb)
Operation temperature range: -10℃~+50℃
2. Receiver Parameter
Receiving mode: DPPL
Medium frequency: 110MHz, 10.7MHz
Antenna connection: BNC/50Ω
Sensitivity: 12dBuV (80sB S/N)
Sensitivity adjustment range: 12-32dBuv
Noise Rejection: ≥75dB
Max output level: +10dBV
3. Transmitter Parameter
Antenna: Built-in
RF Output: <10mW
Noise Rejection: -60dB
Power: 2pcs AA batteries
Battery Life: 10 hours in normal power, 12 hours in low power
Table of contents
Other LY International Electronics Microphone System manuals
Popular Microphone System manuals by other brands

Huawei
Huawei OptiX RTN 950 Quick installation guide

Extron electronics
Extron electronics MTP A/V Series Setup guide

ETC
ETC CS-64 Administration & setup guide

Nady Systems
Nady Systems U-1000 Series owner's manual

RoomPro
RoomPro ONE installation guide

Revolabs
Revolabs 03-HDEXEC4EU Installation and operation guide