MABIS/Duro-Med Freedom 501-1026 Series User manual

Instruction Manual
Model 501-1026 Series
Freedom of
mobility!
Freedom of
mobility!
SERIESTM
DELUXE ROLLAT O R
CAUTION
This product contains natural
rubber latex which may cause
allergic reactions.

Overall Width: 28”
Storage Pouch: 15” x 10” x 7”
Wheels: 8”
Handle Height: 33” – 39”
Width Between Handles: 18”
Seat: 14” x 13”
Seat Height: 22”
Weight: 18 lbs.
Weight Capacity: 300 lbs.
ASSEMBLY INSTRUCTIONS:
1. Flip down rear wheels until they lock securely into place, Fig. 1.
2. Insert front wheels into frame, locking the brass retainer pins securely into position
through the holes on both sides of the rollator frame, Fig. 2. Position the star-shaped
knob onto bracket and tighten until secure, Fig. 3.
3. Place rollator upright with wheels on the floor. Push down on the center folding hinge
until it locks into place, Fig. 4.
4. Insert handlebars with pre-assembled hand brakes into rollator frame, Fig. 5. To adjust
height of the handlebars, align the holes in both the frame and handlebars and insert
screw through holes in the rollator bar. Attach washer and star-shaped knob over the
end of the screw and tighten until secure. Before use, make sure the handlebars are
level and aligned with the rear wheels.
5. Position the removable backrest onto rollator frame and secure by locking the brass
retainer pins into position through the frame holes on both sides of the rollator frame,
Fig. 6. Lower the padded seat over the pouch.
6. Before use, test and adjust the tension on the braking system to ensure proper and
secure braking.
WARNING! It is very important that you read all instructions before assembly and/or
use of this rollator. Before using the rollator, be sure your weight is within the weight
capacity of the unit. This rollator will require little assembly, which can be performed
without tools.
PARTS FOR ASSEMBLY:
Four (4) wheels; two (2) handlebars with loop-lock brakes; one (1) storage pouch; one
(1) backrest; two (2) washers; two (2) knobs
INSTRUCTIONS FOR TOOL-FREE ASSEMBLY
PARTS OF YOUR ROLLATOR AND SPECIFICATIONS
Hand grips
Backrest
Front wheels
Rear
wheel
Hand brake
Brake cable
Retainer
pin
Pin
Knob
Knob
Folding hinge
Seat
Storage pouch
2
SPECIFICATIONS
1026-Series
Fig. 1
Fig. 2
Fig. 3
Fig. 4
Fig. 5
Fig. 6

WALKING
This unit is to be used as a mobility aid creating a natural balance.
With hands grasped securely onto handgrips, slowly walk behind
the rollator. Gently push forward using evenly distributed weight
between handlebars.
BRAKING
Normal Brake can be activated by squeezing the brake handle,
similar to operating the brakes of a bicycle. This function may be
applied while walking with the rollator to slow down momentum,
to stop for a moment, or to maneuver around obstacles which may
be in your path.
Parking Brake can be activated by pushing the handle down into
the lock position. This function should be activated when the user
stops for a period of time. For safety reasons, the parking brake
should always be engaged before sitting down on the seat. For
example, while shopping it is beneficial to activate the parking
brake while stopped in an aisle to avoid the rollator from advancing
forward. To release the parking brake, gently pull up.
The braking system is convenient and easy to operate. People who may have hand disabilities should find the
brake handles wide, comfortable and non-binding. Minimum pressure will need to be applied to activate the
loop-lock brake system.
BEFORE USE, PLEASE READ ALL CAUTION AND WARNING LABELS ON THE ROLLATOR
USE OF NEW ROLLATOR
SQUEEZE TO STOP RELEASE TO ROLL PUSH DOWN TO LOCK
REMEMBER! ALWAYS ACTIVATE THE PARKING
BRAKE BEFORE SITTING.
FOLDING
It is not necessary to remove the storage pouch before folding the rollator. From the user side of the unit,
grasp the folding strap located inside the storage pouch and lift into the folded position. The rollator will fold
easily for storage or transport.
MAINTENANCE
Always make sure your brakes are operating correctly before use. Keep the brake handles free from dirt, dust
and grime. Build-up of particles could cause your brakes to engage improperly. If the brakes are not func-
tioning, check the cables for looseness. The cables can be tightened at the adjuster screw located where the
cable is connected to the brake handle. If the cable is broken, it will need to be replaced.
Periodically check
and tighten all nuts, bolts, screws and other hardware on rollator.
3
FOLDING AND MAINTENANCE INSTRUCTIONS

Always check your brakes before using your rollator. Keep your brake handles in excellent condition at all times. Always
check for loose parts, tightness of the cables and cleanliness. It is best to keep your rollator fully assembled at all times.
Specifications subject to change without notice.
This unit is not intended to be used as a wheelchair. At regular intervals, check and tighten all fasteners and hinged
parts. Check all plastic parts often for wear. Units are not designed to assist users from a sitting to a standing position.
When stopping, do not lean excessively on the unit. The brakes are not designed to withstand excessive pressure.
Excessive use causes the brake cables to stretch or fray and adjustment or replacement of the brake cable may be
required. DMI rollators are not suggested for people with severely limited ambulation for whom a rigid walker may be
recommended.
Failure to observe this warning may result in injury.
4
3-YEAR LIMITED WARRANTY
WARNING! READ BEFORE USING
CAUTION! CHECK BRAKES BEFORE USING
Your Duro-Med Industries (DMI) Freedom SeriesTM Deluxe Rollator is guaranteed to be free of manufacturing defects for
a period of three years from the date of purchase under normal use. This limited warranty does not apply to use in any
clinical or commercial applications. If the unit fails to operate during the warranty period, return it postage prepaid
along with a copy of the original dated purchase receipt and $10.00 for return shipping and insurance to: MABIS DMI
Healthcare, Attn: Repair Department, 1931 Norman Drive South, Waukegan, IL 60085. When returning a product,
please also include a letter with your name, address, phone number and brief description of the specific problem.
Please carefully package the product to avoid any damage that may occur during transit. If DMI determines that the
unit failed to operate due to a manufacturing defect, the unit will be repaired or replaced at the option of DMI. Repair
or replacement of the unit is the sole remedy under this limited warranty. This warranty gives you specific legal rights,
which vary from state to state.
Parts or materials which are subject to normal wear resulting from the use of this product, and which must be replaced
or repaired due to such normal wear, are the owner’s responsibility and are not covered by this warranty.
Products which have been subject to negligence, abuse, improper storage or handling, improper operation, unautho-
rized modifications or damages beyond reasonable control are not covered by this warranty.
This limited warranty constitutes DMI’s only responsibility and obligation to repair and/or replace materials or compo-
nents. We make no other express or implied warranties, arising by operation of law or otherwise, or any warranty of
merchantability or fitness for a particular use or purpose whether or not the use orpurpose has been disclosed to DMI
in specifications, drawings or otherwise, and whether or not DMI’s products are specifically designed and/or manufac-
tured by DMI for the buyer’s use or purposes, except for the limited warranty stated above. DMI will not be responsi-
ble for any indirect, incidental, special, consequential, or punitive damages or other loss, including, but not limited to,
damage to or loss of other property or equipment and personal injuries, whether to purchaser or others. DMI shall in
no event be liable to the purchaser for any amount in excess of the cost of repair and/or replacement of the unit. This
limited warranty supercedes any other waranty expressly written or implied.
Distributed by:
Duro-Med Industries
Div. of DMS Holdings Inc.
1931 Norman Drive South
Waukegan, IL 60085 USA
www.duromed.com
Made in China
Toll-Free Customer
Care Help Line
877-505-6190
Monday - Friday
8:00 am - 4:30 pm CST
#91-032-1026 05/07
©2007 Duro-Med Industries

Manual De Instrucción
Model 501-1026 Serie
SERIESTM
ROLLATOR DE LUJO
La libertad
de la movilidad!
La libertad
de la movilidad!
PRECAUCION:
Este producto contiéne hule
natural latex que puede
causar reacciones alergicas.

INSTRUCCIONES DE EMSAMBLE:
1. Baje las ruedas traseras con un golpecito hacia abajo hasta que queden firmemente
aseguradas en su lugar, Fig. 1.
2. Inserte las ruedas delanteras en la estructura y trabe los pasadores de retención de bronce en
su lugar a través de los orificios ubicados a ambos lados de la estructura del andador Rollator
con ruedas, Fig. 2. Coloque la perilla con forma de estrella en el soporte y ajústela hasta que
sté bien firme, Fig. 3.
3. Pare el andador Rollator hasta que quede derecho y con las ruedas apoyadas en el piso.
Empuje hacia abajo en el centro de la bisagra plegable hasta que se trabe en su posición,
Fig. 4.
4. Inserte los manubrios con los frenos de mano pre-ensamblados en la estructura del andador
Rollator con ruedas, Fig. 5. Para ajustar los manubrios, alinee los orificios de la estructura y
de los manubrios e inserte el tornillo en los agujeros de la barra del andador Rollator con
ruedas. Coloque la arandela y la perilla con forma de estrella sobre el extremo del tornillo y
ajústela bien. Antes de usarlo, asegúrese de que los manubrios estén nivelados y alineados
con las ruedas traseras.
5. Coloque el soporte posterior desmontable sobre la estructura del andador Rollator con ruedas
y asegúrelo trabando los pasadores de retención de bronce a través de los orificios ubicados
a ambos lados de la estructura del andador Rollator con ruedas, Fig. 6. Baje el asiento
acolchado sobre la bolsa.
6. Antes de usarlo, pruebe y ajuste la tension del sistema de frenos para asegurarse de que
puede frenar en forma correcta y segura.
Manijas de
mano
Ruedas de frente
Ruedas
posterior
Freno de
mano
Manija de freno
Pernos de
detenedor
Perilla
Barra plegable
Asiento
Bolsa para guardar cosas
6
INSTRUCCIONES PARA EMSAMBLE Y ESPECIFACIONES
Ancho Apróximado: 28”
Bolsa para Guardar Cosas: 15” x 10” x 7”
Ruedas: 8”
Altura de Pasamano: 33” – 39”
Ancho Entre Pasamano: 18”
Asiento: 14” x 13”
Altura del Asiento: 22”
Peso: 18 lbs.
Capacidad: 300 lbs.
ESPECIFICACIONES
1026 Serie
INSTRUCCIONES PARA ENSAMBLE
Barra de descanso
¡ADVERTENCIA! Es muy importante que Ud. lea todas las instrucciones antes del asamble y/o
el empleo de este rollator. Antes de la utilización del rollator, aseguro que su peso esta dentro
de la capacidad de peso de la unidad. Este rollator requerirá un pequeño emsamble or ninguna
y puede ser realizado sin herramientas.
PARTES DE EMSAMBLE:
Cuatro (4) ruedas; dos (2) manubrios con frenos autoblocantes de cables; una (1) bolsa para
guardar cosas; un (1) soporte posterior; dos (2) arandelas; dos (2) perillas
Fig. 1
Fig. 2
Fig. 3
Fig. 4
Fig. 5
Fig. 6

EL PASEO
Esta unidad debe ser usado como una ayuda de movilidad que crea
un equilibrio natural. Con manos bien agarradas sobre los
pasamanos, camine lentamenta despacio detrás del rollator. Con
cuidado, empuje adelante con el peso distribuído uniformemente
entre pasamanos.
EL FRENADO
Freno Normal puede ser activado tirando la manija de freno hacia
arriba, similar al funcionamiento de los frenos de una bicicleta. Esta
función puede ser aplicada, andando con el rollator para reducir la
velocidad del ímpetu, pararse un momento, o la maniobra
alrededor de obstáculos que pueden estar en su camino.
Freno de Parada puede ser activado empujando la manija abajo
en la posición de cerradura. Esta función debería ser activada
cuando el usuario se detiene por un periodo largo. Por razones de
seguridad, el freno de parada siempre deberá estar activado antes de
sentarse en el asiento. Por ejemplo, míentras que hace sus compras es beneficioso activar el freno de parada
mientras usted se detiene en la sección de la tienda para evitar que el rollator se mueva hacia adelante. Para
desactivar el freno de parada, empuje gentilmente el pasamano hacia arriba. El sistema de freno es conveniente
y fácil de operar. Personas que posiblemente tengan problemas con las manos deberían encontrar el freno de
parada ancho, confortable y no se dobla. La presión mínima tendrá que ser aplicada para activar el sistema de
freno de lazo que se cierra.
ANTES DE USAR, FAVOR LEA TODAS PRECAUCIONES Y ETIQUETAS DE ADVERTENCIA
USO DEL NUEVO ROLLATOR
APRETAR PARA PARAR SOLTAR PARA ANDAR
EL PLEGADO
No es necesario quitar la bolsa para guardar cosas antes de doblar el andador Rollator con ruedas. Ubicado
desde el lado del usuario, tome la tira plegable ubicada dentro de la bolsa y levántela hasta que quede dobla-
da. El rollator se doblará fácilmente para el almacenaje o el transporte.
EL MANTENIMIENTO
Siempre se asegura que sus frenos funcionan correctamente antes del empleo. Cuide que el freno se maneja
este libre de suciedad, el polvo y la mugre. El desarrollo de partículas podría hacer que sus frenos no fun-
cionen correctamente. Si los frenos no frenan, compruebe los cables para la soltura. Los cables pueden ser
apretados en el tornillo de ajustador localizado donde el cable es conectado a la manija de freno. Si el cable
es roto, esto tendrá que ser reemplazado. De vez en cuando compruebe y apriete todas las tuercas,
cerrojos, tornillos, y otras partes localizado en el rollator. 7
EMPUJAR HACIA ABAJO PARA
ASEGURAR
¡RECUERDE! SIEMPRE DEBE DE ACTIVAR EL FRENO DE
ESTACIONAMIENTO ANTES DE SENTARSE.
INSTRUCCIONES DE PLEGAMIENTO Y MANTENÍMIENTO

Estaunidad no es querida paraser usado como una silla de ruedas. A intervalos regulares, haga su distribuidor local
comprobar y apretar todos los sujetadores y partes de la bisagra. Compruebe todas las partes plásticas a menudo para
uso. Esta unidad no ha sido diseñada para asistir a usuarios que esten de pie a la posición sentada. Cuando este paran-
do, no se inclíne en exceso sobre la unidad. Los frenos no son diseñados para soportar la presión excesiva.
El empleo excesivo hace que los cables de freno puede producir estiramiento o desgaste y ajuste ó reemplazo del cable
de freno puede ser requerido. DMI rollators no son sugeridos para la gente con limitaciones de movimiento con severi-
dad limitado para quien pueden recomendar a un caminante rígido.
Omitir estas observaciones de advertencia puede causar una herida.
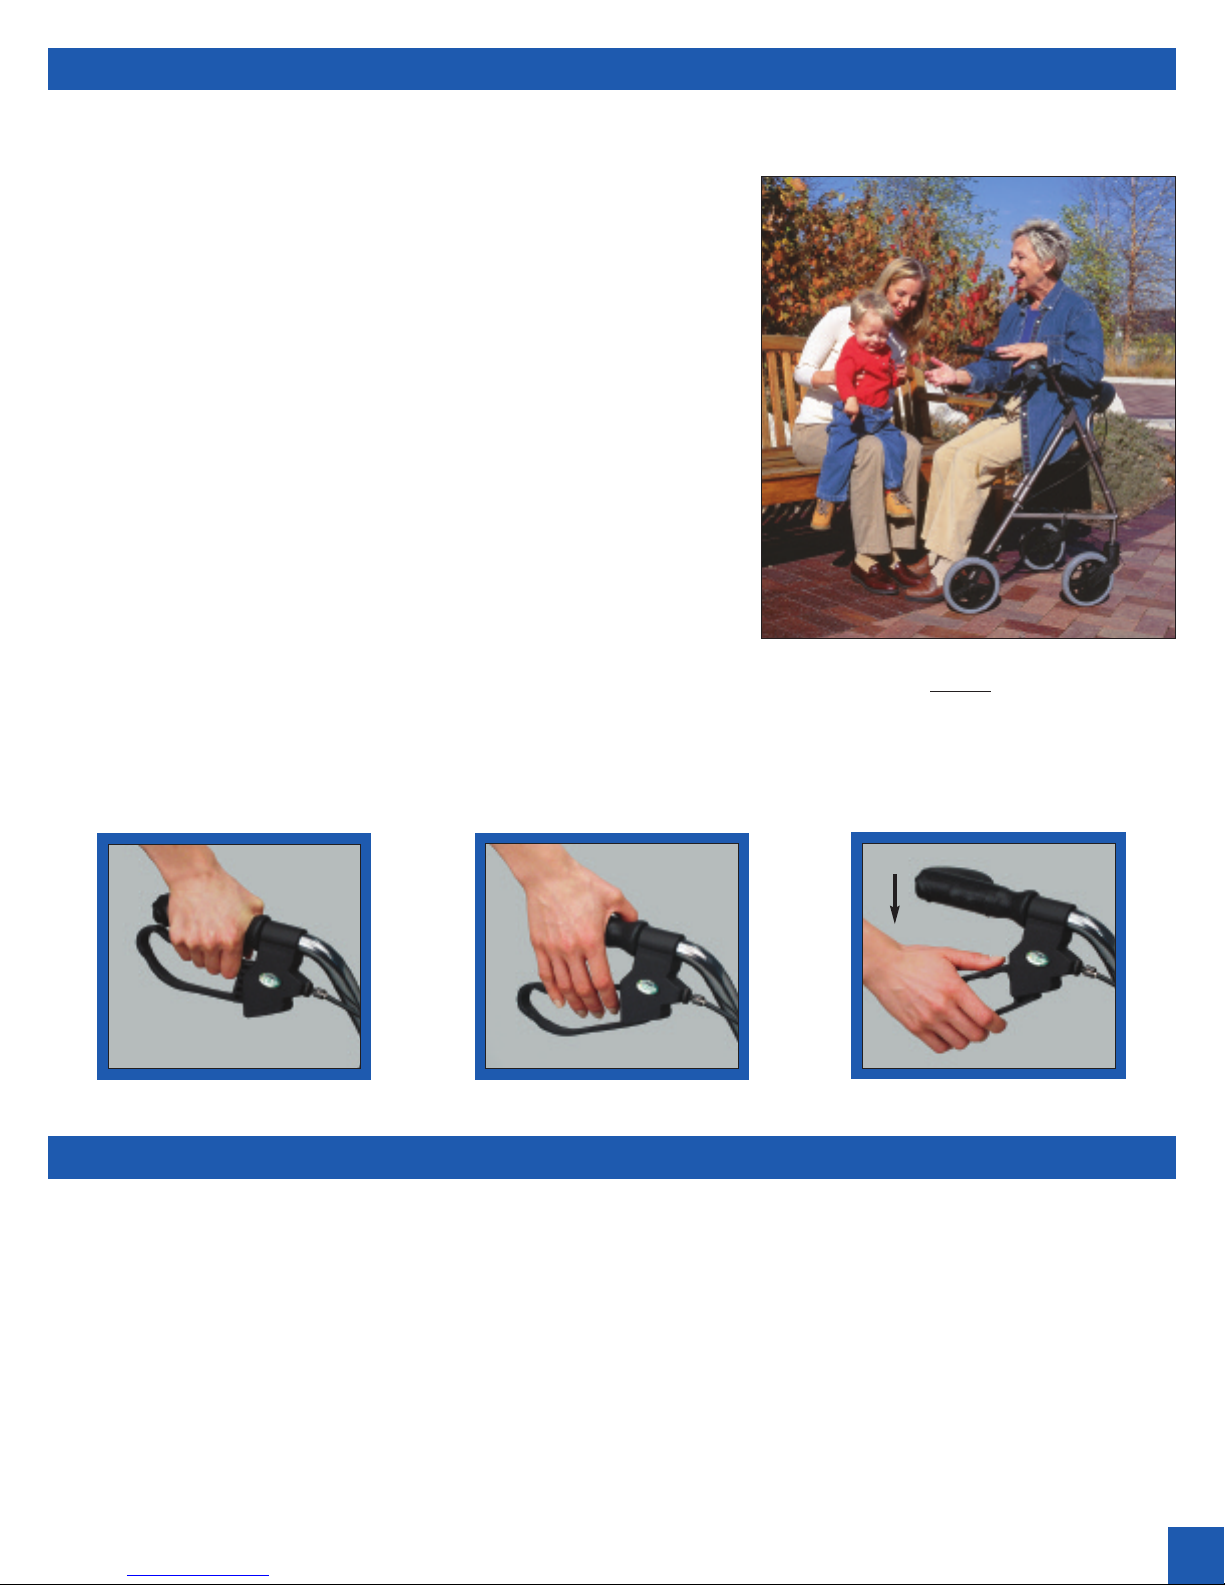
Siempre revise sus frenos antes de usar su rollator. Cuide su freno de mano en excelentes condiciones todo el tiempo.
Siempre revise por partes flojas, tensión en el cable y limpieza. Lo mejor es mantener su rollator en buen estado todo
el tiempo.
GARANTÍA LIMITADA DE TRES AÑOS
¡ADVERTENCIA! LEA ANTES DE USAR
¡CUIDADO! REVISE FRENOS ANTES DE USARLO
Su Rollator de Lugo Freedom SeriesTM de Duro-Med Industries (DMI) esta garantizado libre de defectos de produccion
por un periodo de tres años a partir de la fecha de compras bajo uso normal. Si esta unidad no funciona durante la
garuntia, devuela la unidad postado pagado con copia del recibo, original y $10.00 pararegreso y seguridad a: MABIS
DMI Healthcare, Attn: Repair Department, 1931 Norman Drive South, Waukegan, IL 60085. En regresar el producto,
favor de incluyír una carta con su nombre, direccion, numero de telephon y una, descripcion sensilla de la problema
specifica. Cuidadosamente por favor empaque el producto para evitar cualquier daño que puede ocurrír durante tran-
sito. Si DMI determina que la unidad dejó de funcionar debido a un defecto de fabricación, DMI optará por cambiar-
la o repararla. La reparación o cambio de la unidad es el único recurso que contempla esta garantía limitada. Esta
garantía le brinda derechos legales específicos que varían de estado a estado.
Las partes o los materiales que son sujetos al uso normal que es resultado del empleo de este producto, y que debe
ser reemplazado o reparados debido al uso normal, son la responsabilidad del dueño y no son cubiertos según esta
garantía.
Los productos que han sido sujetos a la negligencia, el abuso, el almacenaje impropio o el manejo, la operación
impropia, modificaciones no autorizadas o daño y perjuicios más allá de el control razonable no son cubiertos según
esta garantía.
Esta Garantía Limitada constituye la única responsabilidad y obligación de DMI de reparar y/o cambiar materiales o
componentes. No otorgamos otras garantías expresas o implícitas, que surjan de la operación de la ley o de otra man-
era, o cualquier garantía de comerciabilidad o adaptabilidad para un uso o propósito específico, ya fuera o no que el
uso o propósito hubiese sido divulgado a DMI en especificaciones, dibujo o de otra manera, y ya fuera o no que los
productos de DMI hubiesen sido específicamente diseñados y/o fabricados por DMI para el uso o propósito del com-
prador, excepto por la garantía limitada indicada anteriormente. DMI no será responsable por los daños indirectos, inci-
dentales, especiales, consecuentes o punitivos, u otras pérdidas, incluyendo, sin limitación, daños o pérdidas de otros
bienes o equipos y lesiones personales, ya sea al comprador o a otros. DMI no será de ninguna manera responsable
frente al comprador por cualquier monto que supere el costo de reparación y/o cambio de la unidad. Esta garantia lim-
itada reemplaza cualqueir otra garantia expresamente escrita insinúa.
8mobility!
Freedom of
mobility!
Las especificaciones están
sujetas a cambios sin previo aviso.
Fabricado por:
Duro-Med Industries
Div. of DMS Holdings Inc.
1931 Norman Drive South
Waukegan, IL 60085 USA
www.duromed.com
Hecho en China
Línea para Llamadas con
Pago Revertido de Ayuda de
Cuidados para Clientes
877-505-6190
Lunes-Viernes
8:00 a.m. - 4:30 p.m. CST
#91-032-1052 05/07
©2007 Duro-Med Industries
Table of contents
Languages:
Popular Mobility Aid manuals by other brands

NRS Healthcare
NRS Healthcare M01278 User instructions

Quantum Rehab
Quantum Rehab Synergy Solution 1 INFMANU3281 Installation and care guide

Aspire
Aspire Mobile Air Chair user manual

Moretti
Moretti EASYRED SL2040 Instructions for installation and use

Moretti
Moretti Mopedia RP755S instruction manual

Dietz
Dietz TAiMA XC user manual