ASSEMBLY AND FIT INSTRUCTIONS
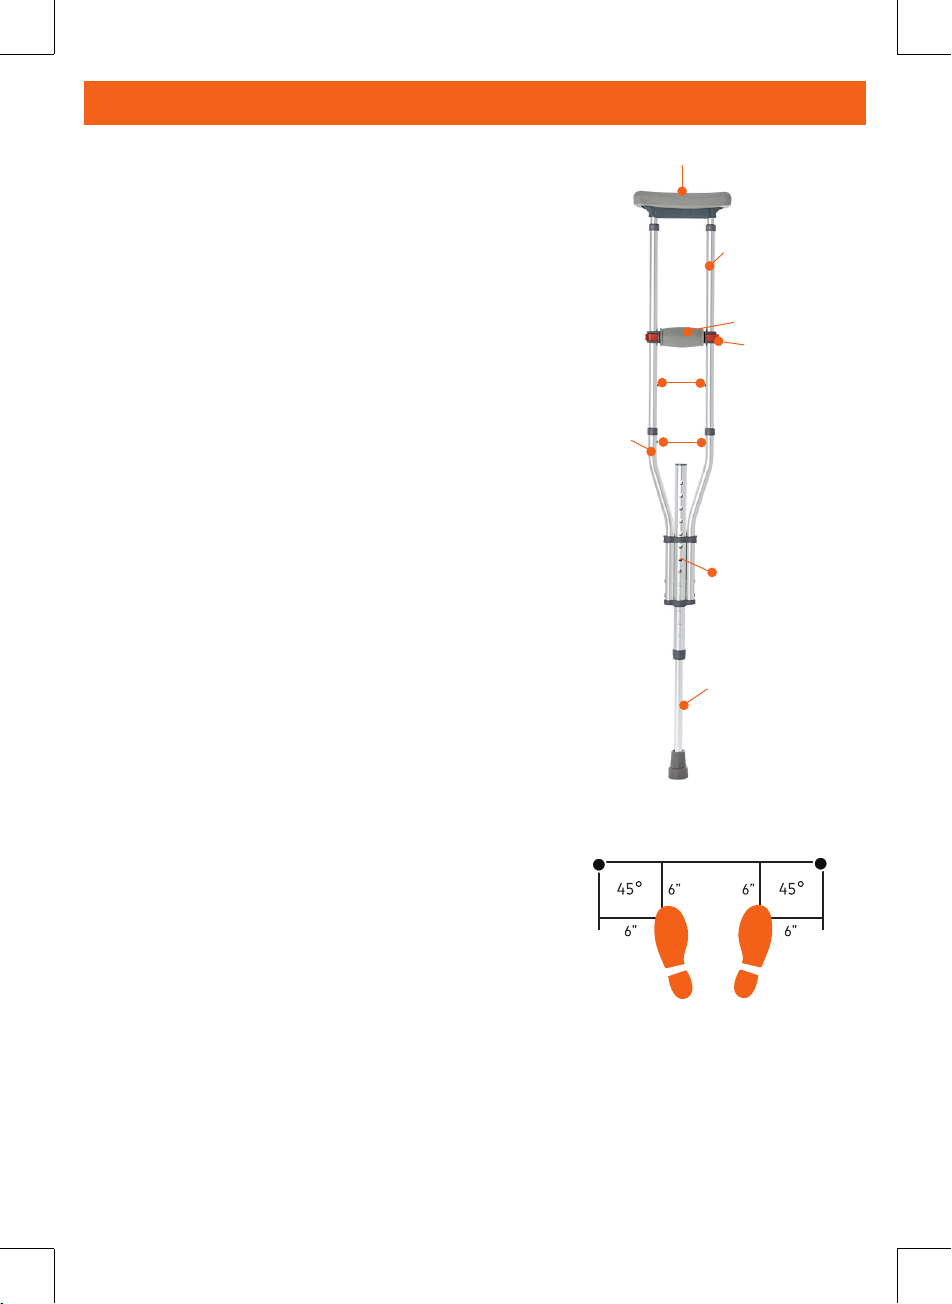
Underarm Pad
Adjustment
Tube
Receptacle
Tube
Hand Grip
Height
Adjustment
Tube
Euro-style
Clip
Adjustment
Holes
Adjustment
Holes
Height
Adjustment
Holes
1. Remove contents from package.
2. With one hand, place bottom section on floor with tip
securely on the ground. Insert top section into tubing as
shown. Depress both brass push pins simultaneously with
thumbs and slide top half into bottom half until the push
pins “pop” through holes. You will hear an audible click when
top section is secure.
Height Adjustment
1. Unlock both blue euro-style clips on hand grip by using
thumbs and pressing outward on thumb tab.
2. With both thumbs, push hand grip down in order to have
full access to brass push pins.
For individuals between 4’6” and 5’2”
3. Set underarm tube in first (lowest) set of INSIDE
adjustment holes on the top crutch section, making sure
push pins protrude all the way through the adjustment holes.
For individuals between 5’3” and 5’10”
3. Turn crutch upside down so underarm pad is on the floor.
With foot, hold underarm pad to the floor and pull up on
receptacle tube while depressing push
pins. Set tube in the second (middle) set of INSIDE
adjustment holes on the top crutch section, making sure
push pins protrude all the way through the adjustment holes.
For individuals between 5’11” and 6’6”
3. Turn crutch upside down so underarm pad is on the floor.
With foot, hold underarm pad to the floor and pull up on
receptacle tube while depressing push pins. Set tube in the
third (top) set of INSIDE adjustment holes on the top crutch
section, making sure push pins protrude all the way through
the adjustment holes.
4. Set hand grip by placing underarm pad under armpit and
sliding hand grip so that the elbow has a 10° bend.
5. When correct position is achieved, lock euro-style clips in
place by inserting into positioning hole and locking push tab.
6. Adjust height adjustment tube by depressing both silver
push pins and rotating slightly so push pins flow freely. Slide
to desired height and turn until silver push pins protrude
through holes.
7. Repeat for second crutch.
Caution
- Use after proper training under the direction of your doctor
or physical therapist.
- Replace Crutch Tips if worn.
- Use extra caution on wet and slippery surfaces.
Safety Check
With crutches positioned per diagram, confirm
patient can lean forward comfortably while
resting on the underarm supports. Patient
should not have to stand uncomfortably
erect. Ensure both push-buttons are firmly in place and
handgrip nuts are tightened
securely
Rhythm Healthcare, LLC -
Lifestyle Mobility Aids
3200 Tyrone Blvd N
St. Petersburg, FL 33710
contactus@rhythmhc.com
www.rhythmhc.com
877 843 6464
V2: 10/05/21


