MAC TOOLS UC3919-3DRW-BK User manual

UC3919-3DRW-BK/ UC3919-3DRW-BL/ UC3919-3DRW-LG/ UC3919-3DRW-OR/ UC3919-3DRW-RD
1 REV: 03/01/19
ASSEMBLY INSTRUCTIONS
®
STEP 1: INSTALL CASTERS TO BOTTOM
TRAY
(a) Install 4 casters to the bottom tray (#12). Two
locking casters (#13) should be installed on either the
right or left side, then the two non-locking casters
(#17) should be installed on the opposite side, see
drawing for reference.
(b) Fasten casters to tray with 16pcs bolts
(#14/15/16), bolts are included.
TOOLS NEEDED: 14mm combination wrench
• Lock lid and drawers before moving. • Apply brake on locking casters anytime cart
is in place. • Do not pull cart. Push from handle on end to move. • Units can tip
or fall causing damage or personal injury. • Cart is designed to roll easily on flat
surfaces and should not be used on uneven or inclined surfaces. • Do not open
more than one loaded drawer at a time. • Do not stand on or step in drawers.
• Keep children away from unit. • Wear gloves when lifting edges. • Failure to heed
these warnings may result in personal injury and/or property damage.
WARNING
Read and understand all instructions. Failure to follow all instructions listed below,
may result in electric shock, fire, explosion and/or serious personal injury. It is the
responsibility of the owner to make sure all personnel read this manual prior to using
the tool. It is also the responsibility of the tool owner to keep this manual intact and in
a convenient location for all to see and read. If the manual or product labels are lost or
not legible, contact Mac Tools for replacements. If the operator is not fluent in English,
the product and safety instructions shall be read and discussed with the operator in the
operator's native language by the purchaser/owner or his designee, making sure that
the operator comprehends its contents.
WARNING: Cancer and Reproductive Harm. -
www.P65Warnings.ca.gov.
SERVICE CART WEIGHT CAPACITY
Maximum Total Net Load ........................... 450 LBS
Top Compartment of Cart ........................... 150 LBS
Bottom Shelf of Cart ............................... 150 LBS
3-1/2" Drawers . . . . . . . . . . . . . . . . . . . . . . . . . . . . . . . 100 LBS each
4-1/2" Drawer ................................ 100 LBS each
PLEASE NOTE: Loading cart beyond rated capacity may cause structural
damage to the cart as well as personal and /or property damage. Please
educate your customers to the dangers of overloading. Do not attempt to
push cart with items on the top lid.
WARNING
Fig 1.
UC3919-3DRW-BK/UC3919-3DRW-BL
UC3919-3DRW-LG/UC3919-3DRW-OR
UC3919-3DRW-RD
-BK, -BL, -LG, -OR, -RD
3 DRAWER UTILITY CART

UC3919-3DRW-BK/ UC3919-3DRW-BL/ UC3919-3DRW-LG/ UC3919-3DRW-OR/ UC3919-3DRW-RD
2 REV: 03/01/19
®
ASSEMBLY INSTRUCTIONS
STEP 2: MOUNT PUSH HANDLE ONTO TUBE LEG
Install the Push Handle (#7) onto 2pc Tube Legs (#6) with 2pc
Screws (#23)
Note: Plastic Cover (#24) comes factory installed on the push
handle (#7).
TOOL NEEDED: 5mm Hex Key
ASSEMBLY INSTRUCTIONS
STEP 3: MOUNT TUBE LEGS ONTO BOTTOM TRAY
(a) Put left/right assembled legs (#6) on the bottom tray (#12)
(b) Attach the legs (#6) to bottom tray (#12) using M6 Bolt/Nut (#22/21/20/19)
TOOLS NEEDED: Screwdriver & 10mm combination wrench
ASSEMBLY INSTRUCTIONS
STEP 4: MOUNT SUPPORT BEAM
Mounting the Support Beam (#11) to cart body with M6 Screws (#18/19/20)
TOOL NEEDED: Screwdriver
STEP 5: MOUNT CART BODY
(a) Turn over the assembled frame (Step 4)
(b) Lift and move the cart body to the installing position - Fig 5.
(c) Fasten the Tube leg(#6) and the cart body with M6 x 25 bolts
(#27/#20#19)
(d) Fasten the Tube leg (#6) and support beams (#11) with M6 x 12 bolts
(#22/#21/#20/#19)
TOOLS NEEDED: 5mm Hex Key, 10mm combination wrench and
Screwdriver
UC3919-3DRW-BK/UC3919-3DRW-BL
UC3919-3DRW-LG/UC3919-3DRW-OR
UC3919-3DRW-RD
-BK, -BL, -LG, -OR, -RD
3 DRAWER UTILITY CART

UC3919-3DRW-BK/ UC3919-3DRW-BL/ UC3919-3DRW-LG/ UC3919-3DRW-OR/ UC3919-3DRW-RD
3 REV: 03/01/19
TROUBLESHOOTING
®
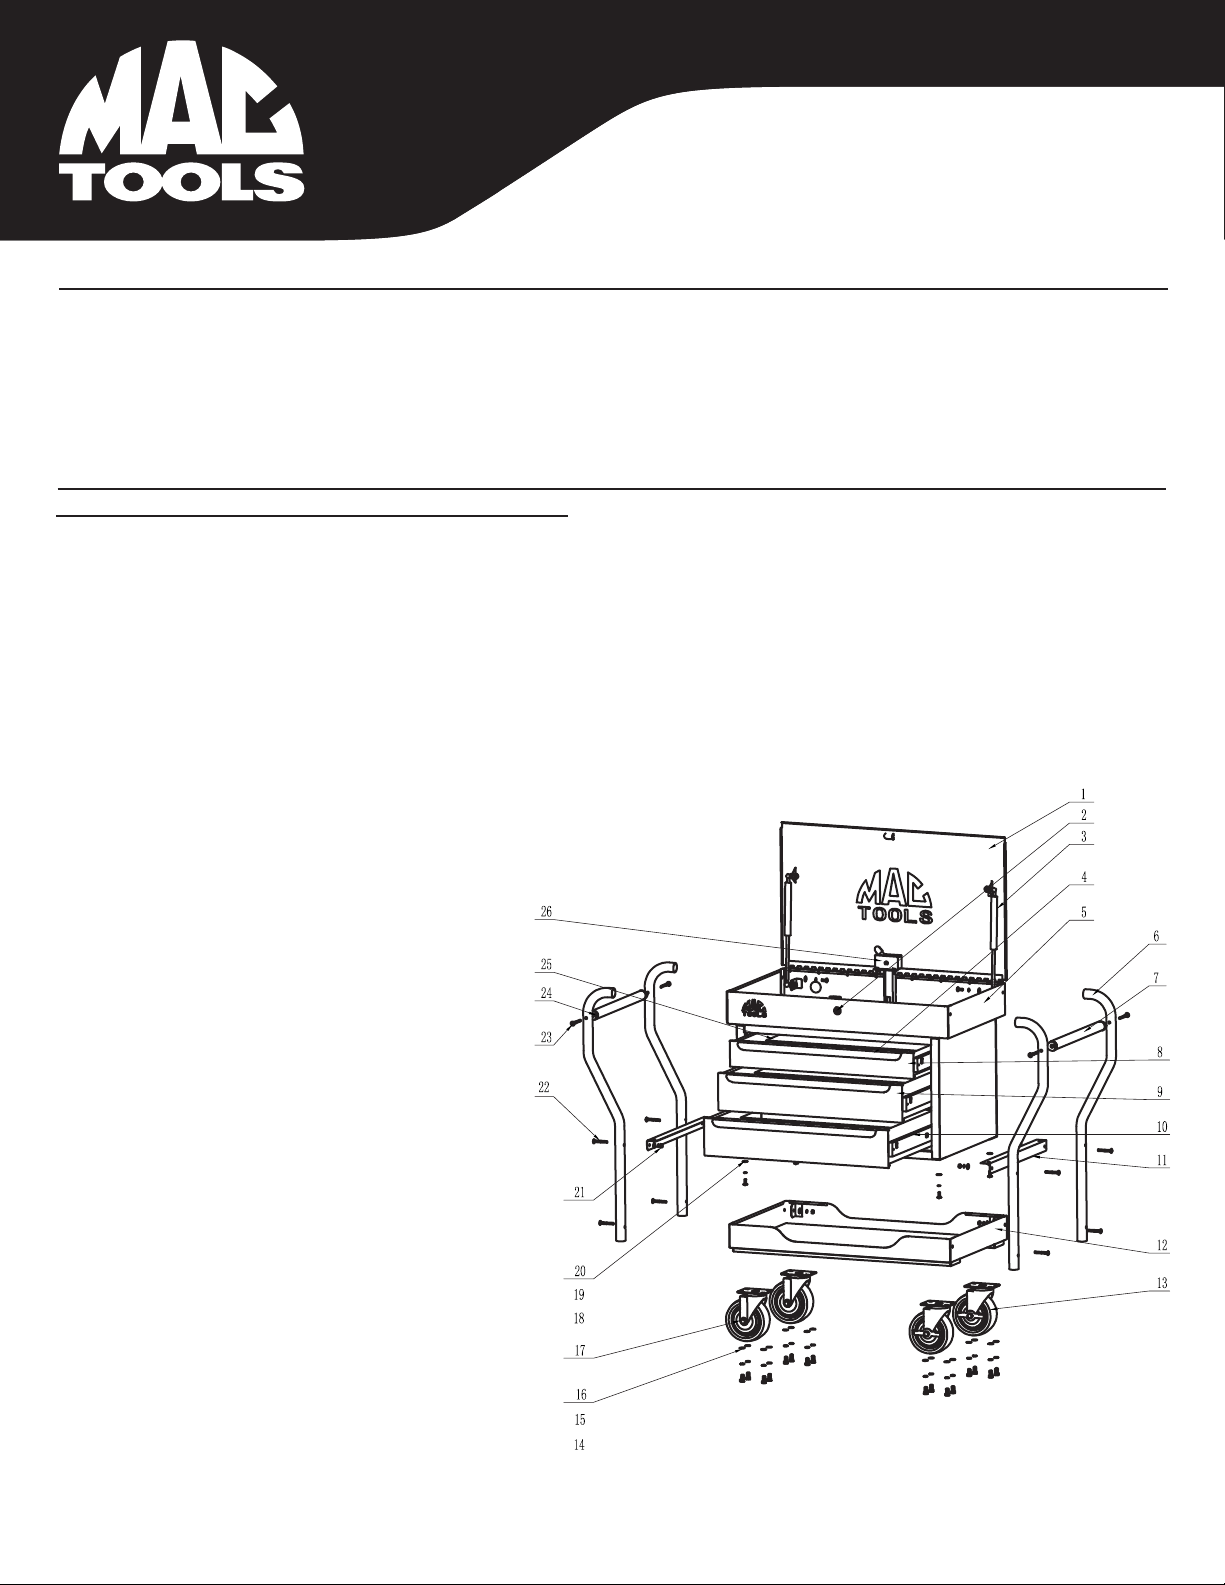
PARTS LIST AND PARTS DRAWING
Item No.Part No. No. Req'd Description
1 MB303LIDR 1 Lid - Red
MB303LIDBK 1 Lid - Black
MB303LIDBL 1 Lid - Blue
MB303LIDOR 1 Lid - Orange
MB303LIDLG 1 Lid - Lime Green
2 RS303LKBK 1 Lock Kit - Black
3 RS303GPBK 2 Gas Piston - Black
4 RS303DPTBK 3 Drawer Pull - Textured Black
5 1 Cart body
6 RS303TLTBK 1 Tube Leg - Textured Black (4 pc set)
7 RS303PHTBK 2 Push Handle - Textured Black (incl #24)
8 MB3033D 1 3-1/2" Drawer - Red
MB3033DBK 1 3-1/2" Drawer - Black
MB3033DBL 1 3-1/2" Drawer - Blue
MB3033DOR 1 3-1/2" Drawer - Orange
MB3033DLG 1 3-1/2" Drawer - Lime Green
9 MB3035D 2 4-1/2" Drawer - Red
MB3035DBK 2 4-1/2" Drawer - Black
MB3035DBL 2 4-1/2" Drawer - Blue
MB3035DOR 2 4-1/2" Drawer - Orange
MB3035DLG 2 4-1/2" Drawer - Lime Green
10 RSRBSLIDEC2 3 Roller Bearing Slides
11 RS303SBR 2 Support Beam - Red
RS303SBBK 2 Support Beam - Black
RS303SBBL 2 Support Beam - Blue
RS303SBOR 2 Support Beam - Orange
RS303SBLG 2 Support Beam - Lime Green
12 RS303BTR 1 Bottom Tray - Red
RS303BTBK 1 Bottom Tray - Black
RS303BTBL 1 Bottom Tray - Blue
RS303BTOR 1 Bottom Tray - Orange
RS303BTLG 1 Bottom Tray - Lime Green
13 RS323UCLC 2 5"x1.5" Swivel Locking Caster
14 * 16 Hex Screw (M8x16)
15 * 16 Spring Spacer (8.5x1.5)
16 * 16 Spacer (8.5x1.5)
17 RS323UCNLC 2 5x1.5” Swivel Non-locking Caster
18 ** 4 M6x12 Inner hexagon head screw - Black
19 ** 16 8 Spacer - Black
20 ** 16 8 Spring Spacer - Black
21 ** 8 M6 Nut - Black
22 ** 8 M6x45 Round Head Bolts - Black
23 RS303HK2 4 Push Handle Hardware Kit (M6x50) Screws - Black
24 RS303PHC 4 Push handle Cover (incl w/#7)
25 RS3035ELK 1 EVA Liner Kits (5 pc set)
26 RS303LMR 1 Lock Mechanism - Red
RS303LMBK 1 Lock Mechanism - Black
RS303LMBL 1 Lock Mechanism - Blue
RS303LMOR 1 Lock Mechanism - Orange
RS303LMLG 1 Lock Mechanism - Lime Green
27 ** 4 M6x25 Inner hexagon head screw - Black
not shown
RS303LMLK 1 Product Label Kit
Also available:
* RS89UCCBBK – Caster Hardware Kit (incl #14, 15 & 16) - Black
** RS303HK1 – Leg & Frame Hardware Kit (incl #18, 19, 20, 21, 22 & 27)
UC3919-3DRW-BK/UC3919-3DRW-BL
UC3919-3DRW-LG/UC3919-3DRW-OR
UC3919-3DRW-RD
-BK, -BL, -LG, -OR, -RD
3 DRAWER UTILITY CART
Problem: Drawers appear not to fit, do not slide in accurately and bump the cart sides.
Solution: The roller bearing slides must be fully engaged into the mounting slots on all drawers. They potentially could fall out of position in shipment or
during assembly. Remove the drawer that is out of position. The drawer is removed by the two clips on the roller bearing slides.
Simply push the roller bearing slide back down into position.
Insert the drawer back onto the roller bearing slides.
This manual suits for next models
4
Other MAC TOOLS Outdoor Cart manuals