Mad Catz WARHEAD 7.1 User manual

WARHEAD™ 7.1
WIRELESS SURROUND HEADSET
PRODUCT MANUAL
®

[2]
.com
TRITTONUSA
.com
TRITTONUSA
®
®
Package contents
[
[
[
[
[
[
[
[
EN
FR
DE
IT
ES
SV
DA
PT
]
]
]
]
]
]
]
]
Auriculares Warhead 7.1
Casque Warhead 7.1Warhead
Warhead 7.1-Headset
Cuffia Warhead 7.1
[
[
[
[
[
[
[
[
EN
FR
DE
IT
ES
SV
DA
PT
]
]
]
]
]
]
]
]
[
[
[
[
[
[
[
[
EN
FR
DE
IT
ES
SV
DA
PT
]
]
]
]
]
]
]
]
[
[
[
[
[
[
[
[
EN
FR
DE
IT
ES
SV
DA
PT
]
]
]
]
]
]
]
]
Microphone
Microphone
Mikrofon
Microfono
[
[
[
[
[
[
[
[
EN
FR
DE
IT
ES
SV
DA
PT
]
]
]
]
]
]
]
]
RCA Adapter Cable
Câble adaptateur RCA
RCA-Adapterkabel
Cavo adattatore RCA
Digital Audio Adapter
Adaptateur audio numériqu
Digitaler Audioadapter
Adattatore audio digitale
Base Station with Charger and Headset Stand
Socle avec chargeur et support de casque
Basisstation mit Ladegerät und Headset-Ständer
Stazione base con caricatore e supporto per cuffie
A
B
C
D
E
A
B
C
D E

[3]
.com
TRITTONUSA
.com
TRITTONUSA
®
®
[
[
[
[
[
[
[
[
EN
FR
DE
IT
ES
SV
DA
PT
]
]
]
]
]
]
]
]
[
[
[
[
[
[
[
[
EN
FR
DE
IT
ES
SV
DA
PT
]
]
]
]
]
]
]
]
[
[
[
[
[
[
[
[
EN
FR
DE
IT
ES
SV
DA
PT
]
]
]
]
]
]
]
]
Optical Cable
Câble optique
Optisches Kabel
Cavo ottico
2x Rechargeable Battery Packs
2 batteries rechargeables
2 Akkus
2 gruppi batterie ricaricabili
Package contents
F
G
HPower Adapter
Adaptateur d’alimentation
Netzadapter
Adattatore di alimentazione
F
G
H

[4]
.com
TRITTONUSA
.com
TRITTONUSA
®
®
contents
ENGLISH
Microphone Insertion Directions
Headset Stand Insertion Directions
Batteries
Headset Controls
Base Station
Digital Audio Setup
Analog Audio Setup
Power Save Mode
Wireless Range
Syncing Headset to Base Station
Stereo Input Modes
Dolby Digital/EX Input Modes
Matching with Controllers
Troubleshooting
Warranty
Technical Support
FRANÇAIS
Installation du microphone
Installation du support de casque
Batteries
Commandes du casque
Socle
Installation audio numérique
Installation audio analogique
Mode Économie d’énergie
Portée sans fil
Synchronisation du casque avec le socle
Modes d’entrée stéréo
Modes d’entrée Dolby Digital/EX
Association à des manettes
Résolution des problèmes
Garantie
Assistance technique
6
6
7
8
10
12
14
15
15
15
16
17
18
18
19
19
22
22
23
24
26
28
30
31
31
31
32
33
34
34
35
35

[5]
.com
TRITTONUSA
.com
TRITTONUSA
®
®
contents
DEUTSCH
Anweisungen zum Anschließen des Mikrofons
Anweisungen zum Anschließen des Headset-Ständers
Akkus
Headset-Steuerelemente
Basisstation
Digitale Audioeinrichtung
Analoge Audioeinrichtung
Energiesparmodus
Wireless-Bereich
Headset mit Basisstation synchronisieren
Stereo-Eingangsmodi
Dolby Digital-/EX-Eingangsmodi
Controllern zuordnen
Problembehandlung
Garantie
Technischer Support
ITALIANO
Indicazioni per l’inserimento del microfono
Indicazioni per l’inserimento del supporto per cuffie
Batterie
Comandi cuffie
Stazione base
Impostazione audio digitale
Impostazione audio analogico
Modalità risparmio energetico
Raggio di copertura del segnale wireless
Sincronizzazione delle cuffie con la stazione base
Modalità di ingresso stereo
Modalità di ingresso Dolby Digital/EX
Abbinamento ai controller
Risoluzione problemi
Garanzia
38
38
39
40
42
44
46
47
47
47
48
49
50
50
51
51
54
54
55
56
58
60
62
63
63
63
64
65
66
66
67
contents

[6]
.com
TRITTONUSA
.com
TRITTONUSA
®
®
WarnIng
Before using this product, read the manuals for this accessory and the Xbox 360 console (and any other applicable manuals) for
important safety and health information. Keep all manuals for future reference.
For replacement Xbox manuals, see www.xbox.com/support or call Xbox Customer Service.
PREVENTION OF HEARING LOSS
CAUTION – Permanent hearing loss may occur if earphones or headphones are used at high volume for prolonged periods of time.
MIcroPhone InsertIon
headset stand InsertIon
1
2
Locate jack port.
Insert microphone.
Adjust microphone into desired position.
1
2
Snap Headset Stand onto bottom of Base Station.

[7]
ENGLISH
.com
TRITTONUSA
.com
TRITTONUSA
®
®
batterIes
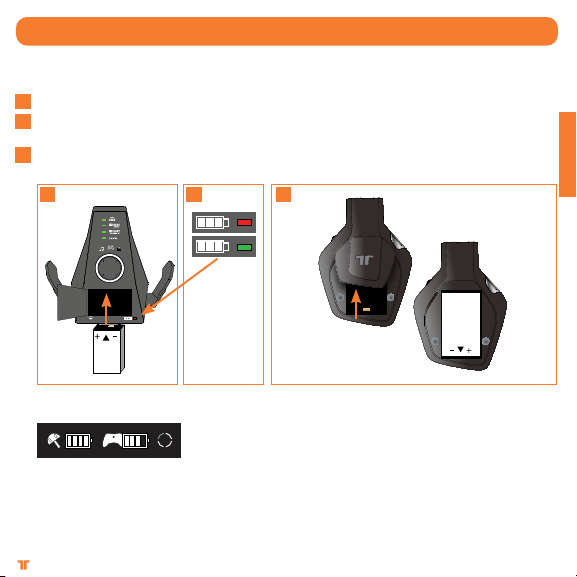
Charge your Warhead 7.1 Wireless Surround Headset batteries before first-time use, and
whenever either battery is depleted. To charge or recharge the battery:
Place the battery in the charging slot on the Base Station.
While the battery is charging, the Battery Charge Indicator will illuminate Red. Once
charging is complete, the Battery Charge Indicator will illuminate Green.
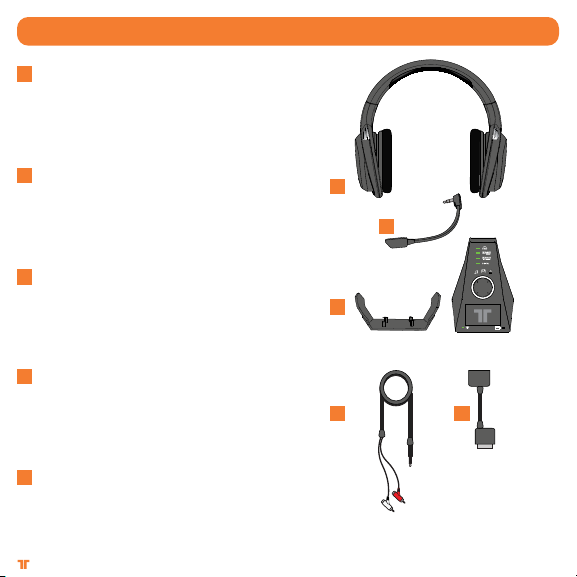
Once the battery is charged, insert it into the Headset by removing the battery cover from the
right earcup and placing the battery into the compartment.
To check the current charge level of the battery in the Headset, press and release the Xbox
Guide Button. The charging status will be displayed on screen.
Notes:
• Fullychargingabatterycantakeupto8hours.
• Ifthebatteryisunusedforalongtime,thebatterymayloseitscharge.
If this occurs, simply recharge the battery normally.
• ThebatteryandBaseStationmaybecomewarmwhilecharging.
1
2
3
1 2 3

[8]
.com
TRITTONUSA
.com
TRITTONUSA
®
®
headset controls - left sIde
Input: Push this button to toggle between the Analog and Digital (optical) inputs. Press
and hold this button for 0.5 seconds.
Mic Mute: Press the mic mute button so that others cannot hear you. The LED at the
end of the microphone will illuminate when the mic is muted.
Voice Communication Volume and SVM Control: Use to adjust the volume of the voices
of other players. SVM = Selectable Voice Monitoring. SVM allows the user to hear his or
her own voice through the Headset. Push in to turn SVM ON/OFF.
Connect Button: Push and release this button to match the Headset to the controller.
Press and hold this button for 3 seconds to connect Headset to the console.
A
B
C
D
A
B
C D

[9]
ENGLISH
.com
TRITTONUSA
.com
TRITTONUSA
®
®
Game Audio Volume and Mute: Use to adjust the volume of the game audio.
Push in to mute/unmute game audio.
Dolby Mode: Push to select between the various Dolby modes. Press and hold this button
for 0.5 seconds. See pages 16-17 for more information.
Power/Sync: Push and release to turn Headset ON/OFF. Hold for 5 seconds to put
Headset in Sync mode. See page 15 for more information on Syncing the Headset
to the Base Station.
headset controls - rIght sIde
E
F
G
E F G

[10]
.com
TRITTONUSA
.com
TRITTONUSA
®
®
base statIon
A
B
C
D
E
F
G
H
i

[11]
ENGLISH
.com
TRITTONUSA
.com
TRITTONUSA
®
®
base statIon
Dolby Headphone Indicator: Illuminates when Dolby Headphone mode is enabled.
Dolby Digital Indicator: Illuminates when a Dolby Digital signal is received.
Dolby Pro Logic IIx Indicator: Illuminates when Dolby Pro Logic IIx is enabled.
Digital Indicator: Illuminates when the Digital (optical) input is selected. The LED will turn
OFF when the analog input is selected.
Power/Sync Status Indicator:
a. Flashing: Syncing or searching for Headset.
b. Solid: Connected to a Headset while Base Station is powered ON.
c. OFF: Base Station is powered OFF.
EQ Mode Indicator: Indicates if Music, Movie or Game mode is selected.
Ring of Light: Indicates the quadrant to which the Headset is associated. See page 18 for
more information.
Battery Charging Slot: Insert battery here for charging.
Battery Charge Indicator: Red when charging, Green when fully charged.
AC Power Input
Line In
Digital Optical input
Sync Button: Press and hold for
2 seconds to put Base Station
in Sync mode. See page 15 for
more information.
A
B
C
D
E
F
G
H
i
j
k
l
m
j k l m
Rear of Base Station

[12]
.com
TRITTONUSA
.com
TRITTONUSA
®
®
dIgItal audIo setuP
Charge the battery and insert it into the Headset. See page 7 for more information.
Remove protective caps from the Optical Cable.
A- Plug one end of the Optical Cable into the optical port on the rear of the Xbox 360®S
Console. Plug the other end of the Optical Cable into the wireless Base Station.
OR
B- If using the Xbox 360 Console (Original) with HDMI, connect the Optical Cable to the
Digital Audio Adapter, and then connect the Digital Audio Adapter to the AV port on the
rear of the Xbox 360.
If using the Xbox 360 Console (Original) with Component/VGA/Composite AV cable,
connect the Optical Cable to the optical port on the Component/VGA/Composite AV cable.
Connect Power Adapter to Base Station. Plug Power Adapter into wall outlet.
Power ON the Xbox 360 Console and Headset.
In the Xbox dashboard, select System Settings > Console Settings > Audio > Digital Output
and select “Dolby Digital 5.1.” Watch to ensure that the “Dolby Digital” light on the Base
Station illuminates as a game or movie starts.
To confirm Xbox LIVE settings, press the “Xbox Guide Button” when a game is loaded, and go
to Personal Settings > Voice. Ensure that “Headset Only” is selected.
Press the connect button on the Xbox 360. Press and hold the connect button on the headset
for 3 seconds.
Match the Base Station quadrant to the controller by pressing the Connect Button. See page
18 for more information.
Press the Input button on the Headset to select the digital input. The “Digital” LED on the
Base Station will illuminate when the digital input is selected.
1
2
3
4
5
6
7
8
9
10

[13]
ENGLISH
.com
TRITTONUSA
.com
TRITTONUSA
®
®
dIgItal audIo setuP
A
B
3
4
3
3
4
*HDMI cable and Component/VGA/Composite AV cable not included

[14]
.com
TRITTONUSA
.com
TRITTONUSA
®
®
analog audIo setuP
Charge the battery and insert it into the Headset. See page 7 for more information.
Plug the 3.5mm stereo audio connector of the RCA Adapter Cable into the Line In input of
the Base Station.
Connect the Red/White RCA cables from the RCA Adapter Cable to the Red/White RCA
cables on the Component/VGA/Composite AV cable. Optional: Connect the male ends of
these cables to the RCA audio inputs on the display.
Connect Power Adapter to Base Station. Plug Power Adapter into wall outlet.
Power ON the Xbox 360 Console and Headset.
To confirm Xbox LIVE settings, press the “Xbox Guide Button” when a game is loaded, and
go to Personal Settings > Voice. Ensure that “Headset Only” is selected.
Press the connect button on the Xbox 360. Press and hold the connect button on the
headset for 3 seconds.
Match the Base Station quadrant to the controller by pressing the Connect button.
See page 18 for more information.
Press the Input button on the Headset to select the analog input. The “Digital” LED on the
Base Station will turn OFF when the analog input is selected.
1
2
3
4
5
6
7
8
34
9

[15]
ENGLISH
.com
TRITTONUSA
.com
TRITTONUSA
®
®
.com
TRITTONUSA
.com
TRITTONUSA
®
®
PoWer save Mode
If the Headset receives no audio for 15 minutes, the Headset will power down to save
battery power. Press the Power/Sync button to turn the Headset back ON.
WIreless range
The Warhead 7.1 Headset transmits audio via digital radio frequency (RF) and has an
operating range of 33 feet/10 meters in any direction. Please remain within this range for
optimal performance. Avoid placing the Base Station on top of a metal surface or behind
other devices that use RF. If the Headset is not operating properly within the 33-foot/10-
meter range, try moving the Base Station to a different location for improved performance.
syncIng headsets to base statIon
Note: Headsets are paired to the Base Station at the factory. This step is only
necessary when Syncing a new Headset.
With the Base Station powered ON, press and hold the Power/Sync button on the Base
Station for 2 seconds. The Power/Sync LED on the Base Station will flash slowly.
On the Headset, quickly press and hold the Power/Sync button for 5 seconds. The
Headset and Base Station will Sync, and the LED on the Base Station will illuminate solid
when the Syncing is successful.
1
2
33ft/10m

[16]
.com
TRITTONUSA
.com
TRITTONUSA
®
®
Pro Logic IIx Game 7.1 audio
Pro Logic IIx Movie 7.1 audio
Pro Logic IIx Music 7.1 audio
stereo InPut Modes
No LEDs
LED lights ONMode
Stereo

[17]
ENGLISH
.com
TRITTONUSA
.com
TRITTONUSA
®
®
dolby dIgItal/eX InPut Modes
Pro Logic IIx Game 7.1 audio
Pro Logic IIx Movie 7.1 audio
Pro Logic IIx Music 7.1 audio
Dolby Digital Game 5.1 audio
Dolby Digital Movie 5.1 audio
Dolby Digital Music 5.1 audio
LED lights ONMode
Stereo

[18]
.com
TRITTONUSA
.com
TRITTONUSA
®
®
MatchIng WIth controllers
If a controller is connected to quadrant 1, the Xbox 360 will associate the Headset with
quadrant 1 on the Ring of Light. If another wireless Headset is already associated with
quadrant 1, the Headset will be associated with quadrant 2.
Press the Connect button on the Headset repeatedly to match the quadrant of the Headset
to the quadrant of the controller in use. For example, if the controller on the Xbox 360 is
assigned to quadrant 3, press the Connect button on the Headset until quadrant 3 lights up
on the Base Station.
troubleshootIng
Chat isn’t working:
• MakesureyourconsoleisconnectedtoXboxLIVE.ForinformationaboutXboxLIVE,visitwww.xbox.com/live.
• Makesurethebatteryisfreshlycharged.
• Ifyouhave4wirelesscontrollersconnectedtoyourconsole,youwillneedtodisconnectoneoftheminordertoconnect
a wireless Headset. To disconnect a wireless controller, press and hold the Xbox Guide Button for 3 seconds, and then
turn the controller OFF.
No Sound:
• Checkthatthegameaudiomuteswitchisnotenabled.
• CheckthattheBaseStationispluggedin,poweredON,andpairedtotheHeadset.
• CheckthattheOpticalorAnalogAudioConnectionCableisconnectedbetweentheBaseStationandtheXbox360,
and that the correct input is selected on the Base Station. Check to ensure that the plastic protective caps on the
Optical Cable have been removed.
• MovetheHeadsetclosertotheconsole.
• Makesurethebatteryisfreshlycharged.

[19]
ENGLISH
.com
TRITTONUSA
.com
TRITTONUSA
®
®
Warranty
Register your product at TRITTONUSA.COM to receive warranty coverage, news, events and updates.
If you have any issues using this product, please try the following before returning this product to the store:
If people cannot hear you talk, make sure that the mute switch is not enabled.
• To confirm Xbox LIVE settings, press the Xbox Guide Button when a game is loaded, and go to Personal Settings > Voice. Ensure that
“Headset only” is selected.
• For immediate support, visit http://www.trittonusa.com to find the latest documentation, Knowledge Base articles, and software for
your device. You can also chat live with a support technician or submit a trouble ticket.
2-year limited warranty
Mad Catz warrants this product to be free from defects in materials and workmanship for the warranty period. This non-transferable, two- (2) year limited
warranty is only to you, the first end-user purchaser. If a defect covered by this warranty occurs AND you have registered your product with Mad Catz
AND you provide proof of purchase, Mad Catz, at its option, will repair or replace the product at no charge.
The Mad Catz two- (2) year limited warranty is available to North American and European customers. Your sole and exclusive remedy is repair or
replacement of your Mad Catz product. In no event shall Mad Catz liability exceed the original purchase price of the product. This warranty does not
apply to: (a) normal wear and tear or abusive use; (b) industrial, professional or commercial use; (c) if the product has been tampered with or modified.
To receive warranty service you must:
- North America: call Mad Catz Technical Support at 1.800.659.2287 or 1.619.683.2815
- Europe: call Mad Catz Technical Support at +44 (0) 8450-508418
- Obtain a Return Authorization Number from Mad Catz Technical Support
- Ship the product to Mad Catz at your expense for service
- Enclose a copy of the original sales receipt showing a purchase date
- Enclose a full return address with daytime and evening phone numbers
Online Support and User Guides: www.trittonusa.com
North American telephone: Available 8am - 12pm, 1 - 4pm Pacific Standard Time, Monday
through Friday (excluding holidays) at 1.800.659.2287 (US only) or 1.619.683.2815 (outside US).
European telephone: Available 9 A.M. to 5 P.M. Greenwich Mean Time, Monday through Friday (excluding bank holidays) at +44 (0) 8450-508418
CAUTIONS
• Long-termexposuretoloudmusicorothersoundsinheadphonesmaycausehearingdamage.Itisbesttoavoidextremevolumelevelswhen
using headphones, especially for extended periods.
• Usethisunitonlyasintended.
• Topreventreorshockhazard,donotexposethisunittorainormoisture.Donotusewithin30’ofanywatersuchasswimmingpools,bathtubs,
or sinks.
• Toavoidelectricalshock,donotdisassemble.Referservicingtoqualiedpersonnelonly.
• Neverinsertobjectsofanykind,otherthanauthorizeditems,intotheproductastheymaytouchdangerousvoltagepointsorshortoutpartsthat
could result in fire or electrical shock.
technIcal suPPort

[20]
.com
TRITTONUSA
.com
TRITTONUSA
®
®
• Stopusingthisunitimmediatelyifyoubegintofeeltiredorifyouexperiencediscomfortorpaininyourhandsand/orarmswhileoperatingthe
unit. If the condition persists, consult a doctor.
• Avoidprolongeduseofthisunit.Takebreaksevery30minutes.
• Routeallcordssothattheyarenotlikelytobewalkedonortrippedover.Makesurethatcordsarenotplacedinapositionorareaswherethey
may become pinched or damaged.
• Donotwrapcordsaroundanypartofanyone’sbody.
• Donotallowchildrentoplaywithcords.
• Thisunitshouldbeoperatedonlyfromthepowersourceindicatedontheunit.Ifyouarenotsureofthetypeofelectricalpowersuppliedtoyourhome,
contact your local power company.
• Donotoverloadwalloutletsorextensioncordsbeyondtheircapacity,sincedoingsocancausereorelectricshock.
• Misuse of batteries within this unit may cause batteries to leak and/or explode and lead to personal injury.
• This product contains small parts that may cause choking if swallowed. Not intended for use by children under 3 years of age.
WARNINGS
- Non-rechargeable batteries are not to be recharged.
- Do not mix old and new or different types of batteries.
- Batteries are to be inserted with the correct polarity.
- Remove exhausted batteries from the product.
- Supply terminals are not to be short-circuited.
- Rechargeable batteries are to be removed from the product before being charged.
- Rechargeable batteries are only to be charged under adult supervision.
- The packaging must be retained since it contains important information.
United States and Canada:
As required, certain of these class B digital devices (the headsets) have been tested by Mad Catz, Inc., 7480 Mission Valley Road, Suite 101, San Diego, CA
92108, and found to comply with part 15 of the FCC rules and the Canadian RSS-210 which sets forth limits designed to provide reasonable protection against
harmful interference in a residential installation. These device(s) use, generate and can radiate radio frequency energy and, if not assembled, installed and
used in accordance with the instructions, may cause harmful interference to radio communications. There is no guarantee that interference will not occur in
any particular location or use. Operation is subject to the following two conditions: (1) this device may not cause harmful interference and (2) this device must
accept any interference received, including interference that may cause undesired operation.
FCC Part 15 section 15.105
Warning: Any changes or modifications made on the system not expressly approved by the manufacturer could void the user’s authority to operate
the equipment.
Exposure to Radio Frequency Radiation:
The radiated output power of the headset is well within FCC radio frequency exposure limits for this type of device when unaltered and used as described in our
instructions and the controller operates within guidelines found in radio frequency safety standards, which reflect the consensus of the scientific community
and therefore, the manufacturer believes the device’s internal wireless radio is safe for use by consumers. The level of energy emitted is far less than the
electromagnetic energy emitted by wireless devices such as mobile phones. However, the use of wireless radios may be restricted in some situations (e.g., on
airplanes). If you are unsure of restrictions that may apply in any situation, you must ask for authorization before turning on, connecting or using the controller.
EU DECLARATION OF CONFORMITY:
As required, certain of these products have been tested and conform to the requirements of the European Union Directives 1999/5/EC, 2002/95/EC,
2002/96/EC, and 2004/108/EC. Authorized signatory of the manufacturer is Mad Catz, Inc., 7480 Mission Valley Road, Suite 101, San Diego, CA 92108.
CAUTION
RISK OF EXPLOSION IF BATTERY IS REPLACED BY AN INCORRECT TYPE.
DISPOSE OF USED BATTERIES ACCORDING TO THE INSTRUCTIONS.
12/11
Table of contents
Languages:
Other Mad Catz Headset manuals