Maestri ELPABOX BH User manual

ELPABOX BH
Graffatrice Manuale
Manual Carton Stapler
Istruzioni d’uso
Instructions for use
Mode d’emploi
Gebrauchsanleitung
Modo de empleo

2
ELPABOX BH IT
ATTENZIONE
Attenersi sempre alle norme di sicurezza ed alle istruzioni
contenute in questo stampato. Il costruttore declina
ogni responsabilità conseguente ad un uso non corretto
dell’aggraffatrice.
NORME DI SICUREZZA
• Non utilizzare l’aggraffatrice se vi sono parti danneggiate.
• Usare e riporre l’aggraffatrice in zone sicure, fuori dalla
portata di bambini ed estranei.
• Seguire le norme antinfortunistiche vigenti.
• Non manomettere l’aggraffatrice.
• Usare sempre punti originali.
• L’area di lavoro su cui l’aggraffatrice deve essere utilizzata,
deve essere sgombra; la confusione e il disordine sono
sempre potenziali cause di infortunio.
• Non giocate con l’utensile; rispettatelo in quanto
strumento di lavoro.
• Effettuate controlli giornalieri sul buono stato
dell’aggraffatrice.
• Fate sempre attenzione a come usate l’ aggraffatrice. Usare
il buon senso, evitare situazioni pericolose o di equilibrio
precario, soprattutto quando si é affaticati.
• In caso di dubbio, o per ulteriori informazioni tecniche,
rivolgersi al Servizio Assistenza.
DATI TECNICI
• Peso: Kg. 1,250
• Dimensioni: 310 x 250 x110 mm
• Punti utilizzabili:
32/15 - 32/18
35/15 - 35/19
• Capacità caricatore: 100 punti
• Regolazione della profondità e della forma del punto.
• Fusione in lega speciale di alluminio
FUNZIONAMENTO
• CARICAMENTO
Per caricare l’aggraffatrice, sbloccare il gancio d’ arresto (fig.
1), introdurre i punti del tipo voluto e riaccompagnare con
il palmo della mano il copribanchina (fig.2) con movimento
progressivo.
• CAMBIO ALTEZZA PUNTO
É l’ unica aggraffatrice che consente l’uso di due altezze
diverse di punti metallici, 15 e 19 mm (5/8” e 3/4”) senza
dover cambiare macchina. Posizionare con una moneta il
disco posto poco sotto il grilletto (fig. 3) in relazione al tipo di
punto introdotto (fig. 4 o fig. 5).
A regolazione avvenuta, la tacca dovrà risultare in posizione
orizzontale.
• REGOLAZIONE DI PROFONDITÀ
Per una corretta chiusura del cartone e per la salvaguardia
del prodotto contenuto, regolare la profondità di cucitura
sbloccando prima la leva di chiusura (fig. 6) e quindi
ruotandola nella posizione corrispondente alla profondità
voluta (fig. 7 e 8), indi ribloccarla.
• REGOLAZIONE DELLA FORMA DEL PUNTO
Per una corretta cucitura in relazione ai diversi tipi di cartone
regolare la forma finale del punto (fig. 10) ruotando con un
cacciavite la vite di regolazione (fig. 9 e 11), fino ad ottenere
la forma desiderata.
DISINCEPPO
L’aggraffatrice, se correttamente regolata ed usando punti
esenti da difetti, difficilmente si inceppa. Qualora si verificasse
tale eventualità, procedere come segue:
• Scaricare il Magazzino portapunti
• Sbloccare completamente e sfilare dal perno eccentrico
42495 la leva di chiusura 70895 (fig. 12)
• Allontanare dal corpo C il coperchio 42514 (fig. 12)
• Asportare il punto inceppato controllando che non ve ne
siano altri incastrati nel magazzino
• Per asportare il punto inceppato non utilizzare
assolutamente utensili quali cacciaviti o simili
• Rimontare la leva di chiusura 70895 sul perno eccentrico
42495 e bloccarla nella posizione di regolazione originaria
ATTENZIONE: solo il materiale da aggraffare deve trovarsi nel
raggio d’ azione delle ganasce E e F (fig. 12)
MANUTENZIONE
Per un regolare funzionamento dell’ aggraffatrice, PULIRE e
LUBRIFICARE periodicamente con grasso od olio per motori
tutti gli snodi e le parti mobili (fig. 12). Tali operazioni non
richiedono in genere lo smontaggio dell’ aggraffatrice.
NORME PER LO SMONTAGGIO
Lo smontaggio dell’aggraffatrice deve essere affidato a
persona competente, dotata di attrezzi adatti.
Ci si dovrà comunque attenere alle seguenti istruzioni:
• Sbloccare a fondo e sfilare la leva di chiusura 70895 (fig.12)
• Ruotare su se stessa e togliere la piastrina 70894 (fig.12)
• Sfilare la rondella 70893, l’ anello di gomma 61023 ed il
perno eccentrico 42495 (fig.12).
A questo punto l’aggraffatrice é completamente aperta e si potrà
procedere a qualsiasi tipo di intervento, seguendo le avvertenze
contenute all’interno del presente stampato (fig.12).
Per esigenze tecniche di funzionalità e di estetica, la ditta
costruttrice può, in qualsiasi momento e senza obbligo di
avvisare la committente, apportare modifiche agli articoli
esposti nel catalogo.

3
ELPABOX BH GB
WARNING
Always follow the safety rules and instructions in this manual.
The manufacturer will not accept any responsibility for
damage caused by improper use of the stapler.
SAFETY RULES
• Do not use the stapler if some parts are damaged.
• Use and store the stapler in a safe place, away from children
and unauthorised people.
• Always follow all the safety regulations in force.
• Do not tamper with the stapler.
• Always use genuine staples.
• The work area on which the machine is used must be
cleared up. Disorder is a potential cause of accidents.
• Do not play with the stapler. Remember it is a tool.
• Pay attention and watch what you are doing. Use common
sense, even avoid unsafe situation or unbalanced positions,
particularly when you are tired.
• For any enquiries or for further technical information,
contact the Service Department.
TECHNICAL DATA
• Weight: Kg. 1,250
• Size: mm 310 x 250 x110.
• Staples:
32/15 - 32/18
35/15 - 35/19
• Magazine capacity:100 staples
• Adjustable staple penetration and clinching
• Casting made from special aluminium alloy.
FUNCTIONING
• LOADING
To load the stapler, unlock and push back magazine cover
(fig. 1), insert desired staples and relock magazine cover
moving it forward with the palm of your hand (fig. 2).
Changing the staples height - lt is the only stapler allowing
the use of two different staples legs length 15 mm and 19
mm (5/8” and 3/4”) in the same machine. Position with a
coin the staple adjustment disc placed near the trigger (fig. 3)
corrisponding to staples inserted (fig. 4 or fig. 5). The notch
should then be in horizontal position.
• ADJUSTING THE STAPLING DEPTH
For reaching the best closing of the box and with safe of
the inside products, adjust the stapling depth by loosening
the closure lever (fig. 6) and turming it in the position
corresponding to the depth wanted (fig. 7 and 8), then lock
it again.
• ADJUSTING THE STAPLING SHAPE
For the correct stapling with various kind of corrugated
cardboard, adjust clinching of the staple (fig. 10) by turning
with a screwdriver the adjusting screw (fig. 9 and 11) until the
desired shape has been obtained.
UNJAMMING
In case of jam, proceed as follows: Unload staple magazine
Closing lever 70895 (fig. 12) must be released completely
and unthreaded from latch pin 42495.
Take off front cover 42514 from main housing C (fig. 12).
Remove jammed staple and control that no further staples
are stuck in the magazine.
To remove jammed staple never use tools as screwdriver
Remount closing lever 70895 on latch pin 42495 in previously
adjusted position.
ATTENTION: only the material to be stapled should be within
the functioning area of the anvils E and F (fig.12).
MAINTENANCE INSTRUCTIONS
To secure continuous work, all movable parts of your stapler
must be CLEANED and LUBRICATED at intervals with grease
or motor oil (fig. 12). Normally the machine does not need
disassembling for this operation.
DISASSEMBLING INSTRUCTIONS
Although very simply designed, the machine should only be
disassembled by skilled labour.
The following instructions should always be followed:
• Turn loose and thread out closure lever 70895 (fig. 12)
completely
• Turn special pin 70894 and lift off (fig. 12) .
• Take off round plate 70893, rubber ring 61023 and the latch
pin 42495 (fig. 12).
• At this point the stapler is completely open and any kind of
repair can be carried outaccording to the inside instructions
(fig.12).
For reasons of a technical, functional and aesthetic nature,
the manufacturer may, at any moment, and without any
obligation to give prior notice to the customer, make any
modifications he may deem necessary to the articles
presented in the catalogue.

4
ELPABOX BH FR
ATTENTION
S’en tenir toujours aux normes de sécurité et aux instructions
indiquées sur cet imprimé. Le constructeur décline toute
responsabilité dérivant d’un emploi incorrect l’agrafeuse.
NORMES DE SECURITE
• Ne pas utiliser l’agrafeuse s’il y a des parties endommagées
personnes étrangères au service.
• Suivre les normes en vigueur pour la prévention des
accidents.
• Ne pas altérer l’agrafeuse.
• Utiliser toujours des agrafes d’origine.
• La zone de travail où l’outil est utilisé doit être tenue nette.
Le désordre est toujours cause de possibles accidents.
• Ne pas jouer avec l’appareil. Rappelez-vous il est un outil.
• Contrôler le bon état de l’outil tous les jours.
• Faites attention à ce que vous faites. Ayez du bon sens,
évitez de travailler en positions dangéreuses ou instables,
en particuler si vous êtes fatigués.
• En cas de doute, ou pour informations techniques
complémentaires, s’adresser au Service Assistance.
CARACTÉRISTIQUES TECHNIQUES
• Poids: kg. 1,250
• Dimensions: 310 x 250 x 110 mm
• Agrafes utilisées:
32/15 - 32/18
35/15 - 35/19
• Capacité de chargement: 100 agrafes.
• Réglages de la profondeur d’ agrafage et de la forme de
l’agrafe.
• Corps en alliage spécial d’aluminium.
FONCTIONNEMENT
• CHARGEMENT
Pour charger l’ appareil , débloquer le crochet d’arrêt (Fig.
1), introduire les agrafes du type désiré et renfermer le
chargeur en l’accompagnant avec la paume de la main, d’un
mouvement progressif (Fig.2).
• CHANGEMENT DE L’HAUTEUR DE L’AGRAFE
C’est la seule agrafeuse qui permet l’emploi de deux
différentes hauteurs d’agrafes, 15 et 19 mm.(5/8” et 3/4”)
dans la même agrafeuse. Positionner avec une pièce de
monnaie comme indiqué sur la fig. 3 en fonction du type
d’agrafe utilisé (fig. 4 ou fig. 5). Aprés réglage, la fente devra
être à niveau horizontale.
• RÉGLAGE DE PÉNÉTRATION
Pour une correcte fermeture du carton et pour sauvegarder le
produit contenu, régler la profondeur d’agrafage. Débloquer
le levier (fig.6) de verrouillage au premier temps, le tourner
jusqu’à ce que l’on obtienne la position correspondante à la
profondeur voulue (fig.9 et 11) puis rebloquer.
• RÉGLAGE DE LA FORME DE L’AGRAFE
Pour un agrafage correct en fonction de différents types de
carton utilisés, régler la forme finale de l’agrafe (fig.10) en
tournant la vis de réglage avec un tournevis (fig. 9 et 11),
jusqu’à obtenir la forme désirée.
DESENRAYAGE
L’agrafeuse utilisée régulièrement et avec des agrafes de
bonne qualité s’enraye difficilement. Si cela ce produit, suivre
les instructions suivantes:
• Décharger le magasin d’agrafes
• Débloquer complètement et rétirer le levier de verrouillage
70895 de la camme 42495 (fig.12)
• Etirer du corps C l’ensemble frontal 42514 (fig.12)
• Dégager l’agrafe en vérifiant qu’il n’y en ait pas d’autres
encastrées dans le magasin
• Pour enlever l’ agrafe coincée, n’employez aucun outil
comme des tournevis ou similaires
• Rémonter le levier de verrouillage 70895 sur la camme
42495 et le bloquer dans sa position initiale.
ATTENTION: seulement le matériel à agrafer doit être placé
dans le rayon d’ activité des mâchoires E et F (fig. 12).
ENTRETIEN
Pour un fonctionnement régulier de l’agrafeuse, NETTOYER
et LUBRIFIER périodiquement, avec de la graisse ou de l’huile
pour moteurs, toutes les articulations et les pièces mobiles
(fig.12). Il n’est pas necessaire de démonter l’appareil pour
effectuer cette opération.
DEMONTAGE
Le démontage de l’ agrafeuse doit être confié à une personne
qualifiée et équipée des outils appropriés. Il faudra en tous
cas suivre les instructions suivantes:
• Débloquer à fond et désengager le levier de verrouillage
70895 (fig. 12).
• Faire tourner sur elle même, à l’aide d’une pince, la
plaquette 70894, puis la dégager (fig.12).
• Sortir la rondelle 70893, puis le joint caoutchouc 61023 et
la camme 42495 (fig. 12).
• A ce moment, l’agrafeuse est complètement ouverte et
l’intervention sur le mécanisme est possible. Se référer à la
vue éclatée (fig. 12).
Pour toute nécessité technique liée à la fonctionnalité et
à l’esthétique, le fabricant peut, à tout moment et sans en
avertir le client, apporter des modifications aux articles
présentés dans le catalogue

5
ELPABOX BH DE
ACHTUNG
Um gefahrlos mit dem Gerät arbeiten zu können, lesen Sie
bitte unbedingt vor der Inbetriebnahme des Gerätes die
Betriebsanleitung und die Sicherheitshinweise sorgfältig
und vollständig durch und befolgen Sie die darin enthaltenen
Empfehlungen und Hinweise genau. Bei unsachgemäßem
Gebrauch lehnen wir jedwede Haftung ab.
SICHERHEITSHINWEISE
• Bei Beschädigung das Gerät nicht benutzen.
• Das Gerät nur ar sicheren Orten, außerhalb der Reichweite
von Kindern und Fremden benutzen oder aufbewahren.
• Das Gerät nicht ohne zugelassene Schutzbrille benutzen
und die geltenden Unfallverhütungsvorschriften beachten.
• Das Gerät nicht aufbrechen.
• Nur Originalklammern verwenden.
• Der Arbeitsbereich, in dem mit dem Gerät gearbeitet
wird, muß aufgeräumt sein. Unordnung stellt immer eine
potentielle Unfallgefahr dar.
• Alle Werkzeugteile sauber halten.
• lmmer darauf achten, wie Sie das Gerät benutzen.
Benutzen Sie lhren gesunden Menschenverstand,
vermeiden Sie gefährliche Situationen und achten Sie auf
lhr Gleichgewicht, besonders bei Müdigkeit.
• Bei Fragen oder für weitere Informationen wenden Sie sich
an den Kundendienst.
TECHNISCHE DATEN
• Gewicht: 1,250 Kg.
• Abmessungen: 310x250x110 mm.
• Klammern:
32/15 - 32/18
35/15 - 35/19
• Magazinkapazität: 100 Klammern.
• Einstellhebel für Hefttiefe und Klammerform
• Gehäuse aus Speziallegierung.
ARBEITSWEISE
• LADEN
Zum Laden des Gerätes die Magazinabdeckung entrasten
und nach hinten ziehen (Abb. 1), Klammern in das Magazin
legen und die Abdeckung mit dem Handballen wieder bis zum
Einrasten nach vorne schieben (Abb. 2).
• EINSTELLEN DER KLAMMERLÄNGE
Nur ein Gerät für Klammern mit Schenkellängen von 15 und 19
mm. Die Einstellung auf die gewünschte Länge erfolgt durch
Drehen der Schraube (mit einer Münze o.a.) siehe Abb. 4 und
5. Nach dem Einstellen muß die Kerbe der Schraube wieder in
waagerechter Stellung sein.
• EINSTELLEN DER HEFTTIEFE
Die Hefttiefe sollte so eingestellt sein, daß einerseits die
gewünschte Festigkeit der Klammerverbingung hergestellt
und andererseits das verpackte Gut nicht beschädigt wird.
Die Einstellung ist sehr einfach möglich:
Stellhebel (Abb.6) nach vorne kippen, auf die gewünschte
Länge drehen (Abb. 7 und 8) und zur Sicherung wieder nach
hinten kippen.
• EINSTELLEN DER UMBIEGEFORM
Die Klammern werden durch die Umbieger in einer
bestimmten Form umgebogen (Abb. 10). Diese kann zur
Anpassung art unterschiedliche Kartontypen verändert
werden, indem die Schraube mit einem Schraubendreher
entsprechend verstellt wird (Abb. 9 und 11 ).
BESEITIGUNG VON VERKLEMMUNGEN
Bei richtiger Einstellung des Gerätes und Verwendung von
einwandfreien Klammern treten nur selten Verklemmungen
auf. In solchen Fällen bitte wie folgt vorgehen:
• Gerät von der Druckluftleitung trennen und das Magazin
entleeren.
• Hebel 70895 (Abb. 12) vollständig lösen und vom Bolzen
42495 abschrauben.
• Vorderteil des Körpers 42514 vom Magazin C abnehmen
(Abb. 12).
• Verklemmte Klammer entfernen (und kontrolliern, dass
keine weiteren Klammern im Magazin festsitzen). Dafür
keine Werkzeuge wie z. B. Schraubendreher einsetzen!
• Magazin und Körper wieder zusammenführen und den
Hebel 70895 am Stift 42495 in der früheren Position
anbringen.
ACHTUNG: Es darf nur das zu heftende Material im
Aktionsradius der Umbieger E und F (Abb. 12) sein!
WARTUNG
Zur Sicherung eines ordnungsgemässen Betriebes des
Gerätes alle beweglichen Teile (Abb. 12) des Gerätes
regelmäßig reinigen und schmieren. Ein Auseinanderbauen
des Gerätes ist dabei im allgemeinen nicht erforderlich.
AUSEINANDERBAUEN DES GERÄTES
Obgleich das Gerät sehr einfach konstruiert ist, darf es nur von
geschultem Personal mit geeignetem Werkzeug demontiert
werden. Dabei ist folgendes zu beachten (Abb. 12):
• Hebel 70895 abschrauben (Abb. 12)
• Stift 70894 drehen und abnehmen (Abb. 12)
• Scheibe 70893, Gummiring 61023 und Bolzen 42495
abnehmen (Abb. 12). Das Gerät ist jetzt für jeden Eingriff
gemäß der vorliegenden Betriebsanleitung vollkommen
zugänglich.
Die Herstellerfirma kann aus technischen Gründen der
Zweckmäßigkeit und Ästhetik jederzeit und ohne vorherige
Benachrichtigungspflicht die im
Gesamtkatalog vorgestellten Artikel Änderungen unterwerfen

6
ELPABOX BH ES
ATENCION
Atenerse siempre a las normas de seguridad y a las
instrucciones contenidas en el presente manual. El costructor
declina toda responsabilidad derivada de un uso incorrecto
de la engrapadora.
NORMAS DE SEGURIDAD
• No utilizar la engrapadora si hay partes averiadas.
• Usar y guardar la engrapadora en un sito segùro, lejos del
alcance de niños y extraños.
• No usar la engrapadora sin las gafas de protección
homologadas y seguir las normas existentes contra los
infortunios en vigor.
• No manumitir la engrapadora.
• Usar siempre las grapas originales.
• La zona de trabajo en la que deberà utilizarse la engrapadora
debe estar despejada; la confusión y el desorden son
siempre causas potenciales de accidentes.
• No jugar con la herramienta, respetarla en cuantoque es un
instrumento de trabajo.
• Efectuar controles diarios del buen estado de la engrapadora.
• Mantener limpias todas las partes en funcionamiento del
instrumento.
• Vigilar siempre el modo de uso de la engrapadora. Usar
con cordura, evitar las situaciones peligrosas o de equilibrio
inseguro, sobretodo cuando se está fatigado
• En caso de duda, o para ulteriores informaciones técnicas,
dirigirse al Servicio de Asistencia de nuestra Sociedad.
DATOS TÉCNICOS
• Peso approximado: 1,250 Kg.
• Dimensiones: 310x250x110 mm.
• Grapas utilizables:
32/15-32/18
35/15-35/19
• Capacidad de carga: 100 grapas.
• Regulación de la profundidad y del cierre de la grapa.
• Fundida en aleación especial de aluminio.
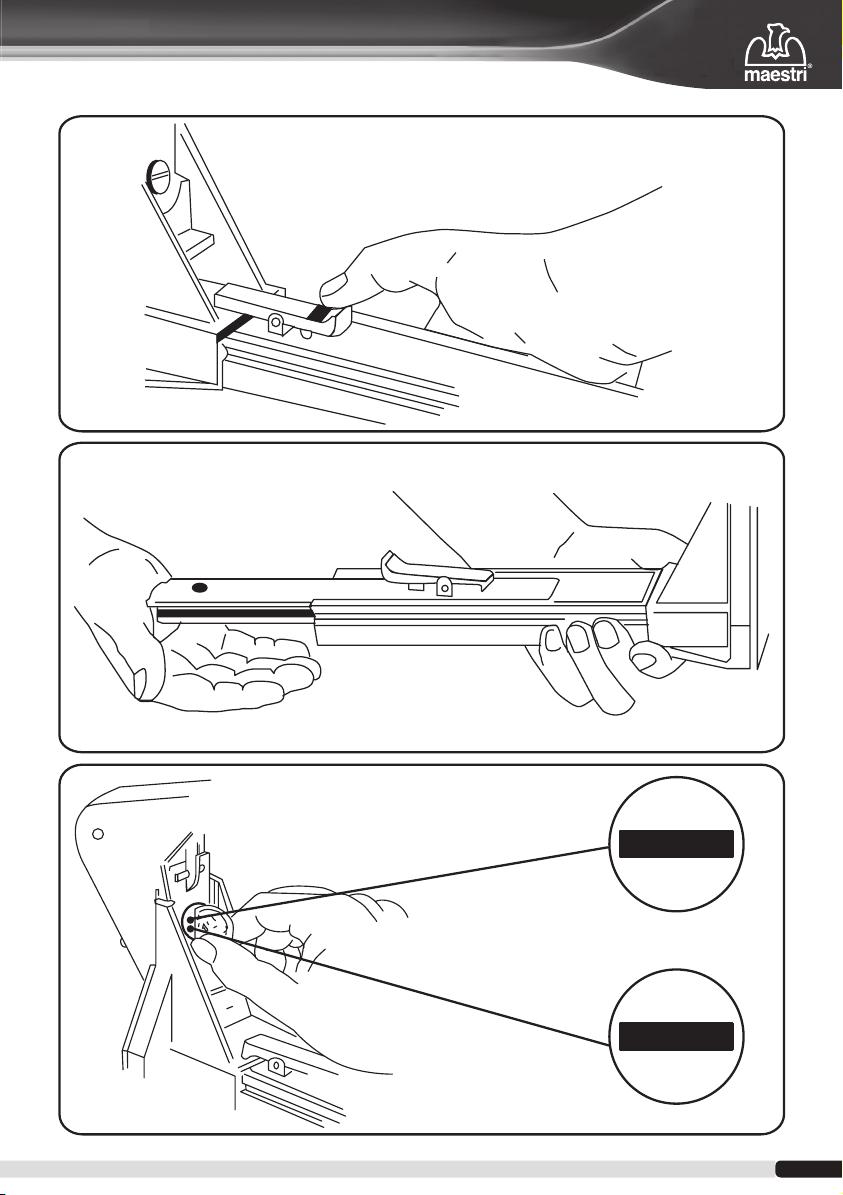
FUNCIONAMIENTO
• CARGA
Para cargar la engrapadora desbloquear la traba (fig. 1),
introducir las grapas del tipo deseado y con la palma
de la mano retornar el cubregrapas (fig. 2) mediante un
movimiento progresivo.
• CAMBIO DE ALTURA DE LA GRAPA
Es la única engrapadora que permite el uso de dos alturas
distintas de grapas metálicas, 15 y 19 mm. (5/8” y 3/4”) sin
tener que cambiar absolutamente nada en la engrapadora.
Con una moneda colocar el disco situado algo por debajo del
disparador (fig. 3) en relación con el tipo de grapa introducido
(fig. 4 o fig. 5).
Una vez efectuada la regulación, la ranura deberà estar en
posición horizontal.
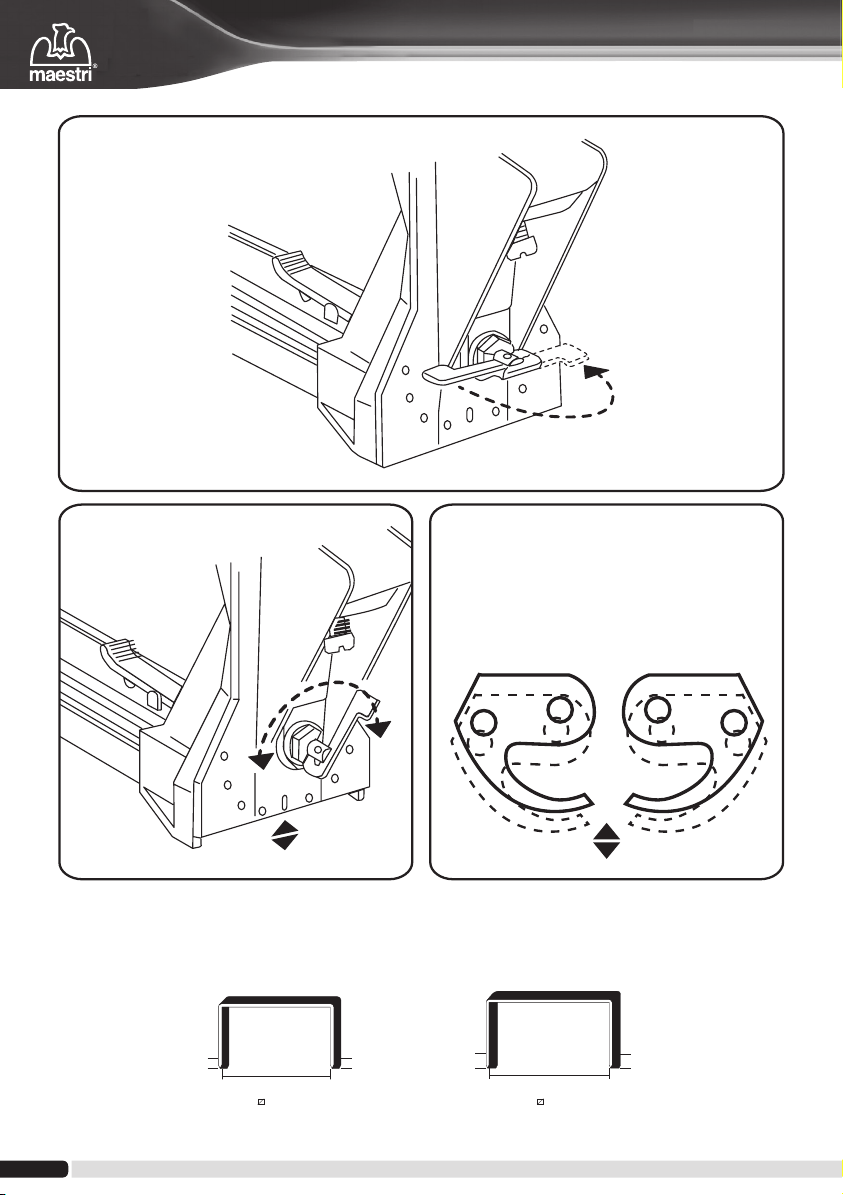
• REGULACIÓN DE LA PROFUNDIDAD
Para un cierre correcto de la caja de cartón y protección del
contenido de la misma, regular la profundidad del engrapado
desbloqueando primero la palanca de cierre (fig. 6) y después
girándola hasta la posición correspondiente a la profundidad
deseada (fig. 7 y 8), luego volverla a bloquear.
• REGULACIÓN DE LA FORMA DE LA GRAPA
Para un engrapado correcto respecto a los diversos tipos de
cartones, regular la forma final de la grapa (fig. 10) girando
con un destornillador el tornillo de regulación (fig. 9 y 11),
hasta obtener la forma deseada.
DESTRABADO
La engrapadora dificilmente se traba si está correctamente
regulada y si se utilizan grapas que no presenten defectos.
No obstante, si ello sucediera proceder de la siguiente forma:
• Descargar el portagrapas.
• Aflojar completamente y extraer del perno excéntrico
42495 la palanca de cierre 70895 (fig.12).
• Separar del cuerpo C la cubierta 42514 (fig. 12).
• Extraer la grapa trabada asegurándose de que no haya
ningún otro impedimento en el depósito de grapas.
• Para extraer la grapa trabada no utilizar ningún utensilio del
tipo destornillador o similar.
• Volver a montar la palanca de cierre 70895 en el perno
excéntrico 42495 y fijarla en la posición de regulación inicial.
ATENCIÓN: en el radio de acción de las mordazas E y F (fig.
12) sólo debe encontrarse el material a engrapar.
MANTENIMIENTO
Para el normal funcionamiento de la engrapadora, LIMPIAR y
LUBRIFICAR periódicamente con grasa y aceite para motores
todas las juntas y piezas móviles (fig. 12).Generalmente este
tipo de operaciones se pueden realizar sin desmontar la
engrapadora.
DESMONTAJE
El desmontaje de la engrapadora debe encargarse a una
persona competente, provista de las herramientas necesarias
para ello. Dicha persona deberá seguir las instrucciónes
siguientes:
• Aflojar completamente y extraer la palanca de cierre 70895
(fig. 12)
• Girar sobre si misma y extraer la plaqueta 70894 (fig. 12)
• Sacar la arandela 70893, el anillo de goma 61023 y el perno
excéntrico 42495 (fig. 12).
Liegados a este punto la engrapadora está completamente
abierta y se puede proceder a cualquier tipo de intervención,
siguiendo siempre las indicaciones del presente manual (fig.12).
Por exigencias técnicas de funcionalidad y estética, la frábrica
constructora puede, en cualquier momento y sin obligación
de avisar el comisionado, aportar cambios en los artículos
expuestos en el catálogo

7
Fig. 1
Fig. 3
Fig. 4
Fig. 5
15-5/8”
19-3/4”
19-3/4”
15-5/8”
Fig. 2

8
Fig. 6
Fig. 7
Gauge 16
1,02x1,93
18mm
30mm
3/4"
32/
15mm5/8"
Gauge 16
0,8x2,3
33,33mm
19mm
3/4"
35/
15mm
5/8"
TABELLA PUNTI - STAPLES TABLE - TABLEAU AGRAFES - LISTE DER KLAMMERN - TABLA DE GRAPAS
Fig. 8

9
Fig. 10
Fig. 11
Fig. 9

10
Aggraffatrice meccanica mod. BH
•Ricambi consigliati
•Recommended spare parts
•Pièces de rechange recommandées
•Empfohlene ersatzeile
•Repuestos açonsejados
ELPABOX BH
70923
42514
43416
55032
55034
70925
50077
70895
•70894
•70893 •61023 70876
50229
50230 49001
FED
G
55033 70917

11
Tavola ricambi - Spare parts list
Pièces de rechange - Ersatzteileliste - Dibujo de despiece
51011
61023
52015 71991
71990
49001
55030
C
70892
43567
•61022
B
A
70880 5502742495 70891 55031 •42500 Fig. 12
WITHOUT CLINCHING
REGULATION

12
LEGGERE ATTENTAMENTE PRIMA DI UTILIZZARE L’ATTREZZO
Se i termini di garanzia non sono accettabili,
riportare subito l’attrezzo inutilizzato per il rimborso
LIMITI DI GARANZIA
• COSA È COPERTO: questa garanzia copre qualsiasi difetto di materiale o di costruzione.
• DURATA:la durata di questa garanzia è di 2 anni dalla data dell’acquisto.
• COSA FARÀ IL FABBRICANTE: Durante questo periodo, le riparazioni o le sostituzioni dell’attrezzo (a discrezione
del fabbricante) verranno eseguite gratuitamente da un centro di assistenza autorizzato.
• COSA NON È COPERTO: questa garanzia non copre i danneggiamenti dell’attrezzo dovuti ad incidente, ad un suo
uso improprio, a riparazioni o modifiche non autorizzate, o dovuti all’uso di componenti non consigliati dal
fabbricante che non soddisfano o alle norme del controllo di qualità da questo richiedente, e/o al rendimento
standard del prodotto.
• COME OTTENERE IL SERVIZIO: per ottenere la riparazione o la sostituzione durante la validità della garanzia,
l’attrezzo deve essere consegnato ad un centro di assistenza autorizzato insieme alla ricevuta originale di acquisto
o ad altro documento che provi che l’attrezzo sia ancora nel periodo di garanzia. Eventuali spese di spedizione e/o
di imballaggio sono a carico del cliente.
QUESTA GARANZIA ESCLUDE ESPLICITAMENTE QUALSIASI ALTRA GARANZIA, ORALE, SCRITTA ESPRESSA
O IMPLICITA, COMPRESA TRA LE ALTRE, MA NON LIMITATAMENTE AD ESSA, QUALUNQUE GARANZIA DI
COMMERCIABILITÀ O IDONEITÀ AD UN FINE PARTICOLARE, E QUINDI NESSUNA DI QUESTE PUÒ ESSERE APPLICATA
A QUESTO PRODOTTO. Qualsiasi immagine o promessa in disaccordo o in aggiunta a questa garanzia non è
autorizzata e non potrà essere imputata alla ditta fornitrice.
IN NESSUN CASO IL FABBRICANTE SARÀ RESPONSABILE PER I DANNI DI QUALSIASI GENERE DERIVANTI
DALL’USO DI QUESTO PRODOTTO. IN OGNI CASO LA RESPONSABILITÀ DEL FABBRICANTE, AI SENSI DEL
PRESENTE CONTRATTO, SARÀ LIMITATA AD UN IMPORTO CORRISPONDENTE A QUELLO EFFETTIVAMENTE
PAGATO PER L’ACQUISTO DELL’ATTREZZO.
READ CAREFULLY BEFORE USING THE TOO
If warranty terms are not acceptable,
return at once unused for refund
LIMITED WARRANTY
• WHAT IS COVERED: this warranty covers any defects in material and workmanship.
• HOW LONG: the duration of this warranty is 2 years from date of purchase.
• WHAT MANUFACTURER WILL DO: during this period, replacements or repairs of tool (at manufacturer's option)
will be made without any cost for parts or labor by an authorized manufacturer service center.
• WHAT IS NOTCOVERED: this warranty does not cover damage by accident, misuse, unauthorized repair or
modification, or due to the use of fasteners not recommended by the manufacturer or which do not comply with
the manufacturer quality control specification and/or product performance standards.
• HOW TO GET SERVICE: to obtain repair or replacement under this warranty, the tool must be returned to an
authorized manufacturer service center, AT YOUR EXPENSE, with original purchase receipt, or other positive proof
the tool is within the warranty period.
THIS WARRANTY IS IN LIEU OF ANY OTHER WARRANTIES. THESE, WHETHER ORAL, WRITTEN, EXPRESS, OR
IMPLIED, INCLUDING, BUT NOT LIMITED TO, ANY IMPLIED WARRANTY OF MERCHANTABILITY OR FITNESS FOR A
PARTICULAR PURPOSE SHALL NOT APPLY TO THE WARRANTIES EXTENDED WITH THIS TOOL. Any representations or
promises inconsistent with or in addition to this warranty are unauthorized and shall not be binding upon the
manufacturer.
IN NO EVENT, WHETHER AS A RESULT OF BREACH OF CONTRACT, WARRANTY, TORT (INCLUDING NEGLIGENCE)
OR OTHERWISE, SHALL MANUFACTURER'S LIABILITY TO THE PUCHASER OF THIS TOOL OR ANY LOSS OR
DAMAGE ARISING OUT OF THE BREACH OF WARRANTY, CONTRACT, OR TORT, EXCEED THE PRICE OF THE TOOL
WHICH HAS GIVEN RISE TO THE CLAIM OR LIABILITY.

13
VOR BENUTZUNG DES GERÄTES, BITTE AUFMERKSAM DURCHLESEN!
Sollten Sie mit der Garantie nicht einverstanden sein,
das unbenutzte Gerät sofort zwecks Rückerstattung zurückbringen
GARANTIE
• GARANTIEUMFANG: Die Garantie erstreckt sich auf jeglichen Material-oder Fabrikationsfehler.
• GARANTIEZEIT: Die Dauer dieser Garantie beträgt 2 Jahren ab dem Kaufdatum.
• HERSTELLER: Während dieser Garantiezeit werden Reparaturen und Austausch von Geräten (nach Ermessen des
Herstellers) kostenlos von autorisierten Kundendienststellen durchgeführt.
• GARANTIEAUSSCHLUSS: Die Garantie erstreckt sich nicht auf Beschädigungen des Gerätes aufgrund von Unfällen,
unsachgemäßem Gebrauch, nicht zulässigen Reparaturen oder technischen Änderungen sowie Verwendung von
Heftmitteln, die nicht vom Hersteller empfohlen wurden und nicht den Normen der Qualtiätskontrolle und/oder der
Standardleistung des Produktes entsprechen.
• GARANTIEABWICHLUNG: Bei Reparaturen oder Austausch des Gerätes während der Garantiezeit muß das Gerät
einer autorisierten Kundendienststelle zusammen mit dem Original der Kaufquittung oder einem anderen Nachweis,
daß auf dieses Gerät noch Garantie besteht, übergeben werden. Eventuelle Versand- und/order Verpackungskosten
trägt der Kunde.
DIESE GARANTIE SCHLIEßT AUSDRÜCKLICH JEDE WEITERE MÜNDLICHE, SCHRIFTLICHE, AUSDRÜCKLICHE ODER
STILLSCHWEIGENDEGARANTIEAUS,EINSCHLIEßLICHDERGARANTIEN,DIEDEMZWECKEDERVERKAUFSFÖRDERUNG
UND DER ZWECKDIENLICKEIT DIENEN. KEINE DIESER GARANTIEN SIND FÜR DIESES PRODUKT GÜLTIG.
Jedes Erscheinungsbild oder Versprechen in Widerpruch oder als Ergänzung zu dieser Garantie ist unzulässig und nicht
der Herstellerfirma zuzuschreiben.
DER HERSTELLER HAFTET NICHT FÜR SCHÄDEN DURCH ABNUTZUNG DIESES PRODUKTES. DIE HAFTUNG DES
HERSTELLERS BESCHRÄNKT SICH AUF JEDEN FALL NUR AUF DEN PRODUKTWERT, DER DEM EFFEKTIVEN
KAUFPREIS DES GERÄTES ENTSPRICHT.
A LIRE ATTENTIVEMENT AVANT D'UTILISER L'OUTIL
Si les conditions de garantie ne sont pas acceptables,
retourner l'outil inutilisé pour remboursement
GARANTIE LIMITEE
• ETENDUE DE LA GARANTIE: la présente garantie couvre les vices de materiau et de construction.
• DUREE DE GARANTIE: la garantie est octroyée pour une durée de 2 ans à compter de la date d'achat.
• PRESTATIONS DU FABRICANT: pendant cette période, le replacement ou la réparation de l'outil (à la discrétion du
fabricant) s'effectuera sans frais de main-d'oeuvre ou de pièces de rechange dans un centre de service après-vente
agréé par le fabricant.
• DOMMAGES NON COUVERTS: la garantie ne couvre pas les dommages résultant d'un accident, d'une utilisation non
adéquate, d'une réparation ou d'une modification non autorisée ou de l'utilisation d'éléments non recommandés par
le fabricant ou ne satisfaisant pas aux normes de contrôle de qualité et/ou aux normes de fonctionnement du produit.
• COMMENT RECOURIR A LA GARANTIE: pour obtenir la réparation ou le remplacement de l'outil dans la cadre de
la présente garantie, retournez celui-ci à un service après-vente agréé par le fabricant, A VOS FRAIS, en y joignant
la quittance d'achat originale ou tout autre justificatif prouvant que l'appareil se trouve encore dans la période de
garantie.
LA PRESENTE GARANTIE EXCLUT EXPRESSEMENT TOUTES LES AUTRES GARANTIES CELLES-CI QUELLES
SOIENT ORALES, ECRITES, EXPRESSES OU IMPLICITES, Y COMPRIS DE MANIERE NON RESTRICTIVE, TOUTE
GARANTIE DE COMMERCIABILITE OU D'ADEQUATION POUR UNE UTILISATION PARTICULIERE NE SONT PAS
COMPRISES DANS LA GARANTIE DONT BENEFICIE L'OUTIL. Toute déclaration ou promesse incompatible ou faite
en complément de la présente garantie n'est pas licite et n'engagera pas la responsabilité du fabricant.
EN AUCUN CAS, LA RESPONSABILITE DU FABRICANT A L'EGARD DE L'ACHETEUR DE CET OUTIL - QU'ELLE
RESULTE D'UNE RUPTURE DU CONTRAT, DE LA GARANTIE OU D'UN ACTE DELICTUEL (NEGLICENCE COMPRISE)
OU AUTRE - OU CONCERNANT DES PERTES OU DOMMAGES RESULTANT D'UNE RUPTURE DE CONTRACT,
DE LA GARANTIE OU D'UN ACTE DELICTUEL NE POURRA EXCEDER LE PRIX DE L'OUTIL A L'ORIGINE DE LA
RECLAMATION OU DE LA RESPONSABILITE.

14
LEER ATENTAMENTE ANTES DE UTILIZAR LA GRAPADORA
Si los términos de la garantia no resultan aceptables,
devolver la grapadora inutilizada para obtener el reembolso
GARANTIA LIMITADA
• QUÉ QUEDA CUBIERTO: esta garantía cubre cualquier posible defecto en el material y la mano de obra.
• DURANTE CUÁNTO TIEMPO: la duración de esta garantía es de 2 años desde la fecha de la compra.
• QUÉ HARÁ EL FABRICANTE: durante este período, los cambios o reparaciones de la grapadora (a elección del
fabricante) los efectuará, sin ningún cargo por piezas o mano de obra, un centro de servicio autorizado por el
fabricante.
• QUÉ NO QUEDA CUBIERTO: esta garantía no cubre los daños producidos por accidentes, uso inapropiado,
reparaciones o modificaciones no autorizadas, o debido al empleo de fijadores no recomendados por
el fabricante o que no cumplan con la especificación del control de calidad del fabricante y/o niveles de
rendimiento del producto.
• CÓMO OBTENER EL SERVICIO: para obtener el servicio de reparación o sostitución bajo esta garantía, la
grapadora debe devolverse a un centro de servicio autorizado por el fabricante, A PORTES PAGADOS, con
el recibo de compra original u otro justificante fehaciente de que la grapadora se encuentra bajo el periodo
decobertura de la garantía.
ESTA GARANTÍA SOSTITUYE A CUALQUIER OTRA GARANTÍA, YA SEA ORAL, ESCRITA, EXPRESA O
IMPLÍCITA, INCLUYENDO PERO NO COMO LIMITACIÓN, CUALQUIER GARANTÍA IMPLÍCITA DE CAPACIDAD
DECOMERCIALIZACIÓN O IDONEIDAD PARA UN PROPÓSITO EN PARTICULAR Y NO SE APLICARÁ A LAS
GARANTÍASFACILITADAS CON ESTA GRAPADORA. Cualquier afirmación o promesa que incurra en contradición
o sea adicional aesta garantía no se autorizará y no será vinculante para el fabricante.
EN NINGÚN CASO, YA SEA COMO RESULTADO DE INCUMPLIMIENTO DEL CONTRATO, GARANTÍA, AGRAVIO
(INCLUIDA NEGLIGENCIA) O DE OTRA FORMA, EL FABRICANTE SERÁ RESPONSABLE FRENTE AL COMPRADOR
RESPECTO A ESTA GRAPADORA O POR CUALQUIER PERDIDA O DAÑO QUE SURJA DEL INCUMPLIMIENTO DE LA
GARANTÍA, CONTRATO O AGRAVIO, POR UN IMPORTE SUPERIOR AL PRECIO DE LA GRAPADORA QUE HA
DADO LUGAR Á LA RECLAMACIÓN O RESPONSABILIDAD.

15
NOTE/NOTES

cod. 8878200
PRODOTTO DA:
romeo maestri & figli S.p.A.
Corso Monforte, 41 - 20122 Milano (Italy)
www.romeomaestri.it
Distributed by:
Table of contents
Languages:
Popular Power Tools manuals by other brands

Metabo
Metabo ELEKTRA BECKUM Multi 260 S operating instructions

Makita
Makita DJS131 instruction manual

Hitachi
Hitachi C18DLP4 - 18V Li-Ion 6-1/2" Circular Saw Safety instructions and instruction manual

Powerfix Profi
Powerfix Profi 275402 Instructions for use

Matco Tools
Matco Tools MT2838 instruction manual

Epiroc
Epiroc EC Series Safety and operating instructions

Performance Tool
Performance Tool M621 owner's manual

Workzone
Workzone Titanium DBAF50/40 instruction manual

Kraissmann
Kraissmann 801SS80 user manual

Hytorc
Hytorc LION GUN Basic operation manual

Dynabrade
Dynabrade Dynafile II 40500 Safety, operation and maintenance manual

HIKOKI
HIKOKI CE 16SA Handling instructions