Mahlkönig FCG 2.0 User manual

GASTRONOMIEMÜHLEN | HORECA GRINDER
The professional art of grinding
since 1924
Operating Instructions
FCG 2.0
”Grind-on-Demand“
- for Filter Coffee -

GASTRONOMIEMÜHLEN | HORECA GRINDER

Dear customer / service personnel
the NEW ”FCG 2.0” is a dedicated filter coffee grinder of the
proven MAHLKÖNIG quality.
We have developed this product with over 80 years of experience
in the manufacture of coffee grinders assuring you of high quality
grinding for filter coffee and also other types of coffee beans (non
pressurised brewing methods).
Read through and observe the operating instructions, so you and
your customers will thoroughly enjoy the ”FCG 2.0”. Please store
the instructions in a safe place. If anything is unclear or additional
information is required, please contact your authorized dealer or
us as the manufacturer.
We will be pleased to advise you further. We wish you unlimited
pleasure and success with our product.
MAHLKÖNIG GmbH & Co. KG
GASTRONOMIEMÜHLEN | HORECA GRINDER
3

7.3 Cleaning counter 11
7.4 Disc change counter 11
8. Calibration of The Dosing Units 12
8.1 Grind a preset amount of coffee 12
8.2 Enter the correct amount of coffee 12
8.3 Quit the calibration mode 12
8.4 Changing the coffee-to-water-ratio (g/l) 12
9. Operating Faults 13
10. Cleaning 14
10.1 Cleaning with GRINDZ™ grinder cleaner 14
10.2 Cleaning the grinder placement surface 14
10.3 Cleaning the grinder casing 14
10.4 Cleaning of the hopper 14
11. Service 15
11.1 Exchange of the built-in grinder EK11 15
11.2 Grinding disc exchange 15
11.3 Recalibration of the grind adjustment 15
12. Spare Parts 15
13. Wiring Diagrams 16
14. Certificate 17
15. Warranty Conditions 17
Table of Contents
1. Safety 5
1.1 Symbols 5
1.2 Safety instructions 5
1.3 Usage purpose 6
1.4 User requirements 6
2. Technical Data 6
3. Description 7
4. Safety Devices of the Grinder 8
5. Set-Up and Basic Adjustment 8
5.1 Usage location 8
5.2 Electrical connection of the grinder 8
6. Operation 9
6.1 Fill the grinder with coffee beans 9
6.2 Switch on the grinder 9
6.3 Insert the brew basket 9
6.4 Alternatively: Place the French Press brewer 9
6.5 Choose the unit of dosing 9
6.6 Adjust the amount of coffee 10
6.7 Start/stop the grinder 10
7. Grinder Statistics 11
7.1 Resettable day counter 11
7.2 Permanent counter (non resettable) 11
GASTRONOMIEMÜHLEN | HORECA GRINDER
4

Always remove the electrical plug from the outlet prior to con-
ducting maintenance or cleaning work on the grinder. Also, prior
to removing the hopper, the plug must be removed from the elec-
trical outlet.
Never operate a grinder with a damaged electrical cord. Inspect
the grinder regularly for damages of the electrical cord, plug, etc.
Any required repairs may only be conducted by authorized service
personnel. For this reason, please contact a customer service re-
pair facility, your dealer or us directly as the manufacturer.
Do not exceed the maximum allowable grinding cycle of S3 25%.
One grinding cycle implies 1/4 grind time and 3/4 rest time for
cooling, e.g. for 1l / 55g / 10s grind need 30s rest (grind cycle of
appr. 40s). Practical restriction: The FCG 2.0 can serve two pourov-
er filter coffee machines. The extraction time of the filter coffee
machines gives enough time for resting.
Do not make any modifications or alterations to the grinder. The
manufacturer assumes absolutely no liability for damages oc-
curring from failure to observe these instructions.
Children cannot appreciate the dangers that can exist in the op-
eration of electrical grinders. For this reason, never leave children
unsupervised with electronic appliances such as this grinder.
1. Safety
Please carefully read and observe the following
safety instructions. Failure to do so can result in
damage to the grinder and danger to the user.
1.1 Symbols
The following two symbols are used in these operating instruc-
tions:
Safety Instruction:
Imminent accident danger if you fail to observe.
General Instruction:
Failure to observe can result in damage to the
grinder and optimum operation cannot be guar-
anteed.
1.2 Safety instructions
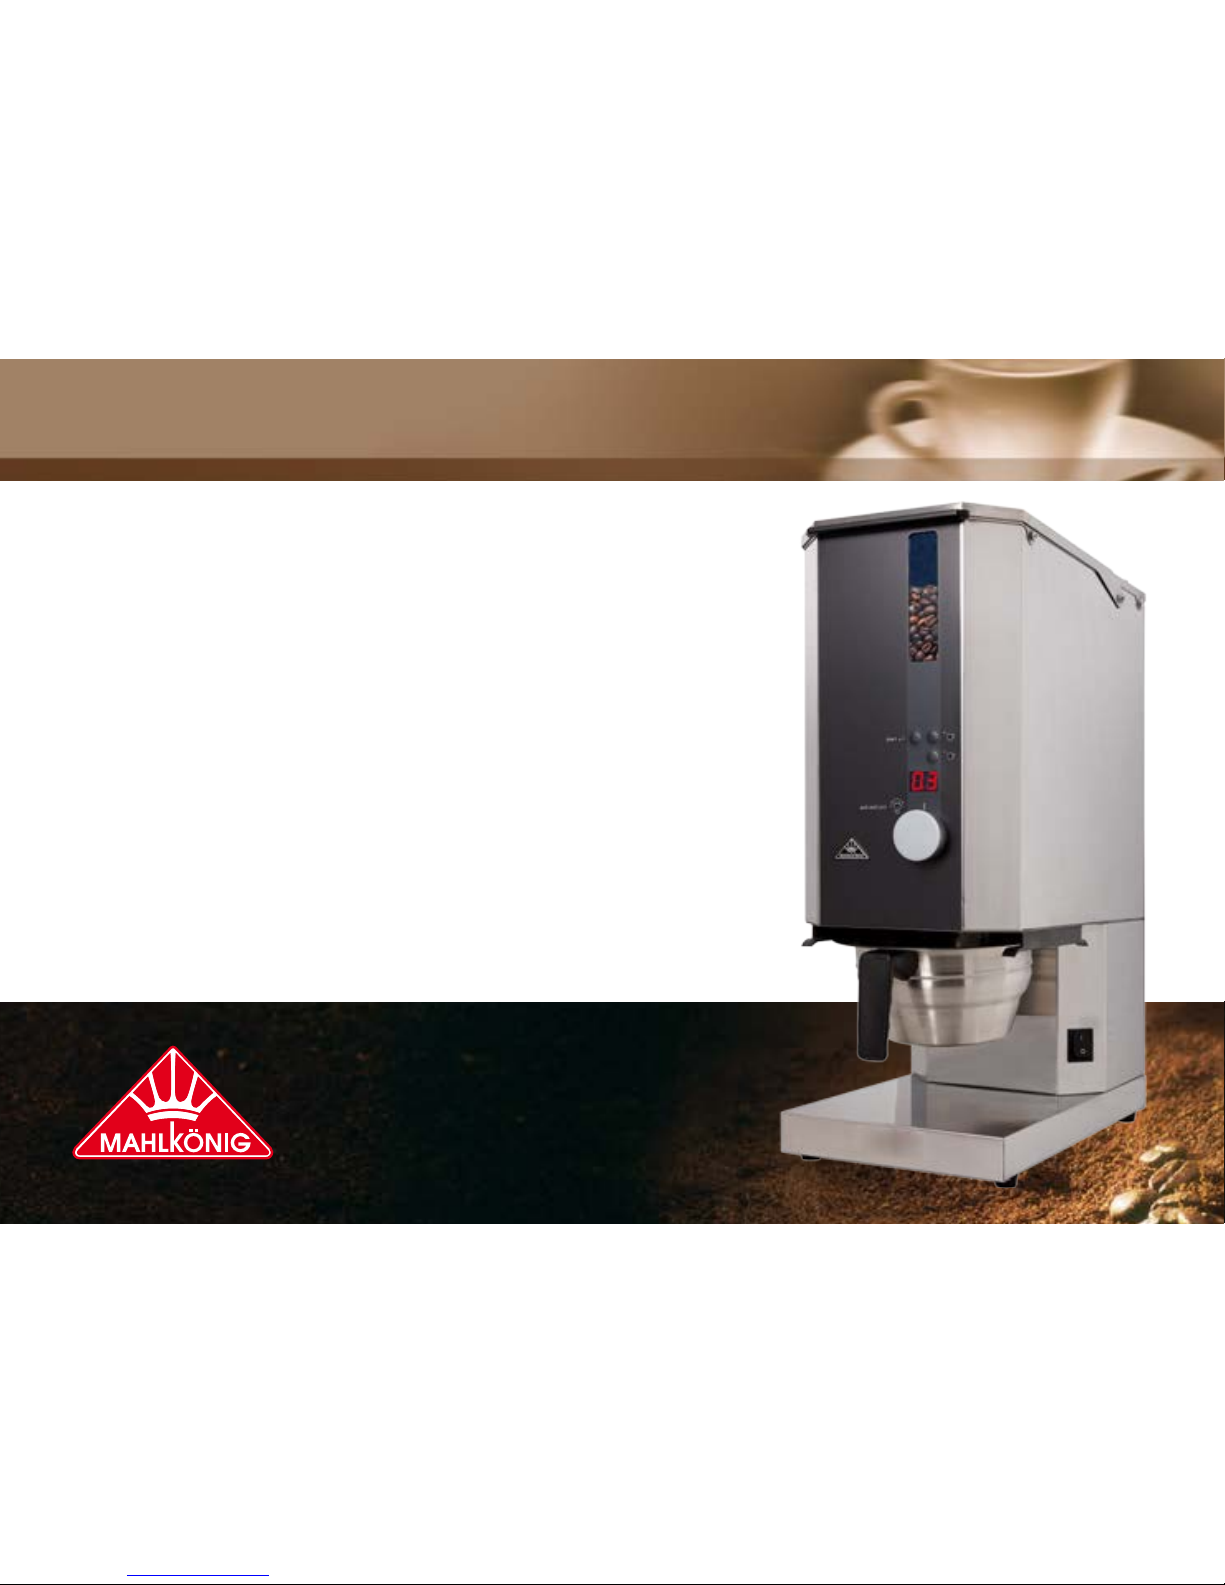
Only whole roasted coffee beans may be ground in the FCG 2.0
When unpacking please inspect whether the power supply (volt-
age) complies with the grinder voltage on the manufacturer’s
name plate on the bottom of the grinder. Never operate the
grinder in damp or wet surroundings.
GASTRONOMIEMÜHLEN | HORECA GRINDER
5

2. Technical Data
Type FCG 2.0
Voltage/Frequency 220-240V / 50-60Hz
Rotation
@ 50 Hz 2850 rpm
Sound emission
Idle operation 65 dB
Grinding 85 dB
Pre-fuse 16 A-slow
Current consumption 2,2 A
Permissible max. Operating
time of the grinder S3 25% 1)
Dimensions in mm W 205, D 370, H 550
Dimensions in inch W 8.1 x D 14.6, H 21.7
Net weight 13 kg (28.7 lbs)
Hopper capacity 2500 g (1.1 lbs)
(Please request technical data for other voltages and frequencies from the manufacturer or dealer.)
1) see chapter 1.2 “Safety instructions”
Never submerge the grinder in water and never
operate with wet hands.
1.3 Usage purpose
Only whole, unground, roasted, cleaned coffee beans may be
ground in the FCG 2.0 grinder. Never use the grinder to grind
other products or objects.
1.4 Personnel requirements
No special requirements are necessary for the users of this grinder.
Nevertheless it is a prerequisite that these operating instructions
have been carefully read and understood and that all instructions
provided are observed. In addition, safety-conscious operation is
expected.
GASTRONOMIEMÜHLEN | HORECA GRINDER
6

3. Description
The main components and operating elements are pictured in
the illustration.
Pos. 1 Hopper lid
Pos. 2 Hopper with window
Pos. 3 “Start”-button
Pos. 4 Increase button (+)
Pos. 5 decrease button (-)
Pos. 6 Adjustment of grind size
Pos. 7 Display
Pos. 8 ON / OFF switch
Pos. 9 Brew basket holder (expandable)
Pos. 10 Center position of “3 Cup French Press”
GASTRONOMIEMÜHLEN | HORECA GRINDER
7
1
5
3
7
2
6
4
8
9
10

5. Set-up of the grinder
A grinding test run is carried out on each grinder in our factory.
This is why you may find ground material residue in the grinding
mechanism!
You have received your grinder in operating condition. Now you
only need to connect the grinder to the mains plug. Proceed as
follows:
5.1 Usage Location
Place the grinder on a level, vibration-free surface. The grinder
is often used in rooms where there is water and humidity, and
therefore it must be properly insulated.
Never operate the grinder in moist, or even
worse, in wet surroundings!
5.2 Electrical connection of grinder
Connect the grinder to an earthed 230V 16A wall outlet.
The machine must be connected to an earthed
power outlet! Always observe the rules in effect
in the user’s country.
4. Safety Devices of the Grinder
Motor protector
The winding of the motor is protected by a thermal switch
(thermo pill/bimetal), which will trip when the motor heats up
significantly. The grinder cannot be started again. Let it rest for
appr. 30 minutes. The thermal switch will re-connect the motor
automatically.
The user has no influence whatsoever on these
circuit breakers. If the circuit breaker trips
repeatedly, an authorised service partner must
be consulted, as the motor’s winding may be
damaged.
Finger protector / Magnet holder
A combined finger protector / magnet holder is fitted in the
hopper of the grinder. It is supposed to prevent the user from
reaching into the running grinding mechanism. At the same
time, it also prevents ferrous foreign objects from getting into the
grinding mechanism. Every now and then clean the magnet since
adhering foreign objects could block the coffee supply.
Never remove the finger protection!
GASTRONOMIEMÜHLEN | HORECA GRINDER
8

The maximum diameter of the brew basket to
fit the FCG 2.0 is 200 mm (7.87 inch).
The maximum height of the brew basket to fit
the FCG 2.0 is 150 mm (5,9 inch).
2)
6.4 Alternatively: Place the French Press brewer
The grinder may also be used to grind directly into a “3 Cup
French Press”. Place the French Press on the marked spot on the
base right under the spout.
6.5 Choose the unit of dosing
The display shows the current dosing setting (unit). The coffee
can be dosed either by CUPS or by LITERS. The active selection is
shown in the display by the dot between the figures.
press
for 3s
Dosing by liters Dosing by cups
To change from CUPS to LITERS and vice versa press the START
button for 3 seconds.
2)
To make off-size brew baskets fit the FCG 2.0 contact the manufacturer for
adaptations.
Protect your device with separate pre-fuses (not
included in the scope of delivery) according to
the information provided under Point 2 “Techni-
cal data”.
Make sure that the pre-fuse is not overloaded by
other devices (e.g. fan heaters, deep freezers).
Check whether the main voltage and frequen-
cy correspond to the information on the rating
plate.
6. Operation
6.1 Fill the hopper with coffee beans
Lift the lid (pos.1) and fill whole roasted coffee beans into the
hopper. Close the lid.
6.2 Switch on the grinder
Turn on the grinder by pressing the ON/OFF switch (pos. 8).
6.3 Insert the brew basket
The grinder can be used for various brew basket sizes, i.e. all
popular 1.8l pourover filter coffee machines.
Slide the brew basket between the movable brackets. It should
hang evenly under the spout of the grinder.
GASTRONOMIEMÜHLEN | HORECA GRINDER
9

6.6 Adjust the amount of coffee
In both dosing units (cups and liters) the amount of coffee can be
adjusted with the +/- buttons prior to grinding.
Press the +button (pos.4) to increase the amount
of ground coffee (full cups or 0.1 liters).
Press the -button (pos.5) to decrease the amount
of ground coffee.
See table on the right for dosing suggestions.
6.7 Start/stop the grinder
Press the START button (pos.3) to start the grinding process. The
grinder stops automatically after grinding the pre-set amount.
To manually stop the grinder before the pre-set amount has been
ground press the START button again.
Note: The remaining time of the discontinued
grinding process will not be saved.
Overview - Dosing Suggestions
Basic definitions by the manufacturer:
• The approximate grind speed of the FCG 2.0 at a medium
filter coffee grind size adjustment is 5.5 g/s.
• The dosing parameters of the FCG 2.0 have been calibrated
to grind coffee to
“SCAE GOLD CUP Standard” 3)
, i.e. coffee-
to-water-ratio of 55g/l.
• One cup has been defined as 225ml (7.6oz).
• The maximum doses are 14 cups or 2.2 liters respectively.
Dosing examples:
Dosing Unit
cups liters Amount Appr. Time
- 0.1 5.5 g 1.0 s
1 (0.225) 10 g 1.8 s
- 0.5 27.5 g 5.0 s
4 0.9 50 g 9.0 s
- 1.0 55 g 10 s
- 1.6 80 g 14.5 s
8 1.8 95 g 17.3 s
- 2.2 (max) 120 g 21.8 s
14 (max) - 170 g 31.0 s
GASTRONOMIEMÜHLEN | HORECA GRINDER
10
3) For more information about this standard, go to www.scae.com

GASTRONOMIEMÜHLEN | HORECA GRINDER
11
7. Grinder Statistics
7.1 Resettable day counter
Press and hold the +button (pos.4) for 3 seconds to see the
amount of cups or liters for which coffee has been ground since
the last reset of the counter.
To exit the counter mode press any button.
For resetting the day counter turn off the grinder by pressing the
main ON/OFF switch (pos.8). Press and hold the +button while
turning the grinder back ON. The day counter will be reset to Zero.
The counter always shows the value of your pre-
set dosing unit (cups or liters).
7.2 Permanent counter (non resettable)
Press and hold the -button (pos. 5) for 3 seconds to see the
amount of cups or liters for which coffee has been ground with
this FCG 2.0 since production. To exit the permanent counter
mode press any button.
7.3 Cleaning counter
After grinding appr. 15kg of coffee the display will show CLEAN as
a ticker. The grinder can still be used despite this alarm.
It is advisable to clean the grinder regularly in or-
der to keep the taste of the ground coffee, the grind
speed and dosing accuracy as constant as possible.
For resetting the cleaning counter turn off the grinder by pressing
the main ON/OFF switch (pos.8). Press and hold the -button
(pos.5) while turning the grinder back ON. The cleaning counter
will be reset to Zero
7.4 Disc change counter
After grinding appr. 700 kg of coffee the display will show DISC as
a ticker while grinding. The grinder can be used ongoingly despite
this alarm.
For resetting the disc change counter turn off the grinder by
pressing the main ON/OFF switch (pos.8). Press and hold both
the +button (pos.4) and -button (pos.5) while turning the grinder
back ON. The disc change counter will be reset to Zero.
It is advisable to change the discs after grinding
appr. 700kg of coffee in order to keep the uni-
formity of the ground coffee particles, the grind
speed and dosing accuracy as constant as possible.
Note: The cleaning counter and the disc change counter are hid-
den counters. Their actual position cannot be shown. Their pa-
rameters cannot be changed.

GASTRONOMIEMÜHLEN | HORECA GRINDER
12
8. Calibration of The Dosing Units
As stated in the overview on page 10, the FCG 2.0 has been cali-
brated to grind to a coffee-to-water-ratio of 55g/l at a given grind
speed of appr. 5.5 g/s.
Depending on:
• the origin of the coffee,
• the type of coffee (arabica, robusta, etc. ),
• the size of beans,
• the blend,
• the degree of roasting,
• the cooling method after roasting (i.e. moisture content of
the bean),
• the age of the roasted coffee,
• the cleaning status of the grinder,
• other external influences (humidity, temperature, etc.)
• and most importantly: the adjusted grind size
the grind speed of the FCG 2.0 can vary quite drastically (5g/s up
to 8g/s).
Subsequently the dosed amount e.g. per cup of an individual
coffee at its best grind size does not match the aimed-for 55g/l.
The actual grind speed of the FCG 2.0 for the chosen coffee has
to be adjusted in the software to ensure the perfect coffee-to-
water-ratio.
8.1 Grind a preset amount of coffee
With coffee in the hopper place a tared cup under the spout and
press the START-button (pos.8) for 6 seconds. The grinder will
start grinding for exactly 10 seconds. The display will show CA for
“calibration”.
Weigh the ground coffee.
8.2 Enter the correct amount of coffee
The display will show a number (factory setting 55). Using the
+/-buttons enter the correct weight of the coffee that has been
ground in 10 seconds.
The software will automatically adjust the grind times to match
the perfect coffee-to-water-ratio of 55g/l.
8.3 Quit the calibration mode
To leave the calibration mode press the START-button (pos.8) for
6 seconds.
8.4 Changing the coffee-to-water-ratio (g/l)
In order to change the factory setting of 55g/l (SCAE Gold Cup
Standard) use the following formulae to calculate the value that
has to be typed into the grinder (see 8.2).
Value to enter in
calibration mode
(see 8.2) ( )
weight of coffee
(gram) ground in
10s (see 8.1)
=wanted coffee-
to-water-ratio
(g/l)
-
55

Defect
The grinder hums
but does not grind.
9. Operating Problems
Cause
The spout is
clogged.
A foreign object
blocks the grinding
mechanism.
Remedy
Carefully clean any adher-
ing coffee grounds out of
the spout. Set grinding
fineness to “coarse” and
trigger the grinding pro-
cess. The grinder will then
grind itself free. Afterwards,
return the setting to the de-
sired grinding fineness.
Set grinding fineness to
“coarse” and trigger the
grinding process. The
grinder will then grind itself
free. Afterwards, return
the setting to the desired
grinding fineness.
In case the grinder does
not grind itself free and
stay clogged, contact your
service partner.
GASTRONOMIEMÜHLEN | HORECA GRINDER
13
Defect
The grinder does
not start, the dis-
play is not lit.
In the case of other malfunctions or continued problems, please contact
your dealer or your authorised customer service centre.
Cause
The main plug is
not inserted.
The thermo pro-
tector has been
tripped. The grind-
er is noticeably
warm.
The pre-fuse has
tripped.
Remedy
Insert the main plug into
the socket.
Let the grinder cool down
for about 30 min.! The
thermo protector will reset
itself.
Check the pre-fuse. Restore
the pre-fuse to its initial
state or replace it. Deter-
mine whether other de-
vices are connected to this
fuse.

GASTRONOMIEMÜHLEN | HORECA GRINDER
10. Cleaning
You should clean your filter coffee grinder regularly, just like your
brewing machine. Grind-on-demand grinders in particular have
to be kept clean and residue free in order to ensure dosing accu-
racy for every shot and every customer.
10.1 Cleaning with GRINDZ™ grinder cleaner
We recommend cleaning your filter coffee grinder every 1-2
weeks (every 15 kg) with our GRINDZ™ Grinder Cleaner.
The display will show “GRINDZ” when 15 kg were ground with no
influence on the standard operation. To reset this cleaning alarm
see chapter 7.3.
For cleaning your grinder with GRINDZ™, just follow the steps below:
• Run the grinder empty of beans
• Fill 70 grams of GRINDZ™ directly into the hopper (content of
two sachets or two can lid).
• Adjust the grind size to coarse (for a better cleaning effect of
the GRINDZ™-particles).
• Start the grinder and grind through all GRINDZ™ into your
brew basket or a seperate bin.
• Grind appr. 2 - 3 sec. of coffee in order to purge the residues of
GRINDZ™ out of the disc casing.
Formation of dust while grinding GRINDZ is
natural and harmless. The dust particles can be
cleaned with a soft cloth from the casing and
spout.
10.2 Cleaning the grinder placement surface
Pull out the mains plug!
• Lift the grinder aside and clean the area on which it stands and
the bottom of its base.
• Both surfaces must be dry and free of oil and grease.
• Reposition the grinder and re-insert the plug.
10.3 Cleaning the grinder casing
From time to time clean the outside of the casing using a damp
cloth with a liquid non-abrasive detergent.
10.4 Cleaning of the hopper
The hopper should be cleaned weekly with a damp cloth inside
in order to remove coffee and oil residues which could negatively
influence the taste in the cup.
14

11. Service
Do not let any foreign objects fall into the grind-
ing mechanism!
Inspect the grinder regularly for damage, par-
ticularly to the electrical cable, plug, etc.
Any required repairs may only be conducted by
authorized specialist personnel. For this reason,
please contact a customer service repair facility,
your dealer or us directly as the manufacturer.
Observe the safety instructions under 1.2!
Always pull out the main plug from the socket
before carrying out maintenance or cleaning
work on the grinder!
GASTRONOMIEMÜHLEN | HORECA GRINDER
15
12. Spare Parts
Spare parts are usually ordered from your customer service cen-
tre or your local dealer. To ensure quick and correct processing of
your order, the following information is absolutely essential:
1. Type designation, serial number and voltage of the
grinder (on the rating plate underneath the grinder).
2. An exact description of the part to be replaced or the
article number.

13. Wiring Diagram 200-240V 50/60Hz
GASTRONOMIEMÜHLEN | HORECA GRINDER
16
M1
K1
K1
Gehäuse / body
X1
L
N
PE
L
N
X2
11 21
PE
W1
W1 Netzkabel mit Stecker / mains cable with plug
X2 Klemmblock / multiple pin strip
K1 Schaltrelais / relay s witch
C1 Betriebskondensator / running capacitor
X3 Netzteilplatine / powerboard
X4 Bedienplatine / pc - board
W2 Flachbandkabel 3 polig / ribbon cable 3-pole
M1 Mühle / built -in grinder
X3
X4
C1
W2
PE
Schaltkontakt /
switch contact
Schaltkontakt /
switch contact

14. Certificate 15. Warranty Conditions
1. The warranty period is 1 year from the date of purchase.
2. The warranty covers all damages that can be attributed to infe-
rior materials or defective workmanship. Corresponding grinders
will be repaired or replaced free-of-charge, with the exception of
transport or freight charges. Transport is the responsibility of the
customer. Therefore, avoid damages with all returns by correct
packing.
3. The grinder may only be opened for cleaning purposes in ac-
cordance with the Operating Instructions.
4. This warranty does not cover damages which have occurred
through: Improper usage, improper maintenance, lack of ser-
vicing, usage for purposes other than those intended, incorrect
installation, incorrect voltage, breakage, natural wear or for rea-
sons beyond our sphere of influence.
5. In order to maintain the warranty, only original spare parts and
accessory parts may be used.
6. Observe in addition our General Delivery Conditions in their
respective current version.
7. The manufacturer is in no way liable for consecutive or second-
ary damages.
8. The warranty does not cover costs resulting from repairs con-
ducted by non-authorized personnel.
GASTRONOMIEMÜHLEN | HORECA GRINDER
17
EC Declaration of Conformity
The manufacturer: MAHLKÖNIG GmbH & Co. KG
Tilsiter Straße 142
D - 22047 Hamburg
Tel.: +49 (0) 40 69 69 40 - 0
Fax: +49 (0) 40 69 39 72 - 1
hereby declares that the below mentioned product:
product type: device for food processing
machine description: Coffee grinder
machine typ: FCG 2.0 / FCG 6.0 high and low versions
is in compliance with the following directives and regulations:
• The provisions of the Machinery Directive 2006/42/EG
• The Low Voltage Directive 73/23/EWG
• The EC Electromagnetic Compatibility Directive 2004/108/EG
• The Directive on the restriction of use of certain
hazardous substances in electrical and electronic equipment 2011/65/EU
• The EU chemicals regulation (REACH – Regulation) (EG) Nr. 1907/2006
Supplements in Europe:
Regulation 1935/2004 Requirements for materials and
the objects with Food comes into
contact
Documentation Agent: Sven Erdmann
Address of the proxy documentation: See the address of the manufacturer
Done in Hamburg on: 01.08.2013
Function of subscriber: General Manager
Name of signatory: Philipp Baumberger
Signature
MAHLKÖNIG GmbH & Co. KG, Amtsgericht Hamburg HR A 85 074; Persönlich haftende Gesellschafterin:
Beteiligungsgesellschaft MAHLKÖNIG mbH, Eingetragen Amtsgericht Hamburg HR B 45 324,
Geschäftsführer: Nils Erichsen, Philipp Baumberger, Jochen Christoph
Dresdner Bank AG (BLZ 200 800 00) Kto. 383 780 400, Postbank Hamburg (BLZ 200 100 20) Kto. 253 89-203,
Commerzbank AG (BLZ 200 400 00) Kto. 21 10 294, Ust. Id. Nr.: DE 118 37 22 65

GASTRONOMIEMÜHLEN | HORECA GRINDER
18
Notes

GASTRONOMIEMÜHLEN | HORECA GRINDER
19
Notes

GASTRONOMIEMÜHLEN | HORECA GRINDER
The professional art of grinding
since 1924
MAHLKÖNIG GmbH & Co. KG
Tilsiter Straße 142
D- 22047 Hamburg, Germany
Phone: +49 (0)40 / 69 69 40-0
Fax: +49 (0)40 / 69 39 721
office@mahlkoenig.de ; www.mahlkoenig.de
December 2010
Subject to change without prior notice!!
Table of contents
Other Mahlkönig Coffee Grinder manuals

Mahlkönig
Mahlkönig W401 User manual

Mahlkönig
Mahlkönig Kenia User manual

Mahlkönig
Mahlkönig Vario User manual

Mahlkönig
Mahlkönig Costa Rica User manual

Mahlkönig
Mahlkönig K30 TWIN User manual

Mahlkönig
Mahlkönig VARIO-W User manual

Mahlkönig
Mahlkönig K30 TWIN User manual

Mahlkönig
Mahlkönig Tanzania User manual

Mahlkönig
Mahlkönig K30 ES User manual