Main Resource 2022S series User manual

Courtesy of Main Resource, Inc. Visit us at www.MainResource.com or call 800 362-6740
for all your Comdial needs.
Page 1 of 34
Comdial Digital Telephone System
LCD Speakerphone
System Reference Guide
Applies to Impression LCD speakerphone models 2022S-xx Using the following
software cartridges on a digital telephone system
I0408 Rev. 18A and Later
I0816 Rev. 18A and Later
I1632 Rev. 18A and Later
S0408 Rev. 18A and Later
S0816 Rev. 18A and Later
S1632 Rev. 18A and Later
Contents:
• sing Speakerphone Capability
• Program Attendant Features
• Answering Calls
• Making Calls
• Subdued Off-Hook Voice Announcement (SOHVA)
• Holding Calls
• Transferring and Conference Calls
• Other Telephone Features
• Text Messaging
• Programming Your Telephone
• Troubleshooting Your Telephone
• Quick Reference Guide
• Glossary

Courtesy of Main Resource, Inc. Visit us at www.MainResource.com or call 800 362-6740
for all your Comdial needs.
Page 2 of 34
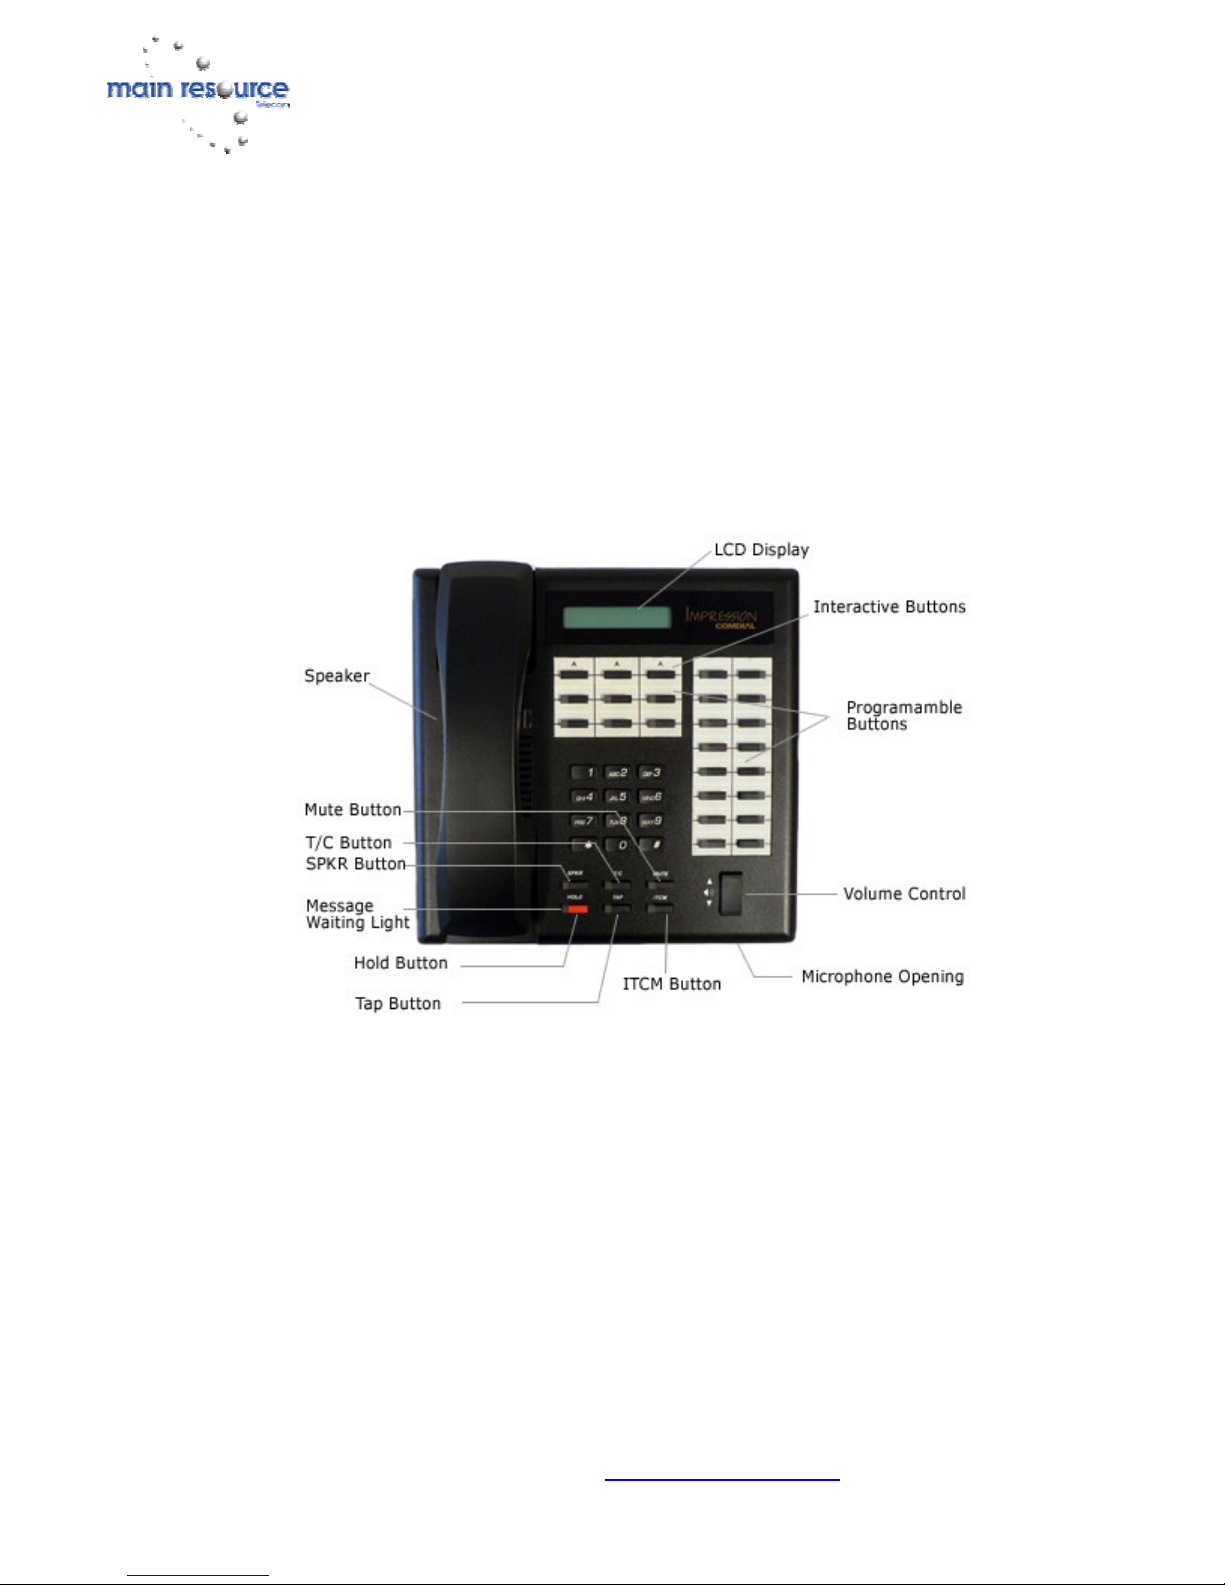
Using Speakerphone Capability
A note on placing your speakerphone: For best audio quality, place your phone
at least eight inches away from the edge of your desk, do not use speakerphone in a
high traffic area with an excess of background noise and do not place anything
directly beside or beneath your speakerphone.
A note on using your speakerphone: Speak directly into the microphone, remain
within a radius of three feet from your phone and keep in mind that the voice-
activated microphone will cause the conversation to become garbled if both parties
speak at the same time.
The speakerphone feature of our phone allows you to place a call or answer a call-
announce while on hook. During a conversation, switch from speakerphone to
handset for privacy by lifting the handset and talking. To return to speakerphone,
press SPKR and hang up.
Place a call using speakerphone:
• Press the line or ITCM button
• Dial
To use autodial with speakerphone, press the programmed button.
Answer a call using speakerphone:
• Press the line button with the flashing red or orange light
End a call using speakerphone:
• Press SPKR
Status Lights
Direct Station Select and Busy Lamp Field Buttons:
Steady red – station is in use or Do Not Disturb
Flashing red – station is receiving a call or station is calling you
Rapidly flashing red – station-to-station messaging has been set.
Line Buttons:
Steady green – line is in use at your station
Steady red – line is in use at another station
Flashing red – a call is coming in on this line
Flashing orange – your line is ringing and will be answered when you take the
telephone off hook
Winking green – line is on hold at your station
Winking red – line is on hold at another station
Rapidly flashing green – line has recalled from hold at your station
Rapidly flashing red – line has recalled from hold at another station
Next to a fixed or programmable feature button:
Steady red – feature is on
Steady off – the feature is off

Courtesy of Main Resource, Inc. Visit us at www.MainResource.com or call 800 362-6740
for all your Comdial needs.
Page 3 of 34
Next to the ITCM button:
Steady red with a quick flash – you are using your intercom
Rapidly flashing red – auto redial is in use or system is in night mode
Winking red – an LCD message is set on your phone for others to receive when they
call you
Flashing red – another station is calling you
Next to the HOLD button:
Flashing red – a message is available for pick up
Rapidly flashing red – automatic station relocation has been set
Next to the SPKR button:
On steady with telephone on hook and busy – speakerphone mode active
On steady with telephone on hook and idle – background music is on
On steady with telephone off hook and busy – group listen is active
Next to the M TE button:
On – called party cannot hear your conversation.
LCD Abbreviations
LCD Screen Feature
ADIAL Automatic Dial
ALL All
ANS Answer
ARDL Automatic Redial
BKSP Back Space
BLOCK Block
CAMP Camp
CFWD Call Forward
CLBK Call Back
CLEAR Clear
CWAIT Call Waiting
DARK Dark (Contrast)
DIAL Dial
DISP Display (Contrast0
DND Do Not Disturb
DSS Direct Station Select
EXIT Exit
EXT External
FEAT Feature
FWD Forward
G (followed by last number) Group
HOLD Hold
HVHLD Have Hold
INT Internal
L (followed by last number) Line
Last No Saved Last Number Saved
LIGHT Light (Contrast)
MUSIC Background Music
MSG Message

Courtesy of Main Resource, Inc. Visit us at www.MainResource.com or call 800 362-6740
for all your Comdial needs.
Page 4 of 34
NEXT Next Display
OVER Override
LCD Screen Feature
P (followed by last number) Port
PERS Personal
PREV Previous Display
RECALL Recall
RECON Reconnect
RING Ring Tone
S (followed by last number) Station
SAVE Save Number
SDIAL Speed Dial
SEND Send Transfer
SET Set
SOHVA Subdued Off Hook Voice Announce
TIMER Timer
TKMSG Take Message
VAB Voice Announce Block
Rings
Two short rings – intercom call
Single longer ring – outside call
One short ring burst – voice announce
Three short ring bursts – ringback from a hall on hold or in queue.
Choose from six rings to identify calls ringing to your phone.
Program Attendant Features
Creating LCD Response Message
Your phone system provides two default messages, “Back at…” and “Call…”. You
may add eight additional messages or choose not to use the default messages and
create 10 customized messages.
To Store LCD Messages:
1. Write your messages (up to 16 characters) on the chart below.
2. Use the letter code table below to assign a number to each letter
3. Write these numbers on the line beside the message letters
4. Press ITCM
5. Dial “*#05”
6. Dial a message location number (0-9)
7. Dial “#” to clear the current message
8. Compose messages by dialing the two digit codes related to the letters
9. Dial “*” to save
10. Dial the next location number
11. Dial “#” to clear, compose messages with two-digit codes and press “*” to
save
12. Repeat as needed

Courtesy of Main Resource, Inc. Visit us at www.MainResource.com or call 800 362-6740
for all your Comdial needs.
Page 5 of 34
13. Press “SPKR to end.
Example Create a message that will read as “GONE HOME” and program it to
message location number 3.
1. Press ITCM
2. Dial “*#05”
3. Dial “3#”
4. Dial
G o n e H o m e
41 66 65 35 42 66 64 35
5. Dial “*” and press SPKR to end.
6. When you have finished creating messages, fill in the list on the page below
and give a copy to each station user.

Courtesy of Main Resource, Inc. Visit us at www.MainResource.com or call 800 362-6740
for all your Comdial needs.
Page 6 of 34
Letter Code Table
Character Code Character Code Character Code
A 21 a 24 SPACE 12
B 22 b 25 ; 17
C 23 c 26 / 18
D 31 d 34 “ 19
E 32 e 35 . 27
F 33 f 36 , 28
G 41 g 44 29
H 42 h 45 1 01
I 43 i 46 2 02
J 51 j 54 3 03
K 52 k 55 4 04
L 53 l 56 5 05
M 61 m 64 6 06
N 62 n 65 7 07
O 63 o 66 8 08
P 71 p 74 9 09
Q 11 q 14 0 00
R 72 r 75
S 73 s 76
T 81 t 84
U 82 u 85
V 83 v 86
W 91 w 94
X 92 x 95
Y 93 y 96
Z 13 z 16
LCD Messages Programmed
Location Code Message Letter Codes
1 Back at System Message
2 Call System Message
3
4
5
6
7
8
9
0

Courtesy of Main Resource, Inc. Visit us at www.MainResource.com or call 800 362-6740
for all your Comdial needs.
Page 7 of 34
Naming System Telephones
Assign a personal or group name to each telephone on the system to know who is
calling you. The name may contain up to seven letters and will be show on the
user’s display and in the called party’s display. Examples SALES, TECH, K BROWN.
To Name a System Telephone:
1. Use the letter code above to create names for all telephones requiring a name
2. Press ITCM
3. Dial “*#06”
4. Dial the station number of the phone to be named (10-57)
5. Dial “#” to clear the current name
6. Dial the two-digit codes that correspond to the letters
7. Dial “*” to continue entering stations names (start at step number 4)
8. Press SPKR to end
9. Record names on the following pages
Station Names Assigned
Ext. Name Ext. Name Ext. Name

Courtesy of Main Resource, Inc. Visit us at www.MainResource.com or call 800 362-6740
for all your Comdial needs.
Page 8 of 34
Music on Hold
To set music on hold:
1. Press ITCM
2. Dial “*#04”
3. Press “1” to enable or “2” to disable.
The Light at button A1 (top left programmable button) will be illuminated when
music on hold is enabled.
Setting the Night Transfer for Ringing Mode
Normal ringing assignments of incoming lines may be transferred to a station or
stations for off-hour or special answering. Stations may also be assigned to answer
any ringing outside line.
Set the night transfer mode from the attendant’s station:
1. Press ITCM
2. Dial “*#03”
3. Dial “1” to enable or “2” to disable.
4. Press SPKR to end.
Setting a night Transfer Button
To program a Night Transfer Button:
1. Press ITCM
2. Dial “**1”
3. Press one of the programmable buttons
4. Press ITCM
5. Dial “*#03”
6. Press SPKR to end.
Setting the System Clock
The time and date appear on the LCD speakerphone display. To set:
1. Press ITCM
2. Dial “*#01”
3. Dial two digits for year (00-99)
4. Dial two digits for month (01-12)
5. Dial two digits for day (01-31)
6. Dial two digits for hour (00-23)
7. Dial two digits for minutes (00-59)
8. Press SPKR to end
Print Station Message Detail Accounting Records (SMDA)
If your system is connect dot a printer, you can command the system to print
several different types of reports and to delete all stored SMDA records.
To Print:
1. Press ITCM

Courtesy of Main Resource, Inc. Visit us at www.MainResource.com or call 800 362-6740
for all your Comdial needs.
Page 9 of 34
2. Dial “*#07”
3. Choose a report
• 1# – station report
• 1 (port number # - single station report
• 2# - line report
• 3# - SMDA department report
• 4# - account codes
• 5# - automatic reports
• 6# - print all records
• 7# - to delete SMDA records
• 0# - Departmental Call Distribution
• 8 – view (on LCD) the number of free records remaining in the system
• 9 – to cancel printing
Press SPKR to end.
Storing System Speed Dial Numbers:
Store up to 99 speed dial numbers at the attendant telephone. All users will be able
to access these from their individual stations. Distribute the list of stored numbers
to all users for their reference.
To program:
1. Press ITCM
2. Dial “*#02”
3. Dial 01-99 to choose storage location
4. Dial “#” to clear the current entry
5. Choose the line that is to be used
a. Dial 01-24 for lines 1 through 24
b. Dial 91-94 for line groups 1 through 4
c. Press ITCM for intercom
6. Dial the number to be stored. Press HOLD to insert a pause. Press TAP to
store flash.
7. Press T/C
8. To program a name, enter the digits from the letter code chart above (up to
16 characters). Press T/C again to leave the name blank
9. Press T/C to save
10. Repeat steps 3-9 to store the next number
11. Press SPKR to end.

Courtesy of Main Resource, Inc. Visit us at www.MainResource.com or call 800 362-6740
for all your Comdial needs.
Page 10 of 34
System Speed Dial Numbers:
Loc. Name
Number
Loc. Name
Number
Loc. Name
Number
System Alarm Reporting
When the system experiences a disruption, such as a failure to communicate with a
particular station due to a disconnected station or an off-line system data printer, an
alarm signal displays at the attendant’s station. The attendant can command the
system to display alarm codes on the LCD of their phone.
When enabled and a new alarm is present, a flashing “*” displays on the first line of
your phone’s LCD. Keep note of the alarms displayed and relate these to the installer
of your system.
To Display Alarms
Press and hold “*” for five seconds. The following information may be displayed

Courtesy of Main Resource, Inc. Visit us at www.MainResource.com or call 800 362-6740
for all your Comdial needs.
Page 11 of 34
“Station disconnected from station port for more than five minutes. Month, day,
station port number and station extension number are shown. Example ‘Mo/Da Pxx
xxxx A’”
“Communications difficulty between a station and the common equipment. The
number of parity errors, up to 256 and the affected station port are shown.
Example ‘xxx PARITY Pxx’”
“Data printer off-line. Example ‘PRINTER OFF LINE’”.
Press “0” to cancel report displays. After alarm messages have been displayed the
“*” is cleared from the LCD until another alarm occurs.
Transferring Calls To The Voice Mail System
Program a Transfer to Voice Mail button on your telephone:
1. Press ITCM
2. Dial “**1”
3. Press the empty programmable button to assign
4. Dial “6”
5. Dial the extension number of the voice mail station port
6. Press SPKR to end. Label the programmed button.
Transfer calls to voice mail:
1. While on a call, press the programmed button.
2. Press the DSS or the party to receive the voice mail message, or
3. Dial the extension number of the party to receive the message and dial “2”.
4. Press SPKR to end.
Transfer Calls to a Secondary Attendant Telephone:
The installer of your system can arrange for station 12 to serve as a secondary
attendant location. When enabled, incoming calls ring at the primary attendant’s
phone. Recalls from unanswered transfers or timed hold recalls will ring at both
attendant stations.
Digital Voice Announce (DVA)
Digital voice announce plays up to two minutes of up to four pre-recorded
announcements (voice prompts and dialing instructions) and messages during an in-
progress call.
Store DVA messages by delivering them from the telephone handset at station 10 or
12 or by playing the contents of a tape recording (see your installer for detailed
instructions).
To store DVA messages:
1. Press ITCM and “*#08”
2. Choose the message style
a. “1” for DISD (Direct Inward Station Dialing – for callers who bypass
attendant) message style

Courtesy of Main Resource, Inc. Visit us at www.MainResource.com or call 800 362-6740
for all your Comdial needs.
Page 12 of 34
b. “2” for DCD (Departmental Call Distribution) style
3. Select DVA station port 10-57 and pres “#” to end the station selection
4. Press “0” to erase all the messages
5. Dial the code for the message type you wish to record
a. “5” to record day answer message
b. “6” to record night answer message
c. “7” to record recall message
d. “8” to record drop message
e. “9” to stop recording.
6. Read the message into the telephone handset mouthpiece or start the audio
tape recorder to play the message.
7. Press “9” to stop.
8. Dial the code for the next message, record the message and press “9” to
stop. Repeat this step for each message.
Listen to stored messages:
Dial the code to listen to your recorded messages
• “1” to play day answer message
• “2” to play night answer message
• “3” to play recall message
• “4” to play drop message
• “9” to stop playback
To erase messages, press “0”. To change DVA messages, repeat the storage
procedure and make different selections.
To exit the DVA session, press SPKR.
Example Messages:
• Day Answer messages
o For DCD callers, “Welcome to Main Resource’s sales department. All of
our agents are busy. Please stay on the line and an agent will answer
your call as soon as possible.”
o For DISD callers, “Welcome to Main Resource. If you know your
party’s extension, please dial it now. To reach the operator, remain on
the line.
• Night answer messages
o For DCD callers, “Welcome to Main Resource’s sales department. Our
hours are eight to five Monday through Friday. Please call again
during those hours.”
o For DISD callers, “Welcome to Main Resource’s sales department. Our
hours are eight to five Monday through Friday. Please call again
during those hours.”
• Recall messages
o For DCD callers, “Please hold; an agent will be with you as soon as
possible.”
o For DISD callers, “The party you have called is not available. Please
dial a new extension number.”
o For DISD callers (when your system has the tracker paging system
installed), “The party you have called is not available. Please dial a
new extension number or dial ‘#’ plus your call-back number followed
by another ‘#’ to page your party.”
• Drop message

Courtesy of Main Resource, Inc. Visit us at www.MainResource.com or call 800 362-6740
for all your Comdial needs.
Page 13 of 34
o “Thank you for calling Main Resource, good bye.”
Direct Inward Station Dialing
Direct inward station dialing (DISD) allows an external party to call an intercom
station directly, with no assistance from the attendant. The attendant must provide
callers with the following information.
Give the caller a DISD line number the extension number associated with the station
desired. When a caller makes a DISD call from an outside line, the system will
answer with a continuous dial tone. At this point the caller should enter the
extension number.
If the station is idle, the called station rings. If another station user answers the call,
the caller may ask to be transferred to the desired station. If ringing stops and the
dial tone sounds again, the caller may dial another extension. If the called station is
busy, the call is placed on hold and camped-on at the busy station. If the call is not
answered within a specified time frame, the busy tone is given, followed by a DISD
dial tone. The caller may be returned to the DISD dial tone a total of three times
and then the line is dropped.
If the called station is busy and is part of a hunt group, the caller is routed to an idle
station in the hunt group when available. If an invalid extension number is dialed,
an error tone sounds and the DISD dial tone is returned. If the extension number is
not dialed within the programmed dial time limit, the call is routed to the DISD assist
station if available. Otherwise, the line is dropped.
Answering Calls
Answering Outside Calls
When the phone sounds long single ring bursts and one of the line button lights is
flashing, press the button of the ringing line if the flashing light is red and lift the
handset. If the flashing light is orange, you have ringing line preference enabled and
may simply lift the handset to answer the call.
Answering Intercom Calls
Intercom calls are made from one system telephone to another. The call may come
directly through your speaker or your telephone will ring with two short ring bursts.
You can block voice calls if you like. See the “Blocking Voice Announce Calls” section
for instructions.
When you hear a short tone burst and then the caller’s voice, speak toward the
telephone to answer or lift handset for privacy.
When you hear two short bursts, press ITCM to respond using the speakerphone or
lift the handset for privacy.

Courtesy of Main Resource, Inc. Visit us at www.MainResource.com or call 800 362-6740
for all your Comdial needs.
Page 14 of 34
Subdued Off-Hook Voice Announcement (SOHVA)
When enabled by your system installer, SOHVA allows an intercom caller to break
into your call if you are using the handset. If you are on a speakerphone, you will
hear a ring burst and may go off-hook to receive the SOHVA call. The party you
were originally conversing with will not hear the SOHVA announcement.
Respond to a SOHVA call verbally by pressing and holding MUTE and speaking into
the handset or headset mouthpiece. The original party will not hear the response.
Release the MUTE button to return to the distant party.
Respond with a non-verbal message to a party with an LCD speakerphone by
pressing MSG and one of the following HVHLD (have them hold), TKMSG (take a
message) or CLBK (I will call back) to send the appropriate message.
If you attempt to respond using a non-verbal message to a party with a non-LCD
phone, the station is immediately disconnected from the call.
Block SOHVA calls by pressing BLOCK when the SOHVA is initiated.
Call Pick-Up
Your system installer may have arranged several telephones together in a user
group. At a station arranged as part of a group, you can answer calls ringing at
other stations within your group. You may also answer a call ringing at any
telephone in the system if you know the telephone’s extension number.
To answer a call ringing in your group, press ITCM and dial “#4”.
To answer a call ringing at any telephone, press ITCM, dial “#4” and dial the
extension number of the ringing telephone.
Caller ID
When enabled, the number calling parties will display on your LCD. Caller ID can be
used at a station with lines that audibly ring, calls you answer with call pick up from
a station with audible ring or with lines transferred to your station.
Night Transfer
When the system is in night mode, answer incoming calls by pressing ITCM and
dialing “80”.
Station Monitoring
If enabled, station monitoring allows you to see the status (idle, ringing or busy) of
other stations. A BLF light will flash when a DSS station is ringing. Answer a call at
a ringing DSS station by pressing the DSS button.

Courtesy of Main Resource, Inc. Visit us at www.MainResource.com or call 800 362-6740
for all your Comdial needs.
Page 15 of 34
Making Calls
Placing Outside Calls
To place an outside call, press the line button or line group button (if prime line is
not assigned to your phone), at the tone dial the number, or press the pre-
programmed button of the number you wish to dial.
Making Intercom Calls
Place an intercom call by dialing the extension number on they keypad or by using a
programmed DSS button. See the “Dial By Name” feature for more information.
When you make an intercom call, either your voice will sound over the receiving
party’s speakerphone or your call will causes the telephone to ring. Default set up
has ringing alert method set up. If the called party sets a voice announce block at
their telephone, all voice announce calls will be prevented.
To cause the called party’s phone to ring, press a programmed DSS button, or pres
ITCM and the extension number.
To place an intercom voice call, press a programmed DSS button and speak, or press
ITCM and dial the extension number.
Executive Override - Breaking in to a busy station or a station in DND
When enabled, you can break in to a conversation at a busy station or a station in
Do Not Disturb.
To break in to a busy station, press NEXT when you hear the busy signal, then press
OVER and join the call in progress. When you press OVER, several short tone bursts
will be heard by all parties.
To break in to a station in Do Not Disturb, press OVER and speak your
announcement unless the ring-back tone sounds, in which case, wait for the party to
respond.
Automatic Callback
If the extension you call in tone announce mode is busy, in Do not Disturb mode or
rings with no answer, use automatic callback to ring your phone when the line is
available. When you reach a station that is busy or does not answer, press CAMP.
When the phone you wish to reach becomes idle, your phone will ring with five short
tones. Press ITCM to cause the other phone to ring. To cancel the callback, press
ITCM and dial “#6”.
If the extension you call in voice announce mode is not answered, press ITCM before
pressing CAMP.

Courtesy of Main Resource, Inc. Visit us at www.MainResource.com or call 800 362-6740
for all your Comdial needs.
Page 16 of 34
Call Waiting
If the extension you are trying to reach is busy, you can send a call waiting tone and
wait for an answer. Press NEXT and then CWAIT and remain on the line. The called
party will hear a short tone burst and may place the original call on hold or hang up.
Autodialing
To automatically dial, press the programmed button. Line selection is usually a part
of the stored autodial. If the stored number is as a second choice at the button,
press HOLD and then the button.
Speed Dial Calling
Station speed dial numbers are exclusive to your phone. System speed dial numbers
are set by the administrator and may be access from every station.
If you manually choose a line for dialing, press HOLD before using a speed dial. If
you place a call on hold before using the speed dial, pause before you press the
speed dial button or the system will automatically choose the line that you have on
hold to place your speed dial call.
To use station speed dials, while on hook dial the keypad number you have
programmed into your phone. To use station speed dials while off-hook and on a
line, press HOLD and the keypad number programmed into your phone.
To use system speed dials while on-hook, press “*” and dial the location number
(01-99) that was programmed into the system. To use system speed dials while off-
hook and on a line, press HOLD and dial “*” and the memory location digits (01-99).
Automatic Redial
When the number you dial is busy or not answering, you can redial it once, initiate a
repeated redialing or save it for later redialing using a programmed saved number
redial button.
To redial the last dialed number one time, press SPKR or hang up to disconnect.
Press “#”. To redial one a minute for 10 minutes, press the ARDL button. When the
tone is heard over the speaker, answer the call. Cancel an automatic redial request,
lift and replace handset or use the phone to make another call.
Select a Line Group
If your system utilizes line groups, access your line group by pressing ITCM and dial
the line group access code 9,81,82 or 83 for groups 1-4. Listen for outside dial tone
and dial the number.
Display Call Time or Cost
If you installer programs your LCD phone to display call costing, press the COST
button to show the cost of the current call. Otherwise, the pressing the TIMER
button will show and display the current call duration.

Courtesy of Main Resource, Inc. Visit us at www.MainResource.com or call 800 362-6740
for all your Comdial needs.
Page 17 of 34
After ending a call, to view call time or cost for the last call made, press HOLD or
HOLD twice, respectively.
Line Queuing
If all the lines in a group are busy, you can put your telephone in queue to await an
idle line. To queue, press ITCM and dial the group access code (9, 81, 82, 83). At
the busy tone, dial “*8” and hang up. When the line group is free, your phone will
sound several short ring bursts. Lift the handset and make your call.
To cancel line group queuing, press ITCM, dial “#8” and hang up.
To queue for a particular line, press HOLD and the line button of the busy line.
When the line is free, the phone will sound five short ring bursts. Lift handset to
answer or ignore to cancel.
Subdued Off-Hook Voice Announcement (SOHVA)
Voice Announcing to a Busy Station
If enabled, you can make a voice announcement to an off-hook or busy station by
using the SOHVA button. When you reach a busy extension, you can hang up or, to
interrupt, press the SOHVA button. At the quick tone bursts, make an
announcement (unless you get a busy signal, which means the called party is on
speakerphone and SOHVA is blocked). Wait for a reply. The called party may
respond with a verbal message, non-verbal message, or they may disconnect your
call.
Dial By Name
Dial by name displays programmed intercom and system speed dial names and
allows you to use interactive buttons on you phone to select the desired party and
automatically call them.
To use, press OPTIONS and press INT for intercom calling or EXT for system speed
dial calling. Dial the first three letters of the name you are looking for. For example,
“Main Resource” would be “624”. If there is no matching entry, “No Match” will
appear in the display (at this point, press PREV or enter three new digits). When an
entry appears, press NEXT to show subsequent names in the list until you find the
one you need or press ALL to view the entire list. Press DIAL to call the displayed
name.
Holding Calls
There are several options for putting calls on hold.
• Regular hold – any user sharing the held line can pick up the call.
• Exclusive hold – your telephone is the only one that may pick up the call.
• Place a parked or transferred call on hold

Courtesy of Main Resource, Inc. Visit us at www.MainResource.com or call 800 362-6740
for all your Comdial needs.
Page 18 of 34
• Place a call on hold at another telephone or on hold in the system where it is
available for pick up by all stations.
After a call has been on hold for a programmed period of time, the system will sound
three short ring bursts at your telephone and the flash rate of the line button
becomes faster. If the call is on exclusive hold, it will revert to manual hold after the
hold recall time period.
Placing a Call on Hold and Retrieving Held Calls
To place a call on hold, press HOLD. Press the line button of the held call (the line
will be flashing). To pick up a call that you answered and placed on hold but for
which you have no line appearance, press TAP.
Exclusive Hold
To place a call on exclusive hold, press HOLD twice. Press the line button of the held
call (light will be flashing) or press TAP if the station does not have line appearance.
Hold Recall
When a call recalls, press HOLD to restart timer or press ANS to retrieve the call.
Call Park
Parking a call in orbit means the call is placed on hold in the system, where it can be
answered from any phone in the system. While on the call, press ITCM and “*”. Dial
the code for the park location (91-99 for orbit 1-9) and remember the code you
chose for later use.
To retrieve a parked call, press ITCM “#” and the orbit number.
Parking a Call at a Station
To park a call on hold at another station, press ITCM and dial “*90” plus the
extension number of the telephone to receive the call.
To pick the call back up, press ITCM “*4” and dial the extension number of that
telephone.
To pick up a call that was placed on hold at your phone by another user, press ITCM
and dial “#90”.
Transferring and Conference Calls
Screened Transfer
To screen and transfer a call
1. Answer the call
2. Press T/C to place the call on hold

Courtesy of Main Resource, Inc. Visit us at www.MainResource.com or call 800 362-6740
for all your Comdial needs.
Page 19 of 34
3. Dial the extension number of the telephone to receive the transfer or press
the DSS button for that extension.
4. When the called party answers, announce the call.
5. Press SPKR to disconnect or hang up to complete the transfer.
If the called party is busy you may (if enabled)
• Press RECON to return the caller to your line
• Press SOHVA to alert the party that a call is waiting
• Press CAMP to camp on to that station or
• Press OVER to join the party’s current conversation.
Unscreened Transfer
To transfer a call to another user on the system
1. Answer a call
2. Press T/C to put the call on hold
3. Dial the extension number of the telephone to receive the call or press the
DSS for that extension
4. Press SPKR or hang up to complete the transfer.
Recalled Unscreened Transfers
If a transferred call is not answered, it returns to your telephone where you may
• Press SEND to attempt the transfer again
• Press HOLD to place the call on hold at your telephone or,
• Press ANS to answer the phone.
Conferencing Calls
Conference calls may involve up to five parties total and may be made up of any
combination of outside lines and intercom parties. When setting up a conference call
between outside lines and internal extensions, call the outside lines first.
To set up a conference call
1. Make the first call
2. Press T/C to place the call on hold
3. Make the next call
4. Press T/C to establish the conference
5. Repeat steps to add desired parties.
To continue the call with the last party after outside lines have left the
conference, press the line button of the remaining party.
To drop outside lines from the conference, press HOLD to put all lines on hold
before the caller hangs up.
To retrieve lines from hold back into the conference,
1. Press the line button,
2. Press T/C,
3. Press the line button,
4. Press T/C

Courtesy of Main Resource, Inc. Visit us at www.MainResource.com or call 800 362-6740
for all your Comdial needs.
Page 20 of 34
5. Repeat until desired lines are reintroduced to the conference.
Unsupervised Conference Calls
An unsupervised conference call occurs when you drop out of a conference call
between two outside lines, leaving them conferenced together.
To drop out of a conference call, dial “#” and hang up.
To rejoin the conference, press one of the lighted buttons where the conference is
taking place.
Other Telephone Features
Adjust Display Contrast:
1. Press OPTIONS
2. Press NEXT three times
3. Press DISP
4. Press LIGHT or DARK to change the contrast level.
5. Press SPKR to save the last level and end.
Blocking Voice Announce Calls:
1. Press OPTIONS
2. Press NEXT
3. Press VAB
4. Press ON
5. Press SPKR to end.
n-Block Voice Announce Calls:
1. Press OPTIONS
2. Press NEXT
3. Press VAB
4. Press OFF
5. Press SPKR to end.
Block an SOHVA while on a call:
Press BLOCK.
Turn Background Music On:
1. Press OPTIONS
2. Press NEXT
3. Press MUSIC
4. Press ON
5. Press SPKR to end
6. Adjust volume with the speaker volume control.
Turn Background Music Off:
1. Press OPTIONS
2. Press NEXT
3. Press MUSIC
4. Press OFF
5. Press SPKR to end.
This manual suits for next models
6
Table of contents