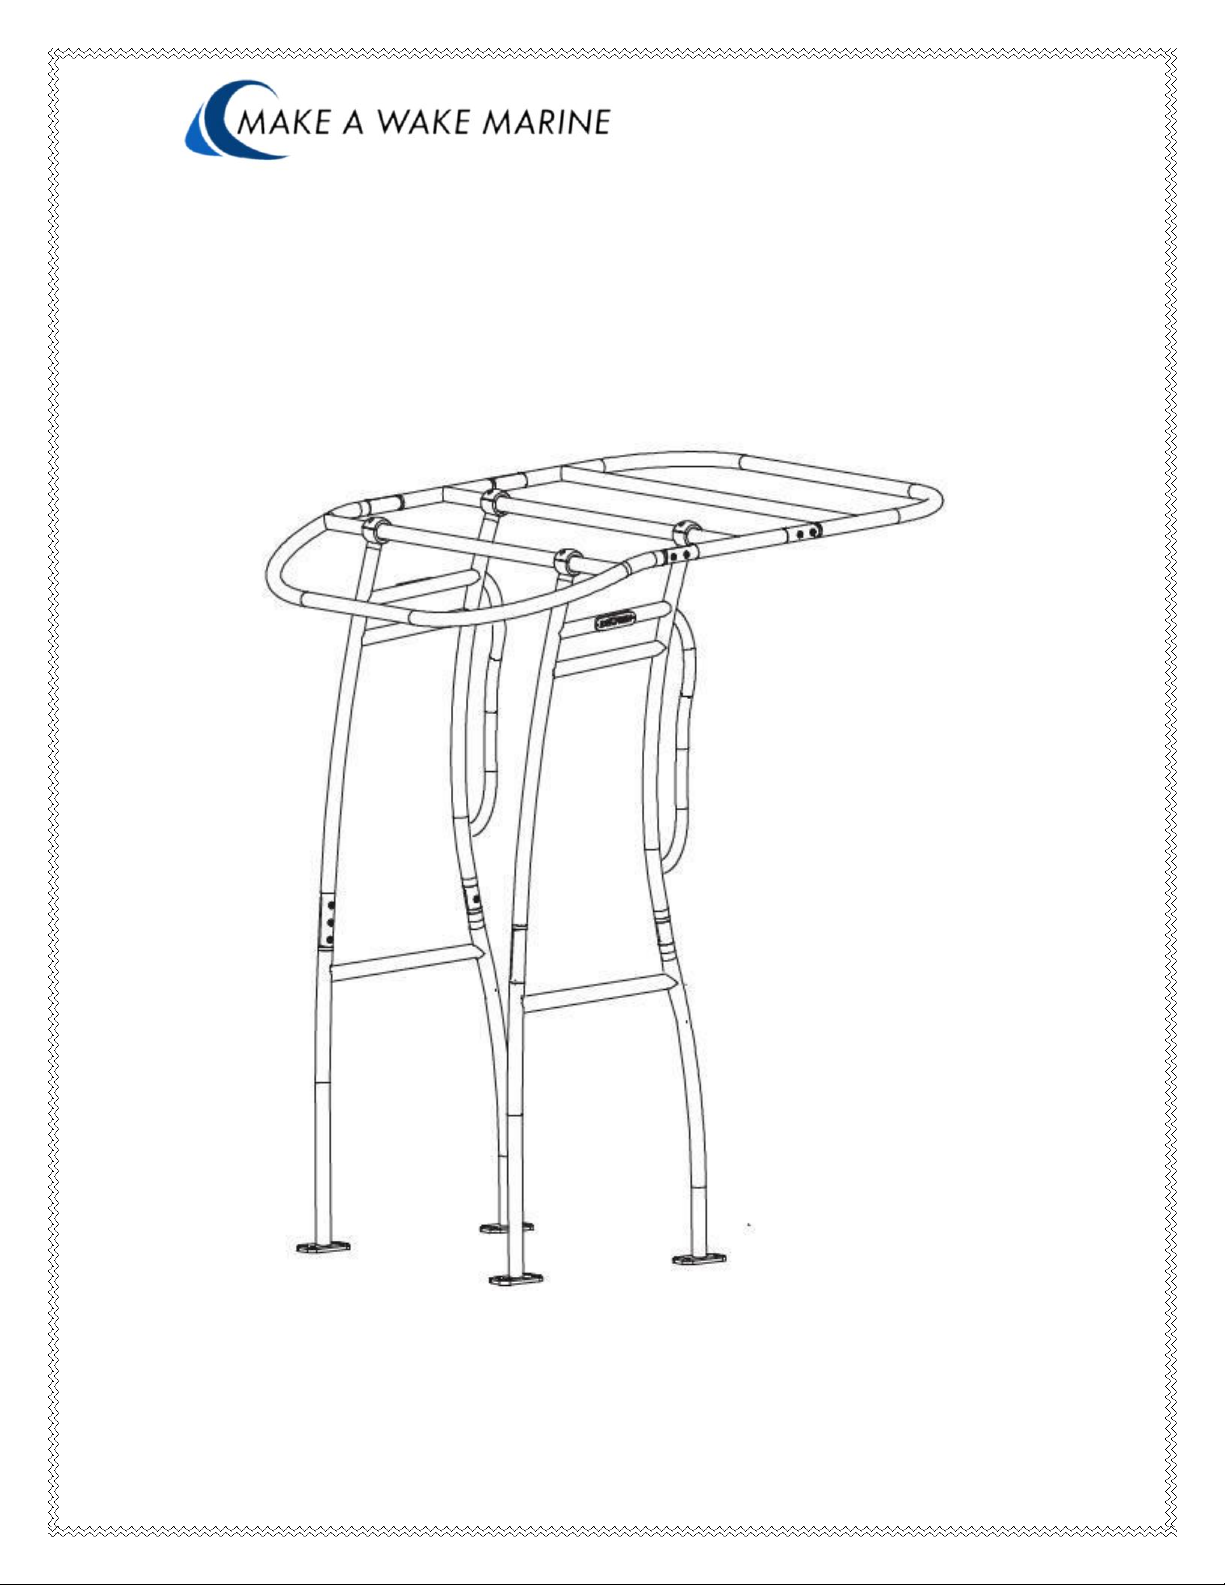
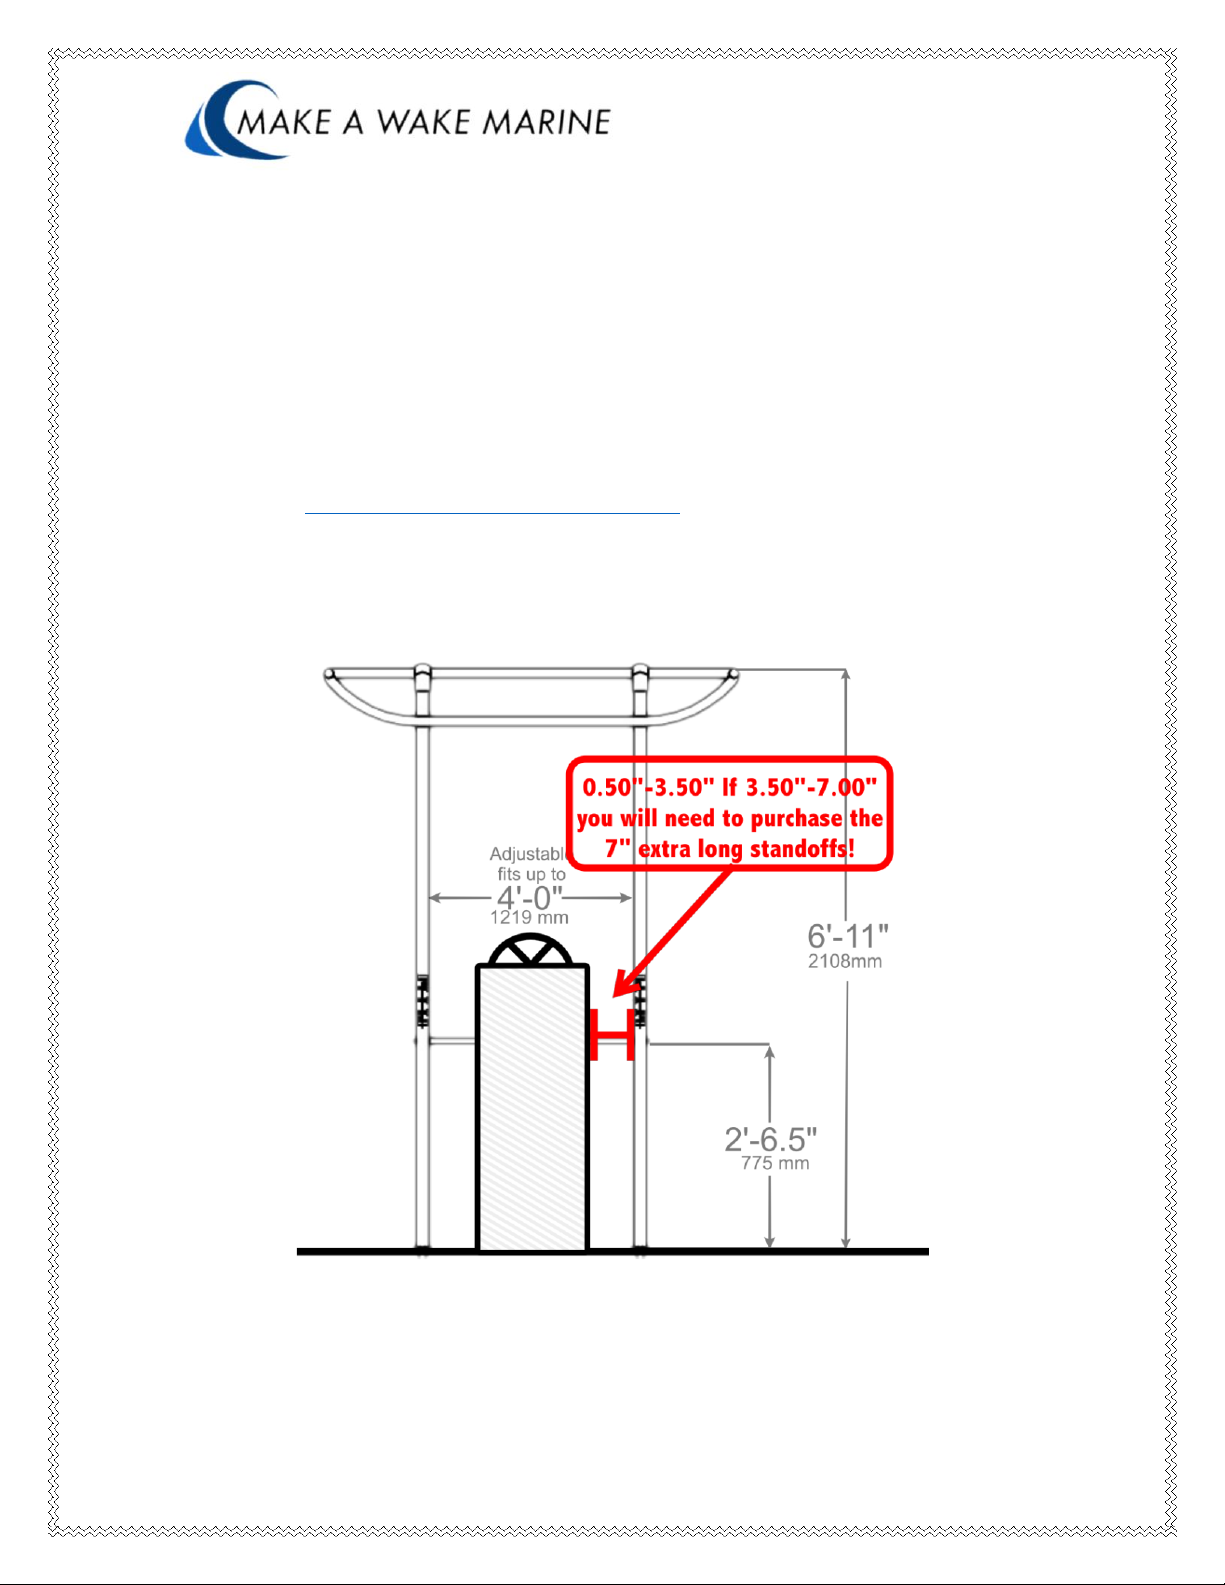
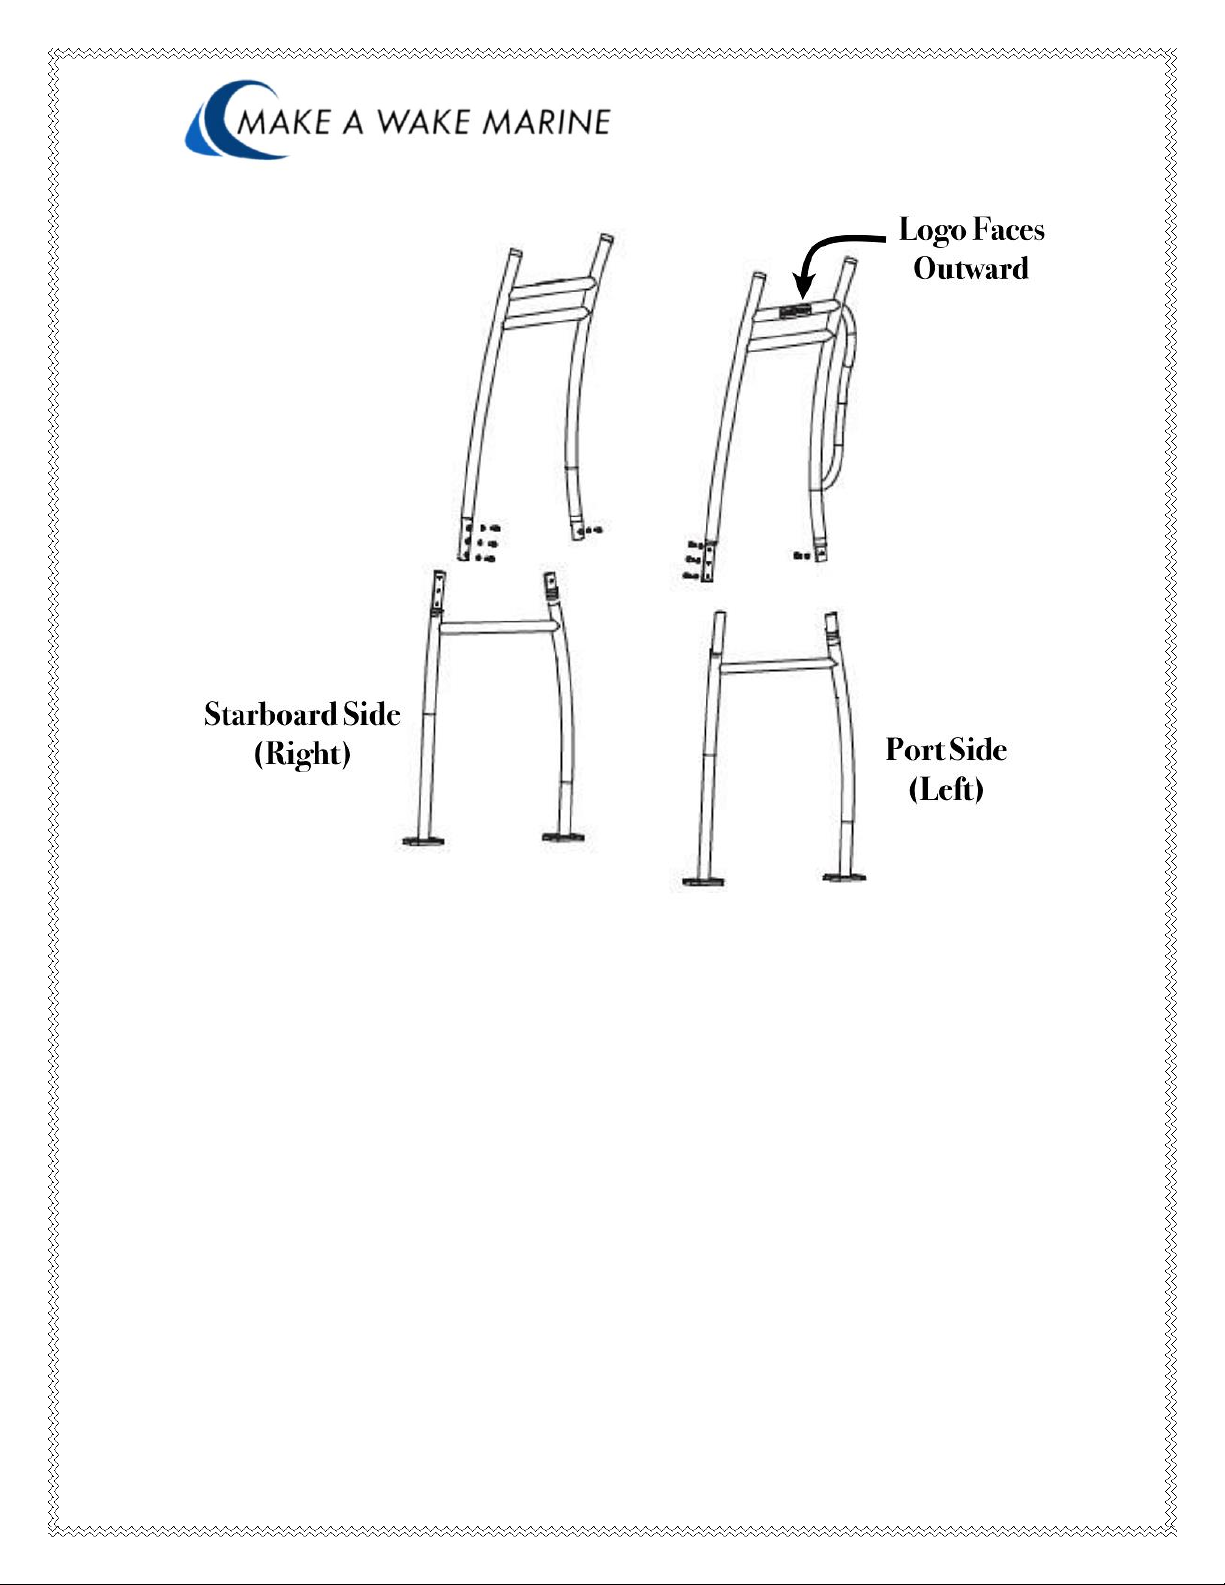
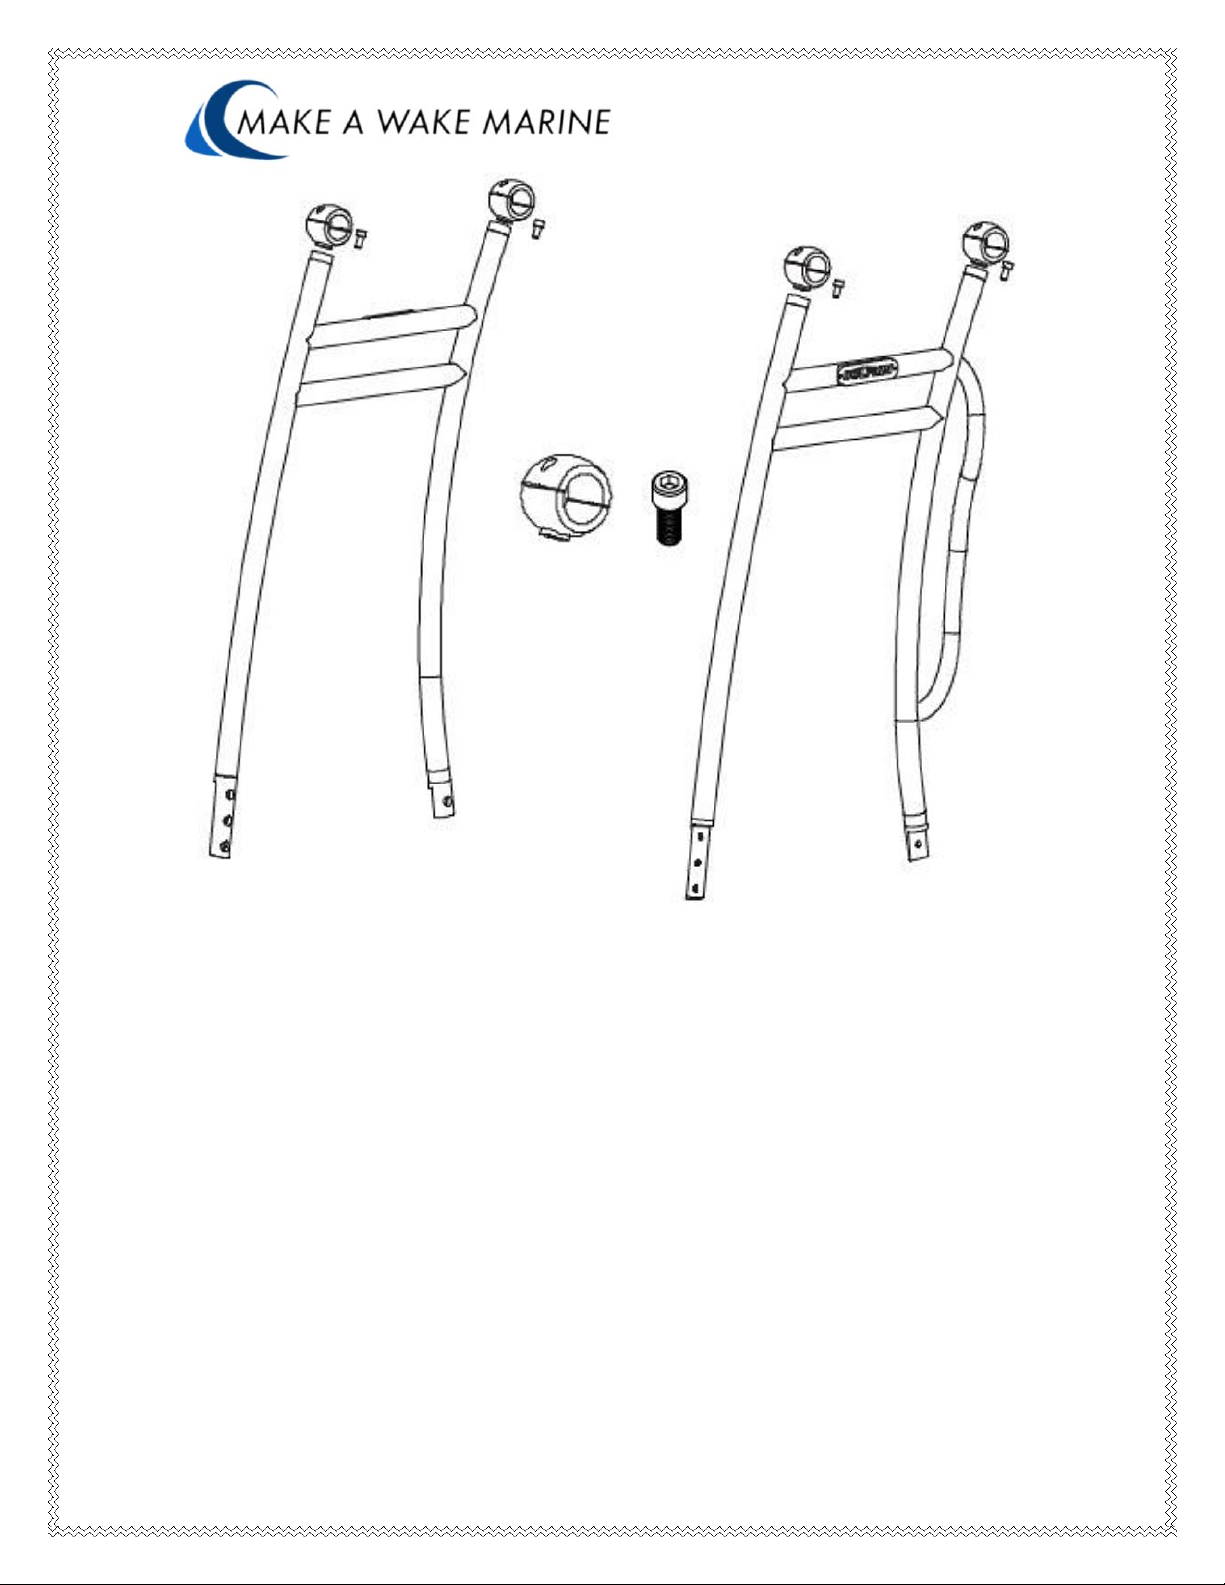
MAKE A WAKE MARINE Pro2 T-Top User manual

1
Pro2 T-Top Installation Guide
EXPLODED VIEW OF THE PRO2 T TOP FOR REFERENCE

3

4
STEP 2: Positioning of the Lower Half of the Side Frame
Place the lower half of the side frame away from the center console. It
should be placed between 0.50”-3.50” away from the center console as
measured from the inside of the horizontal support bar. It can be placed
between 3.50” and 7.00” away, however, you will need to purchase the
additional Extra Long 7” Console Standoffs.

5
Check under the floor for wires or other objects that could affect the
mounting area. Place the lower half of the side frame in the desired
position. Measure the distance between the front mounting position from
port to starboard (side to side) and verify that each of the lower halves of
the sides frames are even on the boat.
Place painters tape on the deck of the boat under the frame, and then use
a pencil to trace an outline around each foot onto the tape. Also trace the
center of each mounting hole. You will use these later to drill pilot holes.
Measure the distance between the front mounting position from port to
starboard (side to side).

6
STEP 3: Assembling the Side Support Frame
Attach the lower half and upper half of the side frames using the bolts and
split washers. The logos on the upper frame face outward. The bolt heads
will be concealed in the counter sunk area, and they will face inward
towards the console.
If you ordered the Quick Release Knobs, they can be installed in the
upper and lower holes of the front legs and the rear holes of the rear legs.
The front legs have a bolt in the center hole which will act as a hinge
point when folding the t-top.

7
STEP 4: Attaching the Ball Clamps to the Top of Side Frames
The top of the side frame has a counter sunk circle with a threaded hole;
the ball clamps have a raised circle area. Insert the raised circle area into
the counter sunk hole of the side frame. Next, insert the bolt from inside
the ball clamp into the side frame end and tighten. Do not fully tighten
the bolt yet so that you can make adjustments later.

8
STEP 5: Assembling the Front and Center Section of the Top Frame
The shape of the front section is narrow and also has a bending curve
which faces downward when attached to the side support frames of the t-
top.
The lap joints have a number on the flat face. Match these up for correct
installation.

9
IMPORTANT: These small holes should be at the same side of each
bar of the top frame. If they are not all on the same side, the legs will not properly attach to the top
frame of the t-top. It may appear a half inch too short when attaching the legs. If this is the case,
check the holes again.
STEP 6: Attaching the Side Supports to the Assembled Top Section
Check the direction of the side support arms: the logo to the outside, the
handle to the rear. The small curved top frame for the cover curves and
bends downward to the floor. Remove the tops of the ball clamps and use
the rubber inserts inside the clamps for a tight connection. Note: The
clamps are to be placed on the same way (they are numbered inside).

10
Find the center of the cross bar on the top section and mark this spot. Use
the measurement you marked for the position of the deck mounts in Step
2. Mark this in the two cross beams on the top section that is assembled.
Attach the partial top section to the support frame while ensuring that all
parts are facing the correct direction. (Refer to pictures of the t-top for
reference if unsure.)

11
STEP 7: Drilling Mounting Holes in the Deck
Place the t-top you have assembled in the area you traced in Step 2. Make
sure the t-top is in the final position where you want it installed. Check
under your floor for any wires or objects before drilling. Consult your
owner’s manual if you are unsure. Next, pre-drill the holes you traced in
REVERSE using a 1/8” drill bit followed by a 3/16” drill bit. Use medium
speed on the drill and apply medium pressure while drilling pilot holes.
Blow away any dust or loose materials from the area.

12
STEP 8: Attaching the T-Top to the Floor of the Boat
The t-top can be attached to the boat using the screws provided or with
bolts/nuts and the backing plates provided. The majority of customers
install the t-top using screws only. If you prefer and have access under
the deck, you can bolt your t-top through the floor.
Use the gaskets provided or 3M 5200 Marine Adhesive to seal the t-top
feet to the deck. Next, use a phillips head bit to tighten the mounting feet
to the deck of the boat. After tightening down all of the screws, recheck
them to make sure they are tight. Be careful not to overtighten or strip
the screws.

13
STEP 9: Attaching Rear Section of the Top Frame to the T-Top
Use the remaining bolts to attach the rear section of the canopy frame to
the t-top.

14
STEP 10: Attaching the Stand-Offs to the T-Top Side Main Frames
Drill through the horizontal bar and the center console to allow the
threaded rod to be installed. If your center console is very thin or flimsy,
we recommend installing a backing plate of ½” PT or MT plywood inside
the console to strengthen up the area where the console standoff will be
mounted. Our T-Tops come with (4) 3.5” console standoffs and they
should ideally be installed at the widest points possible of the horizontal
bar. Some boats center console make it only possible to install 1 standoff

15
per side. Consider adding the Vertical Brace Kit Standoff Kit for more
stability if needed.
STEP 11: Attaching the Canopy to the Top Frame
Remove the cover and lay out on the ground. Note: there is a zipped front
pocket, which is zippered from side to side. Place this over the front
section of the T-top and zipper up now you can fold out over the rest of
the top frame and hook over the back and zipper this section up and the
Velcro corner sections. Now you can pull tight the side section with
zippers and Velcro tabs.
STEP 12: Tighten all bolts and connections
CARE AND MAINTENANCE
***While towing the boat, the canopy should be removed from the T-Top at any speeds
above 45MPH.***
Be sure to check and tighten all fasteners and connections prior to every
use Be cautious when towing or driving under obstacles, low hanging
structures or trees Leave dolphin t top in the erect position when towing
behind a vehicle Use soap and water to clean your tower. Avoid abrasive
material that might scratch or damage the tower protective finish.
Always rinse and wipe down tower after contact with salt (brackish)
water.

16
WARRANTY
Dolphin T Tops warrants the product (not including other 3rd party
accessories) against manufactures defects. To claim you must contact
Dolphin T Tops or is Distributor. The product/part is to be sent to the
Distributor for inspection where it will either be repaired or replaced.
(Unless otherwise agreed in writing) The customer is liable for costs
associated in shipping the product/part to Dolphin T Tops. Dolphin is
not responsible for personal injury or damage to the boat caused by the
use of the T-top or any transport charges or cost of installation or
removal of the T-top. Dolphin is not liability for direct or indirect or
consequential damages resulting from delay or improper installation.
Warranty does not cover Anodized, polished or powder coated surfaces as
well as any hardware corrosion they are specially excluded as their care
and use can not be controlled by Dolphin.
Warranty does not cover the spider coat gel cracking or damage from the
installation or use of the T-top on your boat. No dealer, retailer or
manufacturer is the agent and may not assume any liability in connection
with this warranty. This warranty is in lieu of all.
WARNING
The construction of your boat, design, thickness of flooring deck and
walls and overall design may cause movement at the mounting points. If
the construction of you boat causes movement at the mounting points or
incorrect mounting location creates added pressure on joints increasing
movement of the T-top it voids warranty. If in doubt do not install the T-
top Check all bolts and parts prior to use, especially after towing behind a
vehicle, lowering and raising after storage.
WARNING
Do not stand, climb or jump o# tower, do not tow the boat behind a
vehicle with the T-top lowered. Do Not Ski, wake, tow tubes, boats or
other watercraft from the tower. Watch out whilst moving under objects,
such as bridges, low building and trees.
Table of contents
Other MAKE A WAKE MARINE Boating Equipment manuals
Popular Boating Equipment manuals by other brands

Texas Power Paddle
Texas Power Paddle Mako Quick installation guide

Dowco
Dowco 73582 Series installation instructions

Vetus
Vetus FTANK25 installation instructions

banded
banded Axe Assembly

Aerial
Aerial Airborne Wakeboard Tower installation guide

Marpac
Marpac 7-1545 Owner's installation & operations manual